LilyPad RGB LED Hookup Guide
 bboyho,
  Gella
Gella 
Custom Color Mixing with Code
In this example, you will but use analogWrite() function to change the brightness of each channel in relation to each other. Adjusting the brightness of the red, green, and blue LEDs within the LED will allow you to create a new range of values and color combinations. You will need to confirm that the sew tabs you connect to the RGB LED have PWM capabilities - this code will run on a LilyPad Arduino USB, LilyPad Arduino Simple, LilyPad Arduino SimpleSnap, and LilyPad Main board without any changes needed.
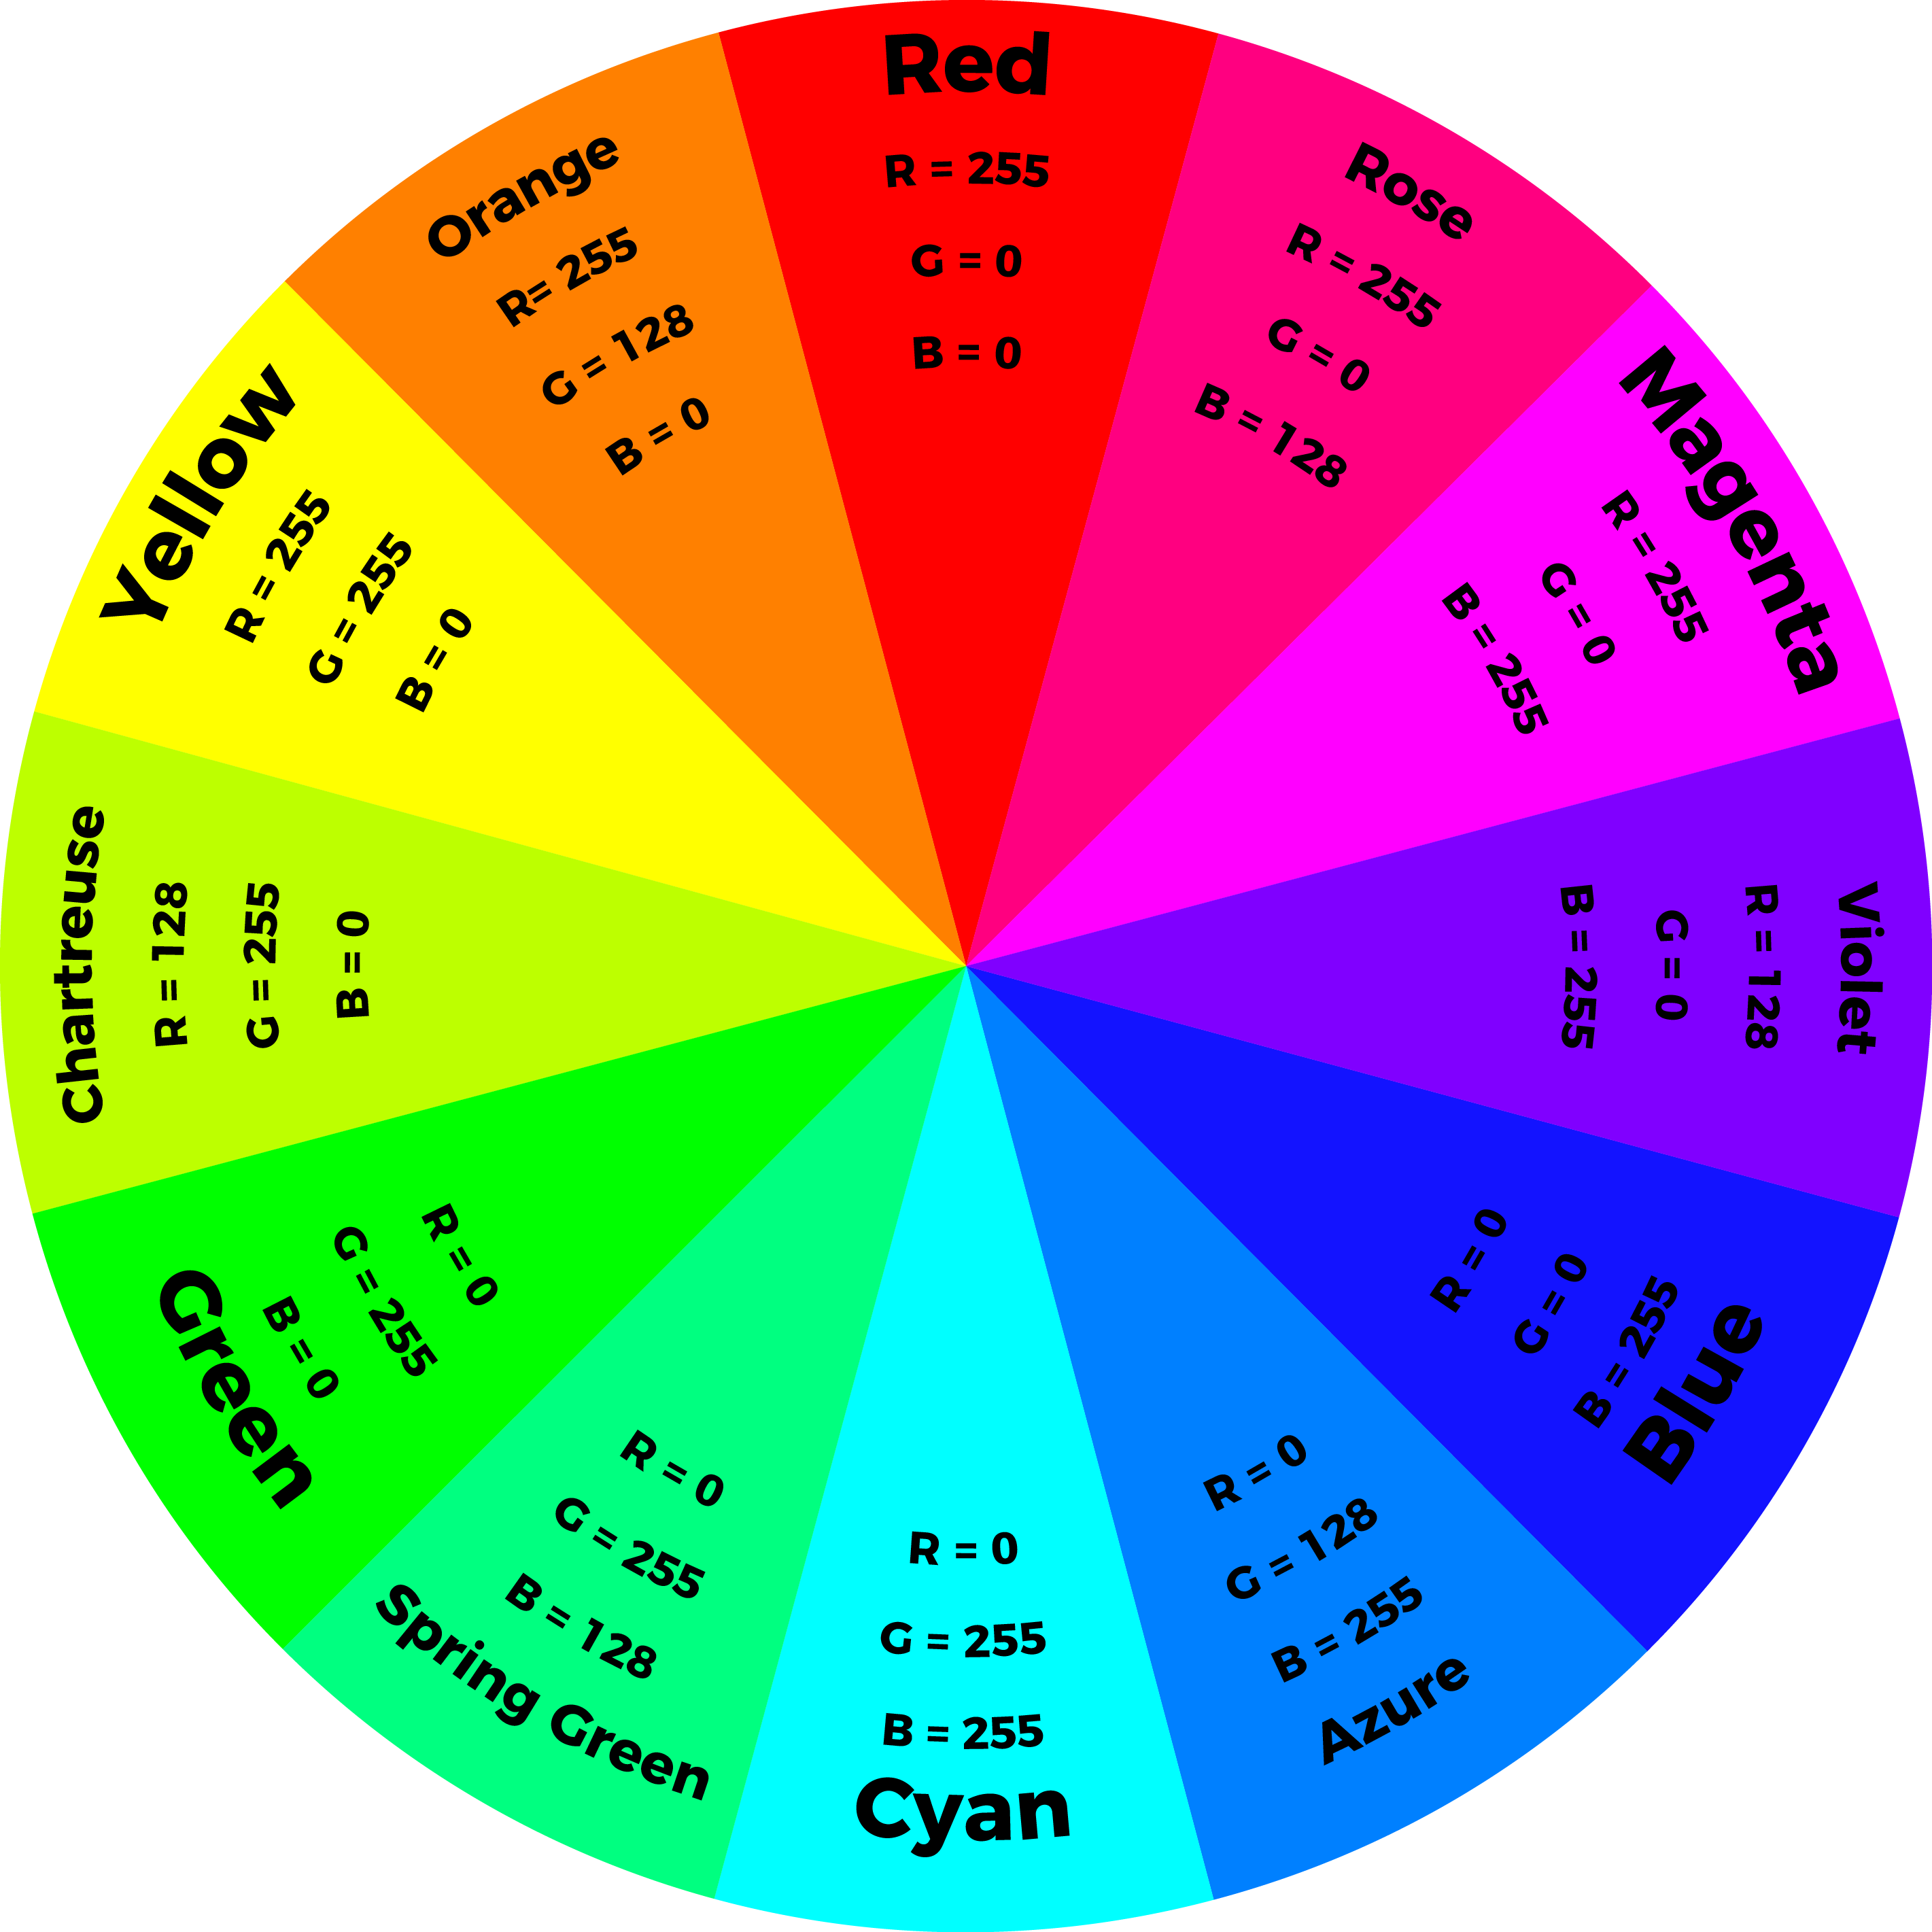
In the last example, you created basic primary and secondary colors by turning the red, green, and blue channels on or off with different combinations. In this activity, you'll create tertiary colors by combining the three color channels at 50% brightness levels. There are actually millions of color combinations available using RGB LEDs once you begin experimenting by adjusting the brightness/saturation of each channel. This example will cover a set of twelve tertiary colors and white.
Copy and paste the following code into the Arduino IDE and upload to your LilyPad Arduino.
language:c
/*
  LilyPad RGB LED: Custom Color Mixing
  Written by: Gella and Ho Yun "Bobby" Chan
  SparkFun Electronics
  https://www.sparkfun.com/products/13735

  Expand your color options using analogWrite and the LilyPad RGB LED

  RGB LED connections:
  R pin to 11
  G pin to 10
  B pin to 9
  - pin to -

  This code is released under the MIT License (http://opensource.org/licenses/MIT)

******************************************************************************/
// In this example we'll use analogWrite to control the brightness of the three channels
// of the RGB LED.
// Here we'll create a rainbow of tertiary colors by adding a 50%-brightness option.

//debug mode, comment one of these lines out using a syntax for a single line comment: //
//#define DEBUG 0     //0 = LEDs only
#define DEBUG 1     //1 = LEDs w/ serial output

// Create integer variables for our LED pins:
#define RGB_red 11
#define RGB_green 10
#define RGB_blue 9

void setup() {

  // Make all of our LED pins outputs:
  pinMode(RGB_red, OUTPUT);
  pinMode(RGB_green, OUTPUT);
  pinMode(RGB_blue, OUTPUT);

#if DEBUG
  Serial.begin(9600); //initialize Serial Monitor
  //while (!Serial); // Comment out to wait for serial port to connect to Serial Monitor. Needed for native USB.
  Serial.println("Custom Color Mixing w/ a Common Cathode RGB LED");
#endif

}//end setup()

void loop()
{
  // In this code we'll step through twelve rainbow colors (primary, secondary, tertiary).

  // Unlike digitalWrite, which can be only HIGH (on) or LOW (off),
  // analogWrite lets you smoothly change the brightness from 0 (off) to 255 (fully on).
  // When analogWrite is used with the RGB LED, you can create millions of colors!

  // In the analogWrite() functions:
  // 0 is off
  // 128 is halfway on (used for the tertiary colors)
  // 255 is full brightness.

  // Black (all LEDs off)
  // RGB LEDs:
#if DEBUG
  Serial.println("OFF");
#endif
  analogWrite(RGB_red, 0);
  analogWrite(RGB_green, 0);
  analogWrite(RGB_blue, 0);
  delay(1000);

  // Red
#if DEBUG
  Serial.println("RED");
#endif
  analogWrite(RGB_red, 255);
  analogWrite(RGB_green, 0);
  analogWrite(RGB_blue, 0);
  delay(1000);

  // Orange
#if DEBUG
  Serial.println("ORANGE");
#endif
  analogWrite(RGB_red, 255);
  analogWrite(RGB_green, 128);
  analogWrite(RGB_blue, 0);
  delay(1000);

  // Yellow
#if DEBUG
  Serial.println("YELLOW");
#endif
  analogWrite(RGB_red, 255);
  analogWrite(RGB_green, 255);
  analogWrite(RGB_blue, 0);
  delay(1000);

  // Chartruese
#if DEBUG
  Serial.println("CHARTRUESE");
#endif
  analogWrite(RGB_red, 128);
  analogWrite(RGB_green, 255);
  analogWrite(RGB_blue, 0);
  delay(1000);

  // Green
#if DEBUG
  Serial.println("GREEN");
#endif
  analogWrite(RGB_red, 0);
  analogWrite(RGB_green, 255);
  analogWrite(RGB_blue, 0);
  delay(1000);

  // Spring Green
#if DEBUG
  Serial.println("SPRING GREEN");
#endif
  analogWrite(RGB_red, 0);
  analogWrite(RGB_green, 255);
  analogWrite(RGB_blue, 128);
  delay(1000);

  // Cyan
#if DEBUG
  Serial.println("CYAN");
#endif
  analogWrite(RGB_red, 0);
  analogWrite(RGB_green, 255);
  analogWrite(RGB_blue, 255);
  delay(1000);

  // Azure
#if DEBUG
  Serial.println("AZURE");
#endif
  analogWrite(RGB_red, 0);
  analogWrite(RGB_green, 128);
  analogWrite(RGB_blue, 255);
  delay(1000);

  // Blue
#if DEBUG
  Serial.println("BLUE");
#endif
  analogWrite(RGB_red, 0);
  analogWrite(RGB_green, 0);
  analogWrite(RGB_blue, 255);
  delay(1000);

  // Violet
#if DEBUG
  Serial.println("VIOLET");
#endif
  analogWrite(RGB_red, 128);
  analogWrite(RGB_green, 0);
  analogWrite(RGB_blue, 255);
  delay(1000);

  // Magenta
#if DEBUG
  Serial.println("MAGENTA");
#endif
  analogWrite(RGB_red, 255);
  analogWrite(RGB_green, 0);
  analogWrite(RGB_blue, 255);
  delay(1000);

  // Rose
#if DEBUG
  Serial.println("ROSE");
#endif
  analogWrite(RGB_red, 255);
  analogWrite(RGB_green, 0);
  analogWrite(RGB_blue, 128);
  delay(1000);

  // White (all LEDs on)
#if DEBUG
  Serial.println("ALL ON, WHITE");
#endif
  analogWrite(RGB_red, 255);
  analogWrite(RGB_green, 255);
  analogWrite(RGB_blue, 255);
  delay(1000);
}//end loop
After uploading your code the RGB LED will step through a rainbow sequence of red, orange, yellow, chartruese, green, spring green, cyan, azure, blue, violet, magenta, rose, and white repeatedly.
By adjusting the brightness of each LED in the RGB LED individually, we open up a much wider range of color options to display than the previous example. In fact, there are many more combinations than we show in the example code. The image below shows a chart of the tertiary colors the example program creates by stepping down the LEDs to half brightness, creating a rainbow with more color transitions than the Basic Color Mixing example. By using analog output to adjust the brightness of each color channel individually, the RGB LED can display almost any color you can choose from a color picker - if you are familiar with RGB sliders in a graphics program, you'll recognize the 0-255 values used in this code.