LilyPad Buzzer Hookup Guide
 Gella
Gella 
Triggering Sounds
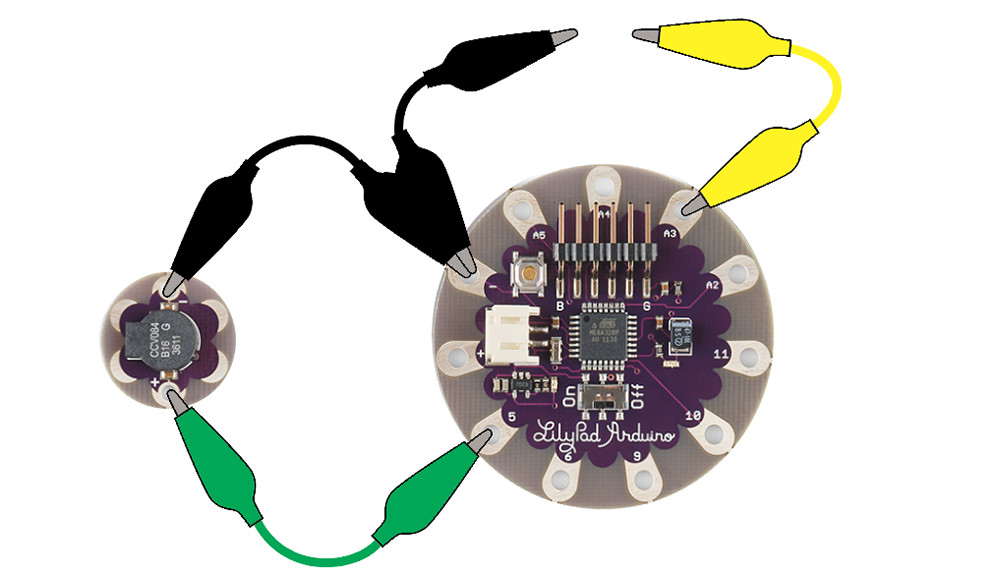
For this example, we'll make the song play only after a trigger is pressed. We can use alligator clips to make a quick and easy switch, or hook up a LilyPad Button or home-made button to the LilyPad Arduino. For LilyPad Development Board users, a button is pre-wired to pin A5.
Here we'll use an if() statement to check if the button is pressed. If yes, we'll call a function we created to play a song, and if not noTone() will keep the buzzer from making noise. To keep the code easier to read/more organized, we've created a function to hold the song we're composing called playSong(). We've also added an additional variable called buttonState to store the readings from the button pin.
language:c
/******************************************************************************

LilyPad Buzzer Example
SparkFun Electronics

This example code shows how use a button (or alligator clips) to trigger sounds
with the LilyPad Buzzer.

Buzzer connections:
   * + pin to 5
   * - to -

Button connections:
   * + pin to A3
   * - to -


******************************************************************************/
// Pin the buzzer is attached to
int buzzerPin = 5;

// Pin the button is attached to
int buttonPin = A3;

// Variable to store the button's state
int buttonState = 0;

// Set a time in milliseconds for all delays
int delayTime = 100;

// Notes
const int C = 1046;
const int D = 1175;
const int E = 1319;
const int F = 1397;
const int G = 1568;
const int A = 1760;
const int B = 1976;
const int C1 = 2093;
const int D1 = 2349;

void setup()
{
    // Set the buzzer pin as an OUTPUT
    pinMode(buzzerPin, OUTPUT);
    //Set the button as INPUT
    pinMode(buttonPin, INPUT_PULLUP);
    // Initialize Serial, set the baud rate to 9600.
    Serial.begin(9600);

}

void loop()
{
  buttonState = digitalRead(buttonPin);
  // Display button press in Serial Monitor
    Serial.print("buttonState is:");
    Serial.println(buttonState);
  // Print the buttonState
  if (buttonState == LOW)
  {
    // Call a function named playSong()
    playSong();
    //Display button press in Serial Monitor
    Serial.println("Button is PRESSED");
  } else
    {
    noTone(buzzerPin);
    //Display button press in Serial Monitor
    Serial.println("Button is NOT PRESSED");
    }
    delay(delayTime);
}

void playSong()
{
  tone(buzzerPin, C);
  delay(delayTime);
  tone(buzzerPin, D);
  delay(delayTime);
  tone(buzzerPin, E);
  delay(delayTime);
  tone(buzzerPin, F);
  delay(delayTime);
  tone(buzzerPin, G);
  delay(delayTime);
  tone(buzzerPin, A);
  delay(delayTime);
  tone(buzzerPin, B);
  delay(delayTime);
  tone(buzzerPin, C1);
  delay(delayTime);
  // Use noTone() to shut off the buzzer and delay to create a 'rest'
  noTone(buzzerPin);
  delay(delayTime);
}
After uploading the code, press the alligator clip connected to the input (buttonPin) to the alligator clip connected to the negative pin on the LilyPad. You should hear a sound play.
We can also take a look at the button press readings in the Serial Monitor. You should begin seeing some values - the first is printing the number in the **buttonState ** variable. If the button is not pressed, the value will show as 1. If pressed, it will read 0. We also print a message saying if the button is pressed or not.
If your button isn't behaving, take a look at a way of debouncing input readings with this tutorial.
Learn more about buttons and switches in our Switch Basics tutorial.