Introduction to the Raspberry Pi GPIO and Physical Computing
 asassy
 Hardware Overview and Hookup
As the Raspberry Pi is a fully functioning computer, it needs the peripherals that a computer you may be accustomed to has to be fully interactive. We’ll need six crucial components to get the Raspberry Pi up and running, but we’ll also take a look at some additional hardware that are often times used with the Pi. Let’s start with what’s required!
General hardware for setup
- Monitor - A monitor is basically required for the initial setup and configuration of the operating system. If you’ll be using SSH to connect to your Raspberry Pi, then you won’t need the monitor after setup (Check out this tutorial that walks you through SSH and the Pi!) Make sure your monitor has an HDMI input.
- microSD Card - The microSD Card stores the operating system and files. If you bought a kit, the microSD card might have already been formatted for use. Otherwise, you’ll to manually install an OS’s image onto the mciroSD card to load it on your Pi
- Keyboard and Mouse - You can either buy these together (the mouse is a part of the keyboard) or seperately
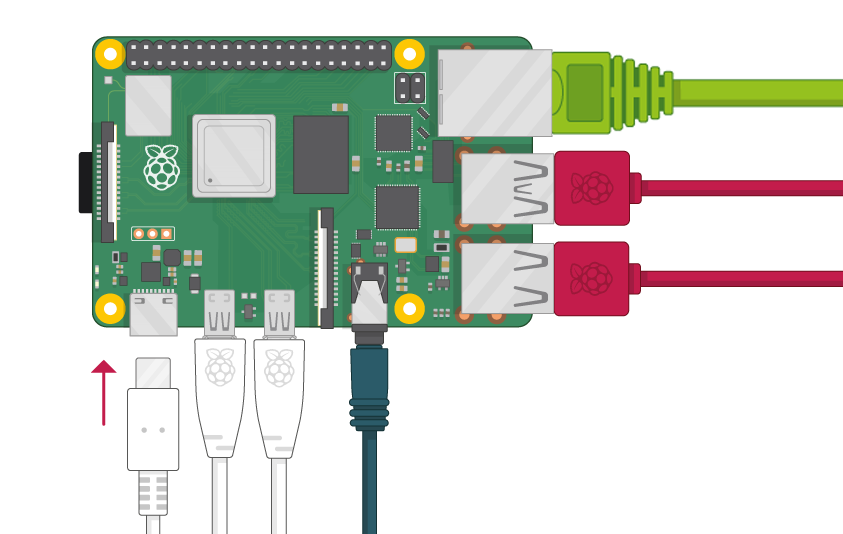
- HDMI Cables - You’ll need an HDMI cable to connect the Raspberry Pi to a monitor. Different Raspberry Pi models have different HDMI cable requirements, but the newest model (Raspberry Pi 4) requires an HDMI to Micro HDMI Cable.
- Power Supply - Different Raspberry Pi models have different USB connections and power requirements, but the newest model (Raspberry Pi 4) requires a USB Type C to C Cable and Wall Adapter.
Additional hardware
Heat Sink - Heat sinks are popular for users who are overclocking the CPU, so the Pi is running too hot. If the temperature of the CPU becomes too hot, a heat sink will passively cool air near the CPU to assist in cooling the processor. The heat sink can double as somewhat of a protective case as well. If you think you might need a heat sink, you can use the following command in the terminal to see the temperature of your Pi:
hot./opt/vc/bin/vcgencmd measure_tempCase - Since the Raspberry Pi comes as an exposed circuit board, you might want to protect it from dust and damage with a case. A variety of companies make cases for the Pi; perhaps the most notable case is the Rasberry Pi 400, which essentially uses a keyboard as a case for the Raspberry Pi. Built by the Raspberry Pi Foundation, it extends the Pi ports through the back of the keyboard as to not limit interactability.
Ethernet Cable - Depending on the Raspberry Pi model you have, and if you'd like to bypass wireless connections, pick up an ethernet cable to plug into the world wide web!
Speakers - If you'd like to play music or sound from your Pi, you'll need a set of speakers. Any standard set of speakers with a 3.5 mm jack should do...they will connect into the AV jack on the side of the board.
Quick Note on the Different Raspberry Pi Versions
The Raspberry Pi comes in a variety of form factors and generations - Zero, 2, 3, etc. - for different use cases. The layout varies slightly between the boards, but most of the connections are the same. For the purpose of this tutorial, we'll be focusing on the most recent version, the Raspberry Pi 4. Still, if you're using another model, double check the connections required by consulting the hookup guide for the exact model when collecting the hardware you need.
Specific Hardware Required
SparkFun Raspberry Pi 4 Desktop Kit - 4GB
Lucky for us, SparkFun has a kit that practically does the work for you in supplying the appropriate hardware and supporting the least frustrating experience possible - the SparkFun Raspberry Pi 4 Desktop Kit includes the following:
- Raspberry Pi 4 - 4GB Model
- Logitech K400 Plus Wireless Keyboard with Touchpad
- Kingston Canvas Go! Plus 64GB MicroSD Card with Adapter
- USB Type C to Type C Male Cable (1 Meter)
- USB Type C Wall Adapter
- Metal Heatsink Case with Thermal Tape - Black
- HDMI to Micro HDMI Cable
- SparkFun Qwiic SHIM for Raspberry Pi
The dark horse of this kit is the afformentioned Qwiic SHIM, which is a crucial component that we will use to interact with the GPIO later on in this tutorial.

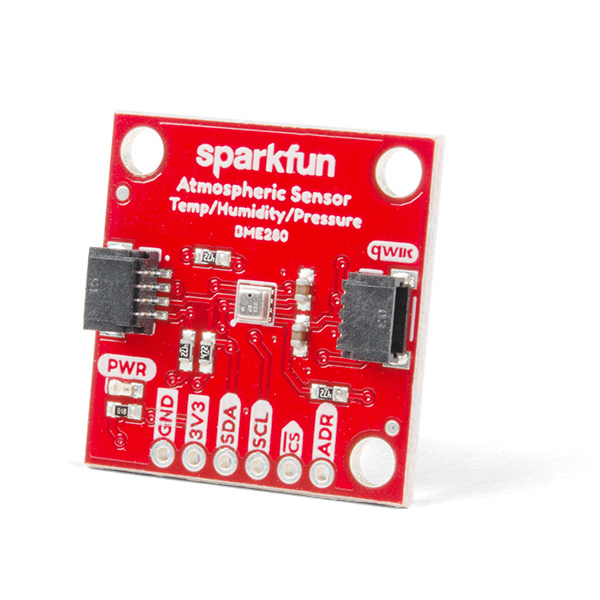
SparkFun Atmospheric Sensor Breakout - BME280
We will also utilize one of the BME280 environmental breakout because it has a wide variety of precise data to offer and can be connected through Qwiic, which means we won't be hindered by soldering and can get right into coding.
Putting it All Together
Fortunately, there is very little additional knowledge for putting it all together. Simply connect the mouse and keyboard via USB, the power supply via USB-C (don't forget to plug the other end into a wall adapter), the HDMI into the both the monitor and the Pi, and load the microSD card into its slot. Besides making sure the wires don't criss-cross and make a mess, you're ready to start your desktop computer!