ELastoLite Hookup Guide
 Pearce
Choosing the Right Circuitry
You should now have lamps, an inverter, and a Molex Connector picked out. We now need to buy the circuitry and connectors to connect them all. Below is the exploded view of the connection to be made between the Molex connector and the iron on circuitry.
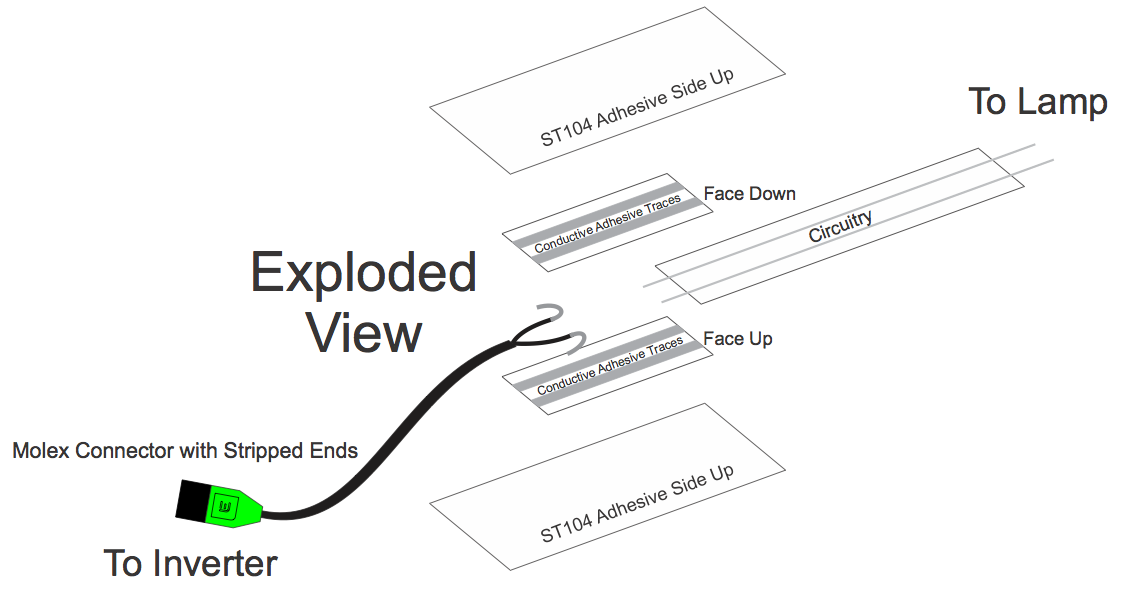
(Note: the top adhesive tape strip should be adhesive side down, not up as in the diagram above.)
To make this connection you will need two of the straight connectors. One goes on the top, the other on the bottom. Those will be encased in an outer layer of iron-on tape. You will only need 1 unit of that. We sell them in 2 inch lengths. When cut in half, it provides the proper amount needed for the top and bottom.
The next part needed is the circuit tape which will provide the connection between the Molex connector and the actual ELastoLite lamp. We sell these in 3 foot lengths. I don’t recommend making connections longer than that. However, if you wish to, repeat the straight connector connection outlined above in the exploded view. Rather than the Molex leads on the one end, use another length of the iron-on circuitry. The lengths will become fully enclosed, and the conductive thread in the circuitry will need to be exposed (which we will cover later).
The contact patches that will help establish the connection between the iron on circuitry and the Lamp will be included with the Lamp (the little dots off to the side). Each Lamp comes with three patches. Two of the three will be used. The first will be used to establish the connection between the iron on circuitry and the lamp. The second one will do the same if there is a chain of more than one lamp. If not, the contact patch will be used to cover up the contact points on the Lamp which will be live when powered.

Buy ELastoLite Parts For Your Project
That’s an overview of the parts and their purpose. For this tutorial, I’m going to assemble a circuit of one 3x5 inch lamp and the INV133 inverter. Below is the wishlist for the parts that we're going to use in the next section. Feel free to add or subtract parts as you see fit.
Once you have figured out the parts you will need for this, place your order and get excited. There is an additional T-junction part that can be used, but we will not be covering this piece in the Assembly. If you wish to add a T-connector, instructions can be found in the Going Further section.