Efficient Arduino Programming with Arduino CLI and Visual Studio Code
 jimblom
Introduction to the Arduino CLI
Now that you've had a crash-course in pairing VS Code with an Arduino library, it's time to dive into the second featured tool of this tutorial: the Arduino CLI.
The Arduino CLI is a command-line interface that packages everything you'd expect from the Arduino IDE into a simple text-based tool. With the Arduino CLI you can build sketches, upload programs, download libraries or board definitions, and do much, much more. Most importantly, the Arduino CLI gives us a command-line interface that can be triggered from VS Code to build and upload Arduino sketches.
Download Arduino CLI
Arduino CLI is still in its infancy of development. You can download the latest "alpha" release from the GitHub repository here: https://github.com/arduino/arduino-cli#download-the-latest-unstable-alpha-preview.
This download is packaged as a simple executable, which you'll need to extract and call directly from a command prompt. I found it handy to copy and place directly in my Arduino project folder. (Hopefully some day, after it's out of alpha, the Arduino CLI will be packaged with a full installer!)
Generate an Arduino CLI Configuration File
It may just be an alpha bug, but the Arduino CLI on my machine has a hard time finding my Arduino sketchbook and board manager installations. To help Arduino CLI find your previous Arduino installation it helps to create an Arduino CLI configuration file. This config file is defined in a YAML format.
To create a base config file, you can use the Arduino CLI. Open up a command prompt and type:
language:shell
arduino-cli.exe config init
(Note that arduino-cli.exe may need to be renamed to something like arduino-cli-0.2.2-alpha.preview-windows.exe, or whatever version you may have downloaded.)
This command will create a new file named .cli-config.yml. Among the most important parameters to modify in this config file are:
sketchbook_path-- should match the directory of your Arduino sketchbook. This is where all of your manual libraries and hardware definitions are installed.arduino_data-- should match the installation location of your Arduino board and library manager. In most cases this should not need to change.
The other options can usually remain at their defaults.
Using the Arduino CLI
The User Documentation linked from the Arduino CLI GitHub repository includes a great rundown of the features and capabilities of the tool. We highly recommend scanning through the User Documentation before continuing on. Give the Arduino CLI a try! Check out its capabilities.
Here are a few critical options you can provide the tool as you begin using it:
Create a New Sketch
As a simple introduction, the Arduino CLI can create a new, blank sketch using the sketch option:
language:shell
arduino-cli sketch new cli_test
This should create a new folder and file in your Arduino sketchbook named "cli_test."
Compile a Sketch
arduino-cli's compile function can be used to compile a sketch for any supported board. The critical option this function requires is a board type, which can be provided with an --fqbn (fully-qualified board name) option.
Supported fqbn's depend on the boards you have installed, but here are a few common options:
- Arduino Uno:
arduino:avr:uno - Arduino Mega:
arduino:avr:mega - SparkFun RedBoard or SparkFun BlackBoard:
SparkFun:avr:RedBoard- (Requires that the SparkFun avr board definitions be installed.)
- SparkFun SAMD21 Mini:
SparkFun:samd:samd21_mini- (Requires that the SparkFun samd board definitions be installed.)
As you'll note, the fqbn value takes the format of manufacturer:architecture:board.
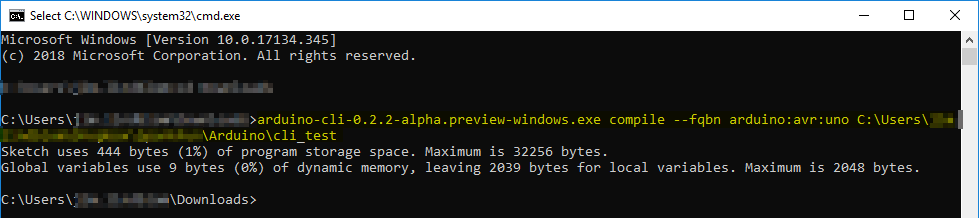
This example command compiles the sketch we just created for an Arduino Uno:
language:shell
arduino-cli compile --fqbn arduino:avr:uno C:/Users/user.name/Documents/Arduino/cli_test
(Note: you'll need to swap your Arduino sketchbook directory in for "C:/Users/user.name/Documents/Arduino/" in the example above.)
You can add all sorts of interesting flags to this command, including:
- verbose:
-v-- Useful if you like to see all of the options and files that are being compiled into your sketch. - Build Path:
--build-path [string]-- Useful if you'd like to store the compiled object and hex files.- Note: On my Windows machine, at least, the value of this parameter needs to be a full path (no relatives).
Upload a Sketch
Once you've compiled a sketch, you're ready to upload it. As with the compile command, the upload command requires an FQBN. It also on a serial port to upload to, set using the -p option.
Here's a command building on the last example, uploading to a Windows COM port on COM18:
language:shell
arduino-cli upload -p COM18 --fqbn -v arduino:avr:uno C:/Users/user.name/Documents/Arduino/cli_test
If all goes well your Arduino should begin blinking its RX/TX LEDs and it should shortly begin running a blank sketch.