Efficient Arduino Programming with Arduino CLI and Visual Studio Code
Introduction
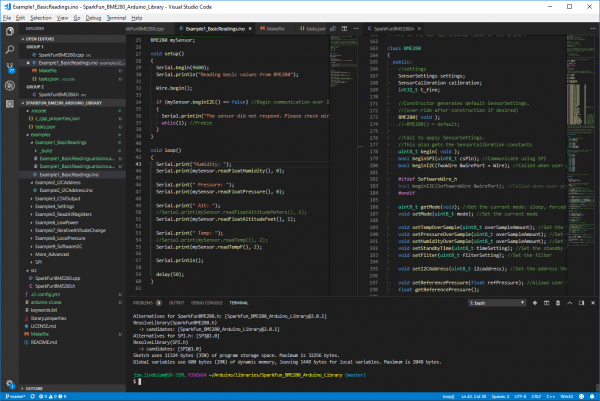
The Arduino IDE (integrated development environment) is great at achieving its intended purpose: It's a simple, single-file application development environment. It has just enough integrated tools to help achieve that purpose. But for larger application development -- whether you're designing Arduino libraries or developing new Arduino cores -- it doesn't compare with a full-featured C/C++ IDE.
The Arduino IDE lacks a number of "professional" code-assistance features, like:
- Code navigation -- Whether it's find-by-reference (instantly navigating to the definition of the function you're using), search-by-symbol (quick navigation to function or symbol definitions within a file), or a quick link to a compilation error, code navigation is critical to managing large code bases.
- Auto-Complete -- This feature can, of course, help complete long constant names, but it can also provide insight into the parameters that a function may expect.
- Version control integration -- Whether you're using git or SVN, many modern IDE's provide source-control integration that can show, line-by-line, the changes you've made since your last commit.
- Refactoring -- Need to overhaul a function's naming scheme? Or convert a common block of code into a function that can be more widely-used throughout your application? Sounds like a refactoring job! A modern IDE can help with that.
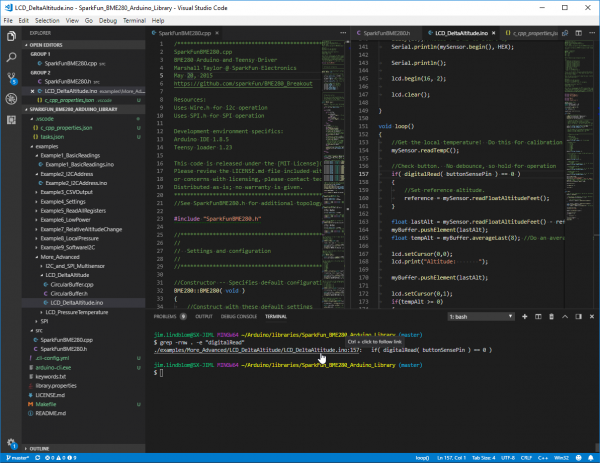
- Integrated Terminal -- Whether you use bash or the Windows CMD, an integrated terminal can save you loads of time. This tool allows you to run "make", "grep", or any of your favorite terminal commands without ever swapping windows.
Once you take the time to learn these tools they make programming in C/C++ (or any language, really) so much more efficient. They help produce better code faster.
Also critical to this tutorial is Arduino's recently (pre-)released Arduino CLI. The Arduino CLI provides a command-line interface for such tasks as:
- Building Arduino sketches
- Uploading Arduino sketches
- Downloading libraries
- Downloading new board definition files.
Arduino CLI is the "glue" we'll use to pair the VS Code IDE with common Arduino compilation and upload tools. Arduino CLI provides us a command line interface that can be passed to tools like make or a shell via the IDE.
Covered in This Tutorial
This tutorial will demonstrate how to use a VS Code to build for and program an Arduino -- all without ever opening the comfortable-yet-restricting Arduino IDE. We'll try to step through, as much as possible, how the VS Code/Arduino CLI pair can be used to develop an Arduino library, but a lot of what we'll cover can be adapted to new Arduino core development or even simple Arduino sketch-writing.
Prerequisites
This is a relatively advanced tutorial. If you're not familiar with using a terminal or invoking command-line tools like make, we'd recommend learning a bit about those first. There are tons of great resources that can help familiarize you with these tools. A few in particular we'd recommend are:
- userland -- An eminently-approachable book on the command-line written by an old SparkFun alumnus.
- O'Reilly's Managing Projects with GNU Make, Third Edition -- A free, exhaustive book on using Make.
Or, honestly, just grab a Raspberry Pi and dive head-first into the Headless Raspberry Pi Setup
You'll also need Arduino installed on your machine. Visit arduino.cc to download the latest version locally to your machine.
We'd also recommend you set up your Arduino sketchbook location and install all libraries and board definitions you'd like to use using the Arduino IDE. (These are features that still seem to mostly be in their infancy as Arduino CLI continues its development.)
Getting Started with VS Code
Microsoft's Visual Studio (VS) Code IDE is a versatile, free, and open-source code editor. It can be used to develop any application you have in mind -- whether the code base is C, C++, Python, Javascript, or anything else you find yourself programming in.
VS Code is available for all operating systems. You can download it here or from the button below.
After downloading, follow along with the installation prompts to install the software.
Microsoft has provided an excellent series of documents supporting VS Code, beginning with their Getting Started guide. We definitely recommend checking that out if this is your first foray into the IDE.
Installing Extensions
The power of VS Code stems from its enormous library of extensions. These addons to the IDE can do anything from providing code-navigation support for additional languages, to equipping the IDE with source-control support, simply modifying the aesthetics of the editor.
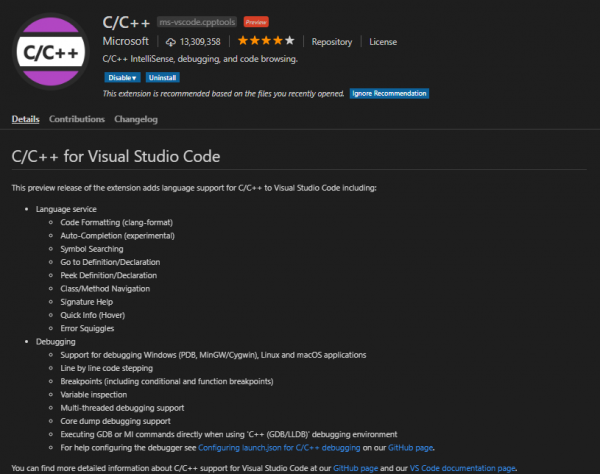
If they didn't come installed by default, we recommend installing C/C++. This is an extensive C/C++ extension that adds code-formatting, auto-completion, symbol-searching, and much-much more to the IDE.
You can also use the "Extensions" browser in the IDE (View -> Extensions, or click the square-ish icon on the left bar) to search for or browse additional extensions.
Installing the extension should be as simple as clicking install on the Visual Studio Marketplace page, or from within the IDE's extension-browser.
VS Code for Arduino Library Development
If your familiar with VS Code you'll understand that its flexibility means the IDE can be used for just about any programming language out there. This section will help you set up VS Code to develop C, C++, or other source files within an Arduino library.
Opening an Arduino Library in VS Code
To follow along, you'll need an Arduino library installed on your machine. If you'd like to follow along really closely, download our BME280 Arduino Library, which is what we'll use an example.
Download the library into your Arduino Sketchbook's "libraries" folder. We recommend using git to download. This will especially show off VS Code's source-control capabilities. Check out our Using GitHub tutorial for help using git to download the library. Alternatively, you can us the "Clone or Download" > "Download ZIP" buttons in GitHub's web interface to download the library.
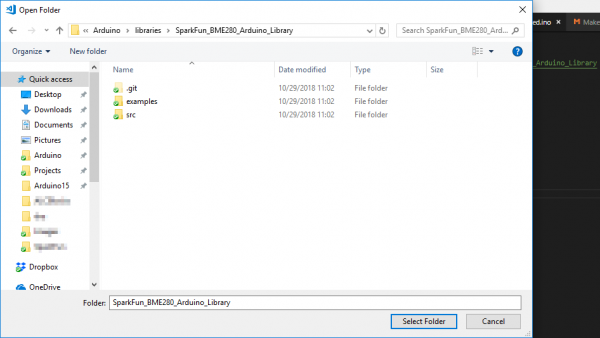
Open VS Code, then open your Arduino library folder by navigating to File > Open Folder.... (or tap CTRL+K then CTRL+O.)
Then select the Arduino library folder you'd like to open in the IDE. It should be the library's top-level directory, where "src" and "examples" directories are contained.
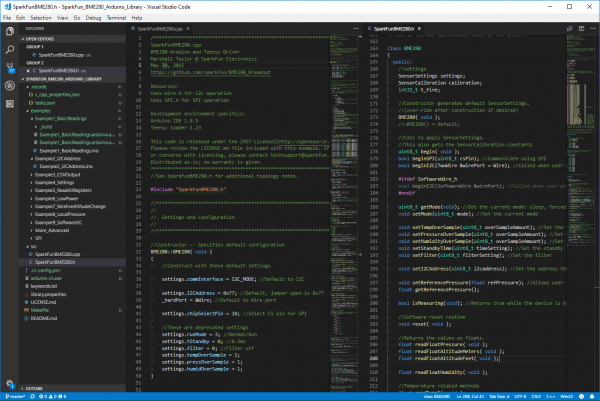
This will open a new VS Code window. Importantly, you should notice a file navigator on the left showing the standard Arduino library file structure ("examples", "src", "kewords.txt", etc.). You can click into the "src" folder and double-click the "cpp" and/or "h" files to open them up. You can also split your window. I like keeping my "h" file on the right and "cpp" file on the left. To move a file, simply drag its tab over to the other side of the window.
Modifying c_cpp_properties.json
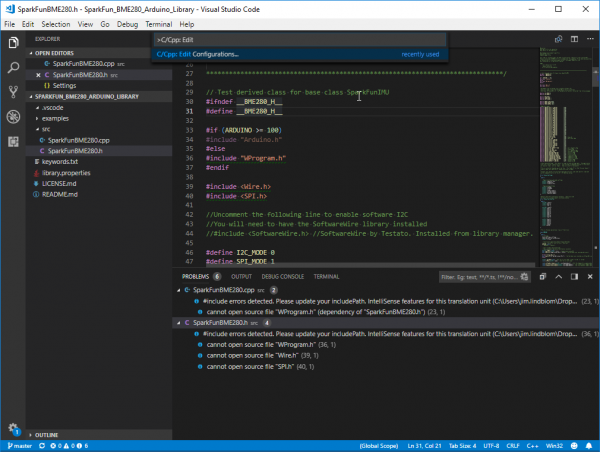
When you first open an Arduino library folder, if you peak at the "Problems" tab at the bottom of the window you'll be greeted with a handful of errors. Most of these will probably be due to the VS Code environment not knowing where your Arduino core files are installed. Locating these files will allow you to dig deep into the Arduino definitions to find out exactly how the String, Serial, digitalRead, etc. classes and functions are defined.
To set these locations press CTRL+SHIFT+P then type: "C/CPP: Edit Configurations" -- or at least begin typing that, then press enter when the correct setting is highlighted.
This will create a file named "c_cpp_properties.json", which will be stored in a ".vscode" folder. This file tells the VS Code IDE where to look for function references, definitions and more. If you tell it the location of your Arduino cores, libraries, and compiler, you should be able to back-track through using the IDE's Go to Definitions feature.
This is my c_cpp_properties.json file when using an Arduino Uno with standard libraries installed:
language:Javascript
{
    "configurations": [
        {
            "name": "Win32",
            "includePath": [
                "${workspaceFolder}/**",
                "C:/Program Files (x86)/Arduino/hardware/arduino/avr/cores/arduino",
                "C:/Program Files (x86)/Arduino/hardware/arduino/avr/libraries/EEPROM/src",
                "C:/Program Files (x86)/Arduino/hardware/arduino/avr/libraries/HID/src",
                "C:/Program Files (x86)/Arduino/hardware/arduino/avr/libraries/SoftwareSerial/src",
                "C:/Program Files (x86)/Arduino/hardware/arduino/avr/libraries/SPI/src",
                "C:/Program Files (x86)/Arduino/hardware/arduino/avr/libraries/Wire/src",
                "C:/Program Files (x86)/Arduino/hardware/arduino/avr/libraries/SPI/src"
            ],
            "defines": [
                "_DEBUG",
                "UNICODE",
                "_UNICODE",
                "F_CPU=16000000L",
                "ARDUINO=10805",
                "ARDUINO_AVR_UNO",
                "ARDUINO_ARCH_AVR"
            ],
            "compilerPath": "C:/Program Files (x86)/Arduino/hardware/tools/avr/bin/avr-gcc.exe",
            "cStandard": "c11",
            "cppStandard": "c++17",
            "intelliSenseMode": "clang-x64"
        }
    ],
    "version": 4
}
Feel free to copy the above into your properties file and save. Make sure you modify the directory locations if necessary. You may need to restart the IDE to get Intellisense working properly.
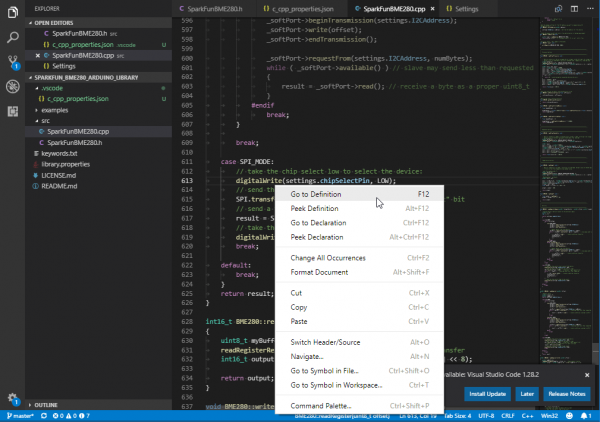
With that set, try navigating to a core or library Arduino function call. Right-click on it and say "Go to Definition".
This is an incredibly powerful tool if you're looking to take advantage of everything the Arduino core/libraries have to offer as you develop Arduino libraries.
Opening the Terminal
One of the most powerful features of VS Code is it support for a variety of integrated terminals. Even if you're on Windows, you can use this terminal as a bash shell, Cygwin interface, or, of course, a Windows command-line prompt.
You can open the terminal by going to View > Terminal (or CTRL+`).
Defining Your Terminal
You can modify the terminal executable by going to the Settings window, then Features > Terminal >** External**. The executable here should match that of the terminal you want to use.
I often find myself switching between terminals, depending on my project. But my most common settings here are either:
- Windows CMD:
C:\Windows\System32\cmd.exe-- A lot of Windows specific executables still require the Windows CMD. This should be your default if you're using a Windows install of VS Code. - Git Bash:
C:\Program Files\Git\bin\bash.exe-- I love git's Windows install. Mostly because I love the Unix-ish bash it installs on my Windows machine. I can use this to "grep", "find", "rm", "cp", or perform all sorts of other Unix commands on my nominally Windows system.- Note this option does require you install Git for Windows.
For more information on using and modifying VS Code's integrated terminal check out their documentation.
Introduction to the Arduino CLI
Now that you've had a crash-course in pairing VS Code with an Arduino library, it's time to dive into the second featured tool of this tutorial: the Arduino CLI.
The Arduino CLI is a command-line interface that packages everything you'd expect from the Arduino IDE into a simple text-based tool. With the Arduino CLI you can build sketches, upload programs, download libraries or board definitions, and do much, much more. Most importantly, the Arduino CLI gives us a command-line interface that can be triggered from VS Code to build and upload Arduino sketches.
Download Arduino CLI
Arduino CLI is still in its infancy of development. You can download the latest "alpha" release from the GitHub repository here: https://github.com/arduino/arduino-cli#download-the-latest-unstable-alpha-preview.
This download is packaged as a simple executable, which you'll need to extract and call directly from a command prompt. I found it handy to copy and place directly in my Arduino project folder. (Hopefully some day, after it's out of alpha, the Arduino CLI will be packaged with a full installer!)
Generate an Arduino CLI Configuration File
It may just be an alpha bug, but the Arduino CLI on my machine has a hard time finding my Arduino sketchbook and board manager installations. To help Arduino CLI find your previous Arduino installation it helps to create an Arduino CLI configuration file. This config file is defined in a YAML format.
To create a base config file, you can use the Arduino CLI. Open up a command prompt and type:
language:shell
arduino-cli.exe config init
(Note that arduino-cli.exe may need to be renamed to something like arduino-cli-0.2.2-alpha.preview-windows.exe, or whatever version you may have downloaded.)
This command will create a new file named .cli-config.yml. Among the most important parameters to modify in this config file are:
sketchbook_path-- should match the directory of your Arduino sketchbook. This is where all of your manual libraries and hardware definitions are installed.arduino_data-- should match the installation location of your Arduino board and library manager. In most cases this should not need to change.
The other options can usually remain at their defaults.
Using the Arduino CLI
The User Documentation linked from the Arduino CLI GitHub repository includes a great rundown of the features and capabilities of the tool. We highly recommend scanning through the User Documentation before continuing on. Give the Arduino CLI a try! Check out its capabilities.
Here are a few critical options you can provide the tool as you begin using it:
Create a New Sketch
As a simple introduction, the Arduino CLI can create a new, blank sketch using the sketch option:
language:shell
arduino-cli sketch new cli_test
This should create a new folder and file in your Arduino sketchbook named "cli_test."
Compile a Sketch
arduino-cli's compile function can be used to compile a sketch for any supported board. The critical option this function requires is a board type, which can be provided with an --fqbn (fully-qualified board name) option.
Supported fqbn's depend on the boards you have installed, but here are a few common options:
- Arduino Uno:
arduino:avr:uno - Arduino Mega:
arduino:avr:mega - SparkFun RedBoard or SparkFun BlackBoard:
SparkFun:avr:RedBoard- (Requires that the SparkFun avr board definitions be installed.)
- SparkFun SAMD21 Mini:
SparkFun:samd:samd21_mini- (Requires that the SparkFun samd board definitions be installed.)
As you'll note, the fqbn value takes the format of manufacturer:architecture:board.
This example command compiles the sketch we just created for an Arduino Uno:
language:shell
arduino-cli compile --fqbn arduino:avr:uno C:/Users/user.name/Documents/Arduino/cli_test
(Note: you'll need to swap your Arduino sketchbook directory in for "C:/Users/user.name/Documents/Arduino/" in the example above.)
You can add all sorts of interesting flags to this command, including:
- verbose:
-v-- Useful if you like to see all of the options and files that are being compiled into your sketch. - Build Path:
--build-path [string]-- Useful if you'd like to store the compiled object and hex files.- Note: On my Windows machine, at least, the value of this parameter needs to be a full path (no relatives).
Upload a Sketch
Once you've compiled a sketch, you're ready to upload it. As with the compile command, the upload command requires an FQBN. It also on a serial port to upload to, set using the -p option.
Here's a command building on the last example, uploading to a Windows COM port on COM18:
language:shell
arduino-cli upload -p COM18 --fqbn -v arduino:avr:uno C:/Users/user.name/Documents/Arduino/cli_test
If all goes well your Arduino should begin blinking its RX/TX LEDs and it should shortly begin running a blank sketch.
Equipping VS Code with Arduino CLI
Now that you're armed with VS Code and the Arduino CLI, it's time to combine them into a single, Arduino-less Arduino IDE! We'll use the Arduino library example from the VS Code section to build up an interface with Arduino if you want to tag along.
There are a couple ways to tackle this integration and both have their pro's and con's. The first relies on VS Code's Task integration, which provides a simple, key-bound interface to trigger any command line tool. The second uses Makefiles to call the Arduino CLI; this example is a bit more complex, but provides for more flexibility.
Option 1: Modifying tasks.json
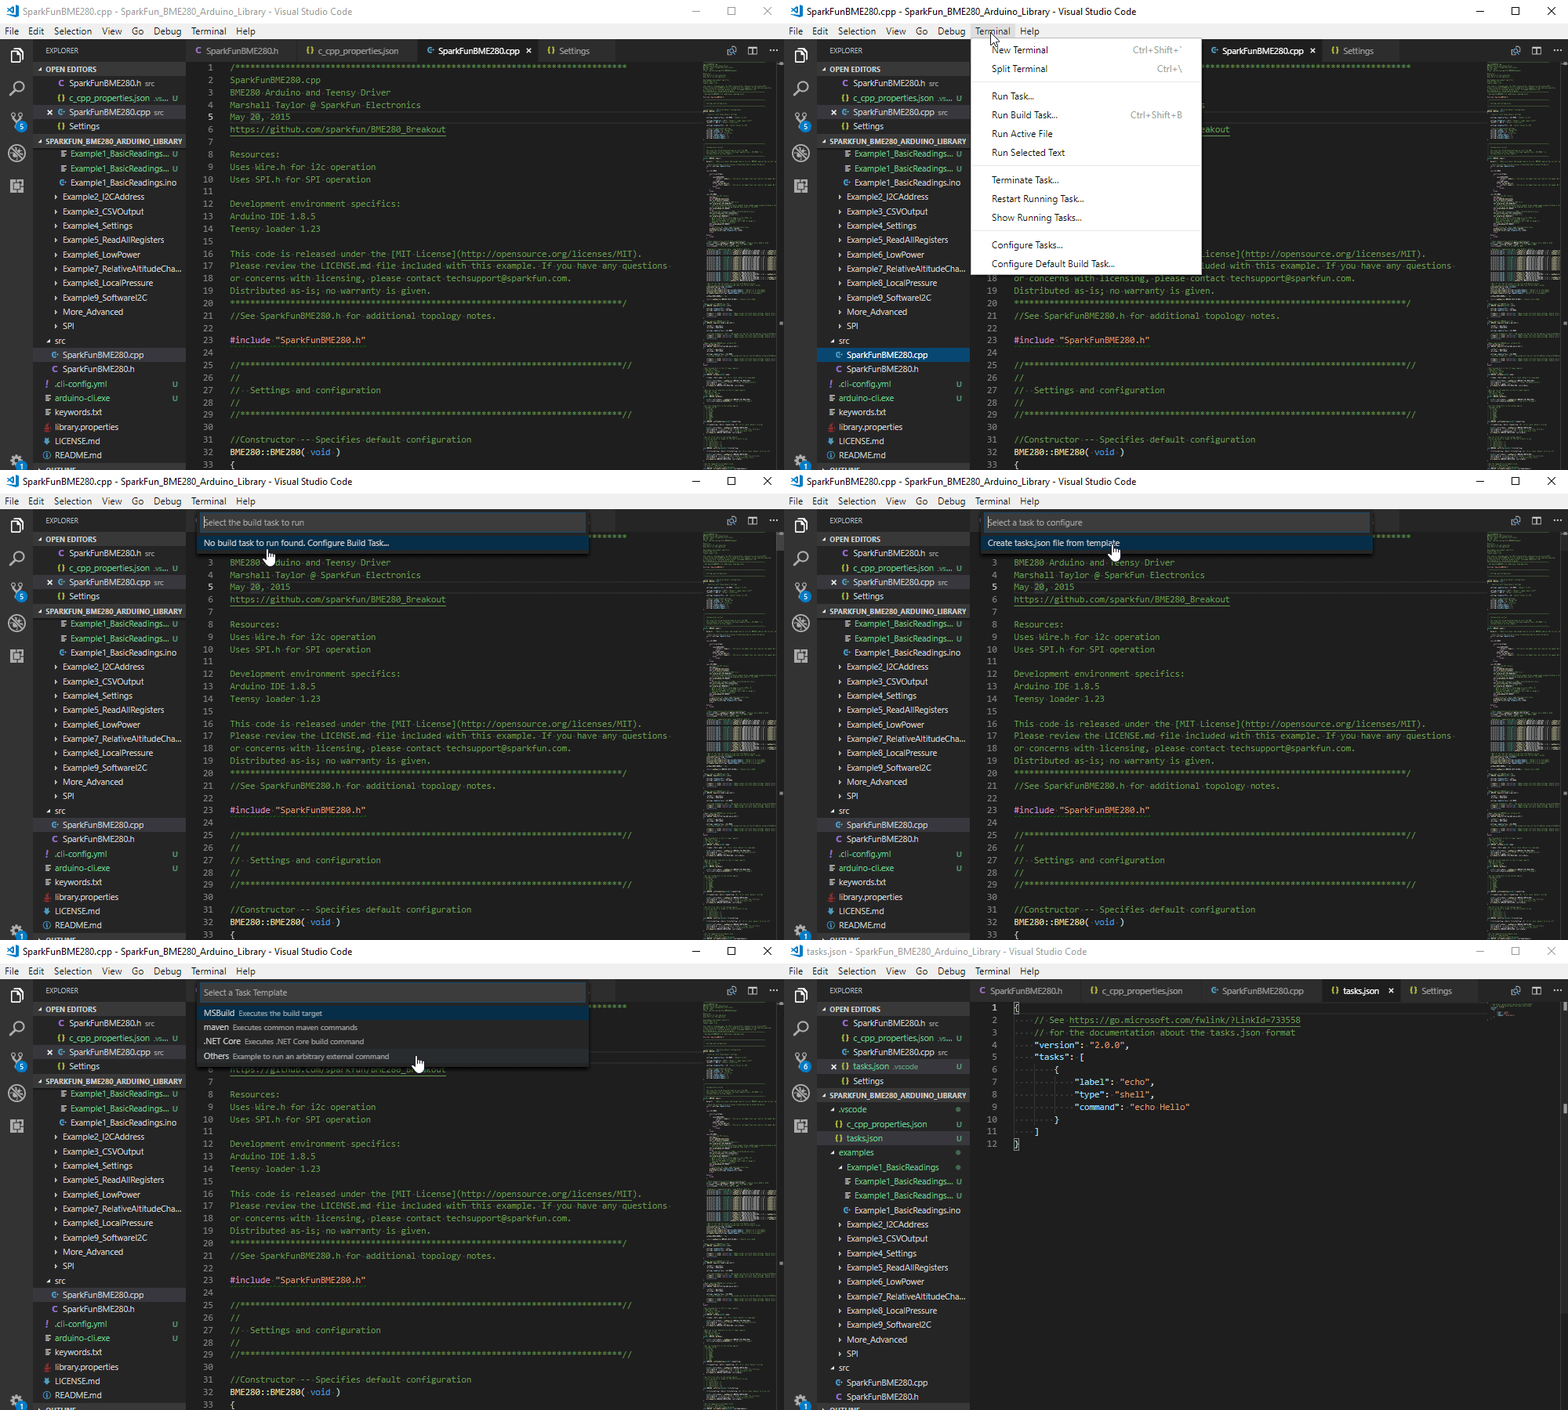
In your open VS Code window navigate to Terminal > Run Build Task. This will prompt you to create a new file -- "tasks.json" -- by pressing Enter a couple times in the focus window up top.
Overwrite the contents of this file with something like this:
language:JSON
{
    // See https://go.microsoft.com/fwlink/?LinkId=733558
    // for the documentation about the tasks.json format
    "version": "2.0.0",
    "tasks": [
        {
            "label": "Example1",
            "type": "shell",
            "command": "arduino-cli compile -v -b arduino:avr:uno examples/Example1_BasicReadings",
            "group": "build",
            "isBackground": false,
            "presentation": {
                "echo": true,
                "reveal": "always",
                "focus": false,
                "panel": "shared",
                "showReuseMessage": true
            },
            "problemMatcher": []
        },
        {
            "label": "Example1-program",
            "type": "shell",
            "command": "arduino-cli upload -p COM18 -v --fqbn arduino:avr:uno examples/Example1_BasicReadings",
            "group": "test",
            "isBackground": false,
            "presentation": {
                "echo": true,
                "reveal": "always",
                "focus": false,
                "panel": "shared",
                "showReuseMessage": true
            },
            "problemMatcher": []
        }
    ]
}
The example task file above creates two new tasks: one to build and one to test (program). Key to both tasks are their "label", "group", and "command" parameters.
You'll see some familiar arduino-cli command-line structures in the "command" parameters for both options. One -- "Example1" -- compiles code while the other, "Example1-program", uploads it.
You'll probably need to edit some values in these command parameters: the upload port and arduino-cli location most importantly. You may also need to modify the FQBN values to select the board you're using.
With the tasks.json file set, try going back to Terminal > Run Build Task -- you should see an option for "Example1." Click that and Arduino CLI should be invoked and begin compiling. You'll see a terminal window pop open in the bottom section of the editor, and hopefully you don't encounter any errors.
You can also upload the code by going to Terminal > Run Task > Example1-program. This will call the second task we have defined in the tasks file above.
Option 2: Makefile Customization
If your system has GNU make installed on it (Windows users: check out Make for Windows) creating a custom makefile provides for a more flexible development solution.
To give it a try, create a file named Makefile in the top directory of your Arduino library. In that file, paste something like this:
language:Makefile
# Arduino Library base folder and example structure
EXAMPLES_BASE = examples
EXAMPLE ?= Example1_BasicReadings

# Arduino CLI executable name and directory location
ARDUINO_CLI = arduino-cli
ARDUINO_CLI_DIR = .

# Arduino CLI Board type
BOARD_TYPE ?= arduino:avr:uno

# Default port to upload to
SERIAL_PORT ?= COM18

# Optional verbose compile/upload trigger
V ?= 0
VERBOSE=

# Build path -- used to store built binary and object files
BUILD_DIR=_build
BUILD_PATH=$(PWD)/$(EXAMPLES_BASE)/$(EXAMPLE)/$(BUILD_DIR)

ifneq ($(V), 0)
    VERBOSE=-v
endif

.PHONY: all example program clean

all: example

example:
    $(ARDUINO_CLI_DIR)/$(ARDUINO_CLI) compile $(VERBOSE) --build-path=$(BUILD_PATH) --build-cache-path=$(BUILD_PATH) -b $(BOARD_TYPE) $(EXAMPLES_BASE)/$(EXAMPLE)

program:
    $(ARDUINO_CLI_DIR)/$(ARDUINO_CLI) upload $(VERBOSE) -p $(SERIAL_PORT) --fqbn $(BOARD_TYPE) $(EXAMPLES_BASE)/$(EXAMPLE)

clean:
    @rm -rf $(BUILD_PATH)
    @rm $(EXAMPLES_BASE)/$(EXAMPLE)/*.elf
    @rm $(EXAMPLES_BASE)/$(EXAMPLE)/*.hex
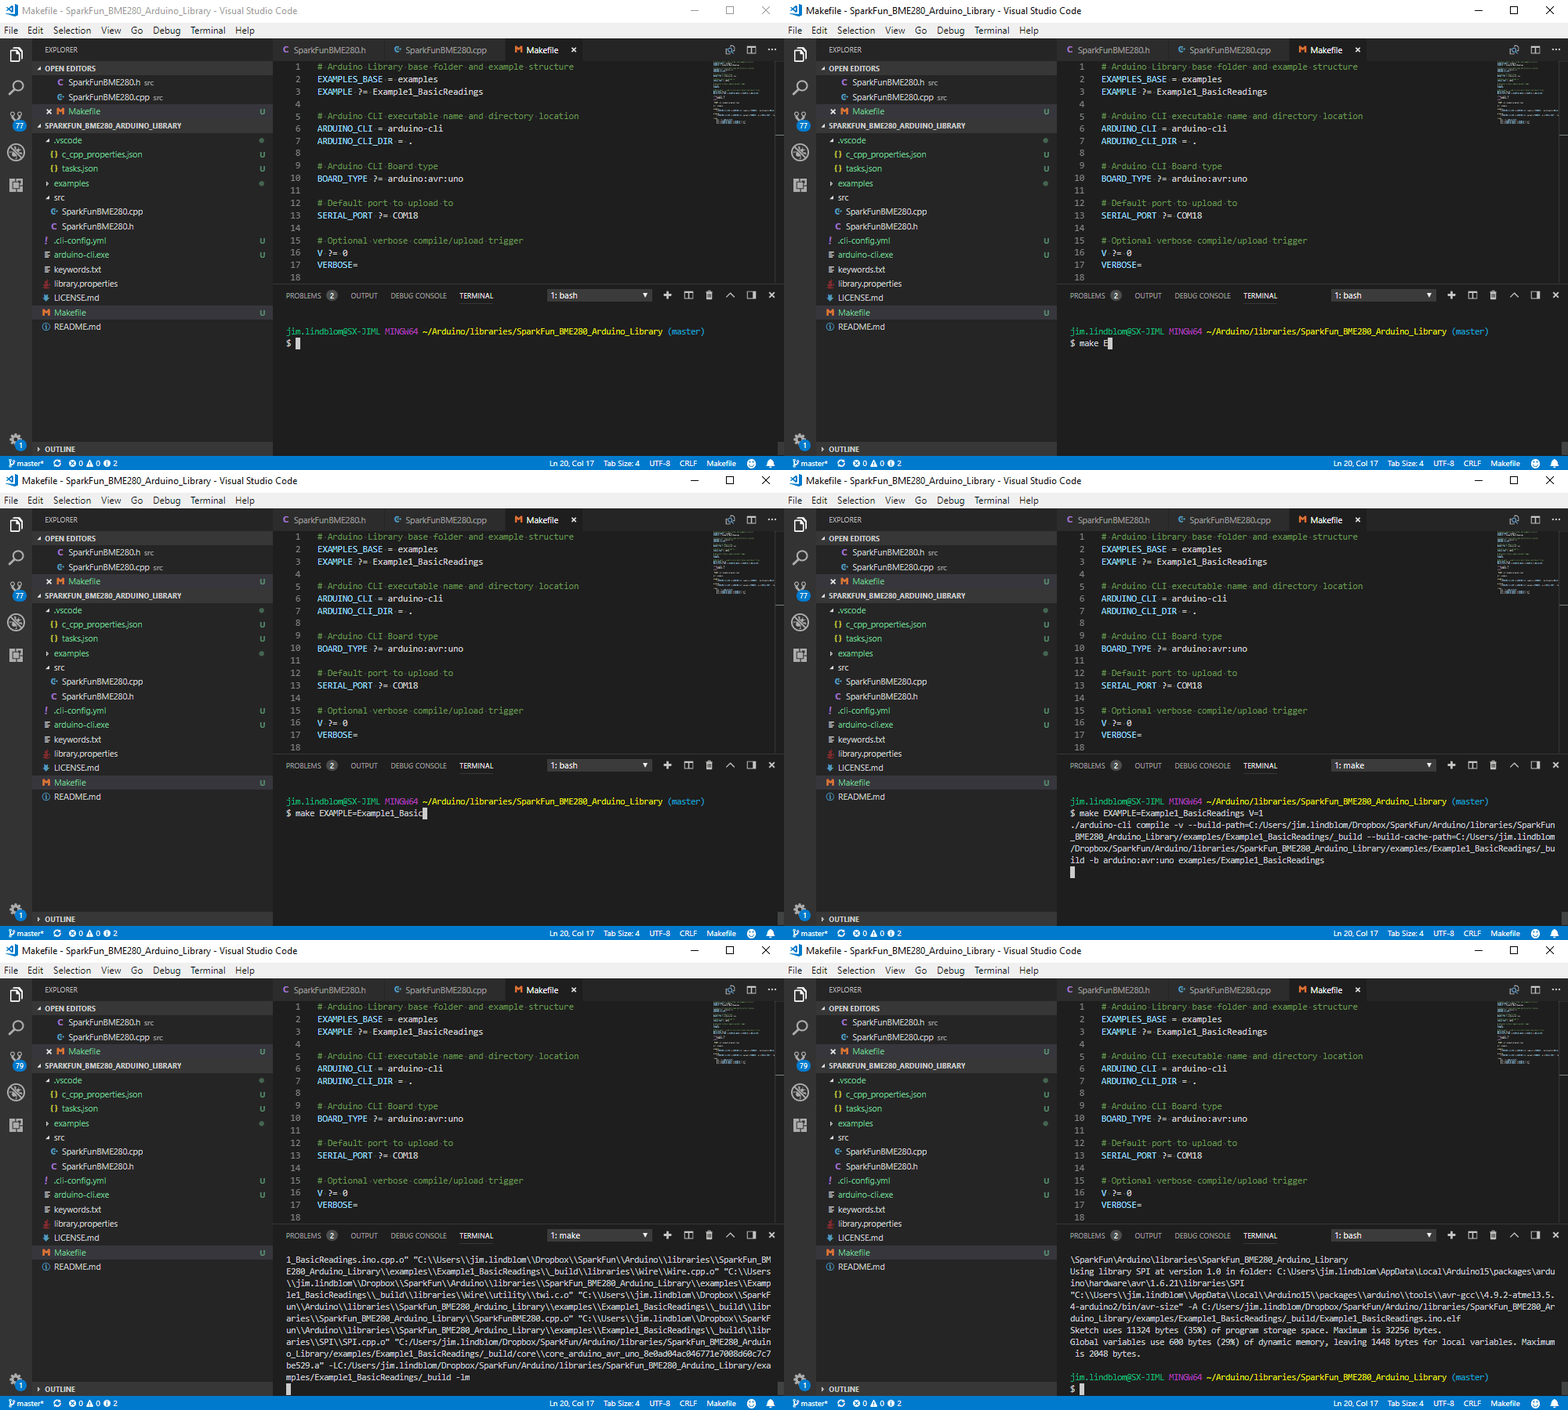
This makefile provides a handful of options for invoking Arduino CLI and building/uploading the various examples in this library. It's super-bare-bones, but accomplishes what we're setting out to do.
As the most simple example, try executing:
make EXAMPLE=Example1_BasicReadings
This should build the first example in this library. You can also add triggers like V=1 for verbose compile/upload or BOARD_TYPE to specify which Arduino board you're compiling for.
Likewise, there's a make target for uploading the built Arduino sketch. Try something like:
make program EXAMPLE=Example1_BasicReadings SERIAL_PORT=COM18
That will take the same example we just compiled and upload it to an Arduino on COM18.
Task-ing the Makefile
Building off the first option, you can use VS Code's task's to quickly invoke Makefile commands. In place of the "command" string, try adding a make call or make program to run a "test."
language:JSON
{
    // See https://go.microsoft.com/fwlink/?LinkId=733558
    // for the documentation about the tasks.json format
    "version": "2.0.0",
    "tasks": [
        {
            "label": "make current example",
            "type": "shell",
            "command": "make EXAMPLE=${fileBasenameNoExtension}",
            "group": "build",
            "isBackground": false,
            "presentation": {
                "echo": true,
                "reveal": "always",
                "focus": false,
                "panel": "shared",
                "showReuseMessage": true
            },
            "problemMatcher": []
        },
        {
            "label": "program current example",
            "type": "shell",
            "command": "make program EXAMPLE=${fileBasenameNoExtension}",
            "group": "test",
            "isBackground": false,
            "presentation": {
                "echo": true,
                "reveal": "always",
                "focus": false,
                "panel": "shared",
                "showReuseMessage": true
            },
            "problemMatcher": []
        }
    ]
}
This example uses VS Code's variable references to tell the task to build your currently open example sketch. (Note: you'll need your cursor to be open in an example sketch, or this build task will fail.)
What's especially powerful about VS Code's tasks utility is its quick access via keybinds. You can hit CTRL+SHIFT+B then enter (or type in a task you want to run), and instantly begin building an example. Test tasks are not bound by default, but you can foray into VS Code's Keyboard Shortcuts (CTRL+K CTRL+S) and modify "Run Test Task" to change that.
Key-binds are the true power behind VS Code -- you can do so much without ever touching your mouse!
Resources & Going Further
Thanks for taking a trip with us through the world of VS Code and Arduino CLI. We hope this pairing, or one like it, will help take your Arduino development to another level.
For more resources on VS Code and Arduino CLI, here are some links to check out:
- Visual Studio Code Documentation Hub
- C/C++ Programming with Visual Studio
- Highly recommend reading up on Navigating Code using the IDE. This is such a powerful part of the software.
- Arduino CLI GitHub repository
- Arduino CLI tutorial from ITP - NYU
If you'd like to leave any feedback, please don't hesitate to provide a comment on this tutorial.
Looking for the right Arduino?
Check out our Arduino Comparison Guide! We've compiled every Arduino development board we carry, so you can quickly compare them to find the perfect one for your needs.
