Efficient Arduino Programming with Arduino CLI and Visual Studio Code
 jimblom
Equipping VS Code with Arduino CLI
Now that you're armed with VS Code and the Arduino CLI, it's time to combine them into a single, Arduino-less Arduino IDE! We'll use the Arduino library example from the VS Code section to build up an interface with Arduino if you want to tag along.
There are a couple ways to tackle this integration and both have their pro's and con's. The first relies on VS Code's Task integration, which provides a simple, key-bound interface to trigger any command line tool. The second uses Makefiles to call the Arduino CLI; this example is a bit more complex, but provides for more flexibility.
Option 1: Modifying tasks.json
In your open VS Code window navigate to Terminal > Run Build Task. This will prompt you to create a new file -- "tasks.json" -- by pressing Enter a couple times in the focus window up top.
Overwrite the contents of this file with something like this:
language:JSON
{
    // See https://go.microsoft.com/fwlink/?LinkId=733558
    // for the documentation about the tasks.json format
    "version": "2.0.0",
    "tasks": [
        {
            "label": "Example1",
            "type": "shell",
            "command": "arduino-cli compile -v -b arduino:avr:uno examples/Example1_BasicReadings",
            "group": "build",
            "isBackground": false,
            "presentation": {
                "echo": true,
                "reveal": "always",
                "focus": false,
                "panel": "shared",
                "showReuseMessage": true
            },
            "problemMatcher": []
        },
        {
            "label": "Example1-program",
            "type": "shell",
            "command": "arduino-cli upload -p COM18 -v --fqbn arduino:avr:uno examples/Example1_BasicReadings",
            "group": "test",
            "isBackground": false,
            "presentation": {
                "echo": true,
                "reveal": "always",
                "focus": false,
                "panel": "shared",
                "showReuseMessage": true
            },
            "problemMatcher": []
        }
    ]
}
The example task file above creates two new tasks: one to build and one to test (program). Key to both tasks are their "label", "group", and "command" parameters.
You'll see some familiar arduino-cli command-line structures in the "command" parameters for both options. One -- "Example1" -- compiles code while the other, "Example1-program", uploads it.
You'll probably need to edit some values in these command parameters: the upload port and arduino-cli location most importantly. You may also need to modify the FQBN values to select the board you're using.
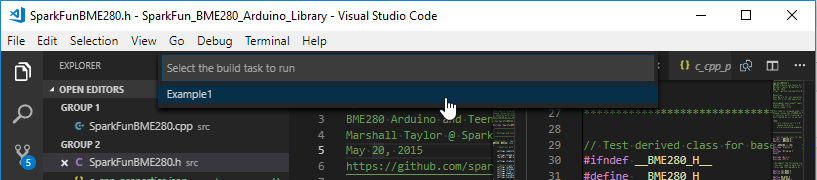
With the tasks.json file set, try going back to Terminal > Run Build Task -- you should see an option for "Example1." Click that and Arduino CLI should be invoked and begin compiling. You'll see a terminal window pop open in the bottom section of the editor, and hopefully you don't encounter any errors.
You can also upload the code by going to Terminal > Run Task > Example1-program. This will call the second task we have defined in the tasks file above.
Option 2: Makefile Customization
If your system has GNU make installed on it (Windows users: check out Make for Windows) creating a custom makefile provides for a more flexible development solution.
To give it a try, create a file named Makefile in the top directory of your Arduino library. In that file, paste something like this:
language:Makefile
# Arduino Library base folder and example structure
EXAMPLES_BASE = examples
EXAMPLE ?= Example1_BasicReadings

# Arduino CLI executable name and directory location
ARDUINO_CLI = arduino-cli
ARDUINO_CLI_DIR = .

# Arduino CLI Board type
BOARD_TYPE ?= arduino:avr:uno

# Default port to upload to
SERIAL_PORT ?= COM18

# Optional verbose compile/upload trigger
V ?= 0
VERBOSE=

# Build path -- used to store built binary and object files
BUILD_DIR=_build
BUILD_PATH=$(PWD)/$(EXAMPLES_BASE)/$(EXAMPLE)/$(BUILD_DIR)

ifneq ($(V), 0)
    VERBOSE=-v
endif

.PHONY: all example program clean

all: example

example:
    $(ARDUINO_CLI_DIR)/$(ARDUINO_CLI) compile $(VERBOSE) --build-path=$(BUILD_PATH) --build-cache-path=$(BUILD_PATH) -b $(BOARD_TYPE) $(EXAMPLES_BASE)/$(EXAMPLE)

program:
    $(ARDUINO_CLI_DIR)/$(ARDUINO_CLI) upload $(VERBOSE) -p $(SERIAL_PORT) --fqbn $(BOARD_TYPE) $(EXAMPLES_BASE)/$(EXAMPLE)

clean:
    @rm -rf $(BUILD_PATH)
    @rm $(EXAMPLES_BASE)/$(EXAMPLE)/*.elf
    @rm $(EXAMPLES_BASE)/$(EXAMPLE)/*.hex
This makefile provides a handful of options for invoking Arduino CLI and building/uploading the various examples in this library. It's super-bare-bones, but accomplishes what we're setting out to do.
As the most simple example, try executing:
make EXAMPLE=Example1_BasicReadings
This should build the first example in this library. You can also add triggers like V=1 for verbose compile/upload or BOARD_TYPE to specify which Arduino board you're compiling for.
Likewise, there's a make target for uploading the built Arduino sketch. Try something like:
make program EXAMPLE=Example1_BasicReadings SERIAL_PORT=COM18
That will take the same example we just compiled and upload it to an Arduino on COM18.
Task-ing the Makefile
Building off the first option, you can use VS Code's task's to quickly invoke Makefile commands. In place of the "command" string, try adding a make call or make program to run a "test."
language:JSON
{
    // See https://go.microsoft.com/fwlink/?LinkId=733558
    // for the documentation about the tasks.json format
    "version": "2.0.0",
    "tasks": [
        {
            "label": "make current example",
            "type": "shell",
            "command": "make EXAMPLE=${fileBasenameNoExtension}",
            "group": "build",
            "isBackground": false,
            "presentation": {
                "echo": true,
                "reveal": "always",
                "focus": false,
                "panel": "shared",
                "showReuseMessage": true
            },
            "problemMatcher": []
        },
        {
            "label": "program current example",
            "type": "shell",
            "command": "make program EXAMPLE=${fileBasenameNoExtension}",
            "group": "test",
            "isBackground": false,
            "presentation": {
                "echo": true,
                "reveal": "always",
                "focus": false,
                "panel": "shared",
                "showReuseMessage": true
            },
            "problemMatcher": []
        }
    ]
}
This example uses VS Code's variable references to tell the task to build your currently open example sketch. (Note: you'll need your cursor to be open in an example sketch, or this build task will fail.)
What's especially powerful about VS Code's tasks utility is its quick access via keybinds. You can hit CTRL+SHIFT+B then enter (or type in a task you want to run), and instantly begin building an example. Test tasks are not bound by default, but you can foray into VS Code's Keyboard Shortcuts (CTRL+K CTRL+S) and modify "Run Test Task" to change that.
Key-binds are the true power behind VS Code -- you can do so much without ever touching your mouse!