DA16200 Thing Plus Hookup Guide
Example: Serial Debug Interface
The serial debug interface provides users with a console to access many of the basic functions of the DA16200MOD, such as provisioning the WiFi connection or uploading new firmware. Once users have connected their board to their computer, they will need to open a serial terminal can connect to the DA16200MOD module's serial debug interface. The terminal serial port should be configured for 230400 bps (8-N-1):
- Baud Rate: 230400 bps
- Data Bits: 8
- Parity: None
- Stop Bits: 1
- Flow Control (HW/SW): None
- If the COM port isn't available, make sure that the driver for the CH340 is installed.
- If users don't see a splash screen or
[/DA16200] #prompt, try hitting the Enter (or Return) key. - Otherwise, double check that the RTC switch is in the
3Vposition.
WiFi Configuration
Follow the instructions below, to configure the WiFi connection to the DA16200 Thing Plus:
- From the
[/DA16200] #prompt, entersetup. - Users will then be prompted
Stop all services for the setting. Are you sure ? [Yes/No] :.- Select yes, by returning
y.
- Select yes, by returning
- After, country code list will be displayed and users will be prompted for their country code.
- Users that live in the USA should enter
usfor their country code.
- Users that live in the USA should enter
- Users will then be prompted to select a WiFi mode.
- Select
1to configure the DA16200 Thing Plus for station mode.
- Select
- A list of available networks will then be displayed and users will be prompted to select an option.
- Users should enter the number of the network, which they would like to use.
- Users will be prompted if they want to set advanced WiFi configuration.
- Enter
nto skip this step.
- Enter
- The WiFi connection settings will be displayed and users will be asked to confirm the configuration.
- If the settings are correct, enter
yto confirm the configuration.
- If the settings are correct, enter
- Users will be asked to select a connection type.
- Enter
ato select an automatic DHCP IP address.
- Enter
- Users will be prompted to confirm the configuration.
- Enter
yto confirm the configuration.
- Enter
- Lastly, users will be prompted about the
SNTP ClientandDialog DPM (Dynamic Power Management).- Enter
nfor both of these options.
- Enter
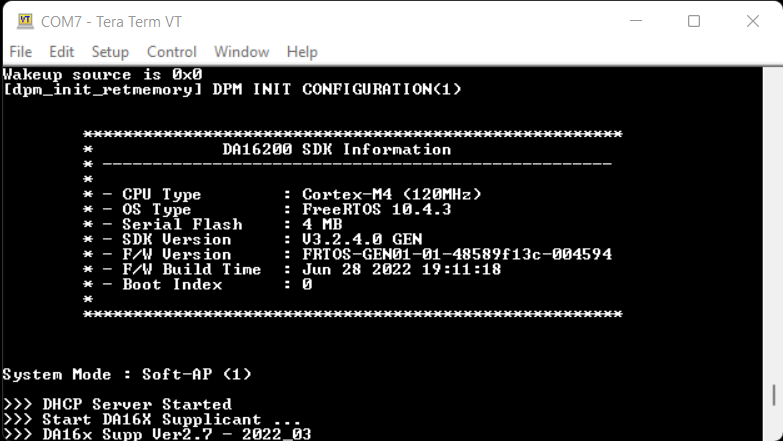
Once completed, the DA16200 will automatically reboot. After the splash screen, users should see a statement declaring that the board is in station mode (System Mode : Station Only (0)), which is eventually followed by a print out of information about the WiFi connection.
Upload New Firmware
Follow the instructions below, to upload new firmware to the DA16200 Thing Plus:
- From the
[/DA16200] #prompt, enterresetto enter the MROM command mode. - Another splash screen will be displayed followed by the
[MROM] #prompt. - To specify the memory location of where the new firmware is uploaded to the DA16200MOD, use the
loadycommand.- For the second bootloader firmware image (
FBOOT), use theloady bootorloady 0command. - For the main firmware image (
FRTOS):- Use the
loady 23000command (for slot 1). - Use the
loady 1e2000command (for slot 2).
- Use the
- For the second bootloader firmware image (
- Upload the new firmware using Y-Modem.
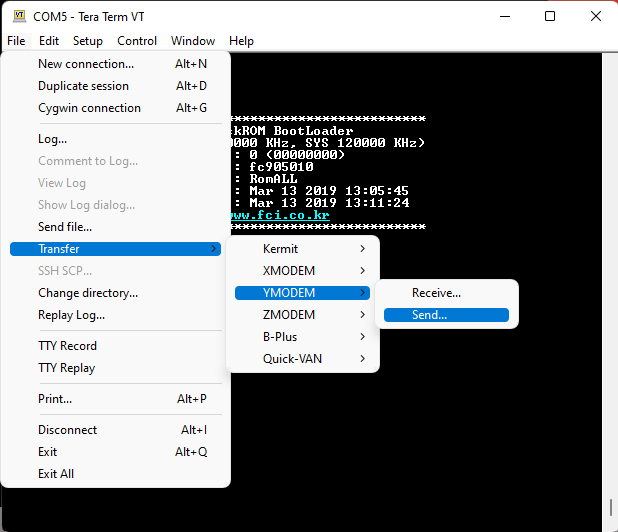
- For Windows Tera Term:
- From the File menu, select Transfer > YMODEM > Send.
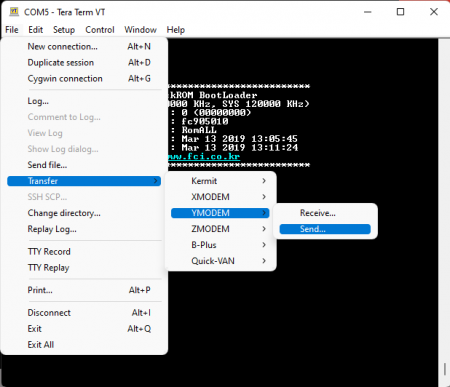
- Navigate to where the firmware image is stored, choose the required firmware image and start the download.
- From the File menu, select Transfer > YMODEM > Send.
- For Linux
minicom:- Press Ctrl+A+S and select
ymodemfrom the menu. - Navigate to where the firmware image is stored, choose the required firmware image and start the download.
- Press Ctrl+A+S and select
- For Windows Tera Term: