BMP180 Barometric Pressure Sensor Hookup
This Tutorial is Retired!
This tutorial covers concepts or technologies that are no longer current. It's still here for you to read and enjoy, but may not be as useful as our newest tutorials.
 MikeGrusin
Under Pressure!
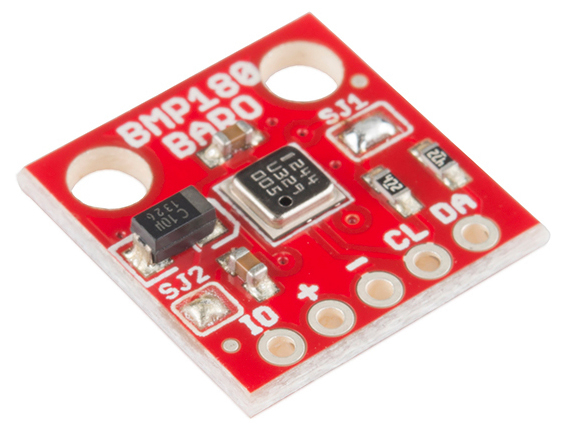
The BMP180 Breakout is a barometric pressure sensor with an I2C ("Wire") interface.
Barometric pressure sensors measure the absolute pressure of the air around them. This pressure varies with both the weather and altitude. Depending on how you interpret the data, you can monitor changes in the weather, measure altitude, or any other tasks that require an accurate pressure reading.
Covered in this Tutorial
We will show you how to connect this sensor to an Arduino microcontroller and use the included software library to get measurements out of the sensor. (If you're using a different type of microcomputer these instructions and source code may still help.) We'll also show you how to interpret the readings for both monitoring the weather and showing changes in altitude.
Suggested Reading
This part is easy to use. But before you start, we recommend the following background knowledge:
Connecting the Hardware
In this guide, we'll connect the BMP180 to an Arduino microcontroller. If you're using a different microcontroller, don't panic. Many microcontrollers have an I2C interface, and you can use this library, datasheet, and example code to help you write you own code.
Connection Names
The BMP180 Breakout Board breaks out five connections from the IC. We traditionally call these connections "pins" because they come from the pins on the IC, but they are actually holes that you can solder wires or header pins to.
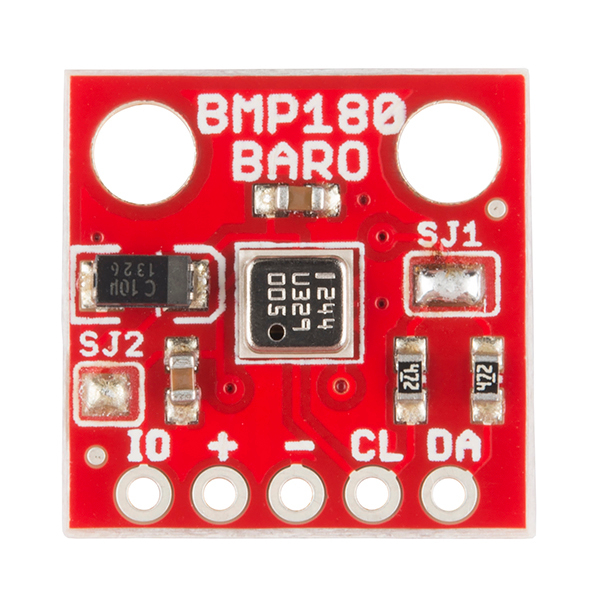
We'll connect four of the five pins on the board to your Arduino. The four pins you need are labeled +, -, CL, and DA.
(If you're wondering, the fifth pin labeled IO allows you to alter the I/O voltage for very low voltage processors (e.g. 1.8V). This pin is disabled by default, and you can normally leave that pin disconnected.)
Connecting Wires to the Board
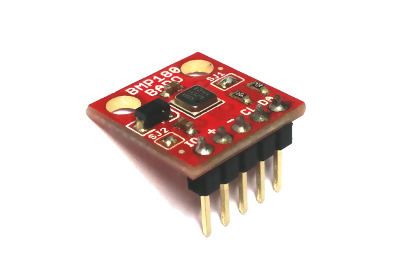
You can use any method you like to make your connections to the board. For this example, we'll solder on a five-pin length of male-male header strip, and use male/female jumper wires to connect the BMP180 to your Arduino.
Solder a 5-pin length of male-male header to the board. You can solder it to either side; the bottom is more useful for breadboards, and the top is more useful for jumper wires.
Note that the BMP180 is sensitive to moisture. When you're done soldering, do not clean off the flux by rinsing the board in water or other fluids.
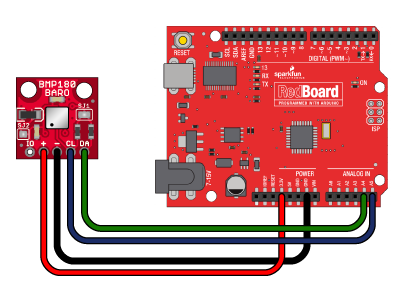
Connecting the Board to your Arduino
When you're done soldering, connect the +, -, CL, and DA pins to your Arduino. Different Arduino models use different pins for the I2C interface; use the following chart to determine where to plug everything in.
IMPORTANT: Connect the power pins (+ and -) ONLY to a 3.3V supply. Larger voltages will permanently damage the part. Note that because I2C uses open drain drivers, it is safe to connect the I2C pins (DA and CL) to an I2C port on a 5V microprocessor.
| BMP180 label | Pin function | Arduino connection | ||||||
| DA (SDA) | I2C data |
Any pin labeled SDA, or:
|
||||||
| CL (SCL) | I2C clock |
Any pin labeled SCL, or:
|
||||||
| "-" (GND) | ground | GND | ||||||
| "+" (VDD) | 3.3V power supply | 3.3V | ||||||
| IO (VDDIO) | I/O voltage | Leave disconnected unless you're connecting to a lower-voltage microprocessor |
Once you have the BMP180 connected to your Arduino, we're ready to play with the software.
Installing the Arduino Library
Libraries are collections of software functions geared towards a single purpose, such as communicating with a specific device. We've written an Arduino library called SFE_BMP180 that allows you to easily talk to the BMP180 sensor. This library is not included with the stock Arduino software, but don't worry, installing new libraries is easy.
If you'd like to interface the BMP180 to a microcontroller other than an Arduino, the C++ source code in the library and the information in the datasheet may be helpful when writing your own code.
1. Install the Arduino IDE
If you don't already have the Arduino IDE (Integrated Development Environment) installed, download the version for your system (Windows, Mac, Linux) from http://arduino.cc/en/Main/Software and install it following the instructions on that site.
If you need help installing the IDE, check out our tutorial.
2. Install the SFE_BMP180 Library
Arduino versions 1.6 and higher have tools to help you install libraries.
First, download the latest BMP180 library from this link:
Now open your Arduino IDE, and from the menu, choose Sketch / Include library / Add .ZIP Library. A file requester will open. Navigate to the "BMP180_Breakout_Arduino_Library-master.zip" file you just downloaded, and click the "Open" button. The library will be installed and ready for you to use.
If you're using an older Arduino version or need help installing the library, you can find detailed instructions in our Installing an Arduino Library tutorial.
Running the Example Sketches
Hopefully at this point you've installed the SFE_BMP180 library, and connected the hardware to your Arduino. Now we're ready to run the example sketches.
Running the Example Sketch
The library you just installed includes two example sketches that show basic operation of the BMP180. These are designed to be blueprints to help you write your own code.
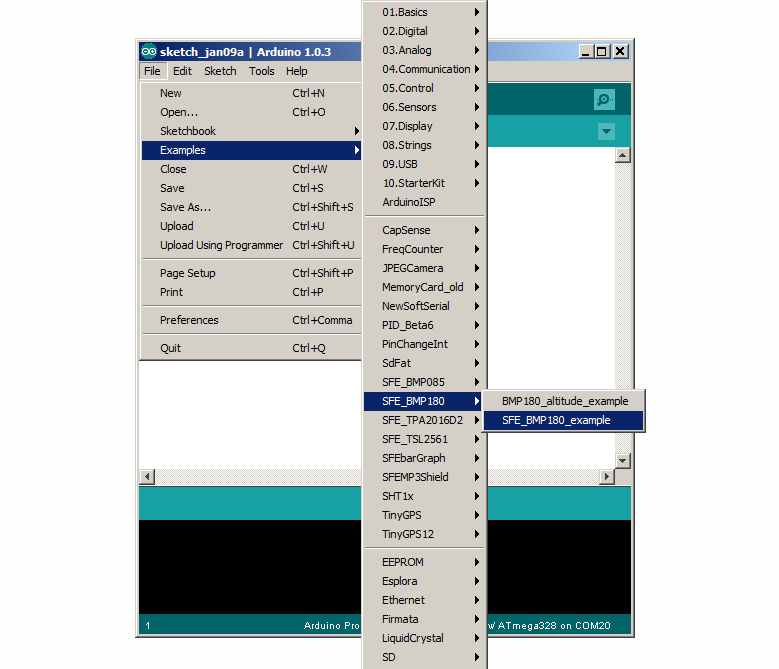
After you install the library, run the Arduino IDE, and open the following menu item: File / Examples / Sparkfun BMP180 / SFE_BMP180_example.
(If you don't see this menu item, you may not have installed the library correctly, or didn't restart the Arduino IDE. Take another look at the library installation page to see if you missed any steps.)
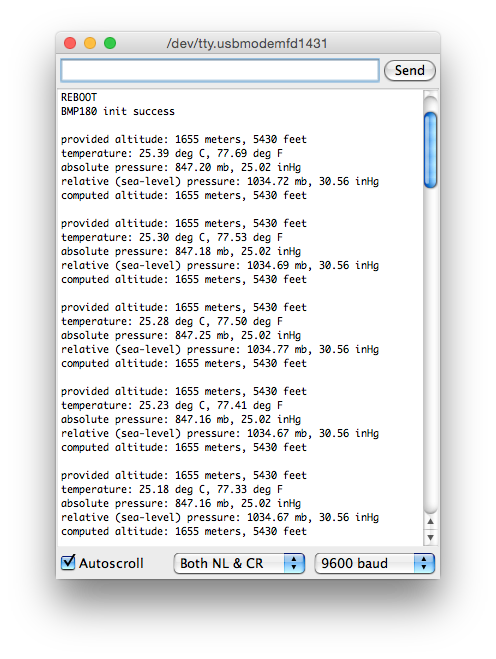
When the example opens, upload it to your Arduino (remember to select the correct board type and serial port), and open the Serial Monitor to 9600 baud. You should see some diagnostic information (if it can't find the device, double check your hardware connections) followed by pressure readings. For more about pressure, see the next section, Measuring Weather and Altitude. The readings in your terminal should look something like this, with data more relevant to your current location.
Writing Your Own Sketches
The comments and code in the example sketch should get you started when writing your own sketches. In many cases you should be able to copy and paste the example code into your own sketch.
Measuring Weather and Altitude
The BMP180 was designed to accurately measure atmospheric pressure. Atmospheric pressure varies with both weather and altitude; you can measure both of these using this sensor. Here's how:
What is Atmospheric Pressure?
The definition of pressure is a force "pressing" on an area. A common unit of pressure is pounds per square inch (psi). One pound, pressing on one square inch, equals one psi. The SI unit is newtons per square meter, which are called pascals (Pa).
There are lots of situations in which pressure can be measured (gravity, pull, etc.), but right now we're interested in atmospheric pressure, which is the force that the air around you is exerting on everything. The weight of the gasses in the atmosphere creates atmospheric pressure. One doesn't normally notice that air weighs anything, but if you took a one inch wide column of air from sea level to the top of the atmosphere, it would weigh about 14.7 pounds. (A 1 cm wide column of air would weigh about 1 kg.) This weight, pressing down on the footprint of that column, creates the atmospheric pressure that we can measure with sensors like the BMP180.
Because that inch-wide column of air weighs about 14.7 pounds, and is pressing on one square inch, it follows that the average sea level pressure is about 14.7 pounds per square inch (psi), or 101325 pascals. This will drop about 4% for each 1000 feet (or 300 meters) you ascend. The higher you get, the less pressure you'll see, because the column to the top of the atmosphere is that much shorter and therefore weighs less. This is useful to know, because by measuring the pressure and doing some math, you can determine your altitude.
Fun fact: The air pressure at 12,500 feet (3810 meters) is only half of that at sea level. In other words, half of the mass of the atmosphere is below 12,500 feet, and the air at 12,500 feet is half as dense as that at sea level. No wonder you have a harder time breathing up there.
The BMP180 outputs absolute pressure in pascals (Pa). One pascal is a very small amount of pressure, approximately the amount that a sheet of paper will exert resting on a table. You will more often see measurements in hectopascals (1 hPa = 100 Pa) or kilopascals (1 kPa = 1000 Pa). The Arduino library we've provided outputs floating-point values in hPa, which also happens to equal one millibar (mbar).
Here are some conversions to other pressure units:
1 hPa = 100 Pa = 1 mbar = 0.001 bar
1 hPa = 0.75006168 Torr
1 hPa = 0.01450377 psi (pounds per square inch)
1 hPa = 0.02953337 inHg (inches of mercury)
1 hpa = 0.00098692 atm (standard atmospheres)
Temperature Effects
Because temperature affects the density of a gas, and density affects the mass of a gas, and mass affects the pressure (whew), atmospheric pressure will change dramatically with temperature. Pilots know this as "density altitude", which makes it easier to take off on a cold day than a hot one because the air is more dense and has a greater aerodynamic effect.
To compensate for temperature, the BMP180 includes a rather good temperature sensor as well as a pressure sensor. To perform a pressure reading, you first take a temperature reading, then combine that with a raw pressure reading to come up with a final temperature-compensated pressure measurement. (Don't worry, the Arduino library makes all of this very easy.)
Measuring Absolute Pressure
As we just mentioned, if your application requires measuring absolute pressure, all you have to do is get a temperature reading, then perform a pressure reading (see the example sketch for details). The final pressure reading will be in hPa = mbar. If you wish, you can convert this to a different unit using the above conversion factors.
Note that the absolute pressure of the atmosphere will vary with both your altitude and the current weather patterns, both of which are useful things to measure.
Weather Observations
The atmospheric pressure at any given location on earth (or anywhere with an atmosphere) isn't constant. The complex interaction between the earth's spin, axis tilt, and many other factors result in moving areas of higher and lower pressure, which in turn cause the variations in weather we see every day. By watching for changes in pressure, you can predict short-term changes in the weather. For example, dropping pressure usually means wet weather or a storm is approaching (a low-pressure system is moving in). Rising pressure usually means that clear weather is approaching (a high-pressure system is moving through).
But remember that atmospheric pressure also varies with altitude. The absolute pressure in Denver (altitude 5280') will always be lower than the absolute pressure in San Francisco (altitude 52'). If weather stations just reported their absolute pressure, it would be difficult to directly compare pressure measurements from one location to another (and large-scale weather predictions depend on measurements from as many stations as possible).
To solve this problem, weather stations always remove the effects of altitude from their reported pressure readings by mathematically adding the equivalent fixed pressure to make it appear as if the reading was taken at sea level. When you do this, a higher reading in San Francisco than Denver will always be because of weather patterns, and not because of altitude.
To do this, there is a function in the library called seaLevel(P,A). This takes absolute pressure (P) in hPa, and the station's current altitude (A) in meters, and removes the effects of the altitude from the pressure. You can use the output of this function to directly compare your weather readings to other stations around the world.
For more information, here is a good Wikipedia article on mean sea level pressure.
Determining Altitude
Since pressure varies with altitude, you can use a pressure sensor to measure altitude (with a few caveats).
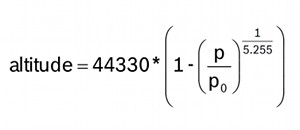
The average pressure of the atmosphere at sea level is 1013.25 hPa (or mbar). This drops off to zero as you climb towards the vacuum of space. Because the curve of this drop-off is well understood, you can compute the altitude difference between two pressure measurements (p and p0) by using this equation:
There are two ways you can take advantage of this.
If you use sea level pressure (1013.25 hPa) as the baseline pressure (p0), the output of the equation will be your current altitude above sea level.
Or, if you take a single pressure reading at your current location, and use that as your baseline (p0), all subsequent pressure readings will result in relative altitude changes from the baseline. Climb the stairs and you should see the altitude go from zero to 3 or 4 meters. Go down to the basement, and you'll see -3 or -4 meters. There's an example sketch included with the library called BMP180_altitude_example.ino that shows how to do this.
There's a function in the library called altitude(P,P0) that lets you accomplish both of these things. If you give it the sea level pressure (1013.25 hPa) for p0, and your local pressure for p, it will give you your altitude above sea level. If you use a local pressure measurement for p0, subsequent p pressure readings will give you your change in altitude from the baseline.
Now for the caveats:
Accuracy: How accurate is this? The theoretical noise level at the BMP180s highest resolution is 0.25m (about 10 inches), though in practice we see noise on the order of 1m (40 inches). You can improve the accuracy by taking a large number of readings and averaging them, although this will slow down your sample rate and response time.
Weather: You should also remember that pressure changes due to weather will affect your altitude readings. The best accuracy will be obtained if you take a "fresh" p0 when you need it and don't rely on it to be accurate for extended periods due to changes in the weather.
Maximum altitude: The BMP180 can't measure all the way down to vacuum (or up to space). It's advertised lower limit is about 300 hPa (or mbar), which corresponds to an altitude of about 3000m or 30,000 feet. People have flown these to higher altitudes and gotten useful results, but this isn't guaranteed or likely to be accurate. (You might consider using GPS for high-altitude measurements).
Minimum altitude: Similarly, this sensor isn't suited for large pressures either. The advertised upper limit is 1100 hPa=mbar (or 16 psi), which is about 500 feet below sea level (that's in air - the BMP180 isn't submersible in water). This sensor isn't a good choice for submersible or compressed-gas measurements.
Tips and Tricks
Things to Watch Out For
Give it the right voltage: The BMP180 will operate on voltages from 1.8V to 3.6V. We recommend operating it at 3.3V. Never connect the "+" header to voltages higher than 3.6V!. Note that it is safe to connect the SCA and SDL pins to an I2C port on a 5V Arduino, as the pullup resistors on the BMP180 board will keep the voltage below 3.6V.
Give it air: Remember that the BMP180 needs access to ambient air to measure its pressure, so don't put it in a sealed case. Providing a small vent hole should be adequate.
But not too much air: On the other hand, exposure to fast-moving air or wind can cause momentary pressure variations that will affect your readings. Shield the device from strong air currents.
Keep it cool: Because an accurate temperature reading is needed to measure the pressure, try not to expose the device to rapid temperature changes, and keep it away from nearby hot parts and other heat sources.
Keep it dry: The BMP180 is sensitive to moisture. Don't submerge it or allow it to contact liquid water.
Don't blind it: Surprisingly, the silicon within the BMP180 is sensitive to light, which can enter the device through the hole on the top of the chip. For maximum accuracy, shield the chip from ambient light.
Changing the Solder Jumpers
Solder jumpers are closely-spaced pads on a printed circuit board that are covered by blobs of solder to create an electrical connection. The BMP180 breakout board has two such jumpers; you can remove the solder from these pads to break the connection and alter the functioning of the board.
To remove the solder from a solder jumper, cover it with solder wick, and carefully heat it with a soldering iron. When the solder melts, it will be absorbed by the wick. Remove the wick before the solder cools so it doesn't stick to the pads. If you didn't get all of the solder on the first pass, give it another try with a clean section of solder wick. When you're done you should be able to see a broken connection between the pads. While doing this be careful not to overheat the board (let it cool off if you're having problems), or the copper pads may lift from the board.
Disabling the I2C pullup resistors (SJ1)
The BMP180 communicates with a host microcontroller via a communications standard called "I2C" (for Inter Integrated Circut). I2C uses two wires, usually labeled SCL (Serial Clock) and SDA (Serial Data). To function properly, I2C requires a pullup resistor on each of those lines. The BMP180 board includes these resistors. They're enabled by default, but you can disable them by clearing solder jumper SJ1.
I2C allows you to have multiple devices connected to the same two lines (collectively called a bus). The pullup resistors allow the bus to function, but you should only have one set of pullup resistors per bus.
If you have just one I2C device (such as the BMP180 breakout board) connected to your microcontroller, the board is already set up properly. You don't need to change anything.
However, if you wish to connect more than one device to the bus, you should ensure that there is only one set of pullup resistors enabled on the bus. You do this by disabling every set of pullup resistors except one. (It doesn't matter where the enabled resistors live; they can be anywhere on the bus.)
To disable the I2C pullup resistors, remove all of the solder from the jumper labeled "SJ1". This jumper has three pads; be sure to separate all of the pads from each other. Remember that you'll need to ensure that another set of pullup resistors are enabled somewhere on the I2C bus.
Note that you should not operate an I2C bus without pullup resistors, as the internal weak pull-up resistors in the Arduino will pull the bus to 5V, which may damage the BMP180.
Using a Different I/O Voltage (SJ2)
By default, the BMP180 breakout board is set up to have the I2C bus communicate at 3.3V. This will work for most 3.3V and 5V microcontrollers. However, if you wish to connect the BMP180 to a lower-voltage microprocessor, such as one that operates at 1.8V, you can do so by removing the solder from the jumper labeled "SJ2". Once you do this, you will need to provide the board with your desired I/O voltage via the "IO" header. The BMP180 will accept I/O voltages from 1.62V to 3.6V.
Resources and Going Further
The example sketches included with the library should help you write your own code for the BMP180. The code is highly commented to help you understand what it's doing. In many cases, you should be able to copy and paste the example code into your own sketches. You may also want to refer to the datasheet for more information about the internal workings of the sensor.
If you have any problems or questions, our technical support department can help. Please don't hesitate to contact us. We also love to hear about your projects!
Further reading and projects:
- MPL3115A2 Pressure Sensor Hookup Guide
- Weather Shield Hookup Guide
- How to Power a Project
- Creating a Humidor
Have fun!
- Your friends at SparkFun