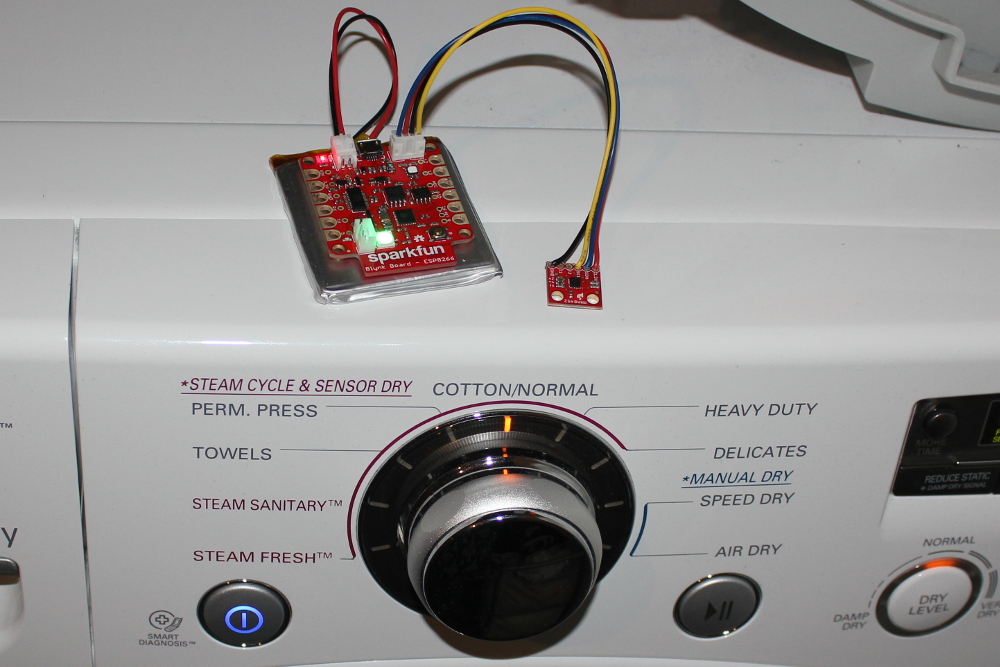
We created the SparkFun Blynk Board to solve problems. Big problems -- like keeping plants healthy -- and problems trending closer to the "first-world" end of the spectrum -- like a phone-alerting laundry monitor.
This tutorial demonstrates how to pair the Blynk Board with an MMA8452Q Accelerometer Breakout to create a shake-sensing laundry monitor. Once the laundry is done, the electronics will communicate with the Blynk app -- over Wi-Fi -- to send your phone a push notification.

Together, the Blynk Board and app will allow you to power through laundry day as quickly and efficiently as possible!
The wishlist below includes all of the electronics and components you'll need to follow along with this tutorial:
In addition to those breakout boards and cables, this project also requires a bit of soldering. A simple soldering iron, some solder, wire strippers, and a flush cutter should be all you really need.
To follow along with this tutorial, you'll need to program your Blynk Board with new firmware. Hopefully, by this point, you've already exhausted the Project Guide and set your computer up to program the Blynk Board using Arduino. If not, check out either -- or both -- of those tutorials first.
This project builds on a handful of electronics concepts. If your unfamiliar with any of the subjects below, consider reading through that tutorial first.
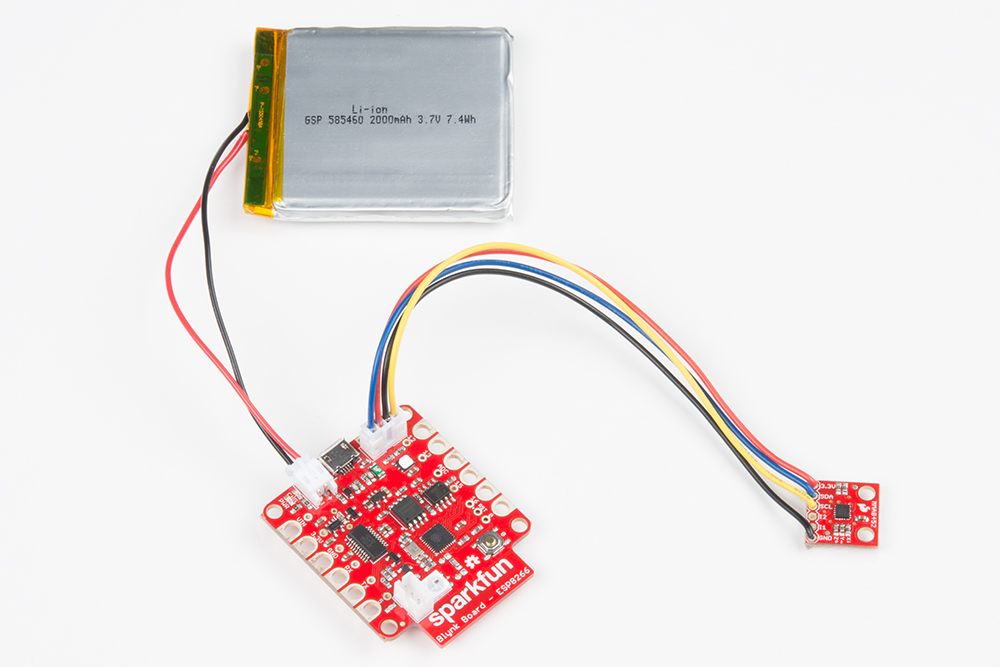
The MMA8452Q is controlled and monitored via an I2C interface interface -- a two-wire, serial interface popular among embedded electronics like this. On the Blynk Board, that interface is broken out to the 4-pin, white JST connector adjacent to the USB port.
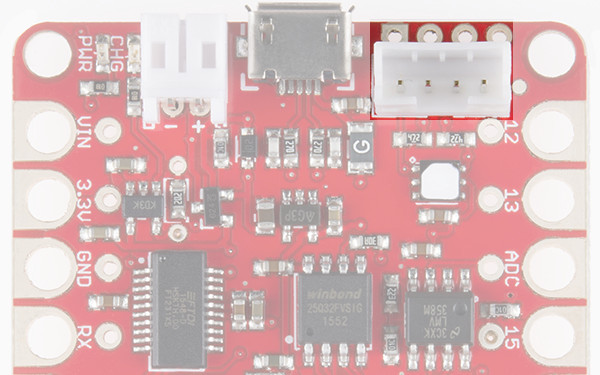
Our 4-Pin JST wire assembly mates perfectly with that connector, but tying the other end to an accelerometer will require some soldering.
If you’ve never soldered before, don’t run off just yet! This is relatively simple soldering, and is a great introduction to the skill. Check out our How to Solder - Through Hole tutorial to learn how to get started.
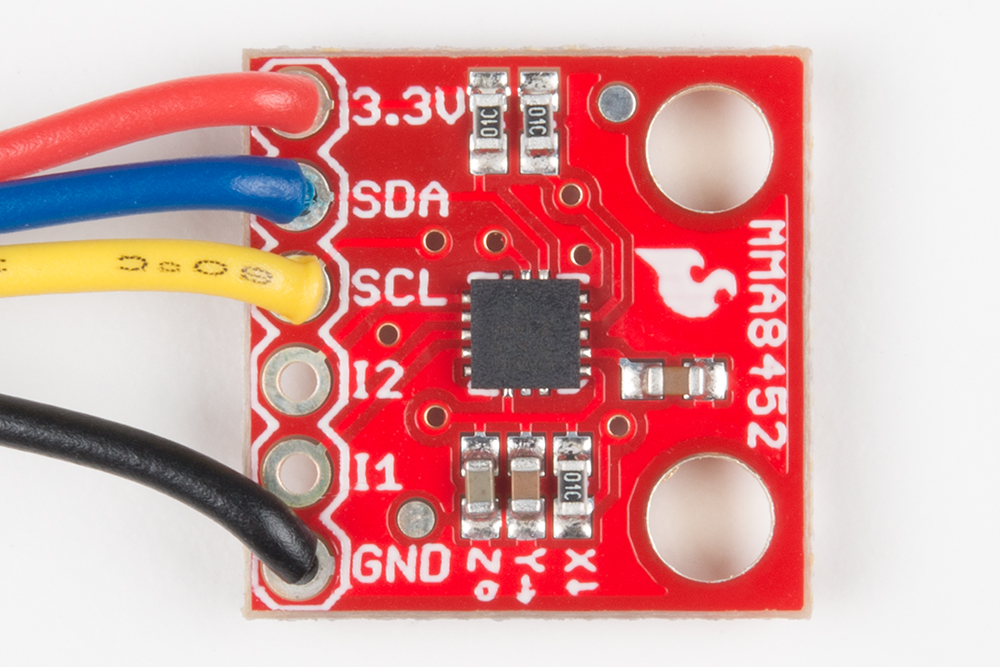
Plugged into the Blynk Board, the colors of the 4-wire JST assembly match up closely with what you'd expect. Black is ground, red is power (3.3V), yellow is SCL, and blue is SDA. That's exactly how you'll need to solder the accelerometer on the other end.
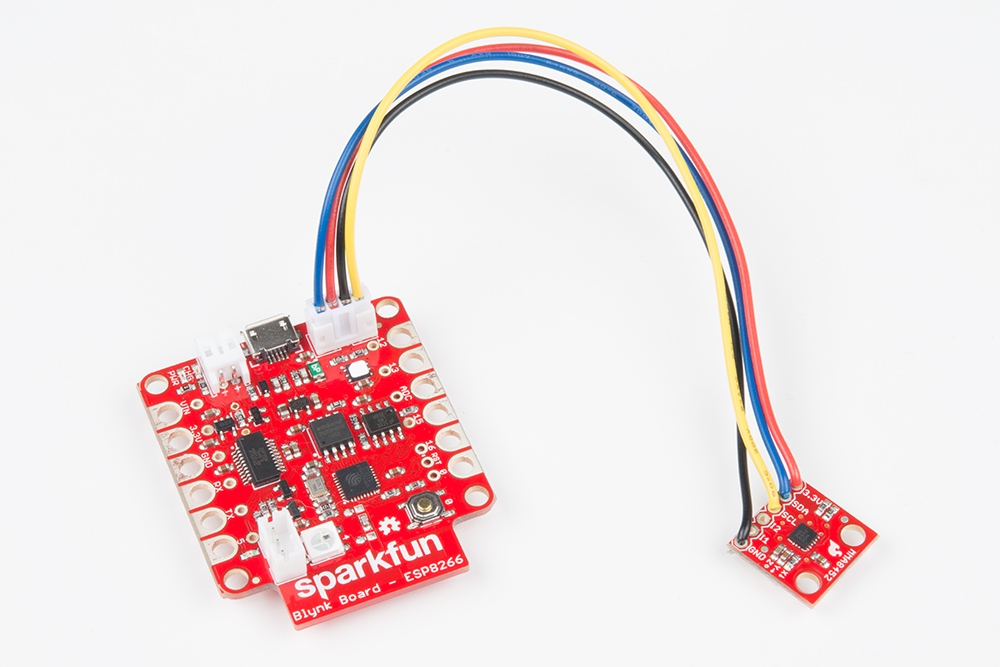
Once the JST cable is soldered into the accelerometer, simply plug the connector into the mating end of the Blynk Board.
This project can take advantage of the Blynk Board's integrated LiPo battery charger. If you don't have an empty wall outlet nearby, you can simply plug the battery in and set the assembly on top of your washer/dryer.
Any of our single-cell lithium-polymer batteries should work. If you're looking for suggestions, we find the 400mAh and 850mAh LiPo's to be a nice compromise between capacity and size.
To charge the battery, simply connect a USB cable (connected on the other end to either a computer or wall adapter) to the Blynk Board.
To enable phone notifications – and to configure the Blynk Board laundry monitor on-the-fly – we're using the Blynk app. Blynk is available for both iOS and Android devices. Click one of the links below, if you don't have the app yet.


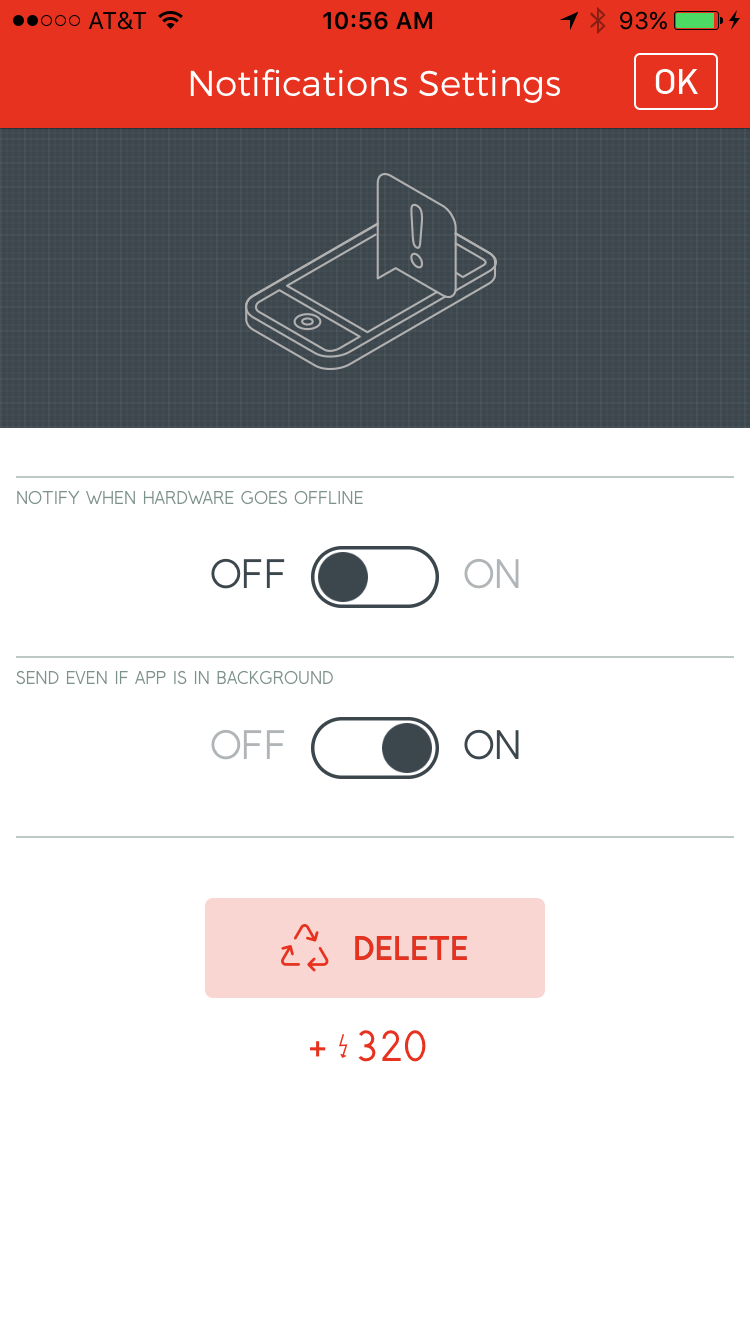
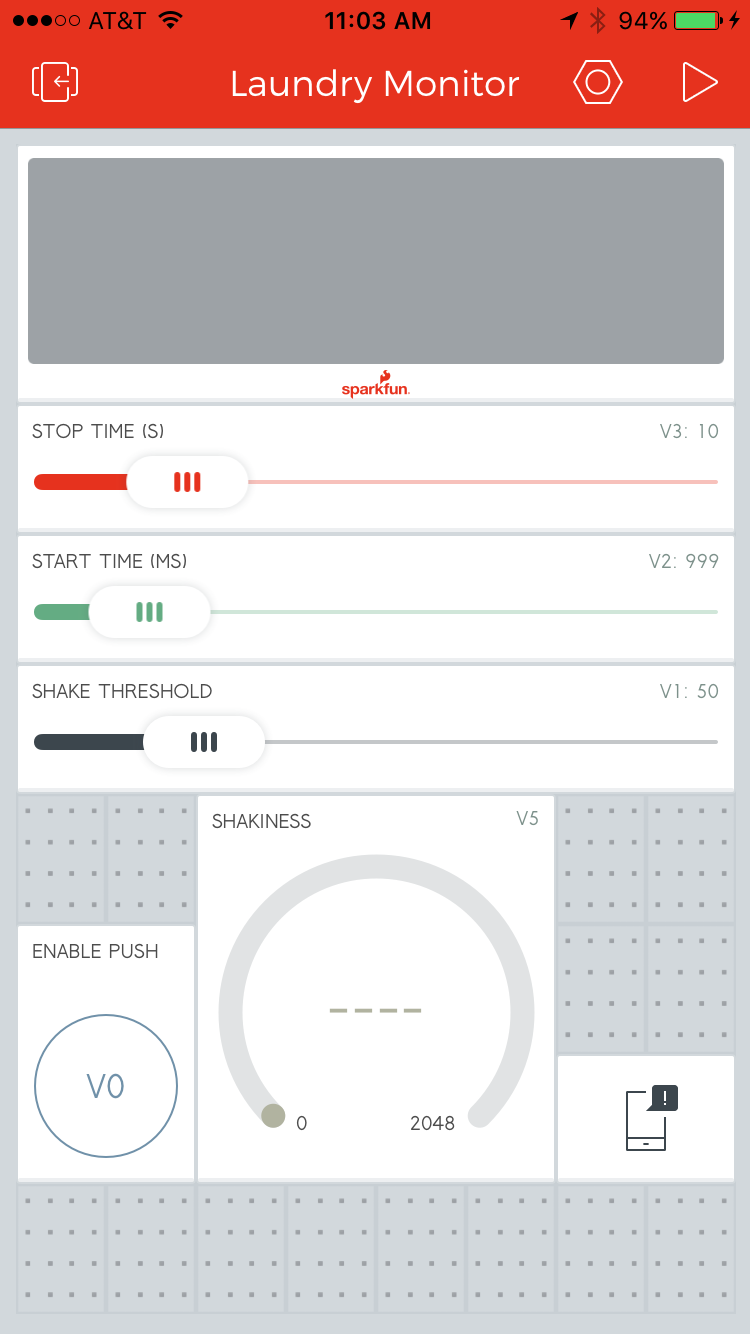
On your phone, create a new Blynk project (or use a previously-created project if you prefer). Then drag in the following widgets:
The most critical widget of the bunch! There's not a whole lot to configure here. The "Send even if app is in background" option is useful, but may end up draining more of your phone's battery.
This button will allow you to easily enable or disable push notifications -- just in case you don't always want the intrusive alerts.
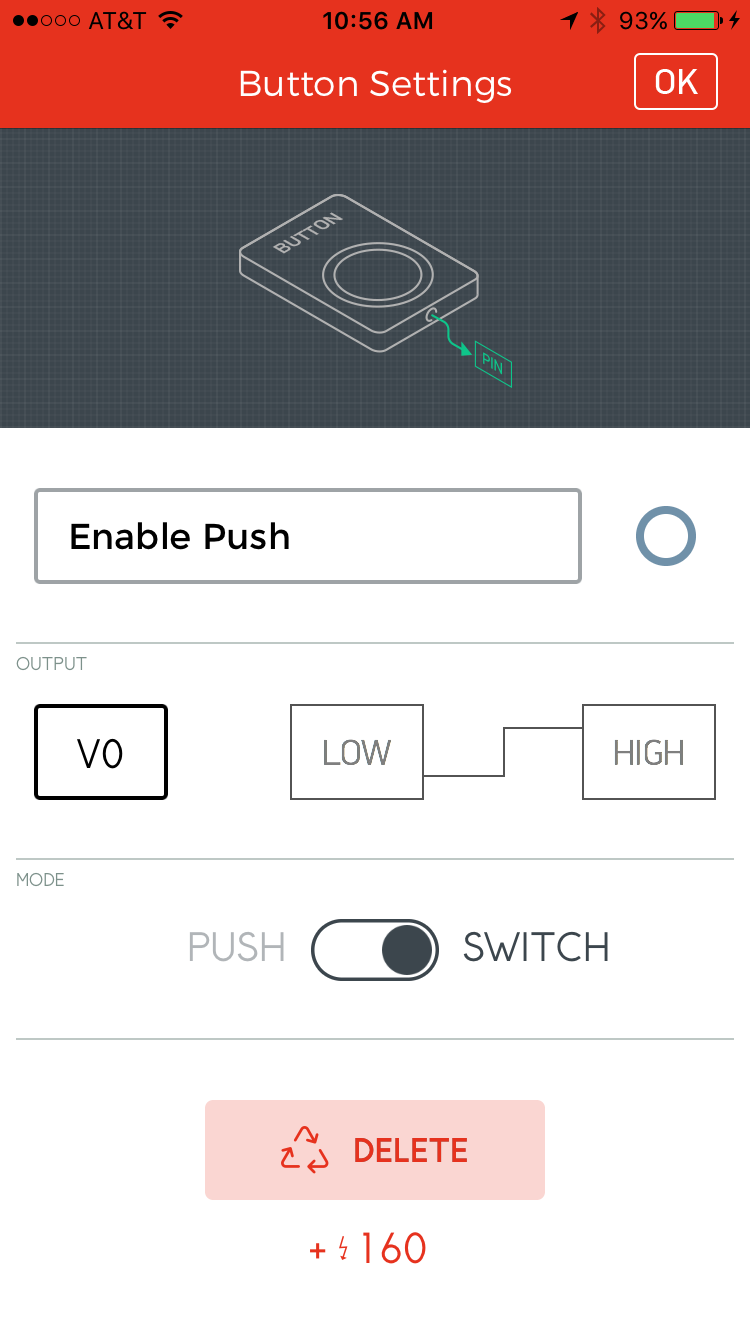
Make sure the button is set to switch mode.
The code adds up sensed acceleration in all three dimensions, then compares that sum against a previous measurement. This threshold value sets the minimum difference between those two measurements that will trigger a "shake".
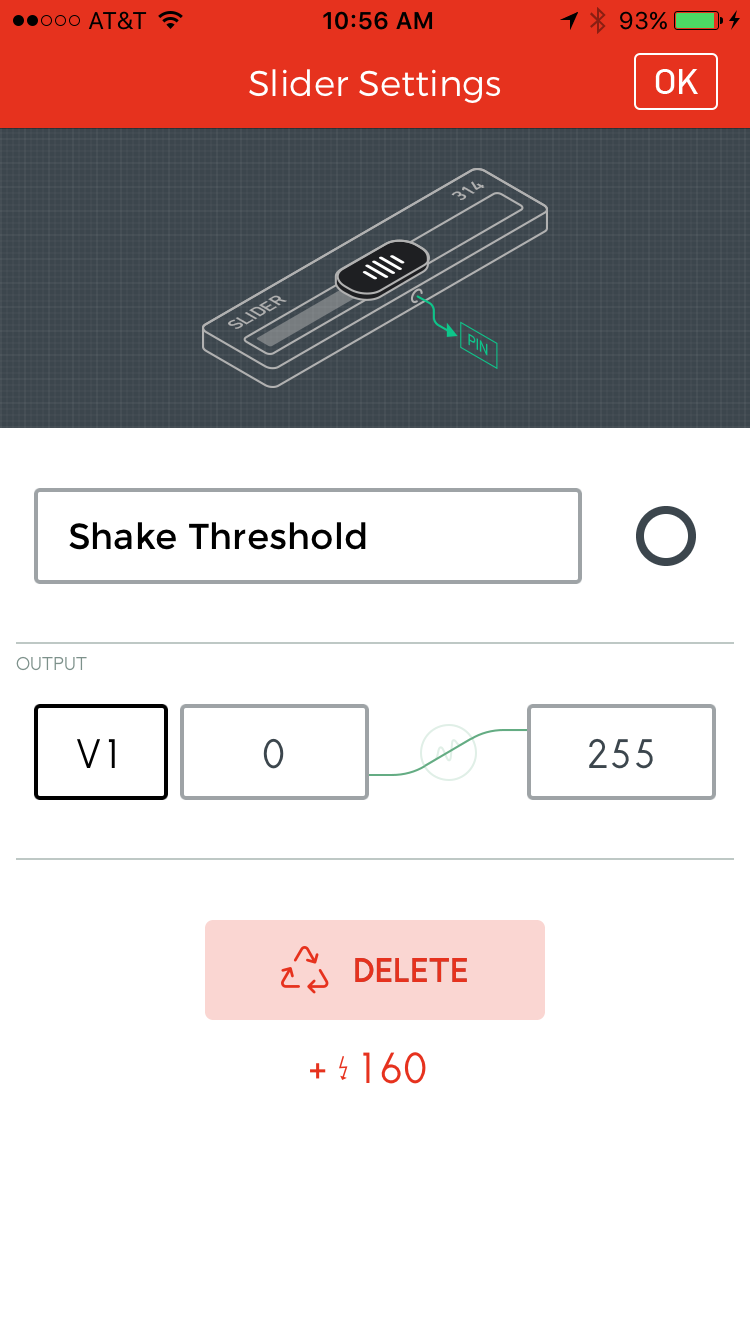
Depending on how much your washer or dryer shakes, a value between 10 and 100 should work. You can monitor the gauge widget to fine-tune this value.
This slider configures the amount of time shaking must be sensed before the Blynk Board assumes the laundry is running. This helps filter out steps, a door closing, earth tremors, etc.
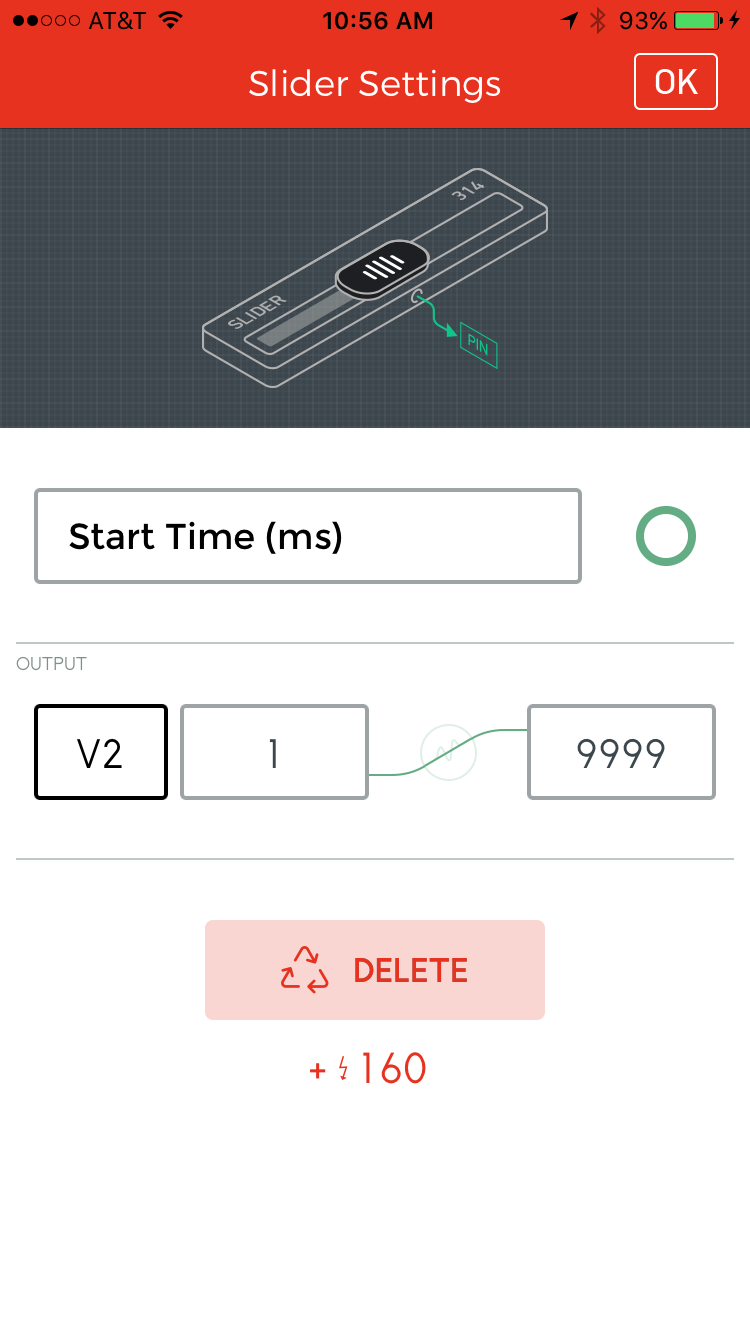
You may need to tweak this value, but 500 (milliseconds) is usually a good default.
This slider sets the number of seconds from when shaking stops to when the notification is sent. Some washers or dryers will try to fake you out, by pausing their cycle for a few seconds before picking back up.
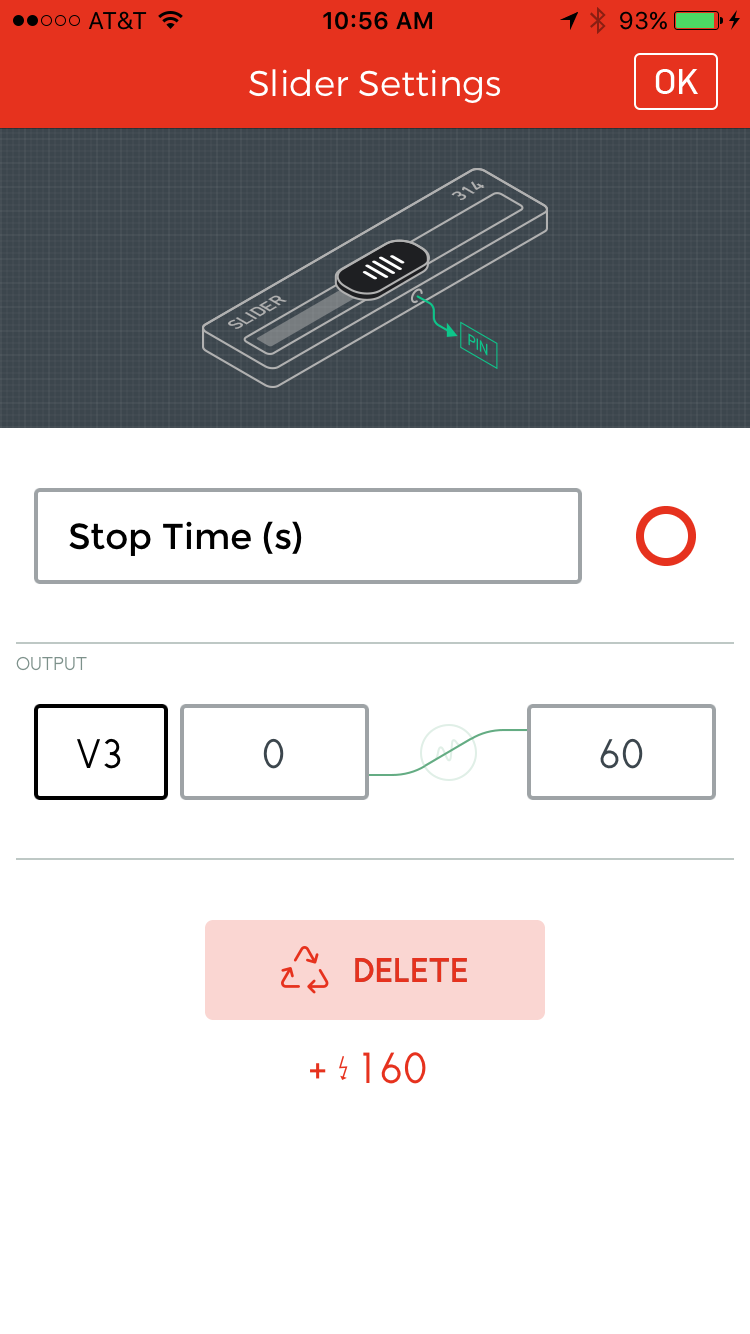
A value between 10 and 60 seconds should work -- though you may have to extend it even more depending on your appliance. Just know that the higher this value is, the slower you'll be to your laundry when it's done.
Bits of data like the state of your washer/dryer or how long it's been running/stopped are routed to the LCD.
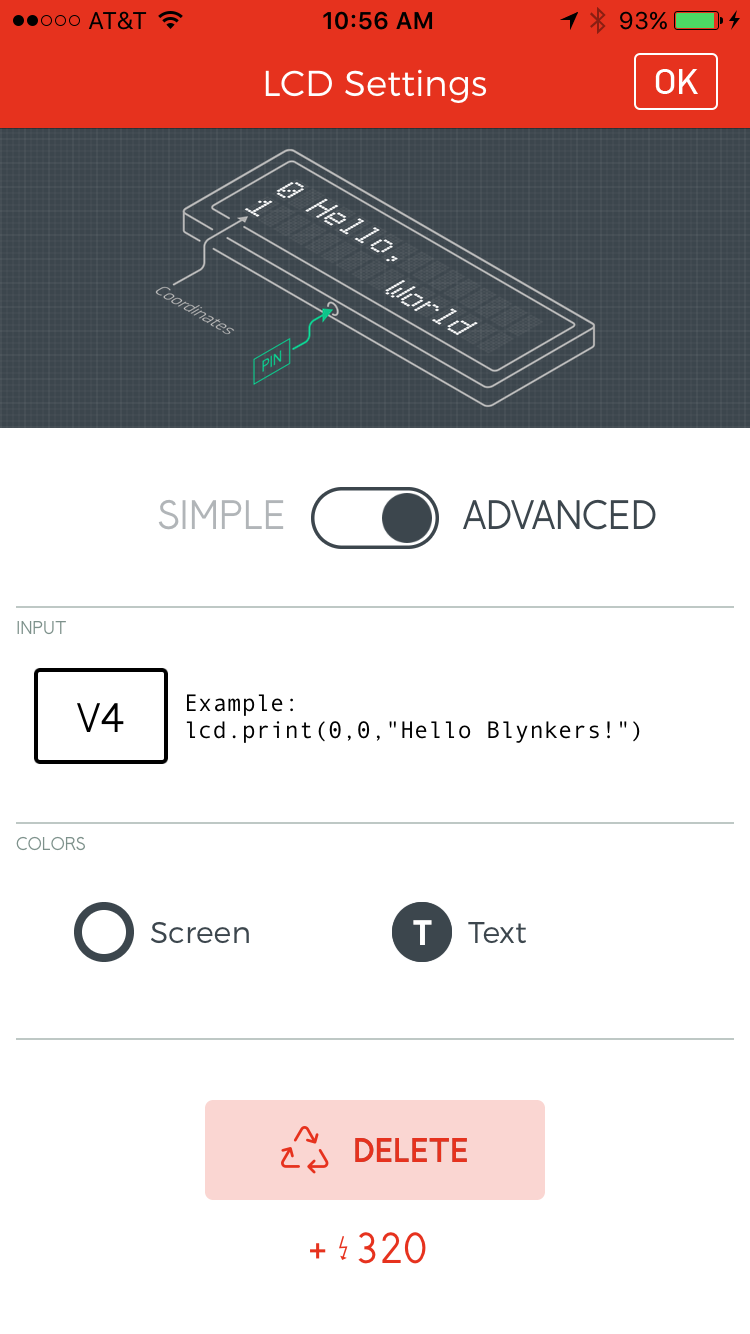
A quick glance at this, while the project is running, may give you an idea of how much time is left on your wash.
The raw "shakiness" calculation is supplied to this virtual variable a few times per second.
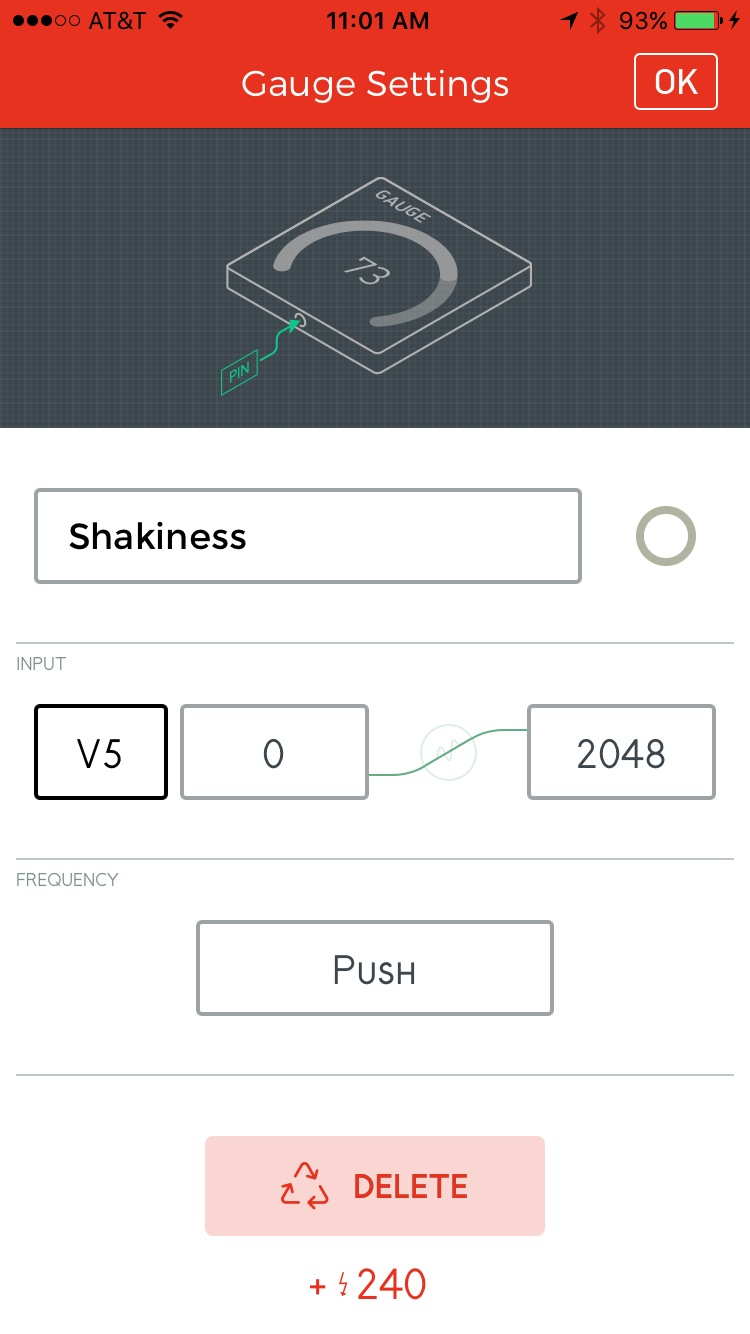
This widget is helpful in tweaking the threshold (V1) slider. Or for verifying that the machine is still shaking.
Arrange the widgets however you'd like, customize the colors, have fun with it! Here's an example set up:
If you haven’t set your computer up to program the Blynk Board using Arduino yet, read through our Blynk Board Arduino Development Guide first. Following that, you should have the Blynk Board hardware definitions and most of the libraries you’ll need added to your Arduino IDE.
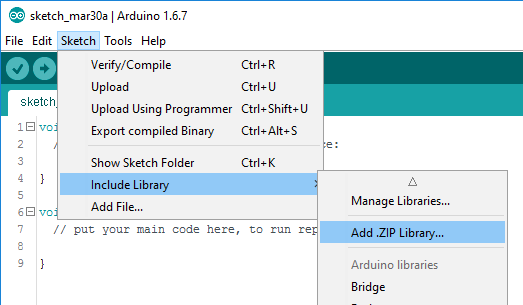
The latest version of our MMA8452Q Arduino library can be downloaded from the SparkFun_MMA8452Q_Arduino_Library GitHub repository (click the "Download ZIP" button there). Or you can skip the detour, by clicking the button below.
The library will be downloaded as a ZIP file. To install it in Arduino, navigate to Sketch > Include Library > Add .ZIP Library.... Then select the MMA8452Q ZIP folder you just downloaded.
Our "Blynk Board Laundry Monitor" source code is also available on GitHub. Download it from there, or copy/paste from the box below:
language:c
#include <ESP8266WiFi.h>
#include <BlynkSimpleEsp8266.h>
#include <Wire.h> // Must include Wire library for I2C
#include <SparkFun_MMA8452Q.h> // Includes the SFE_MMA8452Q library
#include <Adafruit_NeoPixel.h>

//////////
// WiFi //
////////// // Enter your WiFi credentials here:
const char WiFiSSID[] = "WiFiNetworkName";
const char WiFiPSWD[] = "WiFiPassword";

///////////
// Blynk //
///////////             // Your Blynk auth token here
const char BlynkAuth[] = "0a1b2c3d4e5f";
bool notifyFlag = false;
#define VIRTUAL_ENABLE_PUSH     V0
#define VIRTUAL_SHAKE_THRESHOLD V1
#define VIRTUAL_START_TIME      V2
#define VIRTUAL_STOP_TIME       V3
#define VIRTUAL_LCD             V4
#define VIRTUAL_SHAKE_VALUE     V5
WidgetLCD lcd(VIRTUAL_LCD);
bool pushEnabled = false;
void printLaundryTime(void);

/////////////////////
// Shake Detection //
/////////////////////
unsigned int shakeThreshold = 50;
unsigned int shakeStartTimeHysteresis = 1000;
unsigned int shakeStopTimeHysteresis = 10;
unsigned long shakeStateChangeTime = 0;
unsigned long shakeStartTime = 0;
bool loadTimer = true;

enum {
  NO_SHAKING_LONG, // Haven't been shaking for a long time
  NO_SHAKING,  // Hasn't been any shaking
  PRE_SHAKING, // Started shaking, pre-hysteresis
  SHAKING,     // Currently shaking
  POST_SHAKING // Stopped shaking, pre-hysteresis
} shakingState = NO_SHAKING;

// Possible return values from the shake sensor
enum sensorShakeReturn {
  SENSOR_SHAKING,
  SENSOR_NOT_SHAKING,
  SENSOR_NOT_READY
};
sensorShakeReturn checkShake(void);
void shakeLoop(void);

////////////////////////////
// MMA8452Q Accelerometer //
////////////////////////////
MMA8452Q accel;
int16_t lastX, lastY, lastZ;
void initAccel(void);

//////////////////////////
// Hardware Definitions //
//////////////////////////
const int LED_PIN = 5;
const int RGB_PIN = 4;
Adafruit_NeoPixel rgb = Adafruit_NeoPixel(1, RGB_PIN, NEO_GRB + NEO_KHZ800);
void setLED(uint8_t red, uint8_t green, uint8_t blue);

void setup()
{
  Serial.begin(9600);

  pinMode(LED_PIN, OUTPUT);
  digitalWrite(LED_PIN, LOW); // Turn off blue LED
  rgb.begin(); // Set up WS2812
  initAccel(); // Set up accelerometer
  setLED(0, 0, 32); // LED blue

  // Initialize Blynk, and wait for a connection before doing anything else
  Serial.println("Connecting to WiFi and Blynk");
  Blynk.begin(BlynkAuth, WiFiSSID, WiFiPSWD);
  while (!Blynk.connected())
    Blynk.run();
  Serial.println("Blynk connected! Laundry monitor starting.");
  setLED(0, 32, 0); // LED green
}

void loop()
{
  shakeLoop(); // Check if we're shaking, and update variables accordingly
  Blynk.run(); // Blynk run as much as possible
}

bool firstConnect = true;
BLYNK_CONNECTED()
{
  if (firstConnect) // When we first connect to Blynk
  {
    // Two options here. Either sync values from phone to Blynk Board:
    //Blynk.syncAll(); // Uncomment to enable.
    // Or set phone variables to default values of the globals:
    Blynk.virtualWrite(VIRTUAL_SHAKE_THRESHOLD, shakeThreshold);
    Blynk.virtualWrite(VIRTUAL_STOP_TIME, shakeStopTimeHysteresis);
    Blynk.virtualWrite(VIRTUAL_START_TIME, shakeStartTimeHysteresis);
    Blynk.virtualWrite(VIRTUAL_ENABLE_PUSH, pushEnabled);

    // Print a splash screen:
    lcd.clear();
    lcd.print(0, 0, "Laundry Monitor ");
    lcd.print(0, 1, "     Ready      ");
  }
}

BLYNK_WRITE(VIRTUAL_ENABLE_PUSH)
{
  int enable = param.asInt();
  if (enable > 0)
  {
    pushEnabled = true;
    Serial.println("Push notification enabled");
  }
  else
  {
    pushEnabled = false;
    Serial.println("Push notification disabled");
  }
}

BLYNK_WRITE(VIRTUAL_SHAKE_THRESHOLD)
{
  int inputThreshold = param.asInt();

  shakeThreshold = constrain(inputThreshold, 1, 2048);

  Serial.println("Shake threshold set to: " + String(shakeThreshold));
}

BLYNK_WRITE(VIRTUAL_START_TIME)
{
  int inputStartTime = param.asInt();

  if (inputStartTime <= 0) inputStartTime = 1;
  shakeStartTimeHysteresis = inputStartTime;

  Serial.println("Shake start time set to: " + String(shakeStartTimeHysteresis) + " ms");
}

BLYNK_WRITE(VIRTUAL_STOP_TIME)
{
  int inputStopTime = param.asInt();

  if (inputStopTime <= 0) inputStopTime = 1;
  shakeStopTimeHysteresis = inputStopTime;

  Serial.println("Shake stop time set to: " + String(shakeStopTimeHysteresis) + " seconds");
}

void printLaundryTime(void)
{
  unsigned long runTime = millis() - shakeStartTime;
  int runSeconds = (runTime / 1000) % 60;
  int runMinutes = ((runTime / 1000) / 60) % 60;
  int runHours = ((runTime / 1000) / 60 ) / 60;

  // Create a string like HHHH:MM:SS
  String runTimeString = "   " + String(runHours) + ":";
  if (runMinutes < 10) runTimeString += "0"; // Leading 0 minutes
  runTimeString += String(runMinutes) + ":";
  if (runSeconds < 10) runTimeString += "0"; // Leading 0 seconds
  runTimeString += String(runSeconds);

  // Fill out the rest of the string to 16 chars
  int lineLength = runTimeString.length();
  for (int i=lineLength; i<16; i++)
  {
    runTimeString += " ";
  }

  if (shakingState == PRE_SHAKING)
    lcd.print(0, 0, "Laundry starting");
  else if (shakingState == SHAKING)
    lcd.print(0, 0, "Laundry running ");
  else if (shakingState == NO_SHAKING)
    lcd.print(0, 0, "Laundry stopping");
  else if (shakingState == NO_SHAKING_LONG)
    lcd.print(0, 0, "Laundry done!   ");
  lcd.print(0, 1, runTimeString);
}

void shakeLoop(void)
{
  sensorShakeReturn sensorState = checkShake();
  if (sensorState == SENSOR_SHAKING) // If the sensor is shaking
  {
    switch (shakingState)
    {
    case NO_SHAKING_LONG:
    case NO_SHAKING: // If we haven't been shaking
      setLED(32, 0, 32); // LED purple
      shakingState = PRE_SHAKING; // Set mode to pre-shaking
      shakeStateChangeTime = millis(); // Log state change time
      if (loadTimer)
      {
        loadTimer = false;
        shakeStartTime = millis(); // Log time we started shaking
      }
      printLaundryTime();
      break;
    case PRE_SHAKING: // If we're pre-hysteresis shaking
      if (millis() - shakeStateChangeTime >= shakeStartTimeHysteresis)
      { // If we've passed hysteresis time
        shakingState = SHAKING; // Set mode to shaking
        digitalWrite(LED_PIN, HIGH); // Turn blue LED on
        Serial.println("Shaking!");
        notifyFlag = true; // Flag that we need to notify when shaking stops
        setLED(32, 0, 0); // LED red
      }
      break;
    case SHAKING: // If we're already shaking
      printLaundryTime(); // Update laundry timer
      break; // Do nothing
    case POST_SHAKING: // If we didn't stop shaking before hysteresis
      shakingState = SHAKING; // Go back to shaking
      break;
    }
  }
  else if (sensorState == SENSOR_NOT_SHAKING) // If the sensor is not shaking
  {
    switch (shakingState)
    {
    case NO_SHAKING_LONG: // If we haven't been shaking for a long time
      break; // Do nothing
    case NO_SHAKING: // If we haven't been shaking
      if (millis() - shakeStateChangeTime >= (shakeStopTimeHysteresis * 1000))
      { // Check if it's been a long time
        setLED(0, 32, 0); // Turn LED green
        shakingState = NO_SHAKING_LONG;
        if (notifyFlag == true) // If notify flag was set during shaking
        {
          loadTimer = true;
          printLaundryTime(); // Update LCD
          notifyFlag = false; // Clear notify flag
          if (pushEnabled) // If push is enabled
            Blynk.notify("Washer/dryer is done!"); // Notify!
        }
      }
      break;
    case PRE_SHAKING: // If we're pre-hysteresis shaking
      shakingState = NO_SHAKING; // Go back to no shaking
      setLED(0, 32, 0);
      break;
    case SHAKING: // If we're already shaking
      shakingState = POST_SHAKING; // Go to hysteresis cooldown
      shakeStateChangeTime = millis();
      break; // Do nothing
    case POST_SHAKING: // If we're in the shake cooldown state
      if (millis() - shakeStateChangeTime >= shakeStartTimeHysteresis)
      {
        digitalWrite(5, LOW); // LED off
        shakingState = NO_SHAKING;
        printLaundryTime();
        setLED(32, 16, 0);
        Serial.println("Stopped.");
      }
      break;
    }
  }
}

sensorShakeReturn checkShake(void)
{
  static unsigned long lastShakeCheck = 0;
  float shake = 0;
  if (accel.available()) // If new accel data is available
  {
    int16_t x, y, z;

    accel.read(); // read the data in
    x = accel.x;
    y = accel.y;
    z = accel.z;

    // To determine if we're shaking, compare the sum of
    // x,y,z accels to the sum of the previous accels.
    shake = abs(x + y + z - lastX - lastY - lastZ);

    // Write the value to Blynk:
    Blynk.virtualWrite(VIRTUAL_SHAKE_VALUE, shake);

    // Update previous values:
    lastX = x;
    lastY = y;
    lastZ = z;
  }
  else // If sensore didn't have new data
  { // Return not ready
    return SENSOR_NOT_READY;
  }
  // If shake value exceeded threshold
  if (shake >= shakeThreshold)
    return SENSOR_SHAKING; // Return "shaking"
  else
    return SENSOR_NOT_SHAKING; // Or return "not shaking"
}

void initAccel(void)
{
  // Use a slow update rate to throttle the shake sensor.
  // ODR_6 will set the accelerometer's update rate to 6Hz
  // Use +/-2g scale -- the lowest -- to get most sensitivity
  accel.init(SCALE_2G, ODR_6); // Initialize accelerometer

  while (!accel.available()) // Wait for data to be available
    yield(); // Let the system do other things
  accel.read(); // Read data from accel
  lastX = accel.x; // Initialize last values
  lastY = accel.y;
  lastZ = accel.z;
}

void setLED(uint8_t red, uint8_t green, uint8_t blue)
{
  rgb.setPixelColor(0, rgb.Color(red, green, blue));
  rgb.show();
}
Before uploading, however, you'll need to adjust a few strings.
Near the top of the sketch, you'll find a couple string constants named WiFiSSID and WiFiPSWD. Change the WiFiNetworkName and WiFiPassword values to match your WiFi network name (SSID) and password.
language:c
const char WiFiSSID[] = "WiFiNetworkName";
const char WiFiPSWD[] = "WiFiPassword";
Next, you'll need to configure the BlynkAuth string to match your Blynk auth token. You can find this in the settings section of your Blynk project -- click the hexagon-shaped "nut" icon in the upper-right.
Use the E-Mail feature to send yourself a copy of the auth token, which you can copy and paste into the code:
language:c
const char BlynkAuth[] = "0a1b2c3d4e5f..."
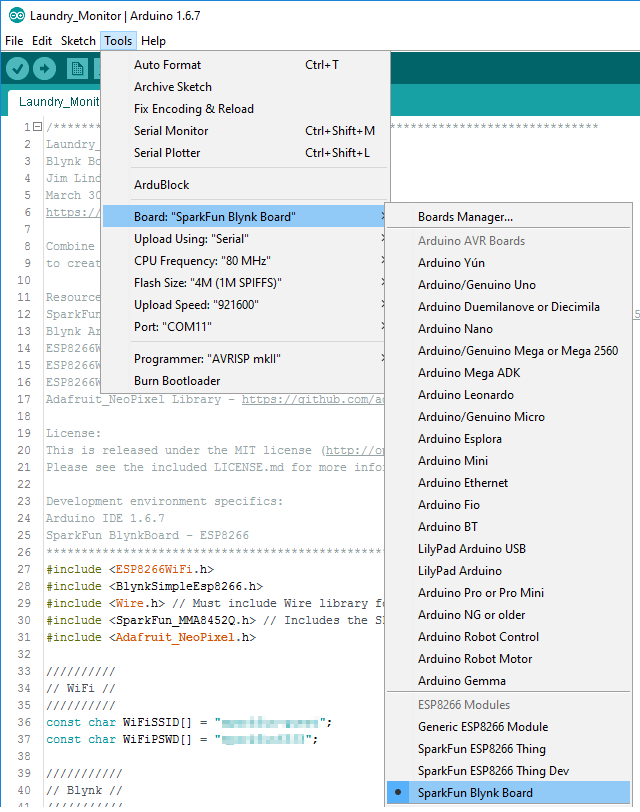
Finally, upload the code -- making sure your serial port is correctly selected and the board type is set to SparkFun Blynk Board.
Once you've uploaded the code, set up your Blynk project, and connected the hardware. You should be all set to monitor your laundry machines!
You may want to test the apparatus out with some manual shaking first. Aside from the LCD and gauge widgets, the Blynk Board's RGB LED should also relay information about the laundry monitor's state.
| LED Color | State |
|---|---|
| Blue | Board initializing, connecting to WiFi/Blynk. |
| Green | Monitor primed - laundry inactive. |
| Purple | Preliminary shakes detected. "Start time" hasn't been fully triggered yet. |
| Red | Laundry machine active! |
| Orange | Preliminary laundry stoppage. No shaking, but the full "stop time" hasn't elapsed yet. |
Once the board connects to WiFi and Blynk, the LED should turn green. As you begin to shake the sensor it should turn purple. Continuing to shake beyond the "start time" settings should turn the LED red, and it will remain red as long as you continue shaking above the threshold.
Once the shaking stops, the LED should turn orange. And as long as the shaking stays below the threshold for the set "stop time" setting, the LED will eventually turn back to green.
When the LED turns from orange to green, the Blynk Board will send a notification -- assuming the "Enable Push" button is ON.
Continue shaking the sensor until you get a feel for how all three the sliders affect the board's state.
Load up your laundry, add your detergent, and set the laundry monitor up on top of your appliance. Use this first load to gauge some of the time and threshold settings that need adjusting.

While the machine is rocking, you should see the "shakiness" gauge widget doing some rocking of its own. Tune the threshold slider up or down so it only triggers when the machine is running. Messages on the LCD should tell you whether or not the Blynk Board thinks your laundry is running.
Watch for any "fake stops", and turn the "Stop Time" slider up accordingly. If you feel like everything's set where it needs to be, turn the "Enable" button on, and go take care of other household needs. When your machine stops shaking, your phone should let you know!
You can find the code from this project, as well as more examples in our Blynk Board GitHub repository.
For more Blynk documentation, check out the docs section of Blynk.cc. Or check out their Blynk Arduino library GitHub repository to learn more about the Blynk Arduino API.
Looking for another project? More Blynk stuff?! Check out some of these tutorials.
learn.sparkfun.com | CC BY-SA 3.0 | SparkFun Electronics | Niwot, Colorado