Arduino Weather Shield Hookup Guide V12
Contributors:
 Nate, santaimpersonator,
  SparkFro
Nate, santaimpersonator, SparkFro 
Example Firmware - Basic
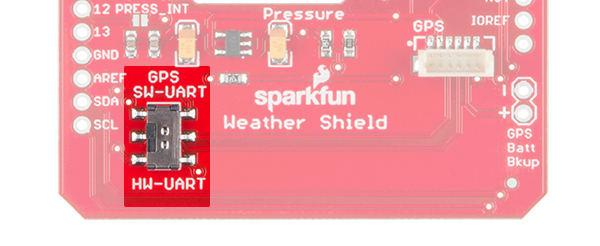
Before uploading code to your Arduino with the Weather Shield attached, make sure the GPS UART switch is in the SW-UART position. Having the switch in the opposite position connects the GPS lines to the USB lines and may cause errors while uploading.
Open the Weather_Shield_Basic_V12.ino sketch from the Firmware folder or copy and paste the code below into the Arduino IDE:
language:c
/*
 Weather Shield Example
 By: Nathan Seidle
 SparkFun Electronics
 Date: June 10th, 2016
 License: This code is public domain but you buy me a beer if you use this and we meet someday (Beerware license).

 This example prints the current humidity, air pressure, temperature and light levels.

 The weather shield is capable of a lot. Be sure to checkout the other more advanced examples for creating
 your own weather station.

 Updated by Joel Bartlett
 03/02/2017
 Removed HTU21D code and replaced with Si7021
 */

#include <Wire.h> //I2C needed for sensors
#include "SparkFunMPL3115A2.h" //Pressure sensor - Search "SparkFun MPL3115" and install from Library Manager
#include "SparkFun_Si7021_Breakout_Library.h" //Humidity sensor - Search "SparkFun Si7021" and install from Library Manager

MPL3115A2 myPressure; //Create an instance of the pressure sensor
Weather myHumidity;//Create an instance of the humidity sensor

//Hardware pin definitions
//-=-=-=-=-=-=-=-=-=-=-=-=-=-=-=-=-=-=-=-=-=-=-=-=-=-=-=-=
const byte STAT_BLUE = 7;
const byte STAT_GREEN = 8;

const byte REFERENCE_3V3 = A3;
const byte LIGHT = A1;
const byte BATT = A2;

//Global Variables
//-=-=-=-=-=-=-=-=-=-=-=-=-=-=-=-=-=-=-=-=-=-=-=-=-=-=-=-=
long lastSecond; //The millis counter to see when a second rolls by

void setup()
{
  Serial.begin(9600);
  Serial.println("Weather Shield Example");

  pinMode(STAT_BLUE, OUTPUT); //Status LED Blue
  pinMode(STAT_GREEN, OUTPUT); //Status LED Green

  pinMode(REFERENCE_3V3, INPUT);
  pinMode(LIGHT, INPUT);

  //Configure the pressure sensor
  myPressure.begin(); // Get sensor online
  myPressure.setModeBarometer(); // Measure pressure in Pascals from 20 to 110 kPa
  myPressure.setOversampleRate(7); // Set Oversample to the recommended 128
  myPressure.enableEventFlags(); // Enable all three pressure and temp event flags

  //Configure the humidity sensor
  myHumidity.begin();

  lastSecond = millis();

  Serial.println("Weather Shield online!");
}

void loop()
{
  //Print readings every second
  if (millis() - lastSecond >= 1000)
  {
    digitalWrite(STAT_BLUE, HIGH); //Blink stat LED

    lastSecond += 1000;

    //Check Humidity Sensor
    float humidity = myHumidity.getRH();

    if (humidity == 998) //Humidty sensor failed to respond
    {
      Serial.println("I2C communication to sensors is not working. Check solder connections.");

      //Try re-initializing the I2C comm and the sensors
      myPressure.begin();
      myPressure.setModeBarometer();
      myPressure.setOversampleRate(7);
      myPressure.enableEventFlags();
      myHumidity.begin();
    }
    else
    {
      Serial.print("Humidity = ");
      Serial.print(humidity);
      Serial.print("%,");
      float temp_h = myHumidity.getTempF();
      Serial.print(" temp_h = ");
      Serial.print(temp_h, 2);
      Serial.print("F,");

      //Check Pressure Sensor
      float pressure = myPressure.readPressure();
      Serial.print(" Pressure = ");
      Serial.print(pressure);
      Serial.print("Pa,");

      //Check tempf from pressure sensor
      float tempf = myPressure.readTempF();
      Serial.print(" temp_p = ");
      Serial.print(tempf, 2);
      Serial.print("F,");

      //Check light sensor
      float light_lvl = get_light_level();
      Serial.print(" light_lvl = ");
      Serial.print(light_lvl);
      Serial.print("V,");

      //Check batt level
      float batt_lvl = get_battery_level();
      Serial.print(" VinPin = ");
      Serial.print(batt_lvl);
      Serial.print("V");

      Serial.println();
    }

    digitalWrite(STAT_BLUE, LOW); //Turn off stat LED
  }

  delay(100);
}

//Returns the voltage of the light sensor based on the 3.3V rail
//This allows us to ignore what VCC might be (an Arduino plugged into USB has VCC of 4.5 to 5.2V)
float get_light_level()
{
  float operatingVoltage = analogRead(REFERENCE_3V3);

  float lightSensor = analogRead(LIGHT);

  operatingVoltage = 3.3 / operatingVoltage; //The reference voltage is 3.3V

  lightSensor = operatingVoltage * lightSensor;

  return (lightSensor);
}

//Returns the voltage of the raw pin based on the 3.3V rail
//This allows us to ignore what VCC might be (an Arduino plugged into USB has VCC of 4.5 to 5.2V)
//Battery level is connected to the RAW pin on Arduino and is fed through two 5% resistors:
//3.9K on the high side (R1), and 1K on the low side (R2)
float get_battery_level()
{
  float operatingVoltage = analogRead(REFERENCE_3V3);

  float rawVoltage = analogRead(BATT);

  operatingVoltage = 3.30 / operatingVoltage; //The reference voltage is 3.3V

  rawVoltage = operatingVoltage * rawVoltage; //Convert the 0 to 1023 int to actual voltage on BATT pin

  rawVoltage *= 4.90; //(3.9k+1k)/1k - multiple BATT voltage by the voltage divider to get actual system voltage

  return (rawVoltage);
}
Open the Serial Monitor. You should see the following output:
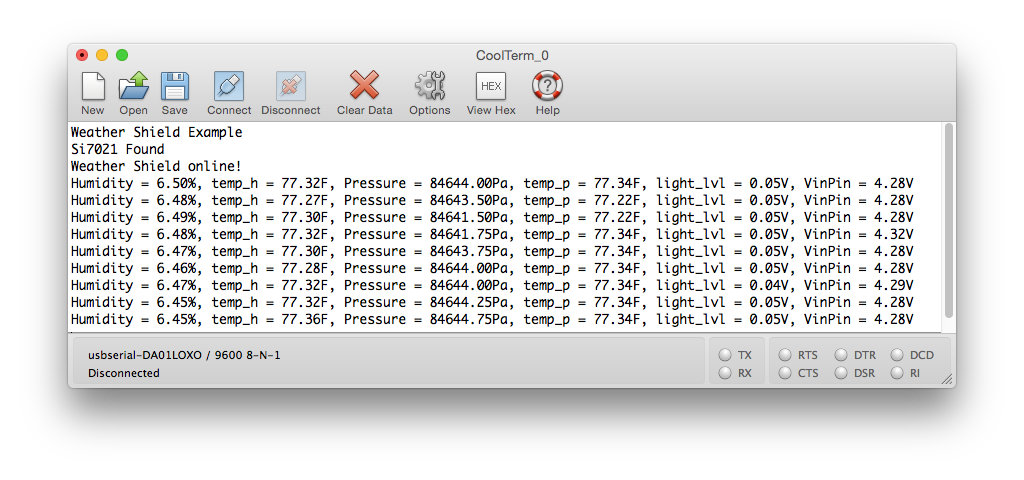
Put your hand over the small clear device labeled 'Light', and watch the light level change to 0. Blow lightly on the humidity sensor, and watch the humidity change.