Weather Shield Hookup Guide
This Tutorial is Retired!
This tutorial covers concepts or technologies that are no longer current. It's still here for you to read and enjoy, but may not be as useful as our newest tutorials.
View the updated tutorial: Arduino Weather Shield Hookup Guide V12
 Nate
Nate 
Example with GPS
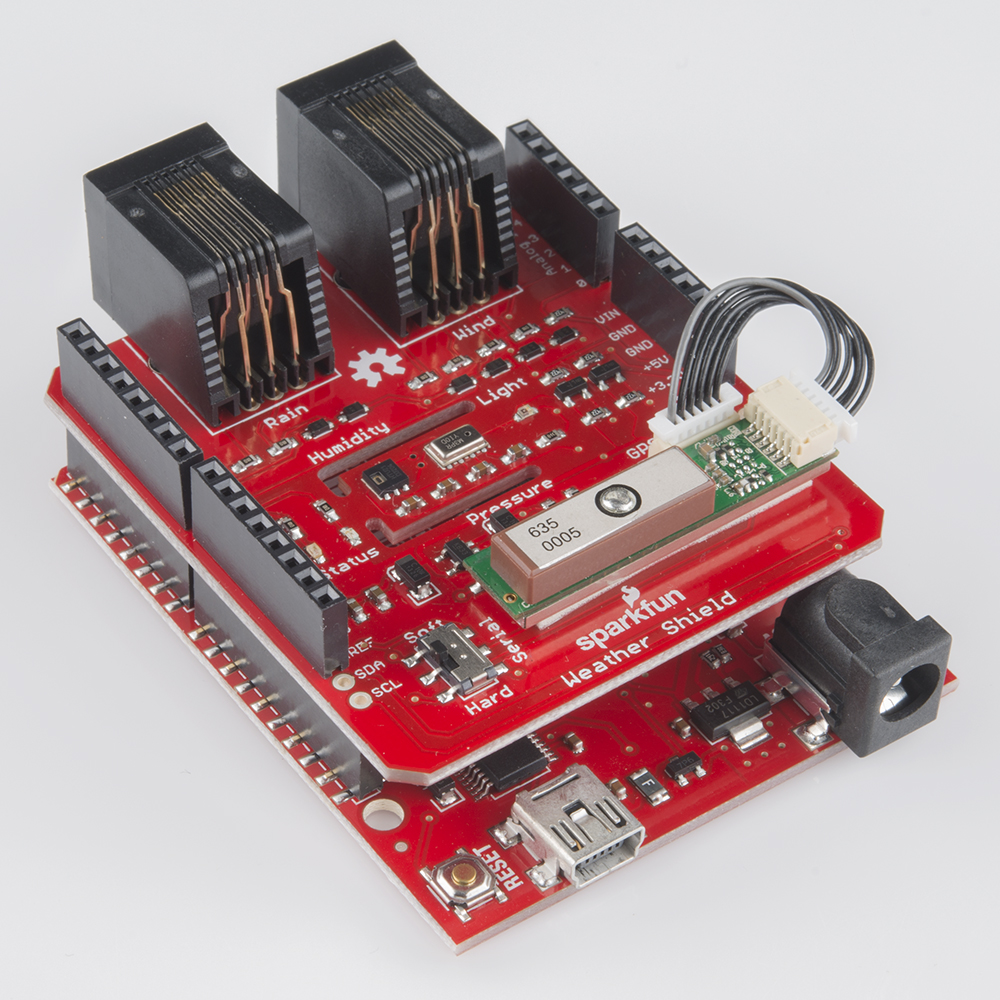
Attach the GP-635T GPS module using the short cable. To secure the module, there is space on the shield to attach the module using double-stick tape.

There is a switch labeled Serial on the shield. This is to select which pins on the Arduino to connect the GPS to. In almost all cases the switch should be set to 'Soft'. This will attach the GPS serial pins to digital pins 5 (TX from the GPS) and 4 (RX into the GPS).
Grab the GPS example sketch that demonstrates using the GP-635T with all the other sensors. Load it onto your Arduino, and open the serial monitor at 9600. You should see output similar to the following:
$,winddir=-1,windspeedmph=nan,humidity=28.2,tempf=76.1,rainin=0.00,dailyrainin=0.00,pressure=81355.00,batt_lvl=4.05,light_lvl=3.05,lat=40.018054,lat=-105.282577,altitude=1647.40,sats=10,date=11/16/2013,time=20:00:44,#

$,winddir=-1,windspeedmph=nan,humidity=28.2,tempf=76.1,rainin=0.00,dailyrainin=0.00,pressure=81358.00,batt_lvl=4.07,light_lvl=3.05,lat=40.018054,lat=-105.282577,altitude=1647.40,sats=10,date=11/16/2013,time=20:00:45,#

$,winddir=-1,windspeedmph=nan,humidity=28.2,tempf=76.1,rainin=0.00,dailyrainin=0.00,pressure=81358.25,batt_lvl=4.08,light_lvl=3.05,lat=40.018054,lat=-105.282585,altitude=1647.40,sats=10,date=11/16/2013,time=20:00:46,#
Note: The batt_lvl is indicating 4.08V. This is correct and is the actual voltage read from the Arduino powered over USB. The GPS module will add 50-80mA to the overall power consumption. If you are using a long or thin USB cable you may see significant voltage drop similar to this example. There is absolutely no harm in this! The Weather Shield runs at 3.3V and the Arduino will continue to run just fine down to about 3V. The reading is very helpful for monitoring your power source (USB, battery, solar, etc).
This example demonstrates how you can get location, altitude, and time from the GPS module. This would be helpful with weather stations that are moving such as balloon satellites, AVL, package tracking, and even static stations where you need to know precise altitude or timestamps.