Using SparkFun Edge Board with Ambiq Apollo3 SDK
 Liquid Soulder
 Bash, Make, and Python -- Oh My
You can learn a lot about embedded software development without ever using command line tools but for brand new systems (like the Apollo3), GUIs and Integrated Development Environments (IDEs) just haven't been built yet. If you're a veteran developer you'll feel right at home. If you're new to this whole idea don't worry -- after you go through this process you'll have a better idea of the steps IDEs take to add convenience. For this tutorial we will standardize our environment so that everyone can follow the same instructions.
Our standardized setup will assume that we are using a Bash shell that has access to Make and Python3.
Bash
Bash is a command line tool for unix-like operating systems. Windows users should install one of the several options listed below to emulate bash.
- Unix, Linux, or similar: chances are good that your shell is bash. If it is not bash should be an option.
- Mac OS X: the Terminal program uses bash by default.
Windows: you will need a Bash shell that has access to your filesystem. Here are several options:
- Git Bash: the preferred option for this tutorial. Download and install here or by clicking on the button below:
- MSYS, MSYS2, WinGW, CygWin: These are some other possible bash shells
- Git Bash: the preferred option for this tutorial. Download and install here or by clicking on the button below:
Make
Make is an automated build tool - you give it information about source locations and dependencies and it will automatically call a sequence of commands to compile or re-compile your project based only on the changed files. This can speed up compilation significantly in large projects. Make is a time-tested tool.
- Unix, Linux, or similar: most unix-like OS's come with Make. Try typing make into your shell to find out. If it does not exist check your package manager's documentation to find out how to get Make.
- Mac OS X: you can get Make on your Mac by installing developer command line tools. Try it out by typing make in your shell (Terminal).
Windows: sadly Windows seems to have been left out from the Make crowd. The GNU folk are happy to help by providing the GNU MCU Eclipse Windows Build Tools. Here's how to install them:
- Download the latest release from GitHub here (choose the 32-bit or 64-bit option correctly for your system) or click on the button below to be redirected to the download location:
- Extract the contents of the .zip into a temporary folder.
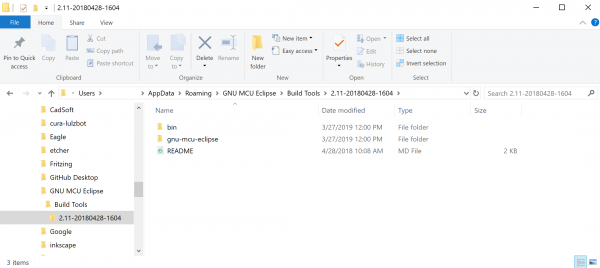
- Within that folder locate the specific release version folder (should be under a directory structure like temp_folder/GNU MCU Eclipse/Build Tools/ and should have a string of numbers indicating the release version.)
- Copy that folder underneath the path
%userprofile%\AppData/Roaming/GNU MCU Eclipse/Build Tools. (You can create the higher level directories if needed. - You should now have a path like
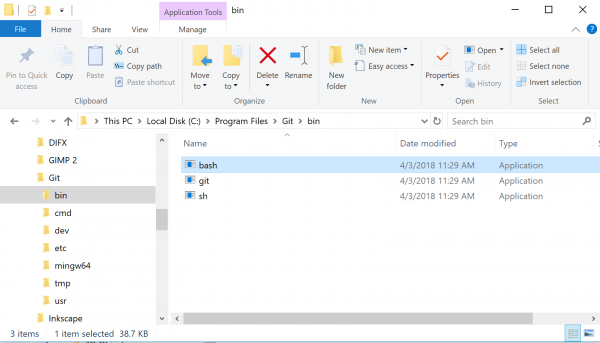
%userprofile%/AppData/Roaming/GNU MCU Eclipse/Build Tools/%release_version_number%/binin which you will find the executable make.exe.
 Need a better look? Click the image!
At this point, if you tried to use the make command in your shell it would not work because your computer isn't aware of that executable file. We will need to add the path to it to the
PATHenvironment variable.- Here's a great tutorial for editing the PATH on many versions of Windows.
- Add the path to the Make executable in your PATH
- Realize that you can change either your system or user PATH -- both will work.
Restart your bash shell and type make to check if your computer can now access the command.
- Download the latest release from GitHub here (choose the 32-bit or 64-bit option correctly for your system) or click on the button below to be redirected to the download location:

Python3 and Packages
Some of the scripts used in the SDK as well as those that upload new code over serial require Python3 and some additional packages.
Check if you have Python3 available in your shell by entering python3. If all is well you'll see the Python version (we have 3.7.2) and the REPL. Enter quit() to get back to the command line.
- If you don't have Python3 then you can follow the instructions for your particular system on the Python website. Pay attention to the install location so that you can add it to your PATH if needed.
- Once Python3 is installed make sure it is accessible from your shell - if it is not then follow the above process to add the location of the executable to your PATH.
- With Python3 installed we will also need 'pycryptodome' to generate secure bootloader images and 'pyserial' to upload them over the UART. If you haven't used pip before, head on over to the pip documentation page here.
- TL;DR: try
pip3 install pycryptodomeandpip3 install pyserialfrom your shell
- TL;DR: try
Things to Note:
Be sure that you are installing these packages to the correct Python executable -- the one that will be used when you call
python3from your bash shell. One trick to do this is to usepip3by explicitly giving the path to the pip that you installed along with your Python3 install (in the 'scripts' folder)If you're on Windows remember that you may need to rename the Python executable as 'python3.exe'
Finally, let's just triple-check that you can run
python3as a command from your shell.
With Bash, Make, and Python3 all set up you're good to move on! Fortunately all that foundation laying is the hard part. Next all we need to do is install the compiler toolchain: Ambiq's SDK and the SparkFun Edge Board Support Package.