Using pcDuino's WiFi Dongle With the Pi
This Tutorial is Retired!
This tutorial covers concepts or technologies that are no longer current. It's still here for you to read and enjoy, but may not be as useful as our newest tutorials.
 jimblom
Edit interfaces
There are two configuration files we need to edit to set up WiFi:
- /etc/network/interfaces -- Configures DHCP (or static) and tells the wireless utility where to look for your authentication settings.
- /etc/wpa_supplicant/wpa_supplicant.conf -- Stores your wireless network's SSID and authentication settings.
To edit both of these files we'll use Nano, Raspbian's default terminal text editor.
Open up LXTerminal to begin. Then, to open interfaces with the Nano editor, enter this command:
pi@raspberrypi ~ $ sudo nano /etc/network/interfaces
That command will open interfaces in Nano. By default it should look like this:

First delete or (if you're a digital packrat) comment out the bottom three lines (iface wlan0 inet manual, wpa-roam /etc/wpa_supplicant/wpa_supplicant.conf, and iface default inet dhcp).
Next, following line 4 (iface eth0 inet dhcp), add these six lines:
auto wlan0
iface wlan0 inet dhcp
    wireless mode managed
    wireless essid any
    wpa-driver wext
    wpa-conf /etc/wpa_supplicant/wpa_supplicant.conf
All done! Save interfaces by pressing CTRL+O, keep the file name the same when it asks. Then exit with CTRL+X. Your new interfaces files should look like this:
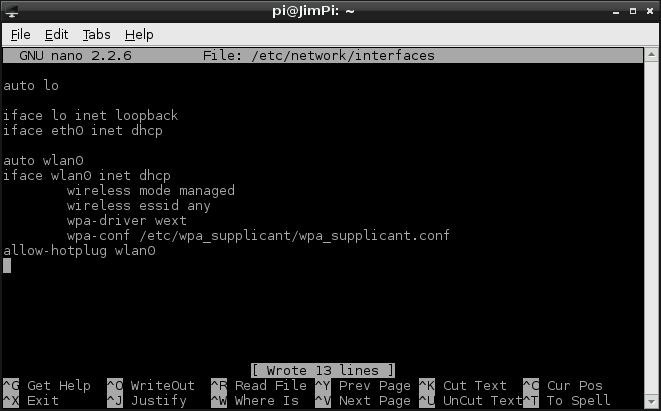
This is a fairly generic configuration that sets the Pi up to receive an IP address dynamically, through DHCP.
If your network requires that you statically assign an IP you'll need to use something like this instead:
iface wlan0 inet static
    address 192.168.0.101
    netmask 255.255.255.0
    network 192.168.0.0
    broadcast 255.255.255.255
    gateway 192.168.0.1
    wireless mode managed
    wireless essid any
    wpa-driver wext
    wpa-conf /etc/wpa_supplicant/wpa_supplicant.conf
Make sure to modify the IP addresses to match the needs of your network.
Now that our network interface is configured, the next step is to specify the SSID and authentication parameters, which we'll do in wpa_supplicant.conf.