Using OpenSegment
Contributors:
 Nate
Nate
Serial Example
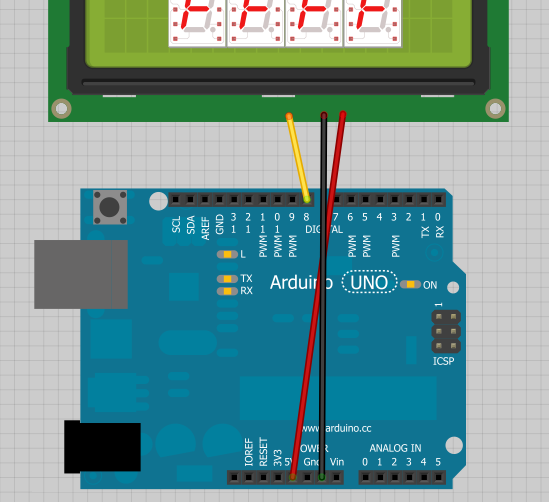
Connect 3 wires to your Arduino
Using an OpenSegment display with Arduino is very straightforward. Power the display from the 5V pin, GND, and connect the RX pin of the display to pin 8 on the Arduino.
Here is an example to get you started immediately.
Note: This example assumes you are using the latest version of the Arduino IDE on your desktop. If this is your first time using Arduino, please review our tutorial on installing the Arduino IDE.
If you have not previously installed an Arduino library, please check out our installation guide.language:c
/*
9-23-2012
Spark Fun Electronics
Nathan Seidle
This code is public domain but you buy me a beer if you use this and we meet someday (Beerware license).
Serial7Segment is an open source seven segment display.
This is example code that shows how to display basic numbers on the display.
Note: This code expects the display to be listening at 9600bps. If your display is not at 9600bps, you can
do a software or hardware reset. See the Wiki for more info:
http://github.com/sparkfun/Serial7SegmentDisplay/wiki/Special-Commands#wiki-baud
To get this code to work, attached an Serial7Segment to an Arduino Uno using the following pins:
Pin 8 on Uno (software serial TX) to RX on Serial7Segment
VIN to PWR
GND to GND
*/
#include <SoftwareSerial.h>
SoftwareSerial Serial7Segment(7, 8); //RX pin, TX pin
int cycles = 0;
void setup() {
Serial.begin(9600);
Serial.println("OpenSegment Example Code");
Serial7Segment.begin(9600); //Talk to the Serial7Segment at 9600 bps
Serial7Segment.write('v'); //Reset the display - this forces the cursor to return to the beginning of the display
}
void loop()
{
cycles++; //Counting cycles! Yay!
Serial.print("Cycle: ");
Serial.println(cycles);
char tempString[10]; //Used for sprintf
sprintf(tempString, "%4d", cycles); //Convert deciSecond into a string that is right adjusted
//sprintf(tempString, "%d", cycles); //Convert deciSecond into a string that is left adjusted (requires digit 1 command)
//sprintf(tempString, "%04d", cycles); //Convert deciSecond into a string with leading zeros
//sprintf(tempString, "%4X", cycles); //Count in HEX, right adjusted
//int negativeCycles = cycles * -1;
//sprintf(tempString, "%4d", negativeCycles); //Shows a negative sign infront of right adjusted number
//Note: This method works well as long as your number is less than or equal to 4 digits.
//14422 will cause the display to wrap (5 digits)
//-5766 will cause the display to wrap (5 digits)
//To fix this, send a 'v' character or look at how to control the digit placement
//https://github.com/sparkfun/Serial7SegmentDisplay/wiki/Basic-Usage#wiki-cursor
Serial7Segment.print(tempString); //Send serial string out the soft serial port to the S7S
delay(10);
}
Load the above example code onto your Arduino, and watch the display count up!
You can find many more examples here on GitHub. There are sketches to show you:
- Basic counting
- Controlling the colon and dots on a display
- Changing the mode
- Fun Predator mode
- Changing the baud rate
- Doing a software serial reset
