The Great Big Guide to Paper Circuits
 Gella
Gella 
Choosing Components
Now that we've explored options for creating traces, let's talk about the components we can use with our circuits. Not all components play nice with paper circuit trace materials. For example, if you'd like to solder connections, copper tape would be a better choice than a conductive ink. Here are a few of our suggestions of components to use in your projects.
Through-Hole Components

Through-hole components with long leads (such as LEDs) can be bent with pliers into a shape that will sit flat on paper and provide more surface area to connect with the traces. Components with shorter legs (like the ATtiny85) can can be carefully bent flat with fingers or pliers.
Use With:
- Bare Conductive Electric Paint - use the paint as a cold solder joint. Here's a tutorial covering that process.
- Copper tape - use clear tape over the leads to quickly attach components, or solder directly to the copper tape.
- Conductive fabric tape - sew over leads with conductive thread or use conductive glue to attach.
SMD Components

While a little trickier to work with, surface-mount device (SMD) components are low profile and great small or flat projects such as greeting cards. You will need tweezers to place these components and a good eye to see the labels on the part itself. SMD components can be soldered to copper tape, connected by painting the pads with conductive paint, or taped onto copper tape. This tutorial from The Exploratorium's Tinkering Studio shows two methods for attaching SMD LEDs - soldering and clear tape.
Use With:
- Copper tape - solder or attach with conductive glue. Some components can also be taped over to hold them to the copper.
- Conductive paints - use superglue to attach to paper, then paint over the pads of the components to connect. Here's a great tutorial from High-Low Tech that walks through the process.
- Conductive inks - use superglue to attach to paper, being careful not to get between the ink pad and the pads of the component. Connect to ink with conductive glue or z-axis tape. This method is used in Circuit Scribe's Paperduino 2.0 project.
LilyPad Components
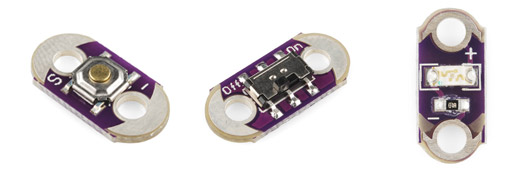
Originally made for e-textile applications, LilyPad components can work well with paper circuits because of their low profile and large conductive pads. LilyPad components work best when soldered to copper tape, but can also be attached using z-axis tape or by placing clear tape over the pads to hold them to traces. Note - if using the clear tape method, only the Button and Switch boards have large enough pads to make good contact.
Use With:
- Copper tape - soldering works best, but conductive tapes, glues, and clear tape may be suitable options.
- Fabric tape - sewing is ideal, or z-axis tape.
Chibitronics Circuit Stickers
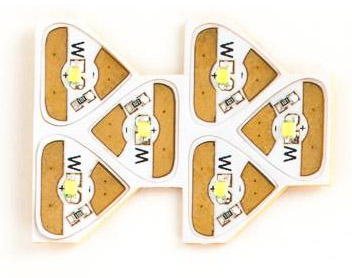
Chibitronics stickers have a conductive adhesive on them which make them ideal for paper circuit projects. They are compatible with almost all paper circuit traces, but can be more expensive than using off the shelf components.
Use With:
- Copper tape
- Conductive fabric tape
- Conductive paint
Circuit Scribe Modules
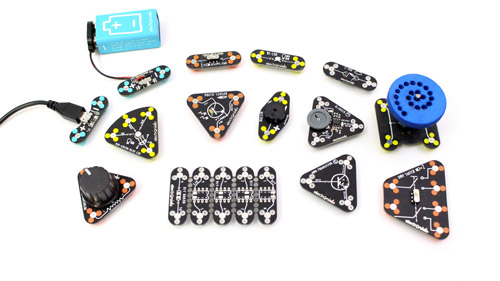
Circuit Scribe modules work differently than all the other components we've shown so far - they are magnetic. To attach to your traces, you will need a metal sheet or surface behind your paper. This is a temporary connection instead of the more permanent connections shown in this tutorial. While their size isn't ideal for small projects like greeting cards, it can be fun to create wall hangings or reconfigurable artwork with the modules.
Use With:
- Copper tape
- Conductive fabric tape
- Conductive inks