SparkFun Temperature Sensor - STTS22H (Qwiic) Hookup Guide
Examples
Example 1: Basic
Now that we've got our library installed and our hardware all hooked up, let's look at some examples.
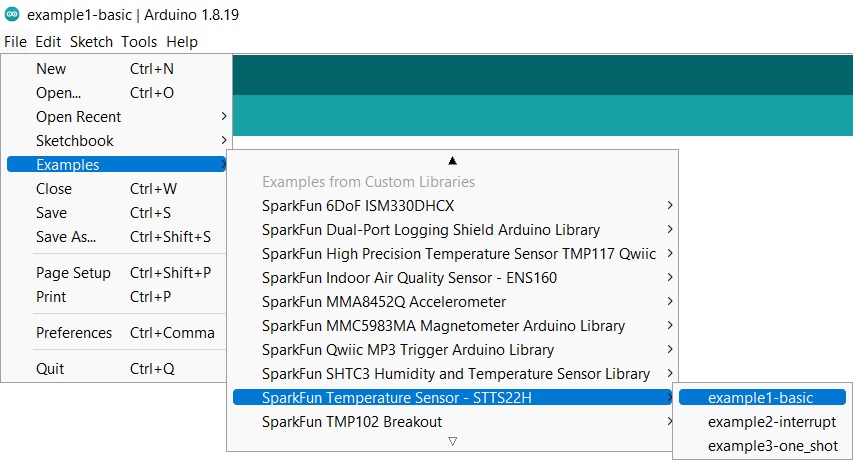
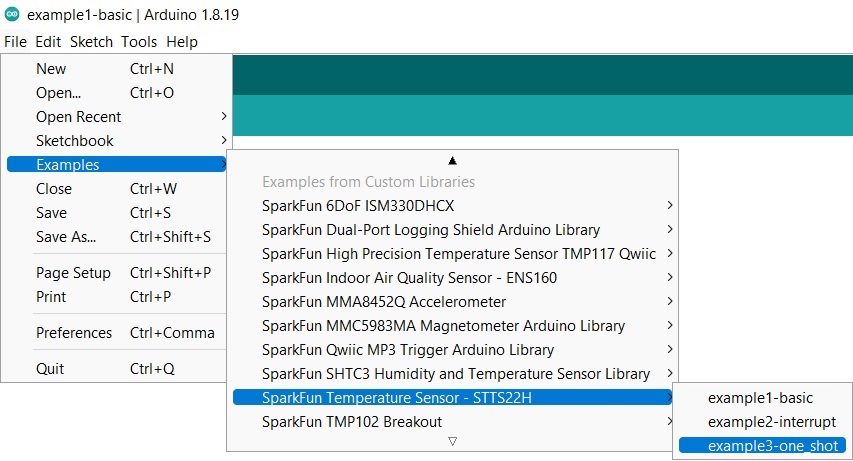
This first example just does some basic measurements. To find Example 1, go to File > Examples > SparkFun Temperature Sensor - STTS22H > example1-basic:
Or alternatively you can copy and paste the code below into a nice shiny new Arduino window:
language:c
/*
example1-basic.ino

This example shows basic data retrieval from the SparkFun Temperature Sensor - STTS22H.

Output Data Rates:

STTS22H_POWER_DOWN
STTS22H_ONE_SHOT
STTS22H_1Hz
STTS22H_25Hz
STTS22H_50Hz
STTS22H_100Hz
STTS22H_200Hz

Written by:
Elias Santistevan @ SparkFun Electronics December, 2022

Products:
   SparkFun Temperature Sensor - STTS2H              https://www.sparkfun.com/products/21262
   SparkFun Micro Temperature Sensor - STTS2H        https://www.sparkfun.com/products/21051

Repository:
     https://github.com/sparkfun/SparkFun_STTS22H_Arduino_Library

SparkFun code, firmware, and software is released under the MIT
License(http://opensource.org/licenses/MIT).

*/

#include <Wire.h>
#include "SparkFun_STTS22H.h"

SparkFun_STTS22H mySTTS;

float temp;

void setup()
{

    Wire.begin();

    Serial.begin(115200);

    if( !mySTTS.begin() )
    {
        Serial.println("Did not begin.");
        while(1);
    }

    Serial.println("Ready");

    // Other output data rates can be found in the description
    // above. To change the ODR or mode, the device must first be
    // powered down.
    mySTTS.setDataRate(STTS22H_POWER_DOWN);
    delay(10);
    mySTTS.setDataRate(STTS22H_1Hz);

    // Enables incrementing register behavior for the IC.
    // It is not enabled by default as the datsheet states and
    // is vital for reading the two temperature registers.
    mySTTS.enableAutoIncrement();

    delay(100);
}

void loop()
{

    // Only use data ready for one-shot mode or 1Hz output.
    if( mySTTS.dataReady() )
    {

        mySTTS.getTemperatureF(&temp);

        // Temperature in different units can be retrieved
        // using the following functions.

        //mySTTS.getTemperatureC(&temp);
        //mySTTS.getTemperatureK(&temp);

        Serial.print("Temp: ");
        Serial.print(temp);
        Serial.println("F");

    }

    // delay = 1/ODR
    delay(1000);

}
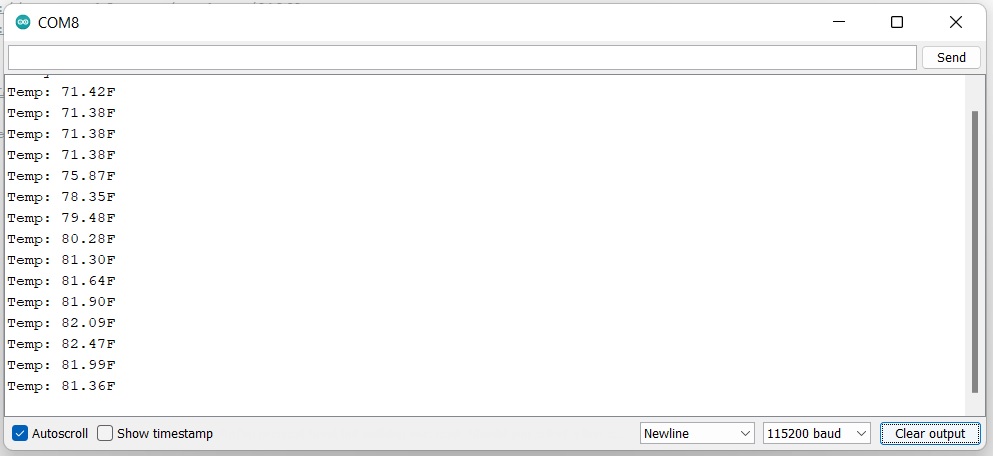
Once you're ready to go, go ahead and hit the upload button (the right facing arrow button under the "Edit" menu item). Once your code is uploaded, open the Serial Monitor and you'll see information start printing out.
Example 2: Interrupt
Example 2 can be found under File > Examples > SparkFun Temperature Sensor - STTS22H > example2-interrupt:

You can also copy the code below into a new Arduino file:
language:c
/*
example2_basic.ino

This example desmonstrates how to set temperature thresholds to trigger an interrupt.

Output Data Rates:

STTS22H_POWER_DOWN
STTS22H_ONE_SHOT
STTS22H_1Hz
STTS22H_25Hz
STTS22H_50Hz
STTS22H_100Hz
STTS22H_200Hz

Written by:
Elias Santistevan @ SparkFun Electronics December, 2022

Products:
   SparkFun Temperature Sensor - STTS2H              https://www.sparkfun.com/products/21262
   SparkFun Micro Temperature Sensor - STTS2H        https://www.sparkfun.com/products/21051

Repository:
     https://github.com/sparkfun/SparkFun_STTS22H_Arduino_Library

SparkFun code, firmware, and software is released under the MIT
License(http://opensource.org/licenses/MIT).

*/

#include <Wire.h>
#include "SparkFun_STTS22H.h"

SparkFun_STTS22H mySTTS;

float temp;

// These values are in Farenheit
float interruptHighValue = 90.5;
float interruptLowValue = 42.0;

int tempInterrupt = 2;

void setup()
{

    Wire.begin();

    Serial.begin(115200);

    pinMode(tempInterrupt, INPUT);

    if( !mySTTS.begin() )
    {
        Serial.println("Did not begin.");
        while(1);
    }

    Serial.println("Ready");

    // Other output data rates can be found in the description
    // above. To change the ODR or mode, the device must first be
    // powered down.
    mySTTS.setDataRate(STTS22H_POWER_DOWN);
    delay(10);
    mySTTS.setDataRate(STTS22H_25Hz);

    // Enables incrementing register behavior for the IC.
    // It is not enabled by default as the datsheet states and
    // is vital for reading the two temperature registers.
    mySTTS.enableAutoIncrement();


    // Set interrupts for both lower and higher thresholds.
    // Note: These functions accept Farenheit as their arguments.
    // Other functions for different units just below.
    mySTTS.setInterruptLowF(interruptLowValue);
    mySTTS.setInterruptHighF(interruptHighValue);

    //mySTTS.setInterruptLowC(interruptLowValue);
    //mySTTS.setInterruptHighC(interruptHighValue);

    //mySTTS.setInterruptLowK(interruptLowValue);
    //mySTTS.setInterruptHighK(interruptHighValue);

    delay(100);
}

void loop()
{

    // Checking if data ready is not necessary when output is set higher
    // than 1Hz.
    mySTTS.getTemperatureF(&temp);

    // Temperature in different units can be retrieved
    // using the following functions.

    //mySTTS.getTemperatureC(&temp);
    //mySTTS.getTemperatureK(&temp);

    Serial.print("Temp: ");
    Serial.print(temp);
    Serial.println("F");

    if( digitalRead(tempInterrupt) == LOW )
    {
        Serial.println("Temperature threshold");
        while(1);
    }

    // delay = 1/ODR
    delay(1000);

}
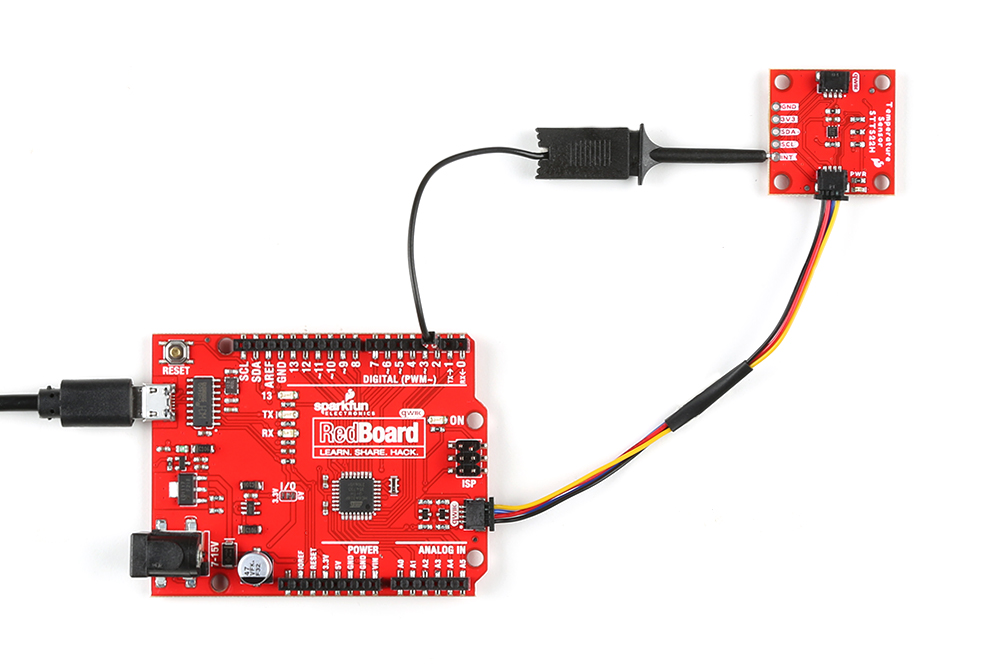
Note that depending on which processor board you are using, you may need to alter the Interrupt Pin. Since we're using a RedBoard here, our Interrupt Pin is 2 (int tempInterrupt = 2;). Also, in this example, we've used an IC hook with a pigtail to connect the Interrupt Pin to the RedBoard pin 2, but you can also solder headers to the STTS22H Temperature Sensor so you can use the interrupt pin. Your hardware hookup should look something like the following:
Once you're ready to go, go ahead and hit the upload button (the right facing arrow button under the "Edit" menu item). Once your code is uploaded, open the Serial Monitor and you'll see information start printing out.
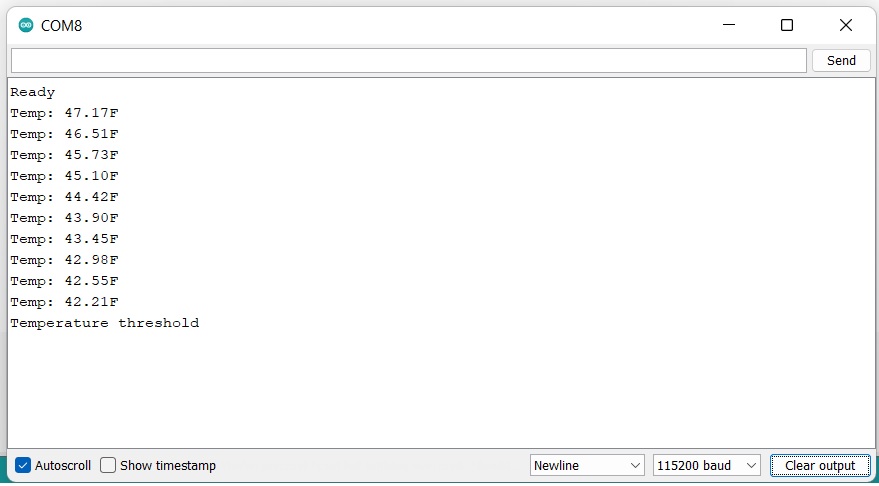
If you have a look at the code, you'll notice that we've set our upper threshhold to 90.5 degrees F, and our lower threshhold to 42 degrees F. I held the sensor in front of a heater to hit the upper threshhold:

The lower threshhold was reached by sticking the sensor in a plastic bag and then putting that plastic bag into ice water:
Example 3: One Shot
In Example 3, we're going to have a look at the One Shot functionality. To find Example 3, go to File > Examples > SparkFun Temperature Sensor - STTS22H > example3-one_shot:
Or you can copy and paste the code below into a clean Arduino sketch:
language:c
/*
example3-one_shot.ino

This example shows basic data retrieval using the "one-shot" feature i.e. - get the temp
now feature.

Output Data Rates:

STTS22H_POWER_DOWN
STTS22H_ONE_SHOT   < -------- This one.
STTS22H_1Hz
STTS22H_25Hz
STTS22H_50Hz
STTS22H_100Hz
STTS22H_200Hz

Written by:
Elias Santistevan @ SparkFun Electronics December, 2022

Products:
   SparkFun Temperature Sensor - STTS2H              https://www.sparkfun.com/products/21262
   SparkFun Micro Temperature Sensor - STTS2H        https://www.sparkfun.com/products/21051

Repository:
     https://github.com/sparkfun/SparkFun_STTS22H_Arduino_Library

SparkFun code, firmware, and software is released under the MIT
License(http://opensource.org/licenses/MIT).

*/

#include <Wire.h>
#include "SparkFun_STTS22H.h"

SparkFun_STTS22H mySTTS;

float temp;

void setup()
{

    Wire.begin();

    Serial.begin(115200);

    if( !mySTTS.begin() )
    {
        Serial.println("Did not begin.");
        while(1);
    }

    Serial.println("Ready");

    // Other output data rates can be found in the description
    // above. To change the ODR or mode, the device must first be
    // powered down.
    mySTTS.setDataRate(STTS22H_POWER_DOWN);
    delay(10);
    // Force new reading, temp sensor will power down after conversion.
    mySTTS.setDataRate(STTS22H_ONE_SHOT);

    // Enables incrementing register behavior for the IC.
    // It is not enabled by default as the datsheet states and
    // is vital for reading the two temperature registers.
    mySTTS.enableAutoIncrement();

    delay(100);
}

void loop()
{

    // Temp sensor will power down automatically after single read.
    if( mySTTS.dataReady() )
    {

        mySTTS.getTemperatureF(&temp);

        // Temperature in different units can be retrieved
        // using the following functions.

        //mySTTS.getTemperatureC(&temp);
        //mySTTS.getTemperatureK(&temp);

        Serial.print("Temp: ");
        Serial.print(temp);
        Serial.println("F");

        // Wait 10 seconds for until we initiate another read.
        delay(10000);

        // Enable another reading.
        mySTTS.setDataRate(STTS22H_ONE_SHOT);

    }

    // Demonstrative delay.
    delay(100);

}
Once you're ready to go, go ahead and hit the upload button (the right facing arrow button under the "Edit" menu item). Once your code is uploaded, open the Serial Monitor and you'll see information start printing out.

This really isn't all that exciting until you measure the current consumption!