SparkFun RFID Starter Kit Hookup Guide
 a_cavis
Example Project
As fun as it is to watch your cards pop up in the serial terminal, you'd probably like to do something with all this power.
The example sketch below scans RFID cards and compares them against trusted cards, then moves a servo to unlock the secured* item of your choice.
* Not suitable for critical applications, e.g. guarding the Hope Diamond.
In addition to your RFID Reader Kit, you will want:
- A microcontroller like the SparkFun RedBoard or the Arduino Uno.
- M/M Jumper Wires
- Breadboard
- A Servo - Larger sizes are suggested for larger locks.
- Break-Away Male Headers to solder to the board's through-holes. (If you need a soldering refresher, take a look at our through-hole soldering tutorial)
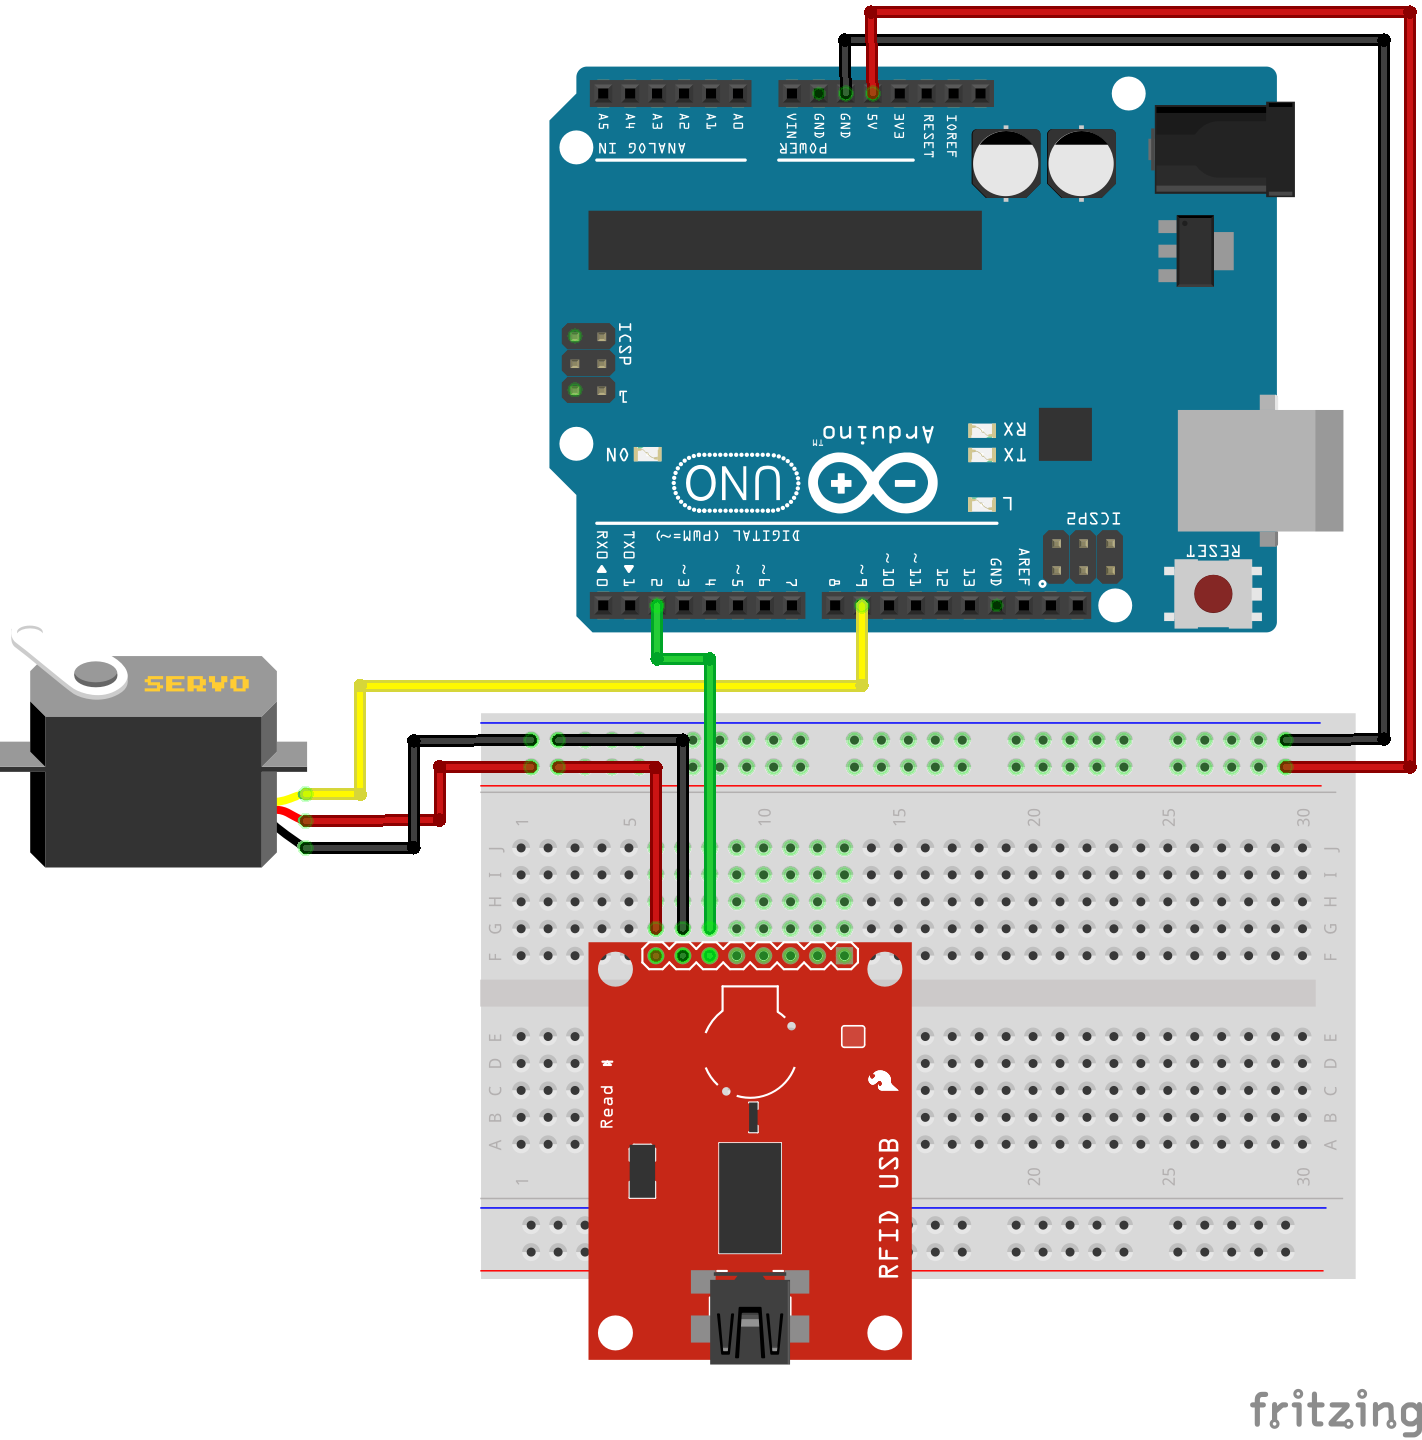
Connect the VCC, GND, and TX pins on the RFID USB Reader to the Arduino's 5V, GND, and D2 pins, and connect the servo to 5V, GND, and D9. Copy the code provided below and adjust values provided in the knownTags[][]{} array that was obtained in the simple hookup so that the Arduino recognizes your RFID tag. Upload the code, open your Serial Monitor by going to Tools > Serial Monitor, and start scanning some cards!
language:c
/*****************************
     RFID-powered lockbox

Written by: acavis, 3/31/2015
Modified: Ho YUN "Bobby" Chan @ SparkFun Electronics Inc., 11/10/2017

Inspired by & partially adapted from
http://bildr.org/2011/02/rfid-arduino/

Description: This sketch will move a servo when
a trusted tag is read with the
ID-12/ID-20 RFID module

----------HARDWARE HOOKUP----------

PINOUT FOR SERVO MOTOR
    Servo Motor ----- Arduino
    GND               GND
    Vcc               5V
    SIG               D9

PINOUT FOR SPARKFUN RFID USB READER
    Arduino ----- RFID module
    5V            VCC
    GND           GND
    D2            TX

PINOUT FOR SPARKFUN RFID BREAKOUT BOARD
    Arduino ----- RFID module
    5V            VCC
    GND           GND
    GND           FORM
    D2            D0

Optional: If using the breakout, you can also
put an LED & 330 ohm resistor between
the RFID module's READ pin and GND for
a "card successfully read" indication.

Note: Make sure to GND the FORM pin to enable the ASCII output format.

--------------------------------------------------

******************************/

#include <SoftwareSerial.h>
#include <Servo.h>

// Choose two pins for SoftwareSerial
SoftwareSerial rSerial(2, 3); // RX, TX

// Make a servo object
Servo lockServo;

// Pick a PWM pin to put the servo on
const int servoPin = 9;

// For SparkFun's tags, we will receive 16 bytes on every
// tag read, but throw four away. The 13th space will always
// be 0, since proper strings in Arduino end with 0

// These constants hold the total tag length (tagLen) and
// the length of the part we want to keep (idLen),
// plus the total number of tags we want to check against (kTags)
const int tagLen = 16;
const int idLen = 13;
const int kTags = 4;

// Put your known tags here!
char knownTags[kTags][idLen] = {
             "111111111111",
             "444444444444",
             "555555555555",
             "7A005B0FF8D6"
};

// Empty array to hold a freshly scanned tag
char newTag[idLen];

void setup() {
  // Starts the hardware and software serial ports
   Serial.begin(9600);
   rSerial.begin(9600);

   // Attaches the servo to the pin
   lockServo.attach(servoPin);

   // Put servo in locked position
   // Note: Value may need to be adjusted
   // depending on servo motor
   lockServo.write(0);

}

void loop() {
  // Counter for the newTag array
  int i = 0;
  // Variable to hold each byte read from the serial buffer
  int readByte;
  // Flag so we know when a tag is over
  boolean tag = false;

  // This makes sure the whole tag is in the serial buffer before
  // reading, the Arduino can read faster than the ID module can deliver!
  if (rSerial.available() == tagLen) {
    tag = true;
  }

  if (tag == true) {
    while (rSerial.available()) {
      // Take each byte out of the serial buffer, one at a time
      readByte = rSerial.read();

      /* This will skip the first byte (2, STX, start of text) and the last three,
      ASCII 13, CR/carriage return, ASCII 10, LF/linefeed, and ASCII 3, ETX/end of
      text, leaving only the unique part of the tag string. It puts the byte into
      the first space in the array, then steps ahead one spot */
      if (readByte != 2 && readByte!= 13 && readByte != 10 && readByte != 3) {
        newTag[i] = readByte;
        i++;
      }

      // If we see ASCII 3, ETX, the tag is over
      if (readByte == 3) {
        tag = false;
      }

    }
  }


  // don't do anything if the newTag array is full of zeroes
  if (strlen(newTag)== 0) {
    return;
  }

  else {
    int total = 0;

    for (int ct=0; ct < kTags; ct++){
        total += checkTag(newTag, knownTags[ct]);
    }

    // If newTag matched any of the tags
    // we checked against, total will be 1
    if (total > 0) {

      // Put the action of your choice here!

      // I'm going to rotate the servo to symbolize unlocking the lockbox

      Serial.println("Success!");
      lockServo.write(180);
    }

    else {
        // This prints out unknown cards so you can add them to your knownTags as needed
        Serial.print("Unknown tag! ");
        Serial.print(newTag);
        Serial.println();
    }
  }

  // Once newTag has been checked, fill it with zeroes
  // to get ready for the next tag read
  for (int c=0; c < idLen; c++) {
    newTag[c] = 0;
  }
}

// This function steps through both newTag and one of the known
// tags. If there is a mismatch anywhere in the tag, it will return 0,
// but if every character in the tag is the same, it returns 1
int checkTag(char nTag[], char oTag[]) {
    for (int i = 0; i < idLen; i++) {
      if (nTag[i] != oTag[i]) {
        return 0;
      }
    }
  return 1;
}
lockServo.write(0) to a higher value like lockServo.write(10).