SparkFun GPS Breakout - XA1110 (Qwiic) Hookup Guide
 Englandsaurus
Example Code
You should have downloaded the SparkFun I2C GPS Library in the previous step, if not, go back and click the button to download it. Within should be contained the library along with five examples. We're going to get you started with the first two examples.
Upload the following example to the microcontroller of your choice.
language:c
#include "SparkFun_I2C_GPS_Arduino_Library.h"
I2CGPS myI2CGPS; //Hook object to the library

void setup()
{
  Serial.begin(115200);
  Serial.println("GTOP Read Example");

  if (myI2CGPS.begin() == false)//Checks for succesful initialization of GPS
  {
    Serial.println("Module failed to respond. Please check wiring.");
    while (1); //Freeze!
  }
  Serial.println("GPS module found!");
}

void loop() //Writes GPS data to the Serial port with a baud rate of 115200
{
  while (myI2CGPS.available()) //available() returns the number of new bytes available from the GPS module
  {
    byte incoming = myI2CGPS.read(); //Read the latest byte from Qwiic GPS

    if(incoming == '$') Serial.println(); //Break the sentences onto new lines
    Serial.write(incoming); //Print this character
  }
}
This first example outputs the raw NMEA sentences. Which look something like this:
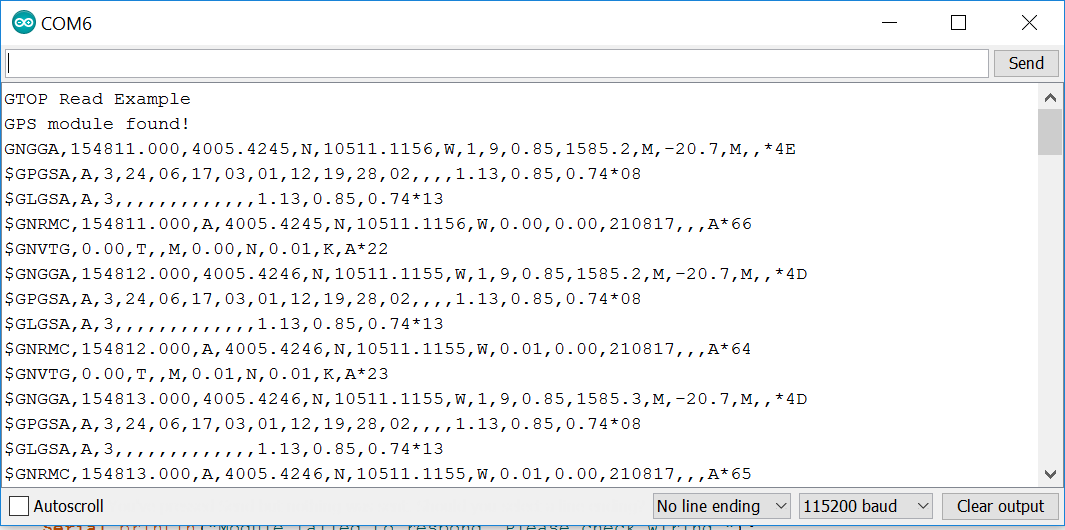
If your GPS doesn't have a satellite fix, you will simply get zeroes instead of numbers. These NMEA sentences may be a little hard to wrap your head around if you don't fluently speak GPS, so let's move onto the second example, which will take this data, and use the TinyGPS library to transform it into some sensible latitude and longitude data. The second example requires the TinyGPS library, which can be downloaded using the button below.
The below example code will take these NMEA sentences and use the displayInfo() function to output some nice and friendly latitude and longitude readings.
language:c
#include <SparkFun_I2C_GPS_Arduino_Library.h> //Use Library Manager or download here: https://github.com/sparkfun/SparkFun_I2C_GPS_Arduino_Library
I2CGPS myI2CGPS; //Hook object to the library

#include <TinyGPS++.h> //From: https://github.com/mikalhart/TinyGPSPlus
TinyGPSPlus gps; //Declare gps object

void setup()
{
  Serial.begin(115200);
  Serial.println("GTOP Read Example");

  if (myI2CGPS.begin() == false)
  {
    Serial.println("Module failed to respond. Please check wiring.");
    while (1); //Freeze!
  }
  Serial.println("GPS module found!");
}

void loop()
{
  while (myI2CGPS.available()) //available() returns the number of new bytes available from the GPS module
  {
    gps.encode(myI2CGPS.read()); //Feed the GPS parser
  }

  if (gps.time.isUpdated()) //Check to see if new GPS info is available
  {
    displayInfo();
  }
}

//Display new GPS info
void displayInfo()
{
  //We have new GPS data to deal with!
  Serial.println();

  if (gps.time.isValid())
  {
    Serial.print(F("Date: "));
    Serial.print(gps.date.month());
    Serial.print(F("/"));
    Serial.print(gps.date.day());
    Serial.print(F("/"));
    Serial.print(gps.date.year());

    Serial.print((" Time: "));
    if (gps.time.hour() < 10) Serial.print(F("0"));
    Serial.print(gps.time.hour());
    Serial.print(F(":"));
    if (gps.time.minute() < 10) Serial.print(F("0"));
    Serial.print(gps.time.minute());
    Serial.print(F(":"));
    if (gps.time.second() < 10) Serial.print(F("0"));
    Serial.print(gps.time.second());

    Serial.println(); //Done printing time
  }
  else
  {
    Serial.println(F("Time not yet valid"));
  }

  if (gps.location.isValid())
  {
    Serial.print("Location: ");
    Serial.print(gps.location.lat(), 6);
    Serial.print(F(", "));
    Serial.print(gps.location.lng(), 6);
    Serial.println();
  }
  else
  {
    Serial.println(F("Location not yet valid"));
  }
}
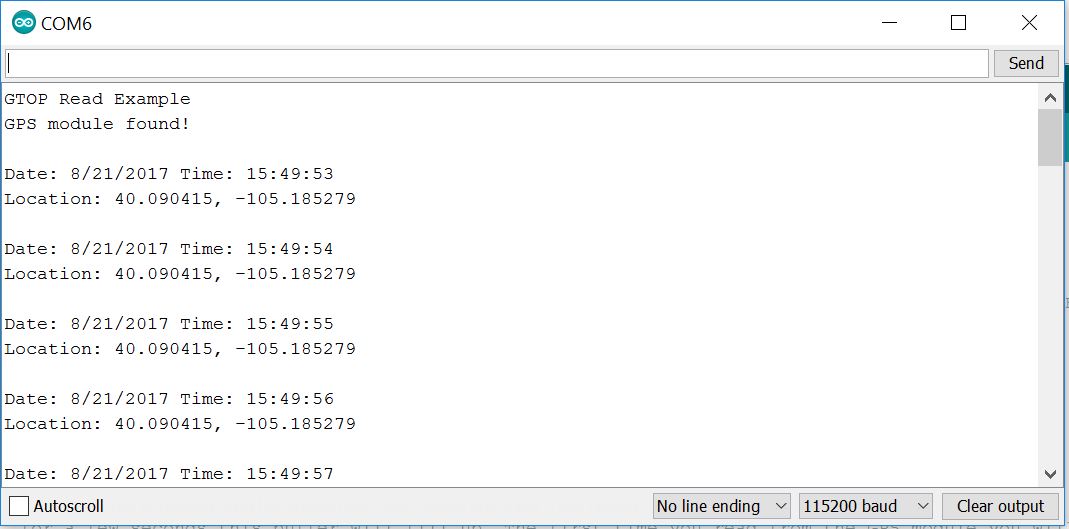
The output of this code in the serial monitor should look similar to the below image. If the module does not yet have a fix, you will see Location not yet valid instead of a latitude and longitude reading.