Simon Says Experiments
 QCPete,
  bboyho
Example: Blink, Button, or Buzzer
At this point, I would like to mention that any piece of code written in the Arduino IDE (such as the examples in the download above), are more commonly referred to as a "Sketch". The sketch is essentially a text document that you are writing and editing code within Arduino. When saving code in the Arduino IDE, it is saved as a *.ino file and called a "Sketch".
We have written 4 example pieces of code that can be used on the Simon Says Board. You can download them here:
After downloading, unzip the files to your computer.
Blink
On your Arduino window, click on File>Open... from the upper menu. Navigate to the folder with the example Simon Says code. This will probably be in your downloads folder similar to this directory: "C:\Users\...\Downloads\Simon-Says-master\Simon-Says-master\Firmware\Additional Experiments". Since we are testing out the first example, click on the folder labelled “SIMON_1_BLINK”. Now double click on the file titled, “SIMON_1_BLINK.ino”. This file contains the Sketch (a.k.a. example code).
You should see a new Arduino window pop up with the sketch inside the Arduino IDE's editor window. Click on the upload button in the Arduino IDE, give it a few seconds, and you should see a LED begin to blink on your Simon Says board.
If so, congratulations!! You just successfully uploaded a new piece of code to your Simon Says board!!
Button
Try opening up the Simon Says experiment example 2. The file is titled, "SIMON_2_BUTTON.ino". Upload the code to your board.
Try hitting the buttons. Pressing one of the buttons will change the state of an LED from OFF to ON. The LED will turn OFF after one second until the button is pressed again.
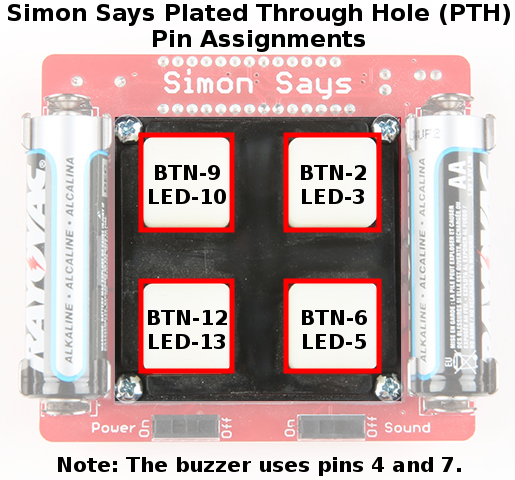
Again, you can read the grey comments to get a better understanding of how the code works. Try experimenting with the code to see if you can change the way the Simon Says board reads the button or turns on the LED. To help you out with hacking the Simon Says, here are a few notes about the pin locations of the Simon Says Plated Through Hole (PTH) version:
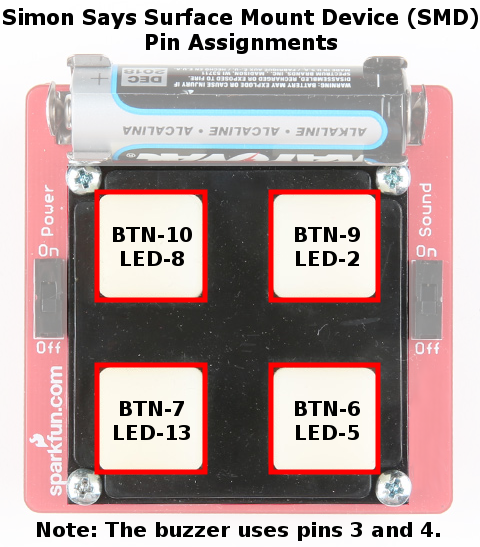
If you happened to get the Simon Says Surface Mount Device (SMD) version, the pin assignments are a little different. Here are the pin locations of the SMD version:
Buzzer
Try opening up the other Simon Says experiment example 3. The file is titled, "SIMON_3_BUZZER.ino". Upload the code to your board.
Try hitting the buttons. Pressing one of the buttons will light the LED and trigger the buzzer to play a few notes. Make sure that the Sound switch is flipped to the "On" position.
Again, you can read the grey comments to get a better understanding of how the code works. Try experimenting with the tone() function to see if you can change the way the Simon Says board plays a note. If you happened to get the Plated-through Hole (PTH) version: pins 4 and 7 are tied to the buzzer. If you happened to get the Surface Mount Device (SMD) version of the Simon Says, the pin assignments are a little different: pins 3 and 4 are tied to the buzzer.