Serial Graphic LCD Hookup
Example 2 - Arduino
We'll first go over the quick and easy way to print to the LCD from an Arduino, then we'll go over a more robust method that utilizes the special characters built into the LCD's firmware.
What You Will Need
- Any Arduino compatible board - we recommend the RedBoard or an Arduino Uno.
- Either the 128x64 pixel Graphic LCD or the 160x128 pixel Graphic LCD
- The appropriate USB cable for your Arduino
- Male-to-Female Jumper Wires
Serial Pass-through
This first example utilizes the built in UART on the Arduino. By doing this, we have to be careful when uploading code to the Arduino while the LCD is connected, since they'll be sharing the same lines. We're going to do things slightly backwards, and upload the code first, then connect the LCD.
With just a few lines of code, you can pass text through the Arduino to a terminal window. Copy this code to a new sketch, and upload it to the Arduino.
language:c
void setup() {
  Serial.begin(115200);
}
void loop() {
  if(Serial.available() > 0){
    Serial.write(Serial.read());
  }
}
This code takes whatever the Arduino receives on its RX line and sends it back out the TX line to the Serial Graphic LCD. You must use Serial.write() instead of Serial.print if you wish to see characters on the LCD and not ASCII numbers.
Hardware
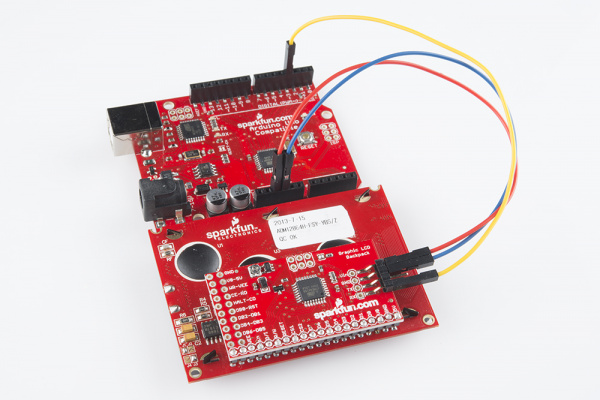
Now, connect the LCD to the Arduino like so..
Make sure your connections are as follows:
| Arduino | Graphic LCD |
| 5V | Vin |
| GND | GND |
| TX | RX |
You don't need to hook up to the LCD's TX line because you're only sending data to the LCD.
Now, open a terminal window (again at 115200), and begin typing. Again text should appear on the LCD. Backspace still works too!
Arduino Library Example
In this last example, we're going to use the Serial Graphic LCD library to do all the work for us. One important feature of the library is that it uses the Software Serial library to create an alternative serial port for the Arduino to communicate to the LCD. The problem with the previous example is that we are using the internal UART and thus have to disconnect the LCD every time we want to upload code. This can be a pain in the butt when you are developing code and need to upload several times.
Hardware
We can use the previous examples setup for this example, you'll just need to change one jumper wire. Move the jumper wire connected to the Arduino's TX pin to Digital Pin 3 on the Arduino. This is the pin that the Serial Graphic LCD library uses when it initializes the Software Serial library.
Your connections should look like this now:
| Arduino | Graphic LCD |
| 5V | Vin |
| GND | GND |
| Pin 3 | RX |
Or, for the visually inclined, here's a picture of what your connections should look like.
Firmware
If you haven't done so already, download and install the Arduino library, or clone it to your computer. Head back to the Firmware Details section for more info on installing the library. Once it's installed, open up Arduino, and navigate to the library Example.
Select the proper serial port and board, and upload the example to your Arduino. Once uploading has finished, the library demo should begin. It will run through examples of using almost every function in the library. All that's left is to sit back and enjoy the show!

