Raspberry Pi SPI and I2C Tutorial
I2C-0 on 40-pin Pi Boards
An Extra I2C bus?
As part of the B+ improvemets, the Raspberry Pi Foundation has standardized the interface to add-on boards, in what they call the "Hardware Added On Top" (HAT) specification. It standardizes the physical form factor for add-on boards, and includes a provision for the B+ to automatically identify and initialize HATs at startup. It uses an I2C bus to read a description from an EEPROM on the HAT, similar to cape identification on the Beagle Bone Black.
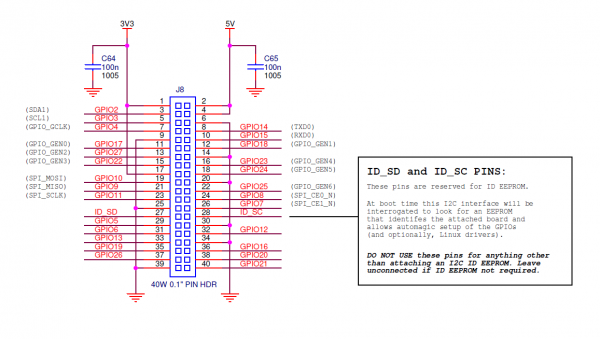
This capability has been carried forward on the A+ and Pi 2 Model B as well. This I2C bus is found on the ID_SC and ID_SD pins (pins 27 and 28 of the 40-pin connector) - but before you get too excited about adding peripherals on that bus, observe the note in the schematic for that port.
This is further clarified in the HAT design guide
On a Model B+, GPIO0 (ID_SD) and GPIO1 (ID_SC) will be switched to ALT0 (I2C-0) mode and probed for an EEPROM. These pins will revert to inputs once the probe sequence has completed.
The only allowed connections to the ID_ pins are an ID EEPROM plus 3.9K pull up resistors. Do not connect anything else to these pins!
It's only there to talk to EEPROMs at addresses 0x50 during boot time. User access at runtime is problematic. If you want a general purpose I2C bus on the B+, you'll need to use I2C-1, on pins 3 and 5 of the 40-pin connector, marked SDA and SCL on the Pi Wedge.
Enabling I2C-0
I2C-0 is disabled by default. To enable it, you'll need to manually edit the configuration file.
Edit /boot/config.txt, and add the following line. If you previously used raspi-config to enable I2C-1 and SPI, you'll see similar entries near the bottom of the vile.
language:bash
dtparam=i2c_vc=on
With that enabled, restart your Pi (sudo reboot). When it's back up, you'll know it's been activated if you've got a filesystem node at /dev/i2c-0.
EEPROM Diagnostic Tools
Alongside the HAT design guide, there is a directory with some software tools for working with HAT EEPROMs. To use them, download them and then make them from the command line.
We'll explore how they're used below.
Testing I2C-0
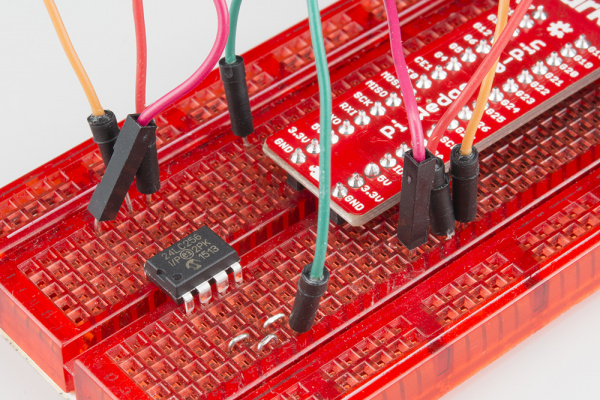
With the information above, we grabbed a 24LC256 EEPROM chip, and wired it to our Pi. We strapped all of the address pins to ground, which puts it at address 0x50, which we were able to confirm with i2cdetect.
Pull the EEPROM utilities mentioned above. The file test_settings.txt is a human-readable example of an EEPROM file. For testing purposes, we edited this file, changing the vendor and product fields to relevant information.
The text file itself needs to be processed into a binary format before it can be written to the EEPROM. The eepmake utility handles this conversion.
language:bash
./eepmake  test_settings.txt test.eep
With the binary test.eep in hand, it can be programmed using the eepflash.sh script. It takes a number of parameters, which are explained if you run it with the -h flag. When writing the EEPROM, you'll also have to approve of the operation by typing the full word yes when it prompts (a simple y is not acceptable). eepflash.sh will print out the status of the write -- the 118 bytes written matches the length of the test.eep file we generated above.
language:bash
sudo sh ./eepflash.sh -w -f=test.eep -t=24c256
This will disable the camera so you will need to REBOOT after this process completes.
This will attempt to write to i2c address 0x50. Make sure there is an eeprom at this address.
This script comes with ABSOLUTELY no warranty. Continue only if you know what you are doing.
Do you wish to continue? (yes/no): yes
Writing...
0+1 records in
0+1 records out
118 bytes (118 B) copied, 2.33811 s, 0.1 kB/s
Done.
As advised by that output, it is time to reboot.
When the system comes back up, you should have some new filesystem nodes at /proc/device-tree/hat
language:bash
pi@raspberrypi /proc/device-tree/hat $ ls -al
total 0
drwxr-xr-x  2 root root  0 Oct 27 20:16 .
drwxr-xr-x 15 root root  0 Oct 27 20:16 ..
-r--r--r--  1 root root  4 Oct 27 20:16 name
-r--r--r--  1 root root 21 Oct 27 20:16 product
-r--r--r--  1 root root  7 Oct 27 20:16 product_id
-r--r--r--  1 root root  7 Oct 27 20:16 product_ver
-r--r--r--  1 root root 37 Oct 27 20:16 uuid
-r--r--r--  1 root root 24 Oct 27 20:16 vendor
If we inspect the contents of those notes, we see the values that we put in the test_settings.txt file:
language:bash
pi@raspberrypi/proc/device-tree/hat $ cat vendor
SparkFun Electronics

pi@raspberrypi /proc/device-tree/hat $ cat product
EEPROM Testing

