Qwiic Micro OLED Hookup Guide
 Englandsaurus
Qwiic OLED Examples
Example: Feature Demo
The demo in this part of the tutorial is similar to the micro OLED Arduino Library. However, the setup is slightly different. While we display the pixels, line, shapes (e.g. pong), and text, you will noticed differences in the functions and methods. Note that the output of the text is also slightly different.
language:c
/*
  Example_Multi_Mod.ino

  This demo performs multiple examples from the library. Note that
  this example is similar to example 8. The difference is that it prints the
  text of the graphic before the animiation. The example also includes example 4
  as part of the demo.

  This library configures and draws graphics to OLED boards that use the
  SSD1306 display hardware. The library only supports I2C.

  SparkFun sells these at its website: www.sparkfun.com

  Do you like this library? Help support SparkFun. Buy a board!

   Qwiic Micro OLED      https://www.sparkfun.com/products/22495

  Updated from example written by Paul Clark @ SparkFun Electronics

  Original Creation Date: December 11th, 2020

  Repository:
     https://github.com/sparkfun/SparkFun_Qwiic_OLED_Arduino_Library

  Documentation:
     https://sparkfun.github.io/SparkFun_Qwiic_OLED_Arduino_Library/

  SparkFun code, firmware, and software is released under the MIT License(http://opensource.org/licenses/MIT).
*/

#include <SparkFun_Qwiic_OLED.h>  //http://librarymanager/All#SparkFun_Qwiic_Graphic_OLED

// The Library supports three different types of SparkFun boards. The demo specifically
// was modified for the Qwiic Micro OLED.

QwiicMicroOLED myOLED;

// Fonts
#include <res/qw_fnt_5x7.h>
#include <res/qw_fnt_8x16.h>
#include <res/qw_fnt_31x48.h>
#include <res/qw_fnt_7segment.h>
#include <res/qw_fnt_largenum.h>

// An array of fonts to loop over
QwiicFont *demoFonts[] = {
  &QW_FONT_5X7,
  &QW_FONT_8X16,
  &QW_FONT_31X48,
  &QW_FONT_LARGENUM,
  &QW_FONT_7SEGMENT
};

int nFONTS = sizeof(demoFonts) / sizeof(demoFonts[0]);
int iFont = 0;

// Some vars for the title.
String strTitle = "<<Font>>";
QwiicFont *pFntTitle = &QW_FONT_5X7;

int width;
int height;

void setup() {
  Serial.begin(115200);
  Serial.println("Running OLED example");

  Wire.begin();
  // Wire.setClock(400000); //Optionally increase I2C bus speed to 400kHz

  // Initalize the OLED device and related graphics system
  if (myOLED.begin() == false) {
    Serial.println("Device begin failed. Freezing...");
    while (true)
      ;
  }
  Serial.println("Begin success");

  width = myOLED.getWidth();
  height = myOLED.getHeight();

  // Not all platforms have A0
#ifdef A0
  randomSeed(analogRead(A0));
#endif
}

void loop() {
  pixelExample();
  lineExample();
  shapeExample();
  textExamples();
}

void pixelExample() {

  String pixel = "Pixels!";

  // Center our message on the screen. Get the screen size of the "hello" string,
  // calling the getStringWidth() and getStringHeight() methods on the oled

  // starting x position - screen width minus string width  / 2
  int x0 = (myOLED.getWidth() - myOLED.getStringWidth(pixel)) / 2;

  // starting y position - screen height minus string height / 2
  int y0 = (myOLED.getHeight() - myOLED.getStringHeight(pixel)) / 2;


  myOLED.erase();

  myOLED.setFont(demoFonts[1]);

  // Draw the text - color of black (0)
  myOLED.text(x0, y0, pixel);

  // There's nothing on the screen yet - Now send the graphics to the device
  myOLED.display();
  delay(1000);


  myOLED.erase();
  for (int i = 0; i < 512; i++) {
    myOLED.pixel(random(width), random(height));
    myOLED.display();
    delay(10);
  }
}

void lineExample() {

  String line = "Lines!";

  // Center our message on the screen. Get the screen size of the "hello" string,
  // calling the getStringWidth() and getStringHeight() methods on the oled

  // starting x position - screen width minus string width  / 2
  int x0 = (myOLED.getWidth() - myOLED.getStringWidth(line)) / 2;

  // starting y position - screen height minus string height / 2
  int y0 = (myOLED.getHeight() - myOLED.getStringHeight(line)) / 2;

  myOLED.erase();

  myOLED.setFont(demoFonts[1]);

  // Draw the text
  myOLED.text(x0, y0, line);

  // There's nothing on the screen yet - Now send the graphics to the device
  myOLED.display();
  delay(1000);


  int middleX = width / 2;
  int middleY = height / 2;
  int xEnd, yEnd;
  int lineWidth = min(middleX, middleY);

  myOLED.erase();
  int deg;

  for (int i = 0; i < 3; i++) {

    for (deg = 0; deg < 360; deg += 15) {

      xEnd = lineWidth * cos(deg * PI / 180.0);
      yEnd = lineWidth * sin(deg * PI / 180.0);

      myOLED.line(middleX, middleY, middleX + xEnd, middleY + yEnd);
      myOLED.display();
      delay(10);
    }

    for (deg = 0; deg < 360; deg += 15) {

      xEnd = lineWidth * cos(deg * PI / 180.0);
      yEnd = lineWidth * sin(deg * PI / 180.0);

      myOLED.line(middleX, middleY, middleX + xEnd, middleY + yEnd, 0);
      myOLED.display();
      delay(10);
    }
  }
}

void shapeExample() {

  String shape = "Shapes!";

  // Center our message on the screen. Get the screen size of the "hello" string,
  // calling the getStringWidth() and getStringHeight() methods on the oled

  // starting x position - screen width minus string width  / 2
  int x0 = (myOLED.getWidth() - myOLED.getStringWidth(shape)) / 2;

  // starting y position - screen height minus string height / 2
  int y0 = (myOLED.getHeight() - myOLED.getStringHeight(shape)) / 2;

  myOLED.erase();

  myOLED.setFont(demoFonts[0]);

  // Draw the text
  myOLED.text(x0, y0, shape);

  // There's nothing on the screen yet - Now send the graphics to the device
  myOLED.display();
  delay(1000);


  // Silly pong demo. It takes a lot of work to fake pong...
  int paddleW = 3;   // Paddle width
  int paddleH = 15;  // Paddle height

  // Paddle 0 (left) position coordinates
  int paddle0_Y = (height / 2) - (paddleH / 2);
  int paddle0_X = 2;

  // Paddle 1 (right) position coordinates
  int paddle1_Y = (height / 2) - (paddleH / 2);
  int paddle1_X = width - 3 - paddleW;
  int ball_rad = 4;  // Ball radius

  // Ball position coordinates
  int ball_X = paddle0_X + paddleW + ball_rad;
  int ball_Y = random(1 + ball_rad, height - ball_rad);  // paddle0_Y + ball_rad;
  int ballVelocityX = 1;                                 // Ball left/right velocity
  int ballVelocityY = 1;                                 // Ball up/down velocity
  int paddle0Velocity = -1;                              // Paddle 0 velocity
  int paddle1Velocity = 1;                               // Paddle 1 velocity

  // Draw the Pong Field
  myOLED.erase();

  // Draw an outline of the screen:
  myOLED.rectangle(0, 0, width - 1, height);

  // Draw the center line
  myOLED.rectangleFill(width / 2 - 1, 0, 2, height);

  bool firstLoop = true;

  while ((ball_X - ball_rad > 1) && (ball_X + ball_rad < width - 2)) {

    if (!firstLoop) {

      // Erase the old ball. In XOR mode, so just draw old values again!
      // Draw the Paddles:
      myOLED.rectangleFill(paddle0_X, paddle0_Y, paddleW, paddleH);
      myOLED.rectangleFill(paddle1_X, paddle1_Y, paddleW, paddleH);
      // Draw the ball: - use rect - xor and circle fails b/c of circle algorithm overdraws
      myOLED.rectangleFill(ball_X, ball_Y, ball_rad, ball_rad);
    }
    // Increment ball's position
    ball_X += ballVelocityX;
    ball_Y += ballVelocityY;

    // Check if the ball is colliding with the left paddle
    if (ball_X - ball_rad < paddle0_X + paddleW) {

      // Check if ball is within paddle's height
      if ((ball_Y > paddle0_Y) && (ball_Y < paddle0_Y + paddleH)) {

        ball_X++;                        // Move ball over one to the right
        ballVelocityX = -ballVelocityX;  // Change velocity
      }
    }

    // Check if the ball hit the right paddle
    if (ball_X + ball_rad > paddle1_X) {

      // Check if ball is within paddle's height
      if ((ball_Y > paddle1_Y) && (ball_Y < paddle1_Y + paddleH)) {

        ball_X--;                        // Move ball over one to the left
        ballVelocityX = -ballVelocityX;  // change velocity
      }
    }

    // Check if the ball hit the top or bottom
    if ((ball_Y <= 1) || (ball_Y >= (height - ball_rad - 1))) {

      // Change up/down velocity direction
      ballVelocityY = -ballVelocityY;
    }

    // Move the paddles up and down
    paddle0_Y += paddle0Velocity;
    paddle1_Y += paddle1Velocity;

    // Change paddle 0's direction if it hit top/bottom
    if ((paddle0_Y <= 1) || (paddle0_Y > height - 2 - paddleH))
      paddle0Velocity = -paddle0Velocity;

    // Change paddle 1's direction if it hit top/bottom
    if ((paddle1_Y <= 1) || (paddle1_Y > height - 2 - paddleH))
      paddle1Velocity = -paddle1Velocity;

    // Draw the Paddles:
    myOLED.rectangleFill(paddle0_X, paddle0_Y, paddleW, paddleH);
    myOLED.rectangleFill(paddle1_X, paddle1_Y, paddleW, paddleH);

    // Draw the ball:
    myOLED.rectangleFill(ball_X, ball_Y, ball_rad, ball_rad);

    // Actually draw everything on the screen:
    myOLED.display();

    // Once the first loop is done, switch to XOR mode. So we just update our
    // moving parts
    if (firstLoop) {
      firstLoop = false;
      myOLED.setDrawMode(grROPXOR);
    }

    delay(25);  // Delay for visibility
  }
  delay(1000);
  myOLED.setDrawMode(grROPCopy);
}

void textExamples() {

  // next font for display
  iFont = (iFont + 1) % nFONTS;
  myOLED.setFont(demoFonts[iFont]);

  // Write font name to screen
  writeTitle();

  delay(1000);

  // Write out the full font char set
  writeFontChars();

  delay(2000);
}

// For the current font, write out all its characters
void writeFontChars() {
  // get the font
  QwiicFont *currFont = myOLED.getFont();

  // how many chars can a screen handle? (x * y)
  uint16_t screenChars = myOLED.getWidth() / (currFont->width + 1);  // X
  uint8_t nY = myOLED.getHeight() / currFont->height;                // Y

  screenChars *= (nY == 0 ? 1 : nY);  // need at least 1 row

  // Loop over the characters in the font.
  for (int i = 0; i < currFont->n_chars; i++) {

    if (i % screenChars == 0) {  // next page
      delay(400);
      myOLED.erase();
      myOLED.setCursor(0, 0);
    }

    // if the character is a carriage return, send a blank - otherwise the
    // write routine will perform a CR and lead to a confusing display.
    myOLED.write((i + currFont->start != '\n') ? i + currFont->start : ' ');

    myOLED.display();  // show the added char

    delay(10);
  }
}

// Simple title for a font
void writeTitle() {

  // Get the current font name
  String strTitle = myOLED.getFontName();

  // save our current font, then switch to font for title
  QwiicFont *currFont = myOLED.getFont();

  // Set title font font
  myOLED.setFont(pFntTitle);

  // Position to use for the time/banner displayed before each font

  // Get the width of the title in screen size
  int width = myOLED.getStringWidth(strTitle);

  // if the string is wider than the screen, set x at 0, otherwise center text

  int xTitle = (width >= myOLED.getWidth() ? 0 : (myOLED.getWidth() - width) / 2);

  // starting y position - width minus string height / 2. No need to chech height, 5x7 font fits everything
  int yTitle = (myOLED.getHeight() - myOLED.getStringHeight(strTitle)) / 2;

  myOLED.erase();

  // Draw the text
  myOLED.text(xTitle, yTitle, strTitle);

  // There's nothing on the screen yet - Now send the graphics to the device
  myOLED.display();

  myOLED.setFont(currFont);
}
Example: Drawing Bitmaps
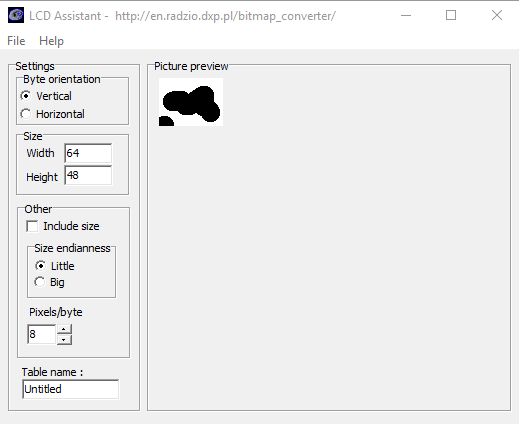
Similar to the Micro OLED bitmap example, it is also possible to load bitmaps of your own custom images into the screen using the Qwiic OLED Arduino Library. This can be done using this Bitmap generator. The tool is pretty self explanatory, just load in an image, tell the tool that your screen is 64x48, go to File, and Save the output.
Open the file generated as a text file, it should look something like the below image.
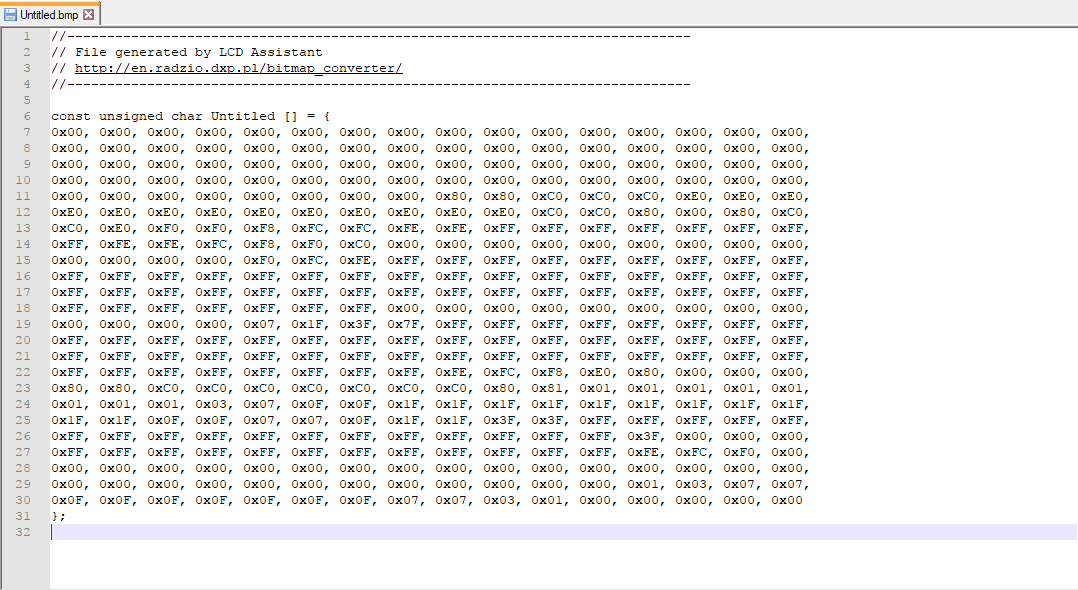
This array is the image that will be displayed by the screen, so now we just have to paste it into the bitmaps.h header file as the correct data type so our compiler is able to find the image. Make sure you change the array to a uint8_t. The pasted bitmap should look something like the below image, with the variable type changed to uint8_t.

With the Qwiic OLED Arduino Library, we will need to know the size of the bitmap image so we have included a few variables below the arrays to indicate the width and height of the image. You will also need to change the name of the array when referencing them in the example code. In this case, we named it rick and morty. The pasted bitmap should look something similar to the following.
language:c
uint8_t rick[] = {
  0xFF, 0xFF, 0xFF, 0xFF, 0xFF, 0xFF, 0xFF, 0xFF, 0xFF, 0xFF, 0xFF, 0xFF, 0xFF, 0xFF, 0xFF, 0xFF,
  0xFF, 0xFF, 0xFF, 0xFF, 0xFF, 0x7F, 0x01, 0xFD, 0xFB, 0xF7, 0xE7, 0xCF, 0xBF, 0x3F, 0x7F, 0xFF,
  0xFF, 0xFF, 0xFF, 0xFF, 0xFF, 0xFF, 0x7F, 0xBF, 0x9F, 0xDF, 0xEF, 0xF7, 0x03, 0xFF, 0xFF, 0xFF,
  0xFF, 0xFF, 0xFF, 0xFF, 0xFF, 0xFF, 0xFF, 0xFF, 0xFF, 0xFF, 0xFF, 0xFF, 0xFF, 0xFF, 0xFF, 0xFF,
  0xFF, 0xFF, 0xFF, 0xFF, 0xFF, 0xFF, 0xFF, 0xF9, 0xE5, 0xDD, 0x3B, 0x7B, 0xFB, 0xFB, 0xF7, 0xF7,
  0xF7, 0xF7, 0xF7, 0xF7, 0xEF, 0xE0, 0xFF, 0x7F, 0x3F, 0xBF, 0xBF, 0xBF, 0xBF, 0xBF, 0xBE, 0xBC,
  0xBD, 0xBB, 0xBB, 0xBD, 0xBC, 0xBE, 0xBF, 0x3F, 0x7F, 0xFF, 0xFF, 0xFF, 0xF0, 0x87, 0xBF, 0xDF,
  0xDF, 0xEF, 0xEF, 0xE7, 0xF7, 0xF7, 0xFB, 0x3D, 0x85, 0xF9, 0xFF, 0xFF, 0xFF, 0xFF, 0xFF, 0xFF,
  0xFF, 0xFF, 0xFF, 0xFF, 0xFF, 0xCF, 0x8F, 0xAF, 0x6F, 0x6F, 0xEF, 0xEE, 0xED, 0xE1, 0xFF, 0xFF,
  0xFF, 0xFF, 0xFF, 0x07, 0xFB, 0x8D, 0xAE, 0xAF, 0xAF, 0xAF, 0x6F, 0x4F, 0x4F, 0x5F, 0x5F, 0x5F,
  0x5F, 0x5F, 0x5F, 0x4F, 0x6F, 0x6F, 0xAF, 0xAF, 0xAF, 0xAE, 0x8D, 0xFB, 0x07, 0xFF, 0xFF, 0xFF,
  0xFF, 0xFF, 0xFF, 0xE7, 0xE3, 0xE9, 0x6C, 0x6E, 0xAF, 0xCF, 0xEF, 0xFF, 0xFF, 0xFF, 0xFF, 0xFF,
  0xFF, 0xFF, 0xFF, 0xFF, 0xFF, 0xFF, 0xFF, 0xFF, 0xFF, 0xBE, 0x9E, 0xAD, 0x35, 0x73, 0xFF, 0x3F,
  0xDF, 0xDF, 0xDF, 0x00, 0xFF, 0x41, 0xB8, 0xBA, 0xBA, 0xB2, 0xB2, 0xBA, 0xBA, 0xB8, 0xC1, 0xFF,
  0xFF, 0xC1, 0xB8, 0xBA, 0xBA, 0xB2, 0xB2, 0xBA, 0xBA, 0xB8, 0x41, 0xFF, 0x00, 0xDF, 0xDF, 0xDF,
  0x3F, 0xFF, 0xF1, 0x6D, 0x5E, 0x5E, 0x3F, 0x7F, 0xFF, 0xFF, 0xFF, 0xFF, 0xFF, 0xFF, 0xFF, 0xFF,
  0xFF, 0xFF, 0xFF, 0xFF, 0xFF, 0xFF, 0xFF, 0xFF, 0xFF, 0xEF, 0xE7, 0xE3, 0xE9, 0xEC, 0x2F, 0xCE,
  0x7D, 0x7B, 0x3B, 0x80, 0x3F, 0xFF, 0x1E, 0xEE, 0xBE, 0xBE, 0xBE, 0xBE, 0xBF, 0xBF, 0x30, 0xAF,
  0xAF, 0xB0, 0xBF, 0xBF, 0x3F, 0xBE, 0xBE, 0xBE, 0xEE, 0x1E, 0xFF, 0x3F, 0x80, 0x3B, 0x7B, 0x7D,
  0xCE, 0x2F, 0xEC, 0xE9, 0xEB, 0xE7, 0xFF, 0xFF, 0xFF, 0xFF, 0xFF, 0xFF, 0xFF, 0xFF, 0xFF, 0xFF,
  0xFF, 0xFF, 0xFF, 0xFF, 0xFF, 0xFF, 0xFF, 0xFF, 0xFF, 0xFF, 0xFF, 0xFF, 0xFF, 0xFF, 0xFE, 0xFE,
  0xFF, 0xFF, 0xFF, 0xFF, 0xFC, 0xF9, 0xF3, 0xF6, 0xE7, 0xEF, 0xCF, 0xDF, 0xDF, 0xDF, 0xDF, 0xDE,
  0xDC, 0xD1, 0xD7, 0xD8, 0xCE, 0xEF, 0xE7, 0xF7, 0xF2, 0xFB, 0xF9, 0xFC, 0xFF, 0xFF, 0xFF, 0xFF,
  0xFE, 0xFE, 0xFF, 0xFF, 0xFF, 0xFF, 0xFF, 0xFF, 0xFF, 0xFF, 0xFF, 0xFF, 0xFF, 0xFF, 0xFF, 0xFF
};

uint8_t rick_Height = 48;
uint8_t rick_Width = 64;

uint8_t morty[] = {
  0xFF, 0xFF, 0xFF, 0xFF, 0xFF, 0xFF, 0xFF, 0xFF, 0xFF, 0xFF, 0x3F, 0x1F, 0x0F, 0x07, 0x07, 0x03,
  0x03, 0x03, 0x03, 0x01, 0x01, 0x01, 0x00, 0x00, 0x00, 0x00, 0x00, 0x00, 0x00, 0x00, 0x00, 0x00,
  0x00, 0x00, 0x00, 0x00, 0x00, 0x01, 0x03, 0x03, 0x03, 0x07, 0x07, 0x07, 0x0F, 0x1F, 0x1F, 0x3F,
  0x7F, 0xFF, 0xFF, 0xFF, 0xFF, 0xFF, 0xFF, 0xFF, 0xFF, 0xFF, 0xFF, 0xFF, 0xFF, 0xFF, 0xFF, 0xFF,
  0xFF, 0xFF, 0xFF, 0xFF, 0x7F, 0x1F, 0x07, 0x07, 0x01, 0x00, 0x00, 0x00, 0x00, 0x00, 0x00, 0x00,
  0x00, 0x00, 0x00, 0x80, 0x80, 0xC0, 0xE0, 0xF0, 0xF8, 0xF8, 0xF8, 0x78, 0x7C, 0x7C, 0x7C, 0x3F,
  0x9F, 0xCF, 0xEF, 0xFF, 0xFF, 0xFF, 0xFF, 0xFF, 0xFF, 0xFF, 0xF4, 0xE4, 0xEC, 0x6C, 0x28, 0x90,
  0xD4, 0xCF, 0xDF, 0xDF, 0xDF, 0xDF, 0xDF, 0xBF, 0x7F, 0xFF, 0xFF, 0xFF, 0xFF, 0xFF, 0xFF, 0xFF,
  0xFF, 0xFF, 0x07, 0x00, 0x00, 0x00, 0x00, 0x00, 0x00, 0x00, 0x00, 0x00, 0x00, 0x00, 0xF0, 0xFC,
  0xFC, 0xFE, 0xFF, 0xFF, 0xFF, 0xFF, 0xFF, 0xFF, 0xFF, 0x07, 0xF3, 0xF9, 0xFD, 0xFC, 0xFE, 0xFE,
  0xFE, 0xFE, 0xFE, 0xFE, 0xFC, 0xF9, 0xF3, 0x07, 0xFF, 0xFF, 0xFF, 0xFF, 0xC0, 0x3E, 0x7F, 0xFF,
  0xFF, 0xFF, 0xFF, 0xFF, 0xFF, 0xF9, 0xF9, 0xFF, 0x3C, 0xC1, 0xFF, 0xFF, 0xFF, 0xFF, 0xFF, 0xFF,
  0xFF, 0xFF, 0xF8, 0xC0, 0x00, 0x00, 0x00, 0x00, 0x00, 0x00, 0x00, 0x00, 0x00, 0x00, 0xFF, 0xFF,
  0xFF, 0xFF, 0xFF, 0xFF, 0xFF, 0xFF, 0xFF, 0xFF, 0xFF, 0xFC, 0xFB, 0xF7, 0xEF, 0xDC, 0xDC, 0xDF,
  0xDF, 0xDF, 0xDF, 0xDF, 0xEF, 0xF7, 0xFB, 0xFC, 0xFF, 0xFF, 0xFF, 0xFF, 0xDF, 0xDF, 0xDF, 0xD6,
  0xD6, 0xED, 0xFD, 0xFD, 0xFD, 0xFD, 0xFE, 0xFE, 0x00, 0xFF, 0xFF, 0xFF, 0xFF, 0xFF, 0xFF, 0xFF,
  0xFF, 0xFF, 0xFF, 0xFF, 0xFF, 0xFE, 0xFC, 0xFC, 0xF8, 0xF0, 0xE0, 0xE0, 0xC0, 0xC0, 0xC1, 0x9C,
  0x1E, 0x7E, 0x7E, 0x7F, 0x3F, 0xBF, 0xDF, 0xFF, 0xFF, 0xFF, 0xFF, 0xFF, 0xFF, 0xFF, 0xFF, 0xFF,
  0xFF, 0xFF, 0xFF, 0xFF, 0xFF, 0xFF, 0xFF, 0xFF, 0xFF, 0xFF, 0xCF, 0x8F, 0xBF, 0x85, 0xE5, 0xF3,
  0xF3, 0xFF, 0x7F, 0x7F, 0xBF, 0xDF, 0xC7, 0xF3, 0xF8, 0xFF, 0xFF, 0xFF, 0xFF, 0xFF, 0xFF, 0xFF,
  0xFF, 0xFF, 0xFF, 0xFF, 0xFF, 0xFF, 0xFF, 0xFF, 0xFF, 0xFF, 0xFF, 0xFF, 0xFF, 0xFF, 0xFF, 0xFF,
  0xFF, 0xFF, 0xFF, 0xFE, 0xF8, 0xF9, 0xF3, 0xF7, 0xF7, 0xE7, 0xEF, 0xEF, 0xDF, 0xDF, 0xDF, 0xDF,
  0xDF, 0xDF, 0xDF, 0xDF, 0xDF, 0xDF, 0xDF, 0xDF, 0xDF, 0xDF, 0xCF, 0xCF, 0xEF, 0xE7, 0xF7, 0xF3,
  0xFB, 0xF8, 0xFE, 0xFE, 0xFF, 0xFF, 0xFF, 0xFF, 0xFF, 0xFF, 0xFF, 0xFF, 0xFF, 0xFF, 0xFF, 0xFF
};

uint8_t morty_Height = 48;
uint8_t morty_Width = 64;
Now we will be able to call displayBitmap() to draw our image. Some example code showing how to display some Rick and Morty bitmaps is shown below.
language:c
/******************************************************************************
 * QwiicMicroOLED_Demo.ino
 * SFE_MicroOLED Library Demo
 * Paul Clark @ SparkFun Electronics
  Original Creation Date: December 11th, 2020
 *
 * This sketch uses the MicroOLED library to draw bitmaps to the OLED
 *
 * This example was modified for the Qwiic Micro OLED
 * Ho Yun "Bobby" Chan on 11/7/2023
 * Joel Bartlett on 04/12/17
 *
 * Development environment specifics:
 *  Arduino v2.1.1
 *  ESP32 IoT RedBoard v1.0
 *  Micro OLED Breakout v1.0
 *
 * This code is beerware; if you see me (or any other SparkFun employee) at the
 * local, and you've found our code helpful, please buy us a round!
 *
 * Distributed as-is; no warranty is given.
 ******************************************************************************/
//#include <Wire.h>  // This is included in the SparkFun Qwiic OLED Arduino Library
#include <SparkFun_Qwiic_OLED.h>  //http://librarymanager/All#SparkFun_Qwiic_OLED
#include "bitmaps.h"

// The Library supports three different types of SparkFun boards. The demo uses the following
// defines for the Qwiic Micro OLED.

QwiicMicroOLED myOLED;

void setup() {

  delay(100);
  Serial.begin(115200);

  Wire.begin();
  //Wire.setClock(400000);  // Optional increase I2C to 400kHz

  // Initalize the OLED device and related graphics system
  if (myOLED.begin() == false) {
    Serial.println(F("Device begin failed. Freezing..."));
    while (true)
      ;
  }
  Serial.println(F("Begin success"));

  myOLED.erase();
  myOLED.display();
  delay(1000);  // Delay 1000 ms
}
//---------------------------------------------------------------
void loop() {
  drawRick();
  delay(5000);
  drawMorty();
  delay(5000);
}
//---------------------------------------------------------------
void drawRick() {

  myOLED.erase();
  displayBitmap(0, 0, rick_Width, rick_Height, rick);  //Display Logo
  myOLED.display();
}
//---------------------------------------------------------------
void drawMorty() {

  myOLED.erase();
  displayBitmap(0, 0, morty_Width, morty_Height, morty);  //Display Logo
  myOLED.display();
}
//---------------------------------------------------------------
//Wrapper to avoid needing to pass width/height data twice
void displayBitmap(uint8_t x, uint8_t y, uint8_t imageWidth, uint8_t imageHeight, uint8_t *imageData) {
  myOLED.bitmap(x, y, x + imageWidth, y + imageHeight, imageData, imageWidth, imageHeight);
}
The output of this code will look something like the GIF below.