Qwiic-ly build a digital indoor thermometer to measure the ambient temperature of the room and display it using an OLED!
To follow along with this tutorial, you will need the following materials. You may not need everything though depending on what you have. Add it to your cart, read through the guide, and adjust the cart as necessary. This tutorial's code was can be used with either the TMP117 or TMP102!
To create your tower of sensing power, you will need a screw driver. If you do not have one already, add it to your cart.
If you aren't familiar with the Qwiic system, we recommend reading here for an overview.
| Qwiic Connect System |
We would also recommend taking a look at the following tutorials if you aren't familiar with them.
The Qwiic ecosystem has made it easier and faster to prototype. You simply connect a Qwiic device to an Arduino using a Qwiic cable. We can add additional Qwiic devices to the I2C bus with ease. The original tutorials use a RedBoard Qwiic with an ATmega328P to connect to each device. In this project tutorial, we'll use the Qwiic Micro with SAMD21 to make it as small as possible.
We will use the Qwiic TMP117 to measure the ambient room temperature. However, if you do not require such precision, you can also use the Qwiic TMP102. We will use the Qwiic micro OLED to display the temperature.
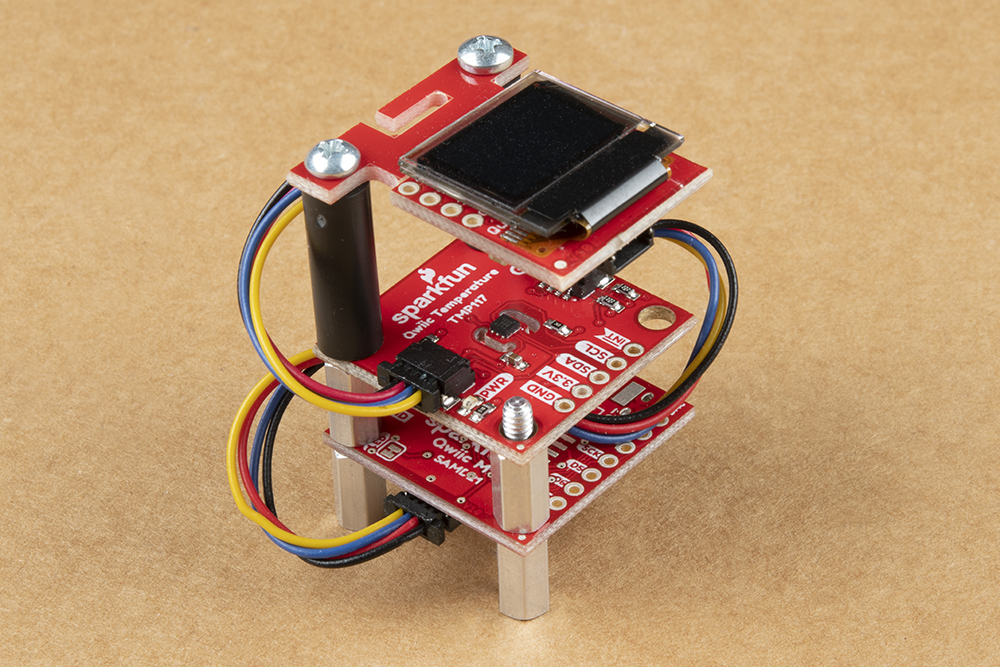
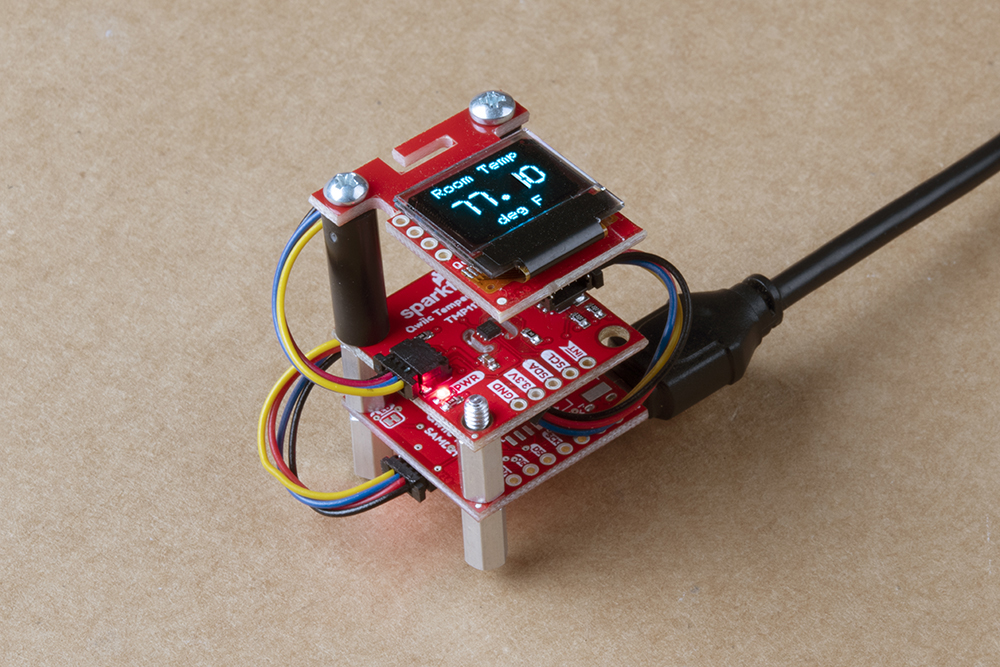
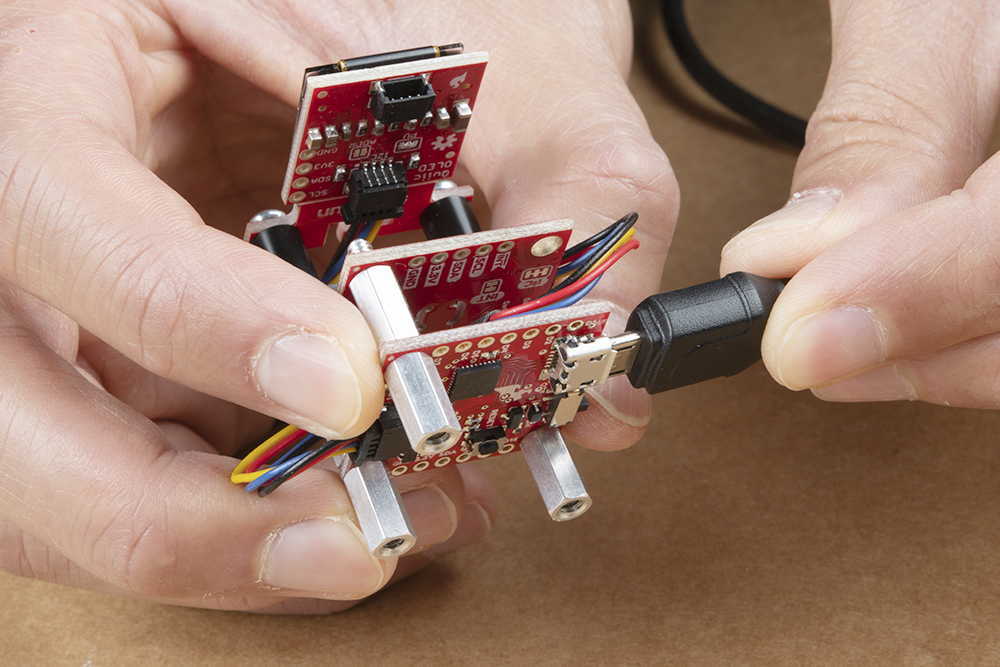
Once the boards are daisy chained, there is an option to mount the boards using the mounting holes located on the standard 1.0"x1.0" sized Qwiic boards. We'll be stacking the Qwiic boards on top of each other using standoffs and any available mounting holes with the Qwiic micro OLED on top, Qwiic TMP117 in the middle, and the Qwiic micro on the bottom. Note that the top of the Qwiic Micro in this tutorial will face away from the other boards so that we can easily access the reset button. However, you can face it however you would like based on your personal preference. When you are ready, connect the USB cable to Qwiic Micro. We will use this to power and program the board.
You'll need to need to download and install a two Arduino libraries for this project tutorial.
To display the sensor readings, we will use the SparkFun Micro OLED library. You can install this library to automatically in the Arduino IDE's Library Manager by searching for "Micro OLED Breakout". Or you can manually download it from the GitHub repository.
To measure temperature from the TMP117, we will use the SparkFUN TMP117 Arduino Library. We'll install this library automatically by using the Library Manager again by searching for Qwiic TMP117. If you prefer downloading the libraries manually you can grab them from the GitHub repository.
If you do not require such high precision opted for the Qwiic TMP102, you can also use the Qwiic TMP102. If you chose this route, you will need to use teh SparkFUN TMP102 Arduino Library. We'll install this library automatically by using the Library Manager by searching for SparkFun TMP102. If you prefer downloading libraries manually, you can grab it from the GitHub Repository.
Since we are using the Qwiic Micro with the SAMD21, we will need to install the board files. Make sure to check out the section in the Qwiic Micro Hookup Guide to install the appropriate board add on.
Below is the example code for the Qwiic TMP117 and Qwiic TMP102. You can use either example to read the ambient temperature of the room. Since we are using the Qwiic Micro, you will need to select the correct board. Head to Tools > Boards > SparkFun Qwiic Micro. Then select the COM port that the board enumerated to before uploading.
If you opted to use the Qwiic TMP117, copy and paste the following code to your Arduino IDE. Make sure the switch is flipped to the ON position on the board before hitting the upload button.
language:c
/******************************************************************************
  Digital Indoor Temperature Monitor with the TMP117
  Written by: Ho Yun "Bobby" Chan
  @ SparkFun Electronics
  Date: Mar 6, 2019

  Description: This sketch configures temperature sensors and prints the
  temperature in degrees celsius and fahrenheit to the Qwiic microOLED.
  Simply adjust the `output_select` to view the °C, °F, or both. You can
  also output the values to the SerialUSB Monitor or Plotter at 115200 baud
  to view the data. There is also a demo mode that displays each output
  on the microOLED with a progress bar at the bottom.

  Resources/Libraries:
  Wire.h (included with Arduino IDE)
  SparkFunTMP117.h (included in the src folder) http://librarymanager/All#SparkFun_TMP117
  SFE_MicroOLED.h (included in the src folder)  http://librarymanager/All#SparkFun_micro_OLED

  Development Environment Specifics:
  Arduino 1.8.10+

  License:
  This code is released under the MIT License (http://opensource.org/licenses/MIT)
  Distributed as-is; no warranty is given.

******************************************************************************/

/*
  NOTE: For the most accurate readings using the TMP117:
  - Avoid heavy bypass traffic on the I2C bus
  - Use the highest available communication speeds
  - Use the minimal supply voltage acceptable for the system
  - Place device horizontally and out of any airflow when storing
  For more information on reaching the most accurate readings from the sensor,
  reference the "Precise Temperature Measurements with TMP116" datasheet that is
  linked on Page 35 of the TMP117's datasheet
*/

#include <Wire.h>            // Used to establish Serial communication on the I2C bus
#include <SparkFun_TMP117.h> // Used to send and recieve specific information from our sensor
#include <SFE_MicroOLED.h>   // Include the SFE_MicroOLED library

//#define SerialUSB Serial     //Uncomment if you are not using a native USB like the Atmega32U4 or SAMD21

///////////////////////////////
///////// micro OLED //////////
///////////////////////////////

#define PIN_RESET 7          // A pin needs to be declared even though we are not physically connecting to the Qwiic micro OLED via I2C
#define DC_JUMPER 1
MicroOLED oled(PIN_RESET, DC_JUMPER);    // I2C declaration

///////////////////////////////
/////////// TMP117 ////////////
///////////////////////////////

// The default address of the device is 0x48 = (GND)
TMP117 sensor; // Initalize sensor

float tempC = 0;
float tempF = 0;

//0 = output degrees °C
//1 = output degrees °F
//2 or any other number = output degrees °C and °F
int output_select = 3; //select output

///////////////////////////////
// Display Mode Page Control //
///////////////////////////////
// This enum defines all of our display modes and their order.
enum t_displayModes {
  DISPLAY_BIG_C,
  DISPLAY_BIG_F,
  DISPLAY_CUBE,
  DISPLAY_C_F
};

const int NUM_DISPLAY_MODES = 4; // Number of values defined in enum above
volatile int displayMode = NUM_DISPLAY_MODES - 1; // Keeps track of current display page

const unsigned long DISPLAY_UPDATE_RATE = 4000; // Cycle display every 5 seconds
unsigned long lastDisplayUpdate = 0; // Stores time of last display update
unsigned long currentMillis = 0; // Stores time of last display update

float percentage = 0; //store percent for progress bar
int progressWidth = 0; // Width of progress bar depends on the [% * (64 pixels wide)]
int progressY = 0;     //location of the progress bar at the botton of the microOLED

///////////////////////////////
/////// Initialize Cube ///////
///////////////////////////////

int SCREEN_WIDTH = oled.getLCDWidth();
int SCREEN_HEIGHT = oled.getLCDHeight();

float d = 3;
float px[] = {
  -d,  d,  d, -d, -d,  d,  d, -d
};
float py[] = {
  -d, -d,  d,  d, -d, -d,  d,  d
};
float pz[] = {
  -d, -d, -d, -d,  d,  d,  d,  d
};

float p2x[] = {
  0, 0, 0, 0, 0, 0, 0, 0
};
float p2y[] = {
  0, 0, 0, 0, 0, 0, 0, 0
};

float r[] = {
  0, 0, 0
};

#define SHAPE_SIZE 600
// Define how fast the cube rotates. Smaller numbers are faster.
// This is the number of ms between draws.
//#define ROTATION_SPEED 0


void setup() {
  delay(100);
  Wire.begin();

  oled.begin();    // Initialize the OLED
  oled.clear(ALL); // Clear the display's internal memory
  oled.display();  // Display what's in the buffer (splashscreen)
  delay(1000);     // Delay 1000 ms
  oled.clear(PAGE); // Clear the buffer.

  SerialUSB.begin(115200);    // Start SerialUSB communication at 115200 baud
  Wire.setClock(400000);   // Set clock speed to be the fastest for better communication (fast mode)

  if (sensor.begin() == true ) // Function to check if the sensor will correctly self-identify with the proper Device ID/Address
  {
    //SerialUSB.println("Begin");

    if (output_select == 0 ) {
      SerialUSB.println("TMP117[°C]");

    }
    else if (output_select == 1) {
      SerialUSB.println("TMP117[°F]");

    }
    else {
      SerialUSB.print("TMP117[°C]");
      SerialUSB.print(",");
      SerialUSB.println("TMP117[°F]");

    }
  }
  else
  {
    SerialUSB.println("Device failed to setup- Freezing code.");
    while (1); // Runs forever
  }

}//end setup


void loop() {
  // Data Ready is a flag for the conversion modes - in continous conversion the dataReady flag should always be high
  if (sensor.dataReady() == true) // Function to make sure that there is data ready to be printed, only prints temperature values when data is ready
  {
    //get TMP117 sensor readings
    tempC = sensor.readTempC();
    tempF = sensor.readTempF();
  }

  //get time based on how long the Arduino has been running
  currentMillis = millis();

  if (output_select == 0 ) {

    oled.clear(PAGE);            // Clear the display
    displayC();
    oled.display();

    // Print temperature in °C
    //SerialUSB.print("Temperature in Celsius: ");
    SerialUSB.println(tempC);//TMP117 temperature
  }
  else if (output_select == 1) {

    oled.clear(PAGE);            // Clear the display
    displayF();
    oled.display();

    // Print temperature in °F
    //SerialUSB.print("Temperature in Fahrenheit: ");
    SerialUSB.println(tempF);

  }
  else if (output_select == 2) {
    //Display both temperatures as °C and °F

    oled.clear(PAGE);            // Clear the display

    oled.setCursor(0, 0);        // Set cursor to top-left
    oled.setFontType(0);         // Smallest font
    oled.print(" Room Temp ");   // Print

    oled.setCursor(0, 16);       // Set cursor to middle-ish
    oled.setFontType(1);         // medium font
    oled.print(String(tempC, 2) + " C"); // Print temp, assuming that it is within room temp in tens
    oled.print(String(tempF, 2) + " F");// Print temp, assuming that it is within room temp in tens
    oled.circle(50, 17, 1);      //"degree" sign after output values
    oled.circle(50, 33, 1);      //"degree" sign after output values

    oled.display();

    //TMP117 temperature with comma delimiter for graphing or datalogging
    SerialUSB.print(tempC);
    SerialUSB.print(",");  //seperator
    SerialUSB.println(tempF);
  }
  else {
    // Displaying °C and °F with a scroll bar

    // Another method of updating display:
    // The display will cycle itself every DISPLAY_UPDATE_RATE seconds
    if ( currentMillis >= (lastDisplayUpdate + DISPLAY_UPDATE_RATE + 1000) )
    {
      // Increment displayMode, next time through a new page will be displayed:
      displayMode = (displayMode + 1) % NUM_DISPLAY_MODES;

      // Update lastDisplayTime, so we don't come back for DISPLAY_UPDATE_RATE seconds
      lastDisplayUpdate = currentMillis;

    }

    oled.clear(PAGE);            // Clear the display
    updateDisplay();
    displayProgressBar(); // Draws a progress bar at the bottom of the screen
    oled.display();

    //TMP117 temperature with comma delimiter for graphing or datalogging
    SerialUSB.print(tempC);
    SerialUSB.print(",");  //seperator
    SerialUSB.println(tempF);

  }

  //delay(5); // Delay added for easier readings
}//end loop


//This function updates the display if we are scrolling through all displays with a progress bar.
void updateDisplay() {

  switch (displayMode)
  {
    case DISPLAY_BIG_C:
      displayC();
      break;
    case DISPLAY_BIG_F:
      displayF();
      break;
    case DISPLAY_CUBE: //used as a screensaver
      drawCube();
      break;
    case DISPLAY_C_F:
      displayC_F();
      break;

  }

}


// This function displays the temperature in °C as big digits.
void displayC() {

  //oled.clear(PAGE);          // Clear the display, this is already called before we enter this function

  oled.setCursor(0, 0);        // Set cursor to top-left
  oled.setFontType(0);         // Smallest font
  oled.print(" Room Temp ");   // Print

  oled.setCursor(0, 16);       // Set cursor to middle-ish
  oled.print(" ");             // Print
  oled.setFontType(2);         // medium font
  oled.print(tempC);           // Print temp, assuming that it is within room temp in tens

  oled.setCursor(0, 38);       // Set cursor to middle-ish
  oled.setFontType(0);         // Smallest font
  oled.print("   deg C");      // Print

  //oled.display();            // Update the display, this is already called after we exit this function

}


// This function displays the temperature in °F as big digits.
void displayF() {

  //oled.clear(PAGE);          // Clear the display, this is already called before we enter this function

  oled.setCursor(0, 0);        // Set cursor to top-left
  oled.setFontType(0);         // Smallest font
  oled.print(" Room Temp ");   // Print

  oled.setCursor(0, 16);       // Set cursor to middle-ish
  oled.print(" ");             // Print
  oled.setFontType(2);         // medium font
  oled.print(tempF);           // Print temp, assuming that it is within room temp in tens

  oled.setCursor(0, 38);       // Set cursor to middle-ish
  oled.setFontType(0);         // Smallest font
  oled.print("   deg F");      // Print

  //oled.display();            // Update the display, this is already called after we exit this function

}


// This function animates a cube. This is used as a quick screensaver.
void drawCube()
{
  r[0] = r[0] + 10 * PI / 180.0; // Add a degree
  r[1] = r[1] + 10 * PI / 180.0; // Add a degree
  r[2] = r[2] + 10 * PI / 180.0; // Add a degree
  if (r[0] >= 360.0 * PI / 180.0) r[0] = 0;
  if (r[1] >= 360.0 * PI / 180.0) r[1] = 0;
  if (r[2] >= 360.0 * PI / 180.0) r[2] = 0;

  for (int i = 0; i < 8; i++)
  {
    float px2 = px[i];
    float py2 = cos(r[0]) * py[i] - sin(r[0]) * pz[i];
    float pz2 = sin(r[0]) * py[i] + cos(r[0]) * pz[i];

    float px3 = cos(r[1]) * px2 + sin(r[1]) * pz2;
    float py3 = py2;
    float pz3 = -sin(r[1]) * px2 + cos(r[1]) * pz2;

    float ax = cos(r[2]) * px3 - sin(r[2]) * py3;
    float ay = sin(r[2]) * px3 + cos(r[2]) * py3;
    float az = pz3 - 150;

    p2x[i] = SCREEN_WIDTH / 2 + ax * SHAPE_SIZE / az;
    p2y[i] = SCREEN_HEIGHT / 2 + ay * SHAPE_SIZE / az;
  }

  for (int i = 0; i < 3; i++)
  {
    oled.line(p2x[i], p2y[i], p2x[i + 1], p2y[i + 1]);
    oled.line(p2x[i + 4], p2y[i + 4], p2x[i + 5], p2y[i + 5]);
    oled.line(p2x[i], p2y[i], p2x[i + 4], p2y[i + 4]);
  }
  oled.line(p2x[3], p2y[3], p2x[0], p2y[0]);
  oled.line(p2x[7], p2y[7], p2x[4], p2y[4]);
  oled.line(p2x[3], p2y[3], p2x[7], p2y[7]);
}


// This function displays both °C and °F on the microOLED
void displayC_F() {

  //oled.clear(PAGE);            // Clear the display, this is already called before we enter this function

  oled.setCursor(0, 0);        // Set cursor to top-left
  oled.setFontType(0);         // Smallest font
  oled.print(" Room Temp ");   // Print

  oled.setCursor(0, 16);       // Set cursor to middle-ish
  oled.setFontType(1);         // medium font
  oled.print(String(tempC, 2) + " C"); // Print temp, assuming that it is within room temp in tens
  oled.print(String(tempF, 2) + " F");// Print temp, assuming that it is within room temp in tens
  oled.circle(50, 17, 1);      //"degree" sign after output values
  oled.circle(50, 33, 1);      //"degree" sign after output values

  //oled.display();              // Update the display, this is already called after we exit this function
}


// This function draws a line at the very bottom of the screen showing how long
// it'll be before the screen updates.
// Based on Jim's micro OLED code used in the Photon SIK KIT => [ https://github.com/sparkfun/Inventors_Kit_For_Photon_Experiments/blob/master/11-OLEDApps/Code/02-WeatherForecast/WeatherApp.ino ]
void displayProgressBar() {
  // Use lastDisplayUpdate's time, the time Arduino has been running
  // (since we do not have an RTC, Internet, or GPS), and the total time
  // per page (DISPLAY_UPDATE_RATE) to calculate what portion
  // of the display bar needs to be drawn.
  percentage = (float)(currentMillis - lastDisplayUpdate) / (float)DISPLAY_UPDATE_RATE;

  //for debugging progress bar
  //SerialUSB.println(currentMillis);
  //SerialUSB.println(lastDisplayUpdate);
  //SerialUSB.println(DISPLAY_UPDATE_RATE);
  //SerialUSB.println(percentage);
  //SerialUSB.println(oled.getLCDWidth());

  // Mutliply that value by the total lcd width to get the pixel length of our line
  progressWidth = percentage * oled.getLCDWidth();
  // the y-position of our line should be at the very bottom of the screen:
  progressY = oled.getLCDHeight() - 1;


  // First, draw a blank line to clear any old lines out:
  oled.line(0, progressY, oled.getLCDWidth(), progressY, BLACK, NORM);
  // Next, draw our line:
  oled.line(0, progressY, progressWidth, progressY);
  //oled.display(); // Update the display, this is already called after we exit this function
}
If you opted to use the Qwiic TMP102, copy and paste the following code to your Arduino IDE. Make sure the switch is flipped to the ON position on the board before hitting the upload button.
language:c
/******************************************************************************
  Digital Indoor Temperature Monitor with the TMP102
  Written by: Ho Yun "Bobby" Chan
  @ SparkFun Electronics
  Date: Mar 26, 2019

  Description: This sketch configures temperature sensors and prints the
  temperature in degrees celsius and fahrenheit to the Qwiic microOLED.
  Simply adjust the `output_select` to view the °C, °F, or both. You can
  also output the values to the Serial Monitor or Plotter at 115200 baud
  to view the data. There is also a demo mode that displays each output
  on the microOLED with a progress bar at the bottom.

  Resources/Libraries:
  Wire.h (included with Arduino IDE)
  SparkFunTMP102.h (included in the src folder) http://librarymanager/All#SparkFun_TMP102
  SFE_MicroOLED.h (included in the src folder)  http://librarymanager/All#SparkFun_micro_OLED

  Development Environment Specifics:
  Arduino 1.8.10+

  License:
  This code is released under the MIT License (http://opensource.org/licenses/MIT)
  Distributed as-is; no warranty is given.

******************************************************************************/

#include <Wire.h>           // Used to establish SerialUSB communication on the I2C bus
#include <SparkFunTMP102.h> // Used to send and recieve specific information from our sensor
#include <SFE_MicroOLED.h>  // Include the SFE_MicroOLED library

//#define SerialUSB Serial     //Uncomment if you are not using a native USB like the Atmega32U4 or SAMD21

///////////////////////////////
///////// micro OLED //////////
///////////////////////////////

#define PIN_RESET 7         // A pin needs to be declared even though we are not physically connecting to the Qwiic micro OLED via I2C
#define DC_JUMPER 1
MicroOLED oled(PIN_RESET, DC_JUMPER);    // I2C declaration

///////////////////////////////
/////////// TMP102 ////////////
///////////////////////////////

// The default address of the device is 0x48 = (GND)
TMP102 sensor; // Initalize sensor

//Set up variables to hold temperature
float tempC = 0;
float tempF = 0;

//0 = output degrees °C
//1 = output degrees °F
//2 or any other number = output degrees °C and °F
int output_select = 3; //select output

///////////////////////////////
// Display Mode Page Control //
///////////////////////////////
// This enum defines all of our display modes and their order.
enum t_displayModes {
  DISPLAY_BIG_C,
  DISPLAY_BIG_F,
  DISPLAY_CUBE,
  DISPLAY_C_F
};

const int NUM_DISPLAY_MODES = 4; // Number of values defined in enum above
volatile int displayMode = NUM_DISPLAY_MODES - 1; // Keeps track of current display page

const unsigned long DISPLAY_UPDATE_RATE = 4000; // Cycle display every 5 seconds
unsigned long lastDisplayUpdate = 0; // Stores time of last display update
unsigned long currentMillis = 0; // Stores time of last display update

float percentage = 0; //store percent for progress bar
int progressWidth = 0; // Width of progress bar depends on the [% * (64 pixels wide)]
int progressY = 0;     //location of the progress bar at the botton of the microOLED

///////////////////////////////
/////// Initialize Cube ///////
///////////////////////////////

int SCREEN_WIDTH = oled.getLCDWidth();
int SCREEN_HEIGHT = oled.getLCDHeight();

float d = 3;
float px[] = {
  -d,  d,  d, -d, -d,  d,  d, -d
};
float py[] = {
  -d, -d,  d,  d, -d, -d,  d,  d
};
float pz[] = {
  -d, -d, -d, -d,  d,  d,  d,  d
};

float p2x[] = {
  0, 0, 0, 0, 0, 0, 0, 0
};
float p2y[] = {
  0, 0, 0, 0, 0, 0, 0, 0
};

float r[] = {
  0, 0, 0
};

#define SHAPE_SIZE 600
// Define how fast the cube rotates. Smaller numbers are faster.
// This is the number of ms between draws.
//#define ROTATION_SPEED 0


void setup() {
  delay(100);
  Wire.begin();

  oled.begin();    // Initialize the OLED
  oled.clear(ALL); // Clear the display's internal memory
  oled.display();  // Display what's in the buffer (splashscreen)
  delay(1000);     // Delay 1000 ms
  oled.clear(PAGE); // Clear the buffer.

  SerialUSB.begin(115200);    // Start SerialUSB communication at 115200 baud
  Wire.setClock(400000);   // Set clock speed to be the fastest for better communication (fast mode)

  if (sensor.begin() == true ) // Function to check if the sensor will correctly self-identify with the proper Device ID/Address
  {
    //SerialUSB.println("Begin");

    if (output_select == 0 ) {
      SerialUSB.println("TMP102[°C]");

    }
    else if (output_select == 1) {
      SerialUSB.println("TMP102[°F]");

    }
    else {
      SerialUSB.print("TMP102[°C]");
      SerialUSB.print(",");
      SerialUSB.println("TMP102[°F]");

    }
  }
  else
  {
    SerialUSB.println("Device failed to setup- Freezing code.");
    while (1); // Runs forever
  }

  sensor.wakeup(); // wake the sensor up, we do not care about low power mode since we will constantly be reading the temperature

}//end setup

void loop() {

  //get TMP102 sensor readings
  tempC = sensor.readTempC();
  tempF = sensor.readTempF();

  //get time based on how long the Arduino has been running
  currentMillis = millis();

  if (output_select == 0 ) {

    oled.clear(PAGE);            // Clear the display
    displayC();
    oled.display();

    // Print temperature in °C
    //SerialUSB.print("Temperature in Celsius: ");
    SerialUSB.println(tempC);//TMP102 temperature
  }
  else if (output_select == 1) {

    oled.clear(PAGE);            // Clear the display
    displayF();
    oled.display();

    // Print temperature in °F
    //SerialUSB.print("Temperature in Fahrenheit: ");
    SerialUSB.println(tempF);

  }
  else if (output_select == 2) {
    //Display both temperatures as °C and °F

    oled.clear(PAGE);            // Clear the display

    oled.setCursor(0, 0);        // Set cursor to top-left
    oled.setFontType(0);         // Smallest font
    oled.print(" Room Temp ");   // Print

    oled.setCursor(0, 16);       // Set cursor to middle-ish
    oled.setFontType(1);         // medium font
    oled.print(String(tempC, 2) + " C"); // Print temp, assuming that it is within room temp in tens
    oled.print(String(tempF, 2) + " F");// Print temp, assuming that it is within room temp in tens
    oled.circle(50, 17, 1);      //"degree" sign after output values
    oled.circle(50, 33, 1);      //"degree" sign after output values

    oled.display();

    //TMP102 temperature with comma delimiter for graphing or datalogging
    SerialUSB.print(tempC);
    SerialUSB.print(",");  //seperator
    SerialUSB.println(tempF);
  }
  else {
    // Displaying °C and °F with a scroll bar

    // Another method of updating display:
    // The display will cycle itself every DISPLAY_UPDATE_RATE seconds
    if ( currentMillis >= (lastDisplayUpdate + DISPLAY_UPDATE_RATE + 1000) )
    {
      // Increment displayMode, next time through a new page will be displayed:
      displayMode = (displayMode + 1) % NUM_DISPLAY_MODES;

      // Update lastDisplayTime, so we don't come back for DISPLAY_UPDATE_RATE seconds
      lastDisplayUpdate = currentMillis;

    }

    oled.clear(PAGE);            // Clear the display
    updateDisplay();
    displayProgressBar(); // Draws a progress bar at the bottom of the screen
    oled.display();

    //TMP102 temperature with comma delimiter for graphing or datalogging
    SerialUSB.print(tempC);
    SerialUSB.print(",");  //seperator
    SerialUSB.println(tempF);

  }

  //delay(5); // Delay added for easier readings

}//end loop


//This function updates the display if we are scrolling through all displays with a progress bar.
void updateDisplay() {

  switch (displayMode)
  {
    case DISPLAY_BIG_C:
      displayC();
      break;
    case DISPLAY_BIG_F:
      displayF();
      break;
    case DISPLAY_CUBE: //used as a screensaver
      drawCube();
      break;
    case DISPLAY_C_F:
      displayC_F();
      break;
  }

}


// This function displays the temperature in °C as big digits.
void displayC() {

  //oled.clear(PAGE);         // Clear the display, this is already called before we enter this function

  oled.setCursor(0, 0);        // Set cursor to top-left
  oled.setFontType(0);         // Smallest font
  oled.print(" Room Temp ");   // Print

  oled.setCursor(0, 16);       // Set cursor to middle-ish
  oled.print(" ");             // Print
  oled.setFontType(2);         // medium font
  oled.print(tempC);           // Print temp, assuming that it is within room temp in tens

  oled.setCursor(0, 38);       // Set cursor to middle-ish
  oled.setFontType(0);         // Smallest font
  oled.print("   deg C");      // Print

  //oled.display();            // Update the display, this is already called after we exit this function

}


// This function displays the temperature in °F as big digits.
void displayF() {

  //oled.clear(PAGE);          // Clear the display, this is already called before we enter this function

  oled.setCursor(0, 0);        // Set cursor to top-left
  oled.setFontType(0);         // Smallest font
  oled.print(" Room Temp ");   // Print

  oled.setCursor(0, 16);       // Set cursor to middle-ish
  oled.print(" ");             // Print
  oled.setFontType(2);         // medium font
  oled.print(tempF);           // Print temp, assuming that it is within room temp in tens

  oled.setCursor(0, 38);       // Set cursor to middle-ish
  oled.setFontType(0);         // Smallest font
  oled.print("   deg F");        // Print

  //oled.display();            // Update the display, this is already called after we exit this function

}


// This function animates a cube. This is used as a quick screensaver.
void drawCube() {

  r[0] = r[0] + 10 * PI / 180.0; // Add a degree
  r[1] = r[1] + 10 * PI / 180.0; // Add a degree
  r[2] = r[2] + 10 * PI / 180.0; // Add a degree
  if (r[0] >= 360.0 * PI / 180.0) r[0] = 0;
  if (r[1] >= 360.0 * PI / 180.0) r[1] = 0;
  if (r[2] >= 360.0 * PI / 180.0) r[2] = 0;

  for (int i = 0; i < 8; i++)
  {
    float px2 = px[i];
    float py2 = cos(r[0]) * py[i] - sin(r[0]) * pz[i];
    float pz2 = sin(r[0]) * py[i] + cos(r[0]) * pz[i];

    float px3 = cos(r[1]) * px2 + sin(r[1]) * pz2;
    float py3 = py2;
    float pz3 = -sin(r[1]) * px2 + cos(r[1]) * pz2;

    float ax = cos(r[2]) * px3 - sin(r[2]) * py3;
    float ay = sin(r[2]) * px3 + cos(r[2]) * py3;
    float az = pz3 - 150;

    p2x[i] = SCREEN_WIDTH / 2 + ax * SHAPE_SIZE / az;
    p2y[i] = SCREEN_HEIGHT / 2 + ay * SHAPE_SIZE / az;
  }

  for (int i = 0; i < 3; i++)
  {
    oled.line(p2x[i], p2y[i], p2x[i + 1], p2y[i + 1]);
    oled.line(p2x[i + 4], p2y[i + 4], p2x[i + 5], p2y[i + 5]);
    oled.line(p2x[i], p2y[i], p2x[i + 4], p2y[i + 4]);
  }
  oled.line(p2x[3], p2y[3], p2x[0], p2y[0]);
  oled.line(p2x[7], p2y[7], p2x[4], p2y[4]);
  oled.line(p2x[3], p2y[3], p2x[7], p2y[7]);
}


// This function displays both °C and °F on the microOLED
void displayC_F() {

  //oled.clear(PAGE);            // Clear the display, this is already called before we enter this function

  oled.setCursor(0, 0);        // Set cursor to top-left
  oled.setFontType(0);         // Smallest font
  oled.print(" Room Temp ");   // Print

  oled.setCursor(0, 16);       // Set cursor to middle-ish
  oled.setFontType(1);         // medium font
  oled.print(String(tempC, 2) + " C"); // Print temp, assuming that it is within room temp in tens
  oled.print(String(tempF, 2) + " F");// Print temp, assuming that it is within room temp in tens
  oled.circle(50, 17, 1);      //"degree" sign after output values
  oled.circle(50, 33, 1);      //"degree" sign after output values

  //oled.display();              // Update the display, this is already called after we exit this function
}


// This function draws a line at the very bottom of the screen showing how long
// it'll be before the screen updates.
// Based on Jim's micro OLED code used in the Photon SIK KIT => [ https://github.com/sparkfun/Inventors_Kit_For_Photon_Experiments/blob/master/11-OLEDApps/Code/02-WeatherForecast/WeatherApp.ino ]
void displayProgressBar() {
  // Use lastDisplayUpdate's time, the time Arduino has been running
  // (since we do not have an RTC, Internet, or GPS), and the total time
  // per page (DISPLAY_UPDATE_RATE) to calculate what portion
  // of the display bar needs to be drawn.
  percentage = (float)(currentMillis - lastDisplayUpdate) / (float)DISPLAY_UPDATE_RATE;

  //for debugging progress bar
  //SerialUSB.println(currentMillis);
  //SerialUSB.println(lastDisplayUpdate);
  //SerialUSB.println(DISPLAY_UPDATE_RATE);
  //SerialUSB.println(percentage);
  //SerialUSB.println(oled.getLCDWidth());

  // Mutliply that value by the total lcd width to get the pixel length of our line
  progressWidth = percentage * oled.getLCDWidth();
  // the y-position of our line should be at the very bottom of the screen:
  progressY = oled.getLCDHeight() - 1;


  // First, draw a blank line to clear any old lines out:
  oled.line(0, progressY, oled.getLCDWidth(), progressY, BLACK, NORM);
  // Next, draw our line:
  oled.line(0, progressY, progressWidth, progressY);
  //oled.display(); // Update the display, this is already called after we exit this function
}
After uploading the appropriate code for your temperature sensor, the Qwiic microOLED will begin displaying the temperature with different views. There should be an option to just display the temperature in degrees Celsius, Fahrenheit, or both temperatures at the same time depending on your personal preference. Just make sure to adjust the output_select as 0, 1, or 2, respectively. When finished, insert the USB cable to a USB power supply to power the board using a wall outlet.
Well, that was quick! Depending on where you place your sensor, you may need to offset the temperature sensor reading. Try adding the Qwiic button and modifying the code to toggle between degrees Fahrenheit or Celsius rather than the scroll bar. Or try adding a few more Qwiic sensors to monitor your environment. Then try making an enclosure to protect your Qwiic tower of sensing power! Looking for inspiration? Check out these other great tutorials using Qwiic-enabled sensors from SparkFun.
Looking for more temperature sensing fun? Check out the following tutorials with non-contact temperature sensors.
learn.sparkfun.com | CC BY-SA 3.0 | SparkFun Electronics | Niwot, Colorado