Qwiic Differential I2C Bus Extender (PCA9615) Hookup Guide
 Joel_E_B,
  Alex the Giant
I2C Bus Extender Example
For this example, we're going to use our Environmental Combo Breakout using the Differential I2C Bus Extender. To follow along in this example, you'll need the following:
You'll also need a straight-through Ethernet cable (up to 100ft).
Hardware Hookup
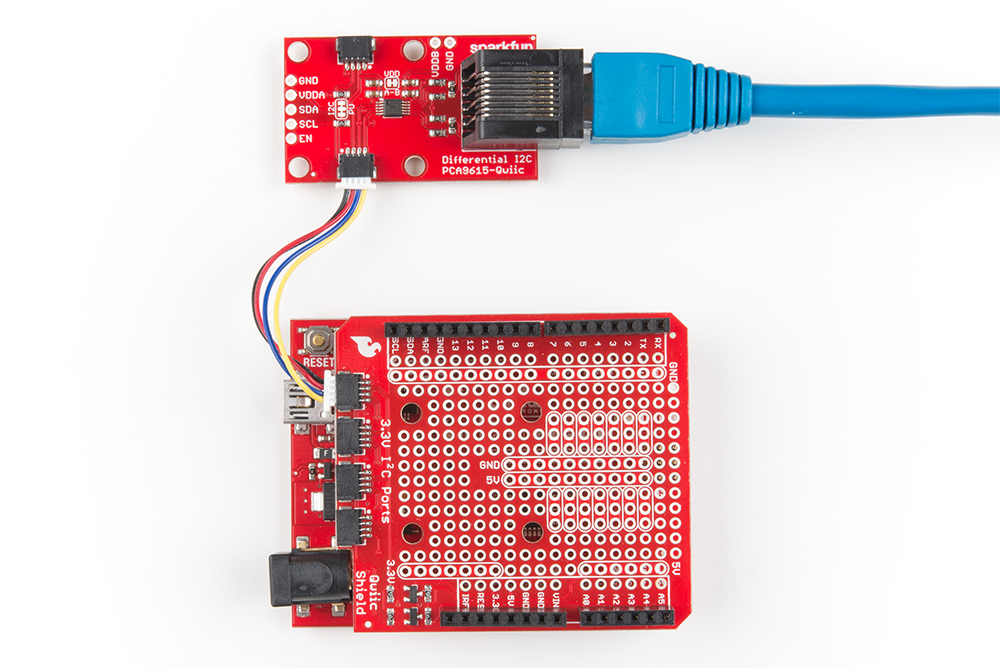
You'll first need to solder the headers on to the Qwiic shield and then connect the shield to the Redboard. Once that's done, you can connect one of the differential I2C to your Redboard as shown below using one of the Qwiic cables.
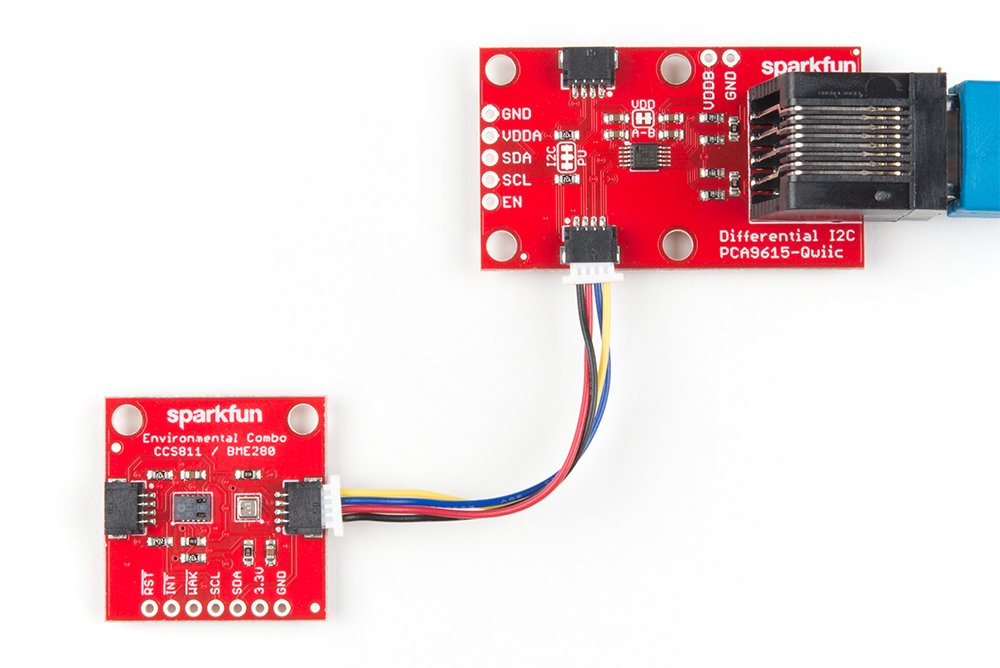
On the other end, all that's needed is to connect the environmental combo sensor to the other differential I2C using another Qwiic cable as shown below.
Arduino Library Installation
Note: This example assumes you are using the latest version of the Arduino IDE on your desktop. If this is your first time using Arduino, please review our tutorial on installing the Arduino IDE. If you have not previously installed an Arduino library, please check out our installation guide.
We're going to use the code from the environmental combo sensor's hookup guide.
CCS811/BME280 (Qwiic) Environmental Combo Breakout Hookup Guide
Since we are using the environmental combo sensor, the BME280 and CCS811 libraries need to be installed. SparkFun has written libraries to control both the CCS811 and the BME280. You can obtain these libraries through the Arduino Library Manager. Search for SparkFun BME280 and SparkFun CCS811 to install the latest version. If you prefer downloading the libraries, you can grab them here to manually install:
Example Code
With the sensor connected via the I2C bus extender, we will use example 2 of the environmental combo breakout. Assuming that you have installed the library for both sensors, copy the code below and paste it into your Arduino IDE and upload the sketch to your board.
language:c
#include <SparkFunBME280.h>  //https://github.com/sparkfun/SparkFun_BME280_Arduino_Library/
#include <SparkFunCCS811.h>  //https://github.com/sparkfun/SparkFun_CCS811_Arduino_Library/

#define CCS811_ADDR 0x5B //Default I2C Address
//#define CCS811_ADDR 0x5A //Alternate I2C Address

//Global sensor objects
CCS811 myCCS811(CCS811_ADDR);
BME280 myBME280;

void printData()
{
  Serial.print(" CO2[");
  Serial.print(myCCS811.getCO2());
  Serial.print("]ppm");

  Serial.print(" TVOC[");
  Serial.print(myCCS811.getTVOC());
  Serial.print("]ppb");

  Serial.print(" temp[");
  Serial.print(myBME280.readTempC(), 1);
  Serial.print("]C");

  //Serial.print(" temp[");
  //Serial.print(myBME280.readTempF(), 1);
  //Serial.print("]F");

  Serial.print(" pressure[");
  Serial.print(myBME280.readFloatPressure(), 2);
  Serial.print("]Pa");

  //Serial.print(" pressure[");
  //Serial.print((myBME280.readFloatPressure() * 0.0002953), 2);
  //Serial.print("]InHg");

  //Serial.print("altitude[");
  //Serial.print(myBME280.readFloatAltitudeMeters(), 2);
  //Serial.print("]m");

  //Serial.print("altitude[");
  //Serial.print(myBME280.readFloatAltitudeFeet(), 2);
  //Serial.print("]ft");

  Serial.print(" humidity[");
  Serial.print(myBME280.readFloatHumidity(), 0);
  Serial.print("]%");

  Serial.println();
}

void printDriverError( CCS811Core::status errorCode )
{
  switch ( errorCode )
  {
    case CCS811Core::SENSOR_SUCCESS:
      Serial.print("SUCCESS");
      break;
    case CCS811Core::SENSOR_ID_ERROR:
      Serial.print("ID_ERROR");
      break;
    case CCS811Core::SENSOR_I2C_ERROR:
      Serial.print("I2C_ERROR");
      break;
    case CCS811Core::SENSOR_INTERNAL_ERROR:
      Serial.print("INTERNAL_ERROR");
      break;
    case CCS811Core::SENSOR_GENERIC_ERROR:
      Serial.print("GENERIC_ERROR");
      break;
    default:
      Serial.print("Unspecified error.");
  }
}

void setup()
{
  Serial.begin(9600);
  Serial.println();
  Serial.println("Apply BME280 data to CCS811 for compensation.");

  //This begins the CCS811 sensor and prints error status of .begin()
  CCS811Core::status returnCode = myCCS811.begin();
  if (returnCode != CCS811Core::SENSOR_SUCCESS)
  {
    Serial.println("Problem with CCS811");
    printDriverError(returnCode);
  }
  else
  {
    Serial.println("CCS811 online");
  }

  //Initialize BME280
  //For I2C, enable the following and disable the SPI section
  myBME280.settings.commInterface = I2C_MODE;
  myBME280.settings.I2CAddress = 0x77;
  myBME280.settings.runMode = 3; //Normal mode
  myBME280.settings.tStandby = 0;
  myBME280.settings.filter = 4;
  myBME280.settings.tempOverSample = 5;
  myBME280.settings.pressOverSample = 5;
  myBME280.settings.humidOverSample = 5;

  //Calling .begin() causes the settings to be loaded
  delay(10);  //Make sure sensor had enough time to turn on. BME280 requires 2ms to start up.
  byte id = myBME280.begin(); //Returns ID of 0x60 if successful
  if (id != 0x60)
  {
    Serial.println("Problem with BME280");
  }
  else
  {
    Serial.println("BME280 online");
  }
}

void loop()
{
  if (myCCS811.dataAvailable()) //Check to see if CCS811 has new data (it's the slowest sensor)
  {
    myCCS811.readAlgorithmResults(); //Read latest from CCS811 and update tVOC and CO2 variables
    //getWeather(); //Get latest humidity/pressure/temp data from BME280
    printData(); //Pretty print all the data
  }
  else if (myCCS811.checkForStatusError()) //Check to see if CCS811 has thrown an error
  {
    Serial.println(myCCS811.getErrorRegister()); //Prints whatever CSS811 error flags are detected
  }

  delay(2000); //Wait for next reading
}
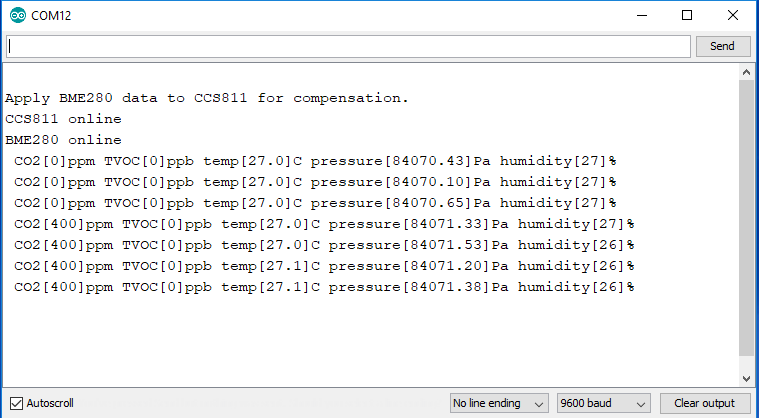
Once uploaded, open your favorite serial monitor to the port assigned to the Arduino. You should see something like similar to the output below: