Photon OLED Shield Hookup Guide
Introduction
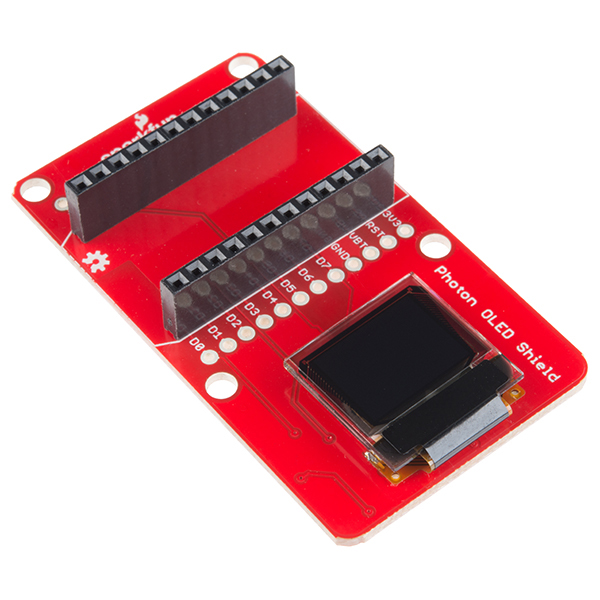
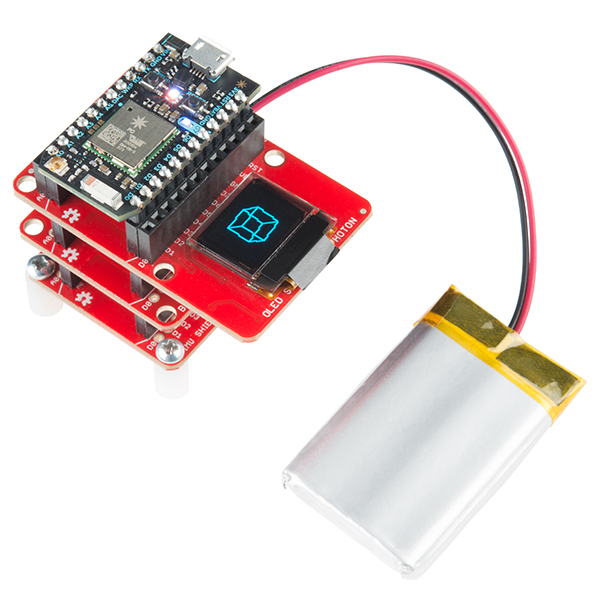
Want your Photon projects to display sensor readings, play pong, or draw little doodles? The Photon OLED Shield might be the perfect fit, and we're going to show you how to use it.
If the OLED screen in the picture above looks familiar, it's probably because we use the same component in our Microview and Micro OLED Breakout products, as well as the OLED Block for the Edison. We love it for it's combination of small footprint yet surprisingly clear graphics -- the screen itself is 0.66" across, with a display area measuring 64 pixels wide by 48 pixels tall.
Covered in this Tutorial
This tutorial will cover the functionality of the OLED shield, how to hook it up in your project, and how to program with it using the SparkFun Micro OLED Library.
Required Materials
All you need to get started with the Photon OLED Shield is a Photon, a micro-USB cable, and the OLED shield. You'll also want to sign up for an account on particle.io and register your photon. Instructions on how to do this can be found at docs.particle.io.
SparkFun Photon Micro OLED Shield
DEV-13628Particle Photon (Headers)
WRL-13774Suggested Reading
- Serial Peripheral Interface (SPI) -- SPI is the preferred method of communication with the display.
- I2C -- Alternatively, I2C can be used to control the display. It uses less wires, but is quite a bit slower.
OLED Shield Overview
Pin Descriptions
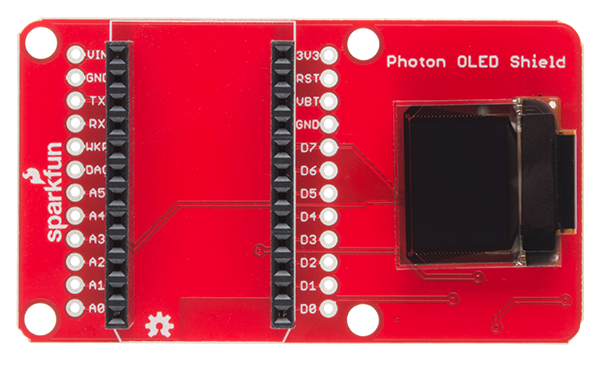
Since the shield does all of the work for you, there's no need to actually wire these connections - but in case you're looking at datasheets, or code for the Microview or OLED breakout, this table will give you a clue as to what the shield is doing. As always, you can check the schematic for more info.
| OLED Shield Pin | Photon Pin | SPI Function | I2C Function | Notes |
|---|---|---|---|---|
| GND | GND | Ground | Ground | 0V |
| 3V3 (VDD) | 3V3 | Power | Power | Should be a regulated 3.3V supply. |
| D1 (SDI/MOSI) | A5 | MOSI | SDA | Serial data in |
| D0 (SCK) | A3 | SCK | SCL | SPI and I2C clock |
| D2 (SDO) | MISO | — | Can be unused in SPI mode. No function for I2C. | — |
| D/C | D6 | Data / Command | I2C address selection | Digital pin to signal if incoming byte is a command or screen data. |
| RST | D7 | Reset | Reset | Active-low screen reset. |
| CS | A2 | — | SPI chip select (active-low) | — |
Setting the Jumpers
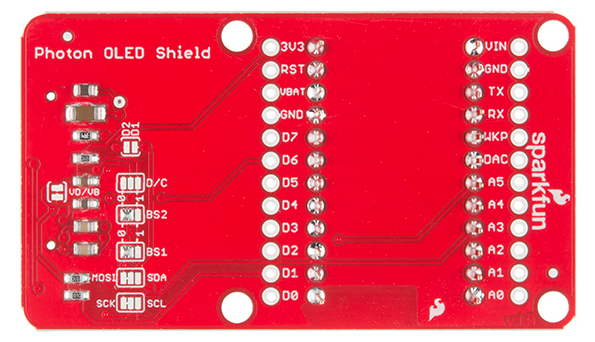
With the board flipped over, you'll notice there are six jumpers. The majority of these jumpers are used to switch between SPI and I2C mode. As the board ships, these jumpers are set to configure the display in SPI mode.
Here's an overview of each jumper, moving from left-to-right, top-to-bottom in the picture above:
- VD/VB -- This jumper shorts the digital power supply (VDD) to the battery power supply (VBAT). Because both of these supplies can be powered at 3.3V, an easy one-supply solution is to short them together and provide them a single supply. If you need to power the digital supply at something lower, like 1.8V, you may need to cut this jumper and provide two supplies.
- D1/D2 -- This jumper can be used to short D1 to D2. If you want to use SPI, leave this jumper open. If you're using I2C, short the jumper. By default this jumper is open.
- D/C -- This jumper can be used to short D/C to either 3.3V (1) or 0V (0). In I2C mode, the D/C pin sets the 7-bit address of the display. In SPI mode this jumper should be left open, as the D/C pin needs to be toggled to determine if an incoming byte is data or command.
- BS2 and BS1 -- These pins on the OLED determine which interface you're using to control the OLED. With the two signals, there are four possible combinations:
BS2 BS1 Interface 0 0 SPI 0 1 I2C 1 0 8-bit Parallel (6800) 1 1 8-bit Parallel (8080)
That brief overview should cover the 99% use case. Consult the schematic and the notes therein if you have any questions about jumpers or pins.
Using the OLED Shield
When attaching your Photon to the top of the OLED shield, make sure the beveled end of your Photon (next to A0 and D0) matches up with the beveled lines on the top of the OLED shield (the end with the Open Source Hardware Logo). The pin labels on the Photon should match those on the OLED shield as well. You can stack many of our Photon shields together, which is why the OLED screen juts out to the side. So, you can end up with something like this:
Using the Particle OLED Library
Great, now that we understand the hardware setup, let's put some code on this thing and see what it can do. Using the Particle library we've written, you'll be able to write text, draw lines and shapes, and generally display anything that'll fit on the screen.
Getting the Particle OLED Library
For this page we'll be using the online Particle environment. If you're using the Particle Dev environment instead, you can get the library and code examples from the GitHub repository.
Load the Demo Example
If you haven't created a Particle user account and claimed your board, you'll need to do that now. Starting here is a great idea if you're having trouble.
Once you're logged into build.particle.io and have a device selected (all this is covered at the link above), you'll want to click on the create new app button in the sidebar -- it's big and blue, you can't miss it. Call your app something like 'OLED_test'.
Next -- this is the important part -- we include the SparkFunMicroOLED library. To do this:
- Click on the icon that looks like a bookmark (it's all the way to the left on the black skinny sidebar, 4th up from the bottom)
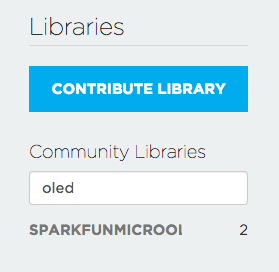
- In the text box under 'community libraries', search for 'OLED' and you'll see 'SparkFunMicroOLED' come up (though it might be cut off a little bit, don't worry).
It should look something like this:
- Click on the library name, and a bunch of stuff will pop up, including all the library files as well as a few options of what to do with the library.
- In this case, we just want to use the library in our app, so click on the 'include in app' button.
- This will lead you to list of all your apps - click on the name of the app you just created, and you should see a statement like
#include "SparkFunMicroOLED/SparkFunMicroOLED.h"at the top of your app. - Last thing is to add the math library to our sketch - on the line below the first
#includestatement, type in:#include "math.h"
Now that we've included the library in our app, let's give it some code - just copy the demo code below and paste it into your app, below the include statements.
language:cpp
/*
Micro-OLED-Shield-Example.ino
SparkFun Micro OLED Library Hello World Example
Jim Lindblom @ SparkFun Electronics
Original Creation Date: June 22, 2015

This sketch prints a friendly, recognizable logo on the OLED Shield, then
  goes on to demo the Micro OLED library's functionality drawing pixels,
  lines, shapes, and text.

  Hardware Connections:
  This sketch was written specifically for the Photon Micro OLED Shield, which does all the wiring for you. If you have a Micro OLED breakout, use the following hardware setup:

    MicroOLED ------------- Photon
      GND ------------------- GND
      VDD ------------------- 3.3V (VCC)
    D1/MOSI ----------------- A5 (don't change)
    D0/SCK ------------------ A3 (don't change)
      D2
      D/C ------------------- D6 (can be any digital pin)
      RST ------------------- D7 (can be any digital pin)
      CS  ------------------- A2 (can be any digital pin)

  Development environment specifics:
    IDE: Particle Build
    Hardware Platform: Particle Photon
                       SparkFun Photon Micro OLED Shield

  This code is beerware; if you see me (or any other SparkFun
  employee) at the local, and you've found our code helpful,
  please buy us a round!

  Distributed as-is; no warranty is given.
*/

//////////////////////////////////
// MicroOLED Object Declaration //
//////////////////////////////////
// Declare a MicroOLED object. If no parameters are supplied, default pins are
// used, which will work for the Photon Micro OLED Shield (RST=D7, DC=D6, CS=A2)

MicroOLED oled;

void setup()
{
  oled.begin();    // Initialize the OLED
  oled.clear(ALL); // Clear the display's internal memory
  oled.display();  // Display what's in the buffer (splashscreen)
  delay(1000);     // Delay 1000 ms
  oled.clear(PAGE); // Clear the buffer.

  randomSeed(analogRead(A0) + analogRead(A1));
}

void loop()
{
  pixelExample();  // Run the pixel example function
  lineExample();   // Then the line example function
  shapeExample();  // Then the shape example
  textExamples();  // Finally the text example
}

void pixelExample()
{
  printTitle("Pixels", 1);

  for (int i=0; i<512; i++)
  {
    oled.pixel(random(oled.getLCDWidth()), random(oled.getLCDHeight()));
    oled.display();
  }
}

void lineExample()
{
  int middleX = oled.getLCDWidth() / 2;
  int middleY = oled.getLCDHeight() / 2;
  int xEnd, yEnd;
  int lineWidth = min(middleX, middleY);

  printTitle("Lines!", 1);

  for (int i=0; i<3; i++)
  {
    for (int deg=0; deg<360; deg+=15)
    {
      xEnd = lineWidth * cos(deg * M_PI / 180.0);
      yEnd = lineWidth * sin(deg * M_PI / 180.0);

      oled.line(middleX, middleY, middleX + xEnd, middleY + yEnd);
      oled.display();
      delay(10);
    }
    for (int deg=0; deg<360; deg+=15)
    {
      xEnd = lineWidth * cos(deg * M_PI / 180.0);
      yEnd = lineWidth * sin(deg * M_PI / 180.0);

      oled.line(middleX, middleY, middleX + xEnd, middleY + yEnd, BLACK, NORM);
      oled.display();
      delay(10);
    }
  }
}

void shapeExample()
{
  printTitle("Shapes!", 0);

  // Silly pong demo. It takes a lot of work to fake pong...
  int paddleW = 3;  // Paddle width
  int paddleH = 15;  // Paddle height
  // Paddle 0 (left) position coordinates
  int paddle0_Y = (oled.getLCDHeight() / 2) - (paddleH / 2);
  int paddle0_X = 2;
  // Paddle 1 (right) position coordinates
  int paddle1_Y = (oled.getLCDHeight() / 2) - (paddleH / 2);
  int paddle1_X = oled.getLCDWidth() - 3 - paddleW;
  int ball_rad = 2;  // Ball radius
  // Ball position coordinates
  int ball_X = paddle0_X + paddleW + ball_rad;
  int ball_Y = random(1 + ball_rad, oled.getLCDHeight() - ball_rad);//paddle0_Y + ball_rad;
  int ballVelocityX = 1;  // Ball left/right velocity
  int ballVelocityY = 1;  // Ball up/down velocity
  int paddle0Velocity = -1;  // Paddle 0 velocity
  int paddle1Velocity = 1;  // Paddle 1 velocity

  //while(ball_X >= paddle0_X + paddleW - 1)
  while ((ball_X - ball_rad > 1) &&
         (ball_X + ball_rad < oled.getLCDWidth() - 2))
  {
    // Increment ball's position
    ball_X+=ballVelocityX;
    ball_Y+=ballVelocityY;
    // Check if the ball is colliding with the left paddle
    if (ball_X - ball_rad < paddle0_X + paddleW)
    {
      // Check if ball is within paddle's height
      if ((ball_Y > paddle0_Y) && (ball_Y < paddle0_Y + paddleH))
      {
        ball_X++;  // Move ball over one to the right
        ballVelocityX = -ballVelocityX; // Change velocity
      }
    }
    // Check if the ball hit the right paddle
    if (ball_X + ball_rad > paddle1_X)
    {
      // Check if ball is within paddle's height
      if ((ball_Y > paddle1_Y) && (ball_Y < paddle1_Y + paddleH))
      {
        ball_X--;  // Move ball over one to the left
        ballVelocityX = -ballVelocityX; // change velocity
      }
    }
    // Check if the ball hit the top or bottom
    if ((ball_Y <= ball_rad) || (ball_Y >= (oled.getLCDHeight() - ball_rad - 1)))
    {
      // Change up/down velocity direction
      ballVelocityY = -ballVelocityY;
    }
    // Move the paddles up and down
    paddle0_Y += paddle0Velocity;
    paddle1_Y += paddle1Velocity;
    // Change paddle 0's direction if it hit top/bottom
    if ((paddle0_Y <= 1) || (paddle0_Y > oled.getLCDHeight() - 2 - paddleH))
    {
      paddle0Velocity = -paddle0Velocity;
    }
    // Change paddle 1's direction if it hit top/bottom
    if ((paddle1_Y <= 1) || (paddle1_Y > oled.getLCDHeight() - 2 - paddleH))
    {
      paddle1Velocity = -paddle1Velocity;
    }

    // Draw the Pong Field
    oled.clear(PAGE);  // Clear the page
    // Draw an outline of the screen:
    oled.rect(0, 0, oled.getLCDWidth() - 1, oled.getLCDHeight());
    // Draw the center line
    oled.rectFill(oled.getLCDWidth()/2 - 1, 0, 2, oled.getLCDHeight());
    // Draw the Paddles:
    oled.rectFill(paddle0_X, paddle0_Y, paddleW, paddleH);
    oled.rectFill(paddle1_X, paddle1_Y, paddleW, paddleH);
    // Draw the ball:
    oled.circle(ball_X, ball_Y, ball_rad);
    // Actually draw everything on the screen:
    oled.display();
    delay(25);  // Delay for visibility
  }
  delay(1000);
}

void textExamples()
{
  printTitle("Text!", 1);

  // Demonstrate font 0. 5x8 font
  oled.clear(PAGE);     // Clear the screen
  oled.setFontType(0);  // Set font to type 0
  oled.setCursor(0, 0); // Set cursor to top-left
  // There are 255 possible characters in the font 0 type.
  // Lets run through all of them and print them out!
  for (int i=0; i<=255; i++)
  {
    // You can write byte values and they'll be mapped to
    // their ASCII equivalent character.
    oled.write(i);  // Write a byte out as a character
    oled.display(); // Draw on the screen
    delay(10);      // Wait 10ms
    // We can only display 60 font 0 characters at a time.
    // Every 60 characters, pause for a moment. Then clear
    // the page and start over.
    if ((i%60 == 0) && (i != 0))
    {
      delay(500);           // Delay 500 ms
      oled.clear(PAGE);     // Clear the page
      oled.setCursor(0, 0); // Set cursor to top-left
    }
  }
  delay(500);  // Wait 500ms before next example

  // Demonstrate font 1. 8x16. Let's use the print function
  // to display every character defined in this font.
  oled.setFontType(1);  // Set font to type 1
  oled.clear(PAGE);     // Clear the page
  oled.setCursor(0, 0); // Set cursor to top-left
  // Print can be used to print a string to the screen:
  oled.print(" !\"#$%&'()*+,-./01234");
  oled.display();       // Refresh the display
  delay(1000);          // Delay a second and repeat
  oled.clear(PAGE);
  oled.setCursor(0, 0);
  oled.print("56789:;<=>?@ABCDEFGHI");
  oled.display();
  delay(1000);
  oled.clear(PAGE);
  oled.setCursor(0, 0);
  oled.print("JKLMNOPQRSTUVWXYZ[\\]^");
  oled.display();
  delay(1000);
  oled.clear(PAGE);
  oled.setCursor(0, 0);
  oled.print("_`abcdefghijklmnopqrs");
  oled.display();
  delay(1000);
  oled.clear(PAGE);
  oled.setCursor(0, 0);
  oled.print("tuvwxyz{|}~");
  oled.display();
  delay(1000);

  // Demonstrate font 2. 10x16. Only numbers and '.' are defined.
  // This font looks like 7-segment displays.
  // Lets use this big-ish font to display readings from the
  // analog pins.
  for (int i=0; i<25; i++)
  {
    oled.clear(PAGE);            // Clear the display
    oled.setCursor(0, 0);        // Set cursor to top-left
    oled.setFontType(0);         // Smallest font
    oled.print("A0:");          // Print "A0"
    oled.setFontType(2);         // 7-segment font
    oled.print(analogRead(A0));  // Print a0 reading
    oled.setCursor(0, 16);       // Set cursor to top-middle-left
    oled.setFontType(0);         // Repeat
    oled.print("A1:");
    oled.setFontType(2);
    oled.print(analogRead(A1));
    oled.setCursor(0, 32);
    oled.setFontType(0);
    oled.print("A7:");
    oled.setFontType(2);
    oled.print(analogRead(A7));
    oled.display();
    delay(100);
  }

  // Demonstrate font 3. 12x48. Stopwatch demo.
  oled.setFontType(3);  // Use the biggest font
  int ms = 0;
  int s = 0;
  while (s <= 50)
  {
    oled.clear(PAGE);     // Clear the display
    oled.setCursor(0, 0); // Set cursor to top-left
    if (s < 10)
      oled.print("00");   // Print "00" if s is 1 digit
    else if (s < 100)
      oled.print("0");    // Print "0" if s is 2 digits
    oled.print(s);        // Print s's value
    oled.print(":");      // Print ":"
    oled.print(ms);       // Print ms value
    oled.display();       // Draw on the screen
    ms++;         // Increment ms
    if (ms >= 10) // If ms is >= 10
    {
      ms = 0;     // Set ms back to 0
      s++;        // and increment s
    }
    delay(1);
  }
}

// Center and print a small title
// This function is quick and dirty. Only works for titles one
// line long.
void printTitle(String title, int font)
{
  int middleX = oled.getLCDWidth() / 2;
  int middleY = oled.getLCDHeight() / 2;

  oled.clear(PAGE);
  oled.setFontType(font);
  // Try to set the cursor in the middle of the screen
  oled.setCursor(middleX - (oled.getFontWidth() * (title.length()/2)),
                 middleY - (oled.getFontWidth() / 2));
  // Print the title:
  oled.print(title);
  oled.display();
  delay(1500);
  oled.clear(PAGE);
}
Now, click the 'flash' button (the one that looks like a lightning bolt) and wait for the magic to begin!
Resources and Going Further
Here are a few links that should help with any further questions you may have about the Photon OLED Shield:
- Photon OLED Shield Github - for schematics and board design files
- SparkFun OLED Particle Libarary -- this is where to go for the firmware library and example code
- Particle Documentation Pages -- go here to set up and configure your Photon (or other Particle devices)
- Particle Community Forum -- anything that you couldn't find in the docs should be easily found in the community forum. If you are having trouble, search this forum first, as many of the answers are there already.
Going Further
Now that you're comfortable with the Photon OLED Shield and its Particle library, what are you going to make with it? Need some inspiration, check out these related tutorials:
Serial Graphic LCD Hookup
RGB Panel Hookup Guide
Reaction Timer
The OLED Shield pairs very well with any of our other Photon Shields; check out our hookup guides for those shields:
