Origami Paper Circuits
 Sarah Al-Mutlaq
 Getting Started
We love paper circuits! They're fun, they're easy to teach, and there are so many different ways you can create paper circuits. In this tutorial, we will show you how to incorporate paper circuits into Origami.

Required Materials
For this tutorial, we will be using origami paper. Regular paper can also be used, but make sure that it can be folded several times and bent without ripping, but also be thin enough that light can shine through it.
For the electronic parts, I have chosen to use copper tape and LED stickers, but you could easily use regular LEDs, Lilypad LEDs, or any number of other LEDs and some adhesive and resistors.
As for the connections, Bare Conductive paint, Circuit Scripe pen, or regular wires could be used instead of copper tape. I chose copper tape and LED stickers because they are already adhesive, they work well with paper, can stick to the origami paper I have, and I can solder to the copper tape for better connections if needed. When choosing your components make sure to check that everything can work together without issue. For example, Bare Conductive paint and the Circuit Scribe pen ink DO NOT work on glossy origami paper, so if you want to use them think about going with a different kind of paper.
Here is a list of exactly what I used for my origami flowers:
Note that origami paper (or some other kind of paper) is also needed. Also worth noting is that two power options are listed int he wish list, a battery and a wall adapter. You will only need one of these to power your project.
Tools
Here are the tools I used:
- Soldering Iron (optional)
- Solder (optional)
- Krazy Glue (may be needed depending on the flower you chose)
- Invisible Tape (may be needed depending on the flower you chose, or if you don't want to solder)
Suggested Reading
If this is your first time working with paper electronics, or you want more information about all your options, and each of their pros and cons, take a look at The Great Big Guide to Paper Circuits.
The Great Big Guide to Paper Circuits
Some other tutorials that may come in handy are:
What is a Circuit?
Voltage, Current, Resistance, and Ohm's Law
Let It Glow Holiday Cards
Choosing a Flower
There are lots of origami flowers from which to choose. There are a few things to keep in mind when choosing one, each discussed below.
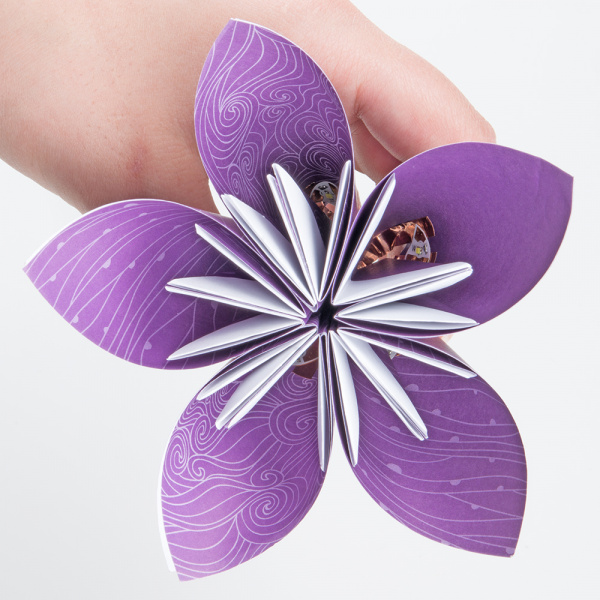
Do you want to be able to see the LEDs or not: With an open flower such as this:
 Origami Kusudama Flower
You can see the LEDs inside, which for most folks isn't a problem. However, for those who don't want the LEDs to show, you will want to look for a flower design that doesn't open and has at least one layer for you to put the LEDs behind:
 Origami Kawasaki Rose
When looking at the design of the flower, you are going to have to think about if there is a surface near the middle where you can put an LED. This is where things can get interesting, and you might have to get creative. I try and make as much of the flower as I can before it is all closed up/finished/glued together, and then I put in the LEDs right before finishing it. Sometimes there isn't a good place to put an LED. In that case, you can kinda "cheat" and insert a piece of paper with the LEDs connected into the center, and tape it in place. This worked well for this lotus flower:


Find a flower you like, get creative with it, and fold it up.
Here are the flowers I worked with and how to fold them:
- Here is a great tutorial video on how to make the five petal Kusudama Flower, done by Origami Instructions
- This video is a wonder tutorial for the Lotus flower done by ProudPaperOfficial
- and here is a video for the origami Rose by Carolzjh1 的频道. There are many variations on this kind of origami rose, so you might want to look around and find the one that you feels is prettiest and/or easiest for you to make.
To rate these from easiest to hardest, the five petal Kusudama flower is the easiest, using five full square sheets of paper that are glued shut and glued together. Medium difficulty would be the Lotus flower, which takes 12 half sheets of paper (6 full square sheets needed) rubber-banded together before the final folds. Lastly, the most difficult is the Rose (or Kawasaki Rose if you want to get really specific). This only uses one sheet of square paper, and all the folds are made before hand and squashed together. No tape, glue, or rubber bands are used for the rose, so if this is the flower you want to use, be prepared to watch the video a few times and to make a few mistakes before you get the technique down.
Adding LEDs
Conductive tape is one of the easiest ways to get started crafting a paper circuit. Just peel off the paper backing, and press down where you want your circuit to go! Copper tape is also solderable, allowing strong connections between components and traces that you won't get with paint and inking methods. (Again you might want to take a look at our more in depth Great Big Guide to Paper Circuits to help you understand all your choices and pick the right parts for your specific project.)
If you are just looking to use the flowers and components that I did, then here is an explanation of how I integrated the LED stickers and copper tape for each of the three flowers previously mentioned.
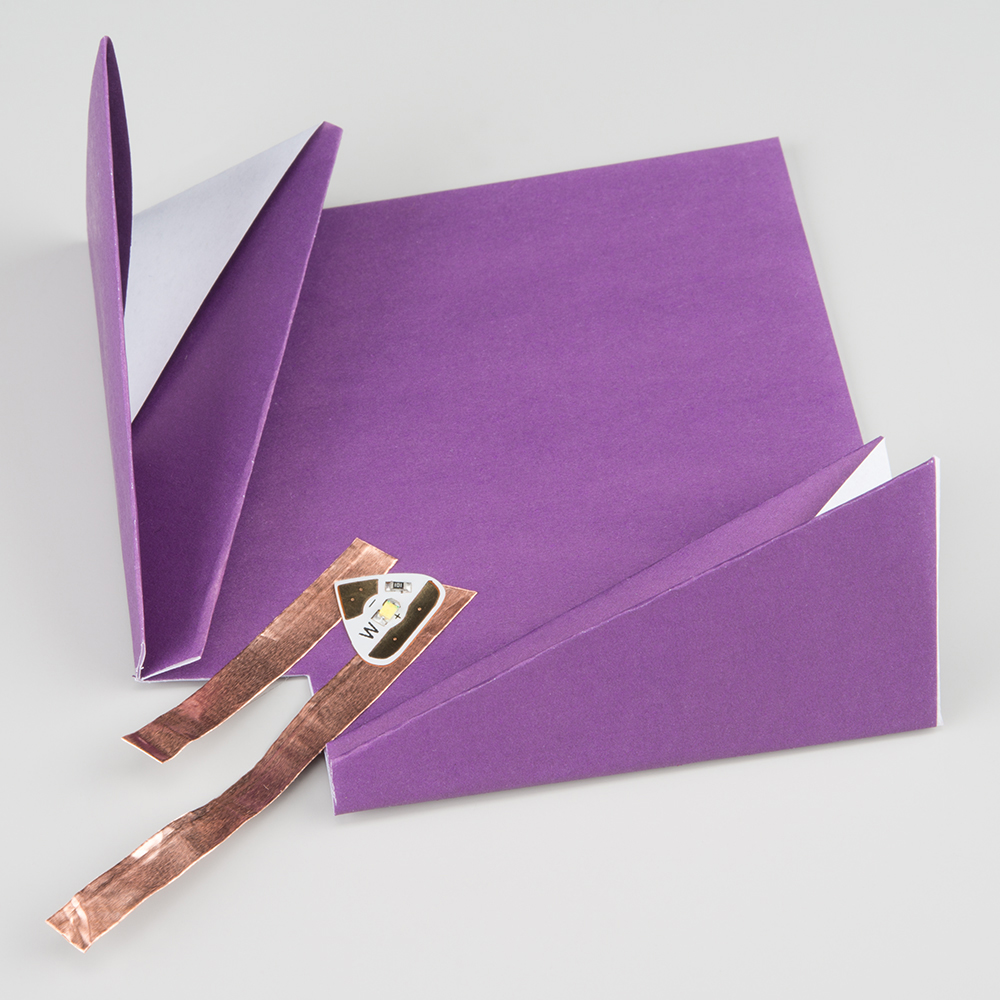
For the five petal flower, first I cut off the bottom corner of the petal so the wires have somewhere to go to the LED. Then I inserted the LEDs before using any glue but after I had done all of the folding:
For the lotus flower, I connected all the folded pieces with the rubber band and then added a paper with the LED before folding the petals up
For the rose, I folded everything and then unfolded the last step and placed an LED on one of the four prongs

Finishing Touches
For the last step, you can solder wires to the copper tape.

Make sure if you are using the same color wires for both 5V and ground, as I did in the photo above, that you mark one of the wires so that you can tell them apart when you close up the flower.
Make sure that the 5V and ground copper wires never touch at any point. Since the copper wires are conductive on the surface, if they touch at any point, you will short your circuit and probably burn up your LED.
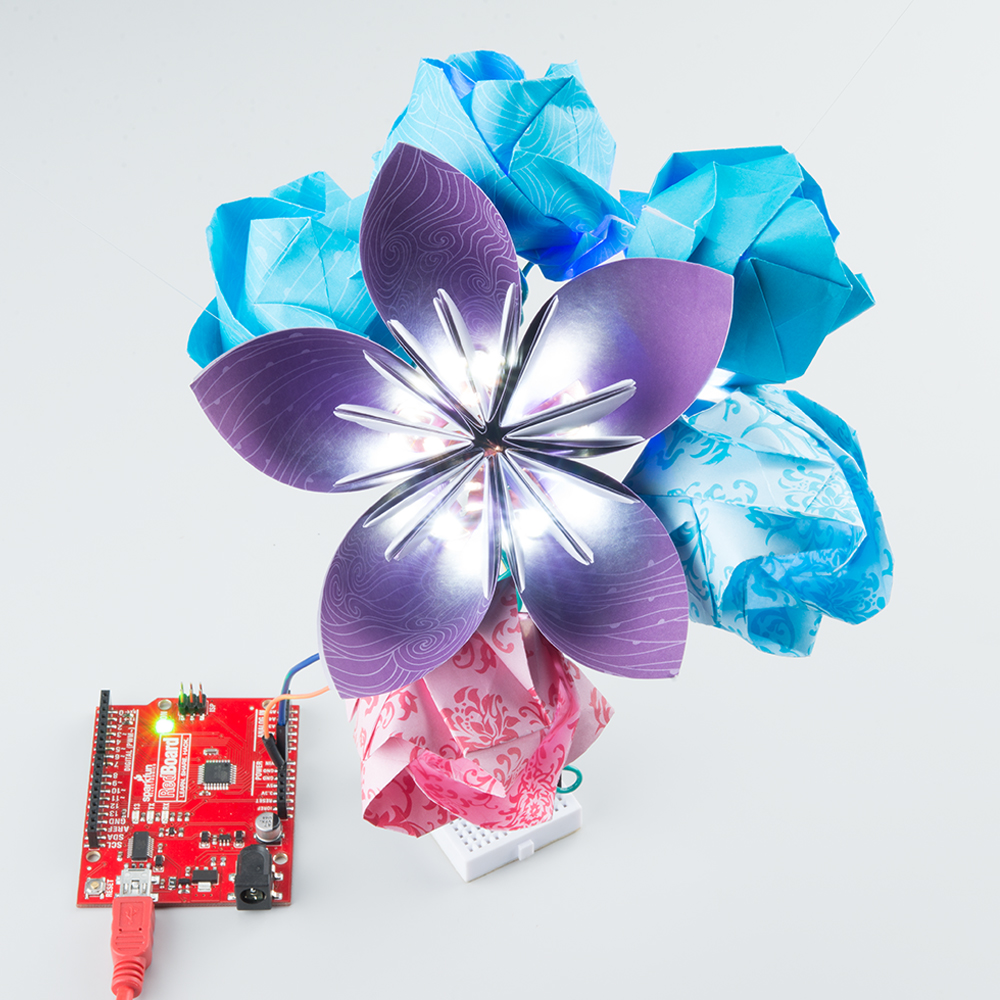
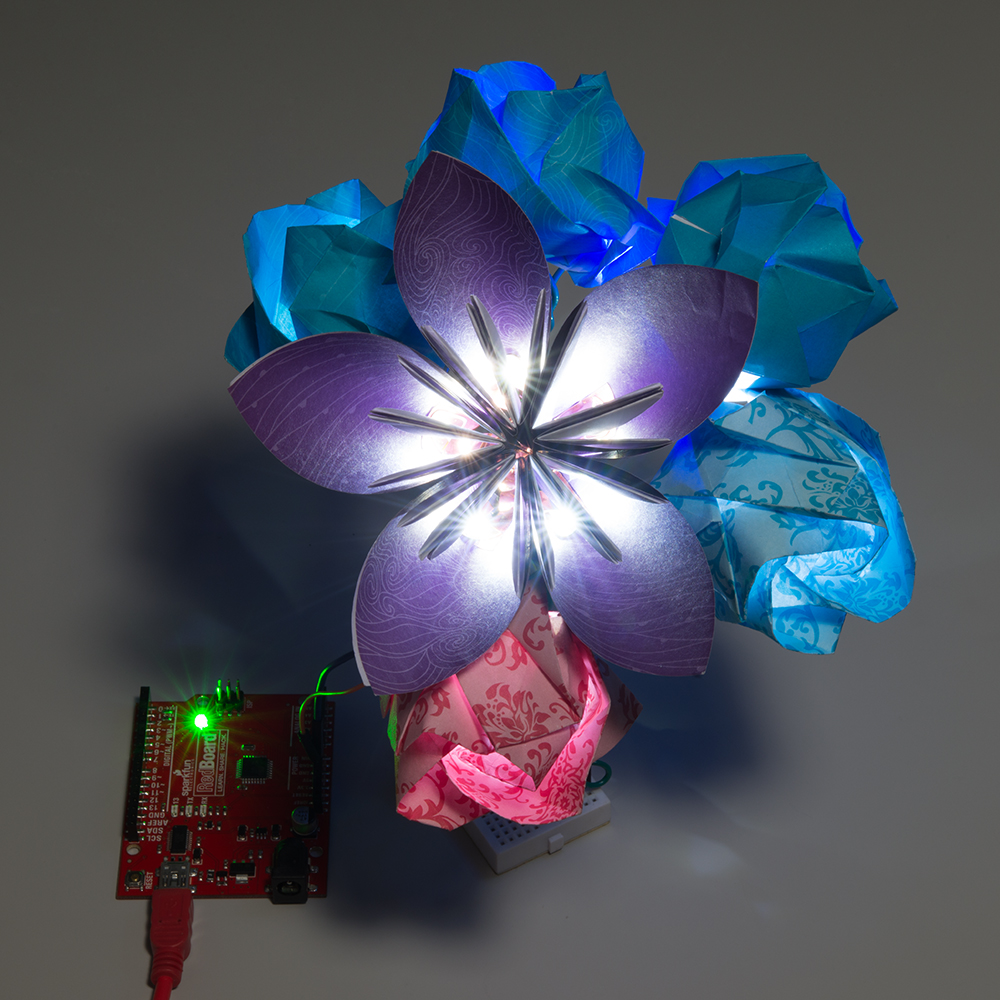
Once you have double checked your connections and made sure there aren't any shorts, connect your wire to ground and 5V. I have twisted mine to make them the stems of my flowers, or you could go further with magnets and metal sheets like my origami flower art installation and make something bigger.
Some of the LEDs I used were colored, and some where white. I suggest you try both out and see which color you like better, if using colored paper, or, if you just want to use white paper with a surprise color inside, that's fun too!

And there you have it! Lovely light up flowers!
Resources and Going Further
Now that you got a hang of embedding electronics with paper, try making an origami art installation!
Want to integrate electronics into more projects? Check out some of our other crafty tutorials: