Let It Glow Holiday Cards
 Gella
Gella 
Introduction
Craft a glowing card for friends and family this holiday season with paper circuits - no soldering required! This tutorial will guide you through how to create simple paper circuitry using only copper tape, a coin cell battery, a LilyPad Button Board, and an LED, and it will leave you with a basic understanding of how circuits work.


Paper engineer and pop up book designer Robert Sabuda allowed us to adapt some of his free templates for use with electronics. We'll be covering the electronics build in this tutorial and linking to Robert's instructions for the pop up cards.
Why Aren't We Soldering?
You may have seen Nick's awesome Father's Day Card tutorial and are wondering why this one is different. In classrooms or homes where supplies or budgets are limited, using tape and craft supplies helps keep complexity down. The drawback is that the connections aren't as sturdy/permanent with tape vs solder. You can always use these templates and solder components to the copper tape if you have the supplies on hand.
Suggested Reading
If you are brand new to working with electronics, here's some helpful reading to check out:
Materials and Tools
Here is a list of all the materials and tools you'd need to follow along:
- Copper Tape - 5mm width (~18" of tape per card)
- LED (2 for Christmas Tree Design) *see note below about LED choices
- Coin Cell Battery - 12mm (CR1225)
- LilyPad Button Board -or- LilyPad Slide Switch
- Cardstock (2-3 pieces)
- Vellum or Parchment Paper (optional) - creates a nice diffused effect for LEDs in window cut outs
- Clear Tape
- Gluestick/Glue
- Scissors/Hobby Knife
- Hole Punch/Screw Punch (optional) - to cut out holes in Christmas Tree Design
- Decorating Supplies - stickers, markers, white out pen (for Gingerbread House 'icing')
A note on LEDs:
We recommend using the smallest LED you can find - 3mm work well because they don't add too much bulk to your card when folded. For extra flair try using cycling RGB LEDs. We've also found that cutting individual LEDs from a set of LED String Lights works well - you will have to use a hobby knife to scrape the coating off of the wires before using. We'll cover that process later in the tutorial. Feel free to experiment with different LEDs and find what works best for your project.
Step 1: Print Templates
Right-click the images below and choose “Save Link As” to download the templates to your computer. Each file has two (or three) pages which includes all pop up pieces and the circuit template.
Print your templates out on cardstock. If needed, adjust your printer's margins or choose 'Fit to Page' in the print settings. The card template is slightly smaller than the paper, make sure to cut along the black border for the final card size.
Set the pop up pages aside for now. We'll build our circuit first and then assemble the pop up once the electronics are all installed.
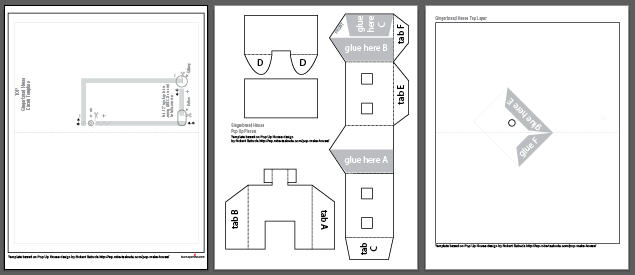 )
)Gingerbread House Template - 3 pages
Print page 2 (pop up pieces) on brown cardstock for a great gingerbread house base, or print all on a light colored cardstock and color in when you are finished. Can also be used to create a winter cottage pop up.
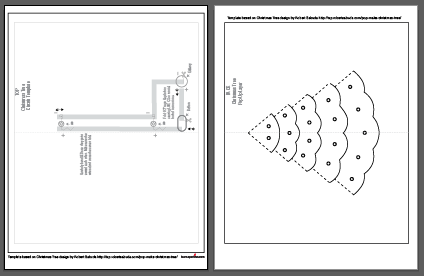
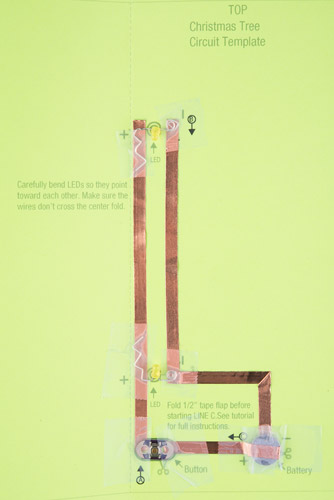
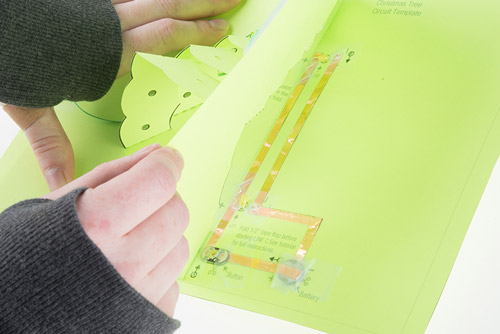
Christmas Tree Template - 2 pages
Looks great if printed on green cardstock, or use light colored cardstock and decorate after assembling.
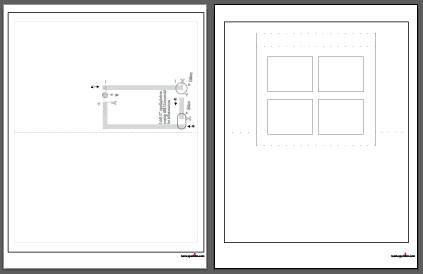
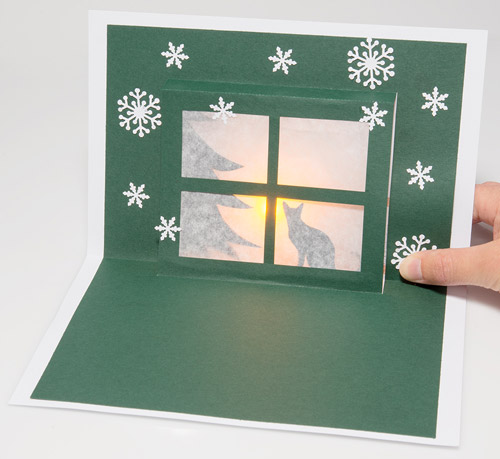
Window Template - 2 pages
Use stickers or paper cut outs on vellum to create a festive silhouette scene in the window frame.
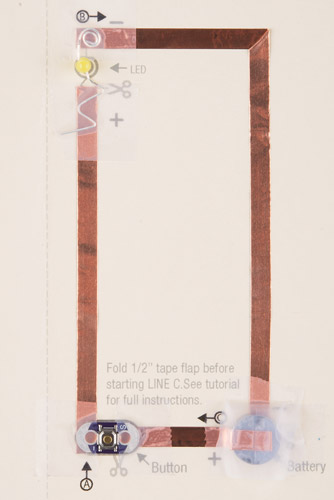
Step 2: Create Copper Traces
Time to create a path for our electricity with copper tape. The templates for both cards are fairly similar, so we'll be demonstrating with the Gingerbread House template. Each has icons to help guide you in constructing the circuit.
Line A
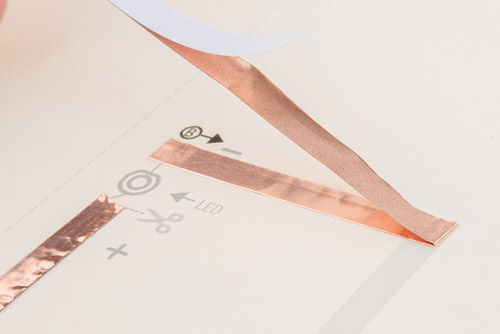
Take a look at the template and find the circle marked A. Peel away a few inches of the paper backing from the copper tape and stick down along the grey line.

Cut when you reach the scissors icon.

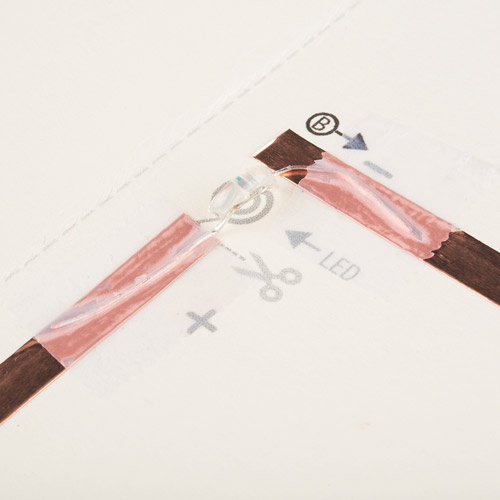
Line B
Next we'll place tape along Line B - but wait, what's this corner?! To keep a solid connection of copper around corners, we'll be using a folding technique to press the tape into shape.
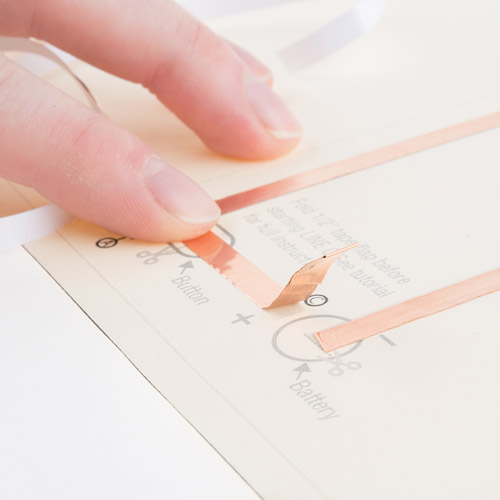
Start by sticking the copper tape down until you reach the corner, then fold the tape backward on itself. Use a fingernail or pen to give it a good crease at the edge.
Then carefully move the tape down around the corner - you should see the fold forming - and press down flat against the paper. The neatness of the fold doesn't matter that much, it will be covered by your pop up in the end. Finally, cut the tape when you reach the scissors icon.


Line C
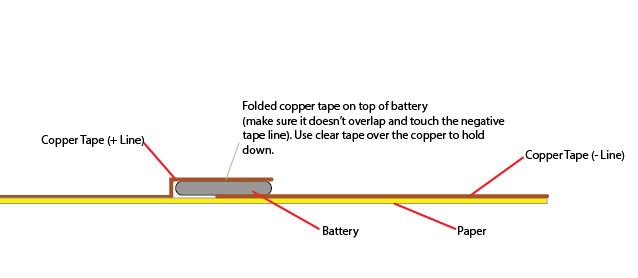
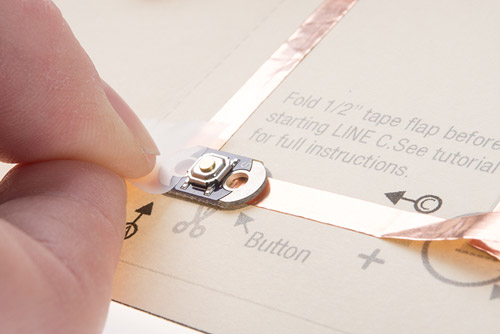
The last copper tape line will also form a battery holder. We'll start by folding 1/2" of copper tape onto itself, sticking the adhesive sides together to form a flap.
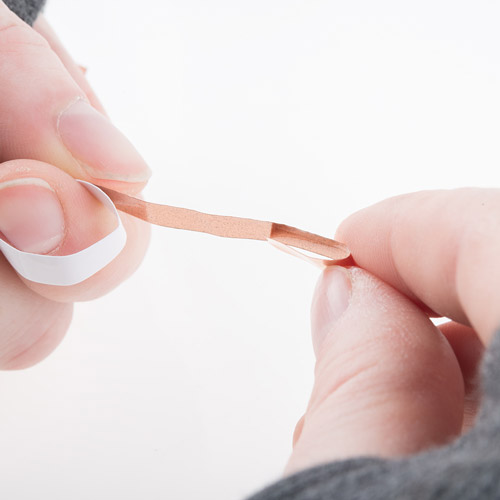
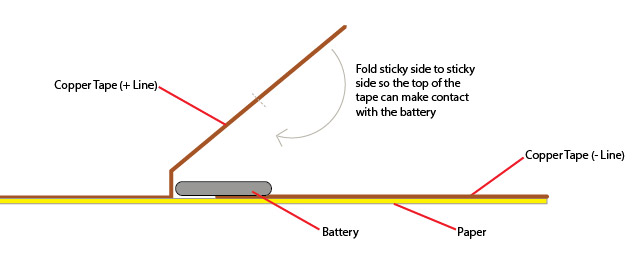
This allows the top of the copper to fold down over the coin cell battery - the positive side of the battery is the top and negative side is the bottom, which allows us to create a 'battery sandwich' with copper tape touching each side.
See the diagrams below to explore how this method works. We won't be installing the battery until the end of our project, so set that aside for now. Fold the card in half along the dotted center line before moving onto the next step.
Step 3: Prepare and Place LED
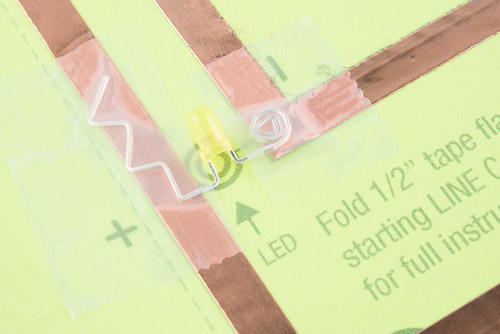
Now that our copper is in place, time to add the LED. Each template has an LED symbol which shows a shaped wire - we use this method to help us remember which side is positive and negative on the LED.
Here's excerpt from our Light-emitting Diodes (LEDs) Tutorial about LED polarity:
"In electronics, polarity indicates whether a circuit component is symmetric or not. LEDs, being diodes, will only allow current to flow in one direction. And when there’s no current-flow, there’s no light. Luckily, this also means that you can’t break an LED by plugging it in backwards. Rather, it just won’t work. The positive side of the LED is called the “anode” and is marked by having a longer “lead,” or leg. The other, negative side of the LED is called the “cathode.”
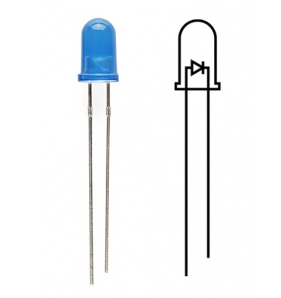
Here are directions for bending a standard LED (as shown in the image above) to prepare it for our circuit.
Using pliers (or your finger) bend the longer leg of the LED flat. Then form the wire into a zig zag shape. Be careful not to break the wire by bending back and forth over the same joint too many times.
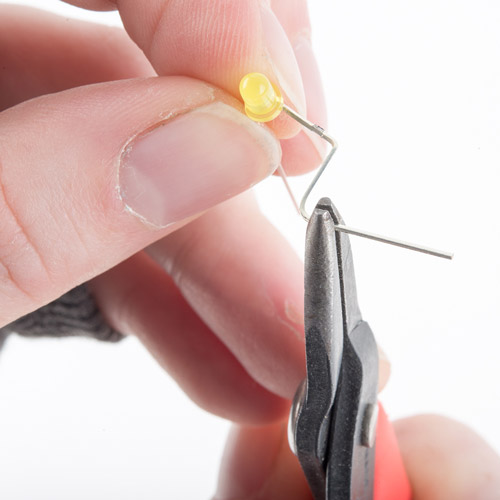
Next, bend the other leg flat and curl into a spiral. Use the end of the pliers to lightly grab the end of the wire and curl around the tool.

Once all shaping is complete, place the LED on a table or flat surface to make sure it sits flat and upright. If not, make any adjustments now.
The Christmas Tree design looks best if the LEDs are pointed at a slight angle toward the middle of the tree and each other, see picture below.
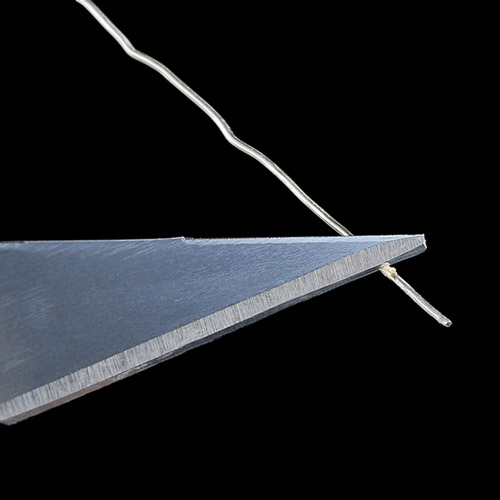
Using LED String Lights
We've been experimenting with cutting up LED string lights (also known as fairy lights) because they use tiny LEDs that are great for flat surfaces like greeting cards. Cut one LED off of the strip, making sure to leave ~1/2" of wire on either side. Then use a hobby knife to scrape away the coating from the wire to expose it. Make sure to scrape all around the wire, not just the top or bottom side, to ensure that you'll have a good connection with the tape. Sandpaper will also work, if you don't want to use a knife.
Each LED will have four wires coming from it - two positive and two negative because the LEDs are wired in parallel. It's hard to see immediately which is which (they don't have the handy longer/shorter trick like normal LEDs) - but we can quickly check them against a battery. Once we know which side is positive - mark the wire with a sharpie to help identify it. It's okay to just leave the wires straight rather than shaping them like the other LED example.
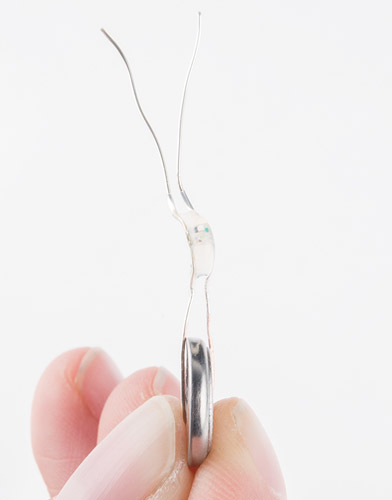
If you have super eyesight - you can check for a green marking on the LED, this is the negative side.

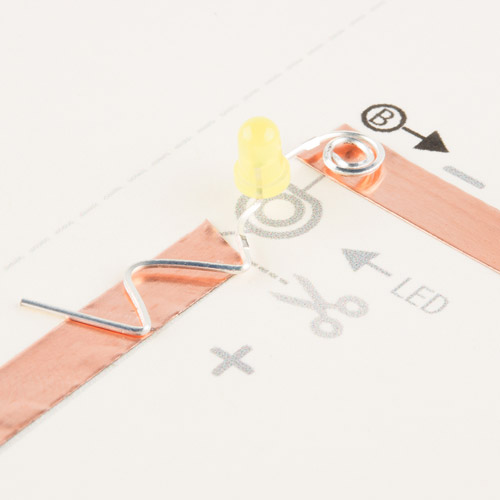
This picture shows an LED from a string light prepped by identifying and marking the positive wire and trimming the extra wires so that they don't accidentally short circuit each other.
Tape Down LED
Regardless of which LED type is going into the card, line up the positive lead with the copper tape marked + and the negative with -. Use clear tape over it to hold down to the copper.
Step 4: Attach Button
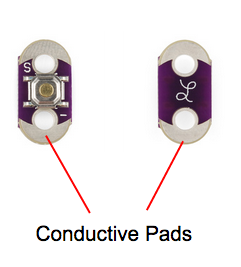
Next, we'll place the LilyPad button over the oval icon on the template facing up. It doesn't matter which side touches postive and negative. Make sure the conductive pads on the bottom of the button touch the copper tape, then tape down the ends with clear tape. Be careful not to tape directly over the push part of the button or it may interfere with the ability to press it. You can also use a LilyPad switch instead of a button - the installation is the same.
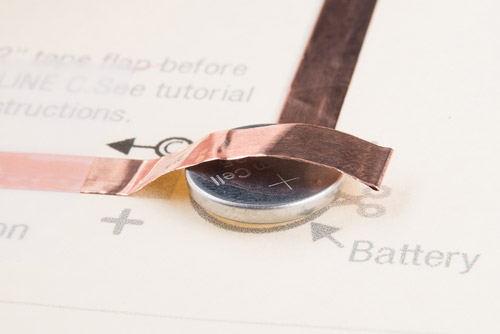
Step 5: Insert Battery
Once all the components are installed, it's time to test our circuit by adding a battery. Carefully slip the battery underneath the copper tape flap we made earlier, and center it inside the circle icon. Make sure the positive side of the battery (top, marked with the battery model and +) is facing up. Press the copper over the battery, and tape with clear tape.
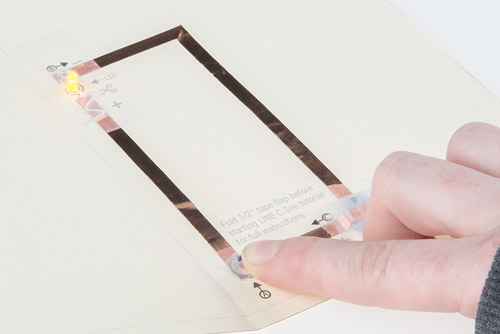
Now, press the button, and the LED should light up!
Troubleshooting
- Check the tape connections - use your nails or a pencil to make sure the tape is firmly adhering the components to the copper tape.
- Check the battery - make sure it is sandwiched firmly between the top and bottom copper tape lines and that the top copper is not accidentally touching the bottom of the battery.
- Check the wires of the LED - double check that they weren't accidentally broken while bending them into shapes with pliers.
Here are what the finished circuits should look like:
Step 6: Prepare Pop Up
Time to cut out our pop up pieces. Click the links below to visit Robert Sabuda's website for full instructions on assembling the Gingerbread and Christmas Tree pop ups.
Gingerbread House Instructions
Note: There is an additional edit to this template - use a hobby knife to cut windows in the house so that the LED can shine through. Cut out the small circle in the base template (page 3 of the pdf) to let the LED shine through before you glue the house down.
Christmas Tree Instructions
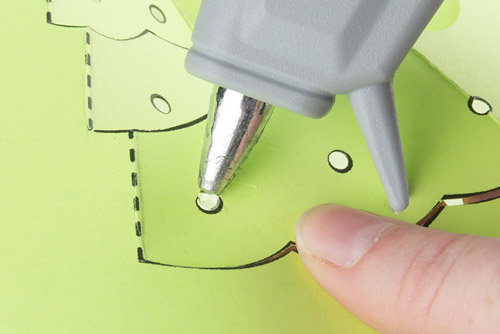
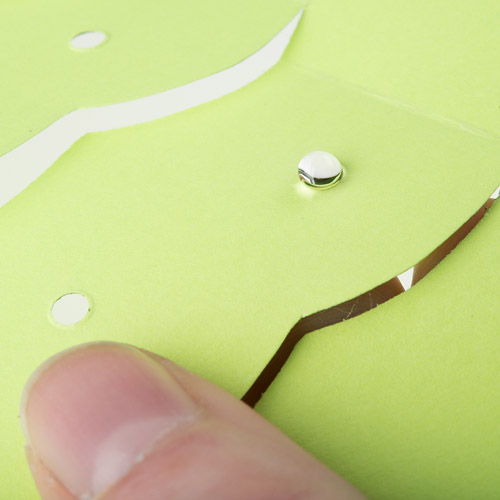
Note: To create a string of lights effect after the pop up is cut and folded, use a hole punch or small pair of scissors to cut out the small circles marked on the back of the template. For a three dimensional look, use a glue gun to adhere a small dab of glue on the back of each hole (be careful not to glue the card to your work surface). The glue will press through and create a bulb-like shape. This may take some practice to get the right amount of glue for each 'bulb' - we recommend trying on scrap paper first.
Window Instructions
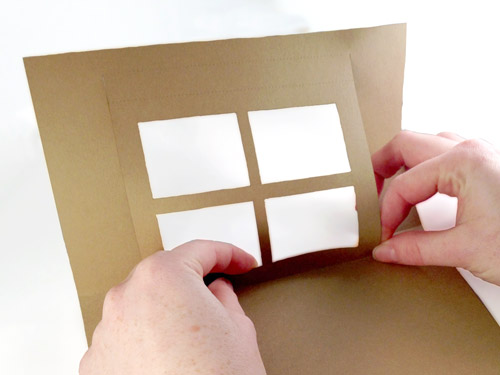
Begin folding the window card along the center crease, be careful not to bend the frame.

Next, carefully fold the bottom of the window frame.
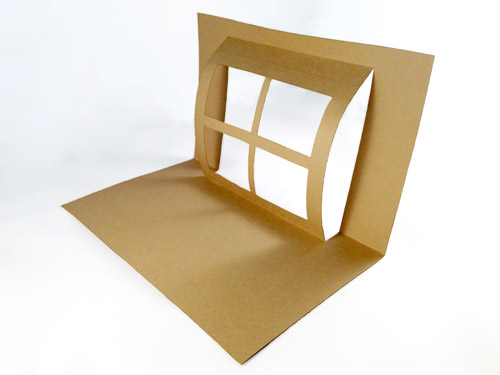
To fold the top creases of the window frame, press the card flat against a table.

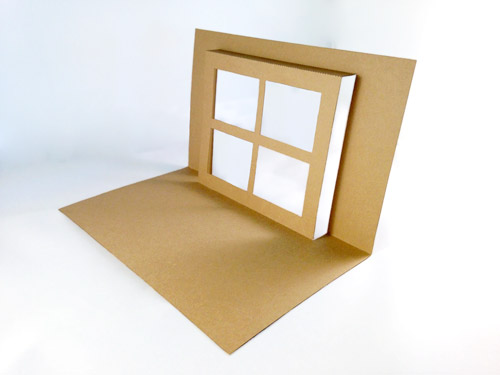
Your final pop up will look like this:
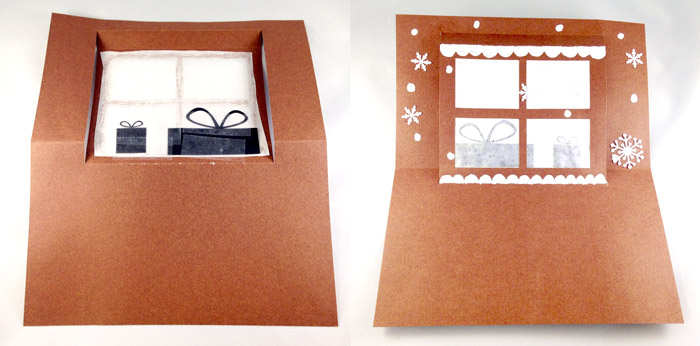
Use a piece of parchment paper or vellum behind the frame to create a frosted look. Tape or glue on silhouette shapes to create a holiday scene.
Step 7: Assemble and Admire
When your pop ups are constructed and ready to light, carefully place them over your copper tape circuit, and cut holes, if necessary, to allow the LED to poke through the paper. Glue or tape the corners down to adhere to the backing. Gently fold down the pop up to close the card.
Finally, use a marker or stickers to indicate where the button should be pressed.
Add any extra decorations to make the card extra special. We used a white out pen to create icing on the Gingerbread House and some candy stickers.
Now, your glowing holiday greeting is ready to mail to a friend or keep for yourself!
Resources and Going Further
Things to try:
- Try these techniques with other pop up designs or create your own - can you figure out how to adapt the copper tape path to fit your card choice?
- Get crafty with stickers, paint, or markers after you've built your card to customize it even more
Further Reading:
- E-Craft Resources - SparkFun's Department of Education has some downloadable templates and activities all about e-crafting.
- Light-Up Father's Day Card - a glowing card using copper tape and soldering skills.
- Light-Up Valentine Cards