OBD II UART Hookup Guide
 Toni_K
Connecting to an Arduino
Connecting to an Arduino
Besides connecting directly to your computer with the OBD-II board, you can also run the data through an Arduino board and display the information on an LCD for embedding a project. For this section, you will need an Arduino Uno (or another 5V Arduino board), jumper wires, and a serial LCD.
You will only need to make 6 connections between all 3 devices to get this set up. Use the diagram and the chart below to properly wire everything.
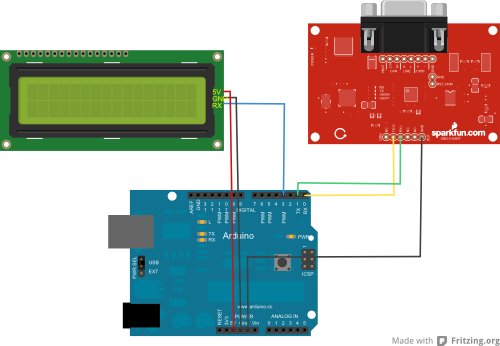
| Arduino Pin | Serial LCD Pin | OBD-II-UART Pin |
| GND | GND | GND |
| 5V | 5V | None |
| D3 | Rx | None |
| D0(Rx) | None | Tx-O |
| D1(Tx) | None | Rx-I |
You will want to download the sketch file here, or you can find the most up to date version of the code on GitHub. Keep in mind when you upload this to your board, you will want to disconnect the OBD-II board RX line from the Arduino TX-0, to prevent issues during code upload, such as bricking the OBD-II board.
Another thing to note about this set up is that the Arduino is not powered off of the OBD-II board. Therefore, you will need to either use USB power from your laptop to power the Arduino, or use a battery supply suck as a 9V battery and 9V barrel jack adapter.
Understanding the Sketch
This example sketch is very simple. The Arduino simply communicates with the OBD-II board and then sends the information received to the LCD screen. You will need to include the SoftwareSerial library in order to communicate with the LCD screen. Set the LCD TX/RX lines to pins 2 and 3 on the Arduino, and initialize the rest of your variables.
language:c
#include <SoftwareSerial.h>

//Create an instance of the new soft serial library to control the serial LCD
//Note, digital pin 3 of the Arduino should be connected to Rx of the serial LCD.

SoftwareSerial lcd(2,3);

//This is a character buffer that will store the data from the serial port
char rxData[20];
char rxIndex=0;

//Variables to hold the speed and RPM data.
int vehicleSpeed=0;
int vehicleRPM=0;
In the set up loop, the serial port for the LCD as well as the serial port for talking to the OBD-II board are both initialized at 9600 bps. The screen is then cleared, and the variable names of Speed and RPM are printed on the first and second rows respectively. As we did before, the OBD-II board is then reset.
language:c
void setup(){
  //Both the Serial LCD and the OBD-II-UART use 9600 bps.
  lcd.begin(9600);
  Serial.begin(9600);

  //Clear the old data from the LCD.
  lcd.write(254);
  lcd.write(1);

  //Put the speed header on the first row.
  lcd.print("Speed: ");
  lcd.write(254);
  //Put the RPM header on the second row.
  lcd.write(128+64);
  lcd.print("RPM: ");

  //Wait for a little while before sending the reset command to the OBD-II-UART
  delay(1500);
  //Reset the OBD-II-UART
  Serial.println("ATZ");
  //Wait for a bit before starting to send commands after the reset.
  delay(2000);

  //Delete any data that may be in the serial port before we begin.
  Serial.flush();
}
The main loop of the code simply sets the cursor locations, clears out any old data on the LCD screen, receives the data from the OBD-II board, tranlates it to an integer and prints the vehicle speed and RPM to the screen.
language:c
void loop(){
  //Delete any data that may be in the serial port before we begin.
  Serial.flush();
  //Set the cursor in the position where we want the speed data.
  lcd.write(254);
  lcd.write(128+8);
  //Clear out the old speed data, and reset the cursor position.
  lcd.print("        ");
  lcd.write(254);
  lcd.write(128+8);
  //Query the OBD-II-UART for the Vehicle Speed
  Serial.println("010D");
  //Get the response from the OBD-II-UART board. We get two responses
  //because the OBD-II-UART echoes the command that is sent.
  //We want the data in the second response.
  getResponse();
  getResponse();
  //Convert the string data to an integer
  vehicleSpeed = strtol(&rxData[6],0,16);
  //Print the speed data to the lcd
  lcd.print(vehicleSpeed);
  lcd.print(" km/h");
  delay(100);

  //Delete any data that may be left over in the serial port.
  Serial.flush();
  //Move the serial cursor to the position where we want the RPM data.
  lcd.write(254);
  lcd.write(128 + 69);
  //Clear the old RPM data, and then move the cursor position back.
  lcd.print("          ");
  lcd.write(254);
  lcd.write(128+69);

  //Query the OBD-II-UART for the Vehicle rpm
  Serial.println("010C");
  //Get the response from the OBD-II-UART board
  getResponse();
  getResponse();
  //Convert the string data to an integer
  //NOTE: RPM data is two bytes long, and delivered in 1/4 RPM from the OBD-II-UART
  vehicleRPM = ((strtol(&rxData[6],0,16)*256)+strtol(&rxData[9],0,16))/4;
  //Print the rpm data to the lcd
  lcd.print(vehicleRPM);

  //Give the OBD bus a rest
  delay(100);

}
Obsolete Code: Arduino has changed how the Serial.flush() function works. It no longer clears the input and output buffers; only the outgoing buffer is cleared.
Serial.available() and then read the buffer until it is empty.
The final section of code simply defines the functions to communicate with the OBD-II board. This saves any incoming characters to the serial buffer until a carriage return is received.The buffer index is set to 0 and the board then waits for the next string to come in.
language:c
/The getResponse function collects incoming data from the UART into the rxData buffer
// and only exits when a carriage return character is seen. Once the carriage return
// string is detected, the rxData buffer is null terminated (so we can treat it as a string)
// and the rxData index is reset to 0 so that the next string can be copied.
void getResponse(void){
  char inChar=0;
  //Keep reading characters until we get a carriage return
  while(inChar != '\r'){
    //If a character comes in on the serial port, we need to act on it.
    if(Serial.available() > 0){
      //Start by checking if we've received the end of message character ('\r').
      if(Serial.peek() == '\r'){
        //Clear the Serial buffer
        inChar=Serial.read();
        //Put the end of string character on our data string
        rxData[rxIndex]='\0';
        //Reset the buffer index so that the next character goes back at the beginning of the string.
        rxIndex=0;
      }
      //If we didn't get the end of message character, just add the new character to the string.
      else{
        //Get the new character from the Serial port.
        inChar = Serial.read();
        //Add the new character to the string, and increment the index variable.
        rxData[rxIndex++]=inChar;
      }
    }
  }
}