MYST Linking Book
 Nick Poole
Two Decades of Gaming
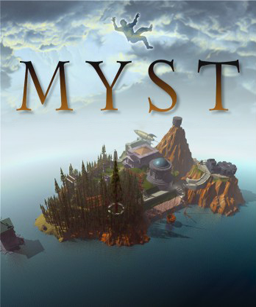
Back in 1991, brothers Rand and Robyn Miller led a team at Cyan, Inc. to begin creating a puzzle-adventure game that would eventually launch the software company to worldwide fame. Its unique premise, simple mechanics and beautiful artwork made MYST the best-selling PC game from its release in 1993 until it was finally beaten by The Sims in 2002.
Twenty years, several sequels, and a host of spin-offs later, Cyan Worlds have just kickstarted a new franchise in the spirit of MYST. To celebrate, I decided to put together a fun little prop from the MYST games. This project will also introduce you to the 4DViSi environment for programming 4D Systems displays!
Suggested Reading/Viewing
Oh, but before we get started, you should check out this primer about 4D Systems Touch Screens. Once you're familiar with using the ViSi Genie, you'll be ready to use the ViSi environment!
The D'ni and The Art
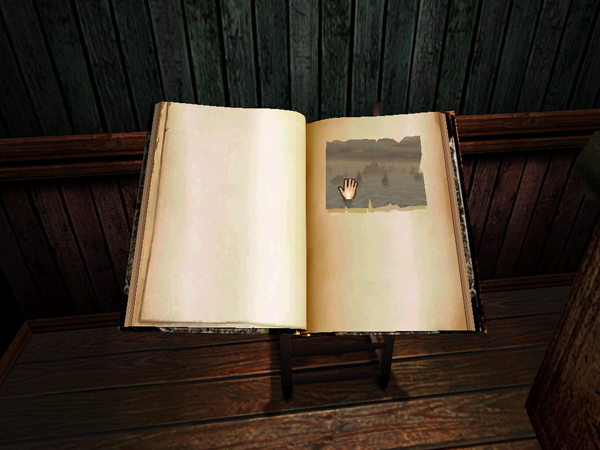
One of the key mechanics of the MYST games was the Linking Book. Essentially, these are a kind of portal that will teleport you from one world (which, in the game, are referred to as "ages") to another. Opening the front cover of the book reveals a panel with a picture or flyover perspective of the location to which it links. Placing your hand on the panel will teleport you to that location.
According to MYST lore, linking books are a product of the D'ni ("dunny") civilization. The D'ni people developed a method of preparing special books and ink and then using a particular style of writing to create links to different worlds. There are different kinds of books (Linking Books, Descriptive Books, Trap Books, etc.), and, since the fall of D'ni, The Art has been mostly forgotten.
Between MYST and the sequels, the details of how all of this works have been thought out by the game's creators and led to significant retcons regarding the books found on MYST island.
Luckily, you won't have to devise any special inks or papers in order to make the linking book in this tutorial. You will have to learn a language, but it won't be ancient D'ni...
Programming with 4D ViSi
In order to make the linking panel for my book, I needed a full color LCD screen and enough computing power behind it to play a short video loop. The obvious choice was one of 4D Systems' display modules. I figured it would be as easy as working something up in the ViSi Genie and plugging in a battery, and it nearly was. The only problem is that there doesn't seem to be any method for looping a video object in ViSi Genie. No big deal, let's take a look under the hood...
First step? We'll start a new project in the ViSi environment:

Once you've selected your target and opened a new ViSi project, you should have something like this:
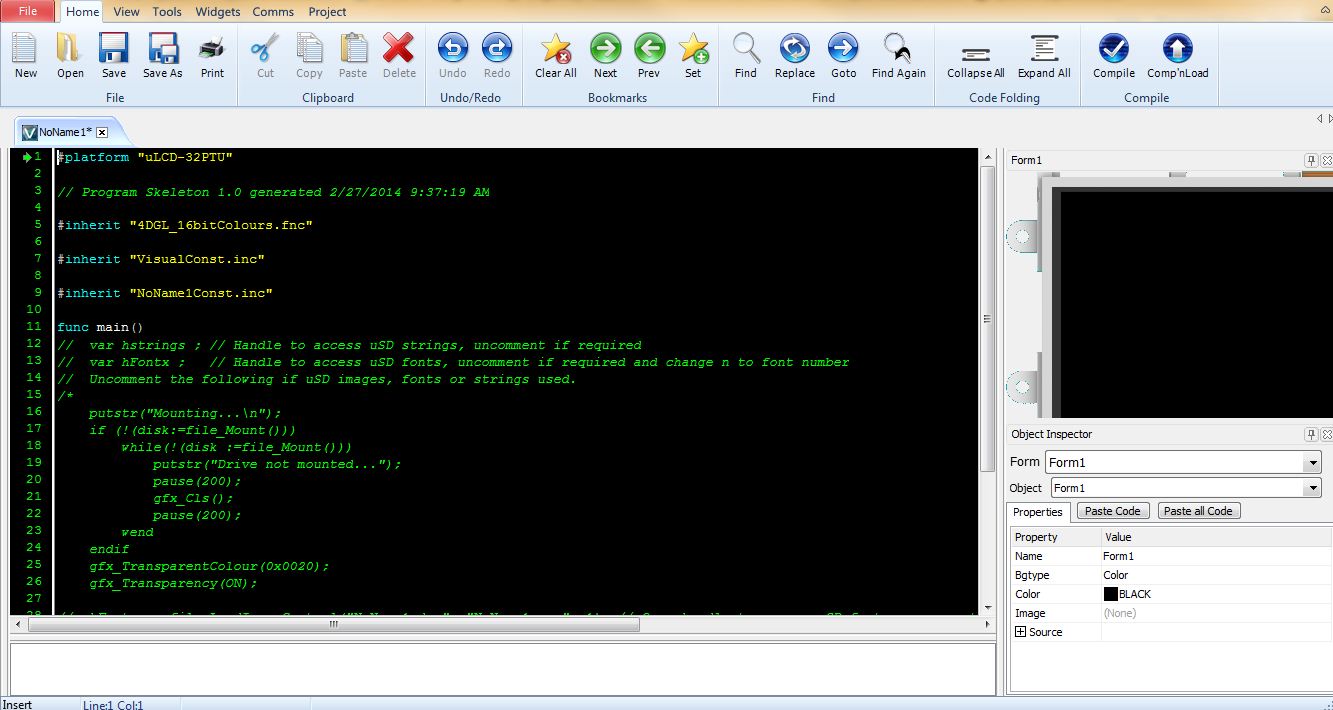
The large text input field is where you'll write the 4DGL code that controls the screen. You'll notice that there's already an outline of a program there, which was generated by 4D Workshop and includes a library specific to your target device. Nifty! To the right you'll see a picture of the target device. This will be familiar to anyone who has used the ViSi Genie. In fact, using the ViSi editor, you can click and drag widgets onto the target device the same way you would in the Genie. Before we get ahead of ourselves, though, let's take a look at that skeleton code:
#platform "uLCD-32PTU"

// Program Skeleton 1.0 generated 2/27/2014 10:25:58 AM

#inherit "4DGL_16bitColours.fnc"

#inherit "VisualConst.inc"

#inherit "NoName1Const.inc"

func main()
//  var hstrings ; // Handle to access uSD strings, uncomment if required
//  var hFontx ;   // Handle to access uSD fonts, uncomment if required and change n to font number
//  Uncomment the following if uSD images, fonts or strings used.
/*
    putstr("Mounting...\n");
    if (!(disk:=file_Mount()))
        while(!(disk :=file_Mount()))
            putstr("Drive not mounted...");
            pause(200);
            gfx_Cls();
            pause(200);
        wend
    endif
    gfx_TransparentColour(0x0020);
    gfx_Transparency(ON);

//  hFontn := file_LoadImageControl("NoName1.dan", "NoName1.gcn", 1); // Open handle to access uSD fonts, uncomment if required and change n to font number dropping a and c if > 9
//  hstrings := file_Open("NoName1.txf", 'r') ; // Open handle to access uSD strings, uncomment if required
    hndl := file_LoadImageControl("NoName1.dat", "NoName1.gci", 1);
*/

    gfx_Set(SCREEN_MODE,LANDSCAPE) ;

    repeat
    forever
endfunc
It looks like a lot of code for a simple framework, but, once you dive into it, you'll find that it's mostly routines related to pulling resources from the uSD card. Because you won't always need to pull strings, fonts, or images from the uSD, these lines are commented out by default. Underneath the uSD stuff there's a call to gfx_Set(), which is just to set up the screen mode. Finally, there's an empty forever loop, which you can fill with the infinitely repeating code of your choice.
Right off the bat, we already know that we'll have to access some images, so we'll go ahead and remove the block comment symbols. This will uncomment the following two chunks of code:
putstr("Mounting...\n");
    if (!(disk:=file_Mount()))
        while(!(disk :=file_Mount()))
            putstr("Drive not mounted...");
            pause(200);
            gfx_Cls();
            pause(200);
        wend
    endif
    gfx_TransparentColour(0x0020);
    gfx_Transparency(ON);
This routine checks to see if the display module can access the uSD card. If it can't, then it will flash the error message "Drive not mounted..."
hndl := file_LoadImageControl("NoName1.dat", "NoName1.gci", 1);
This line gives the names of the resources that you're storing on the uSD card.
The next order of business is to use the video widget to import a video. At this point, it's wise to save your progress. If you select a video file that 4D Workshop can't handle because of its size or format, the IDE could crash (as of version 4.0.2.16). The video that I ended up using was the Mechanical Age flyover from the original MYST game. I found the clip on YouTube, downloaded it using a service I found by Googling around, and then converted it to a small AVI file. I'll include a link in the resources of this tutorial to the clip that worked for me.
In order to add a video widget, you'll need to click on the "Widgets" menu in the top navigation bar, and then select the "System/Media" widget tab. Next, click the icon that looks like a film reel, then click on the target screen where you want to place it. You'll be able to drag it around and resize it later, so just click anywhere on the picture of your target device. A file manager window should pop-up and allow you to select a file.
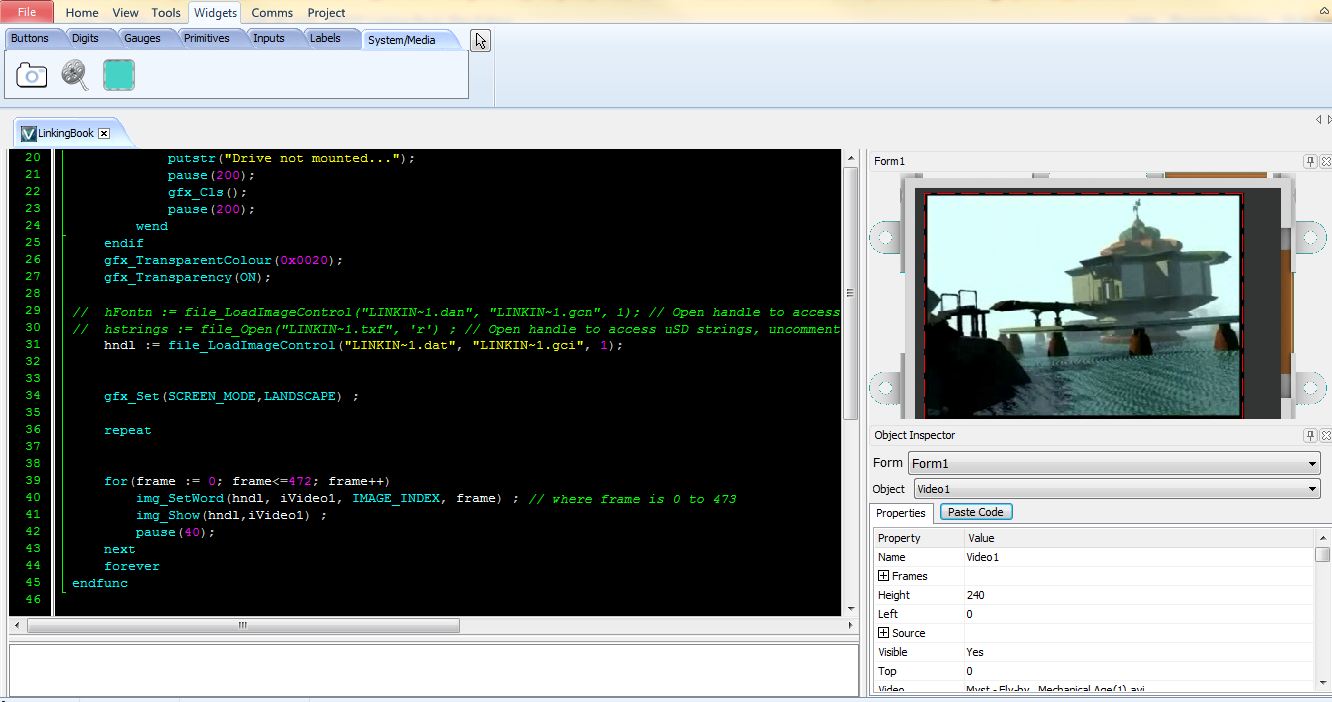
You should now see your video file on the object inspector, and you can stretch it to fit the display. You should also see a button that says "Paste Code" right below the picture of your device. Clicking this button will paste the basic code for the selected object into whatever section of code is selected in the code editor. Make some space between the lines "repeat" and "forever," and paste the video code here. These lines of code should appear:
// Video1 1.0 generated 2/27/2014 2:11:26 PM
img_SetWord(hndl, iVideo1, IMAGE_INDEX, frame) ; // where frame is 0 to 473
img_Show(hndl,iVideo1) ;
As you may have guessed, ViSi handles video playback by slicing the video into images and displaying the images sequentially. The above code is simply for displaying one frame of number "frame". In order to playback the video, we'll need to pop this into a loop that will increment the frame variable for each pass. First, though, we need to declare the variable. Go back up a few lines and add this line:
var frame ;
This just creates a variable that we can use to call each frame in the video. Now wrap the two lines we pasted from the video object into a FOR loop that increments through all of the frames. The total number of frames is helpfully included in the auto-generated line comment. Your repeat-forever loop should look like this:
repeat

for(frame := 0; frame<=472; frame++)
    img_SetWord(hndl, iVideo1, IMAGE_INDEX, frame) ; // where frame is 0 to 473
    img_Show(hndl,iVideo1) ;
    pause(40);
next

forever
That should do the trick! Now we upload our program to the device! First you'll need to connect your module to the computer using a USB-PA5 USB-to-Serial Bridge. You'll also need to insert your uSD card into a card reader, and plug it into your computer. Make sure that the correct serial port for your USB-PA5 is selected under the Comms menu. Now, you should be able to press Compile and Download. The program will generate your support files and ask if you want to put them on the SD card. Go ahead, and do that. Then the program will connect to the device and install your code. After this process is done, remove the uSD card from your computer, and put it into your display module. You should see your video playing repeatedly!
Now that we have a working "Linking Panel," we need a book to put it in...
Finishing Touches
To house my 4D display module, I decided to hollow out an inexpensive sketchbook from the local art supply. For instructions on how to make a hollow book, just search Google for "How to make a book safe," and poke around.
I mounted the screen and some support circuitry to a piece of cardboard to give the assembly some rigidity. In order to power the screen, I hooked it up to a LiPo battery, which is boosted using a PowerCell. This has the advantage of allowing me to plug the book in to charge it. I also ran a reed switch from the EN pin on the PowerCell to GND, allowing me to shut off the power using a magnet that I taped into the front cover of the book. Every time you open the book, the screen boots up and begins displaying the video. When you close the book, the magnet on the front cover comes within reach of the reed switch in the back cover and puts the device to sleep.
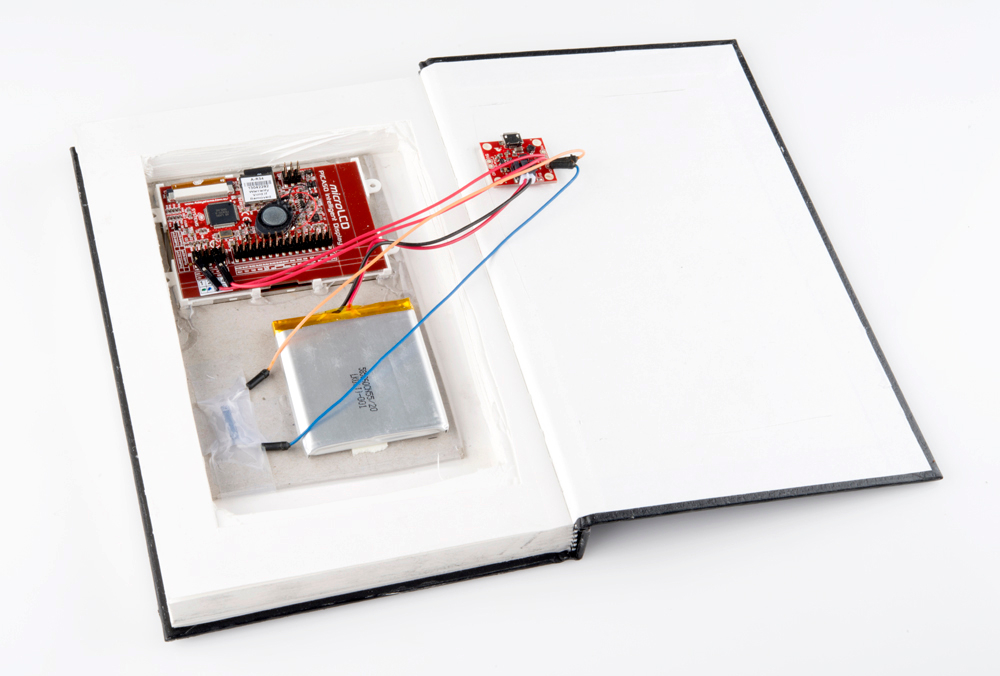
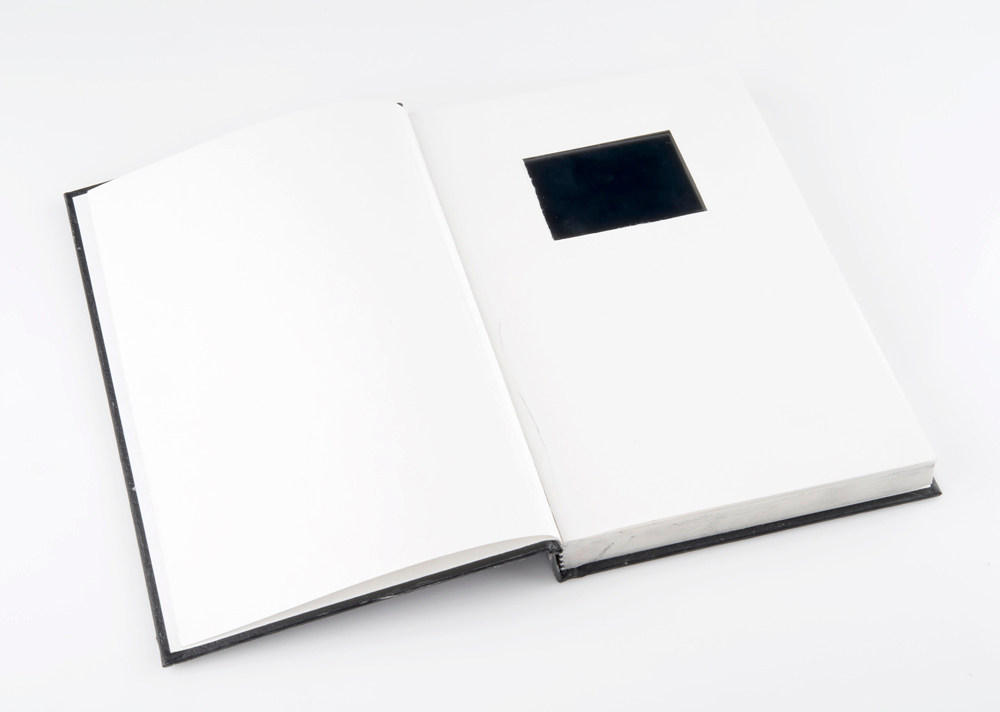
Here you can see my handywork from the back. I attached the PowerCell to the back cover of the book with foam tape, so I could run a USB cable to it easily. I left a few pages in the front of the book and cut a screen sized hole in two of them. I glued the first one directly down to the cardboard assembly and the underlying pages. For the second, I only glued in spots so that it would look natural. Finally there's one undisturbed page in the very front just because some linking books seem to have a page covering the panel.
I used some sandpaper to rough up the edges of the sketchbook. It actually weathered quite well, much to my surprise. If you're feeling ambitious, you could tea-dye the paper. Most of the linking books in the game are in rough shape. After all, unlike Descriptive Books, Linking Books are meant to be portable and are often carried around and taken on adventures.

And here is the final product...
ReplaceMeOpen
ReplaceMeClose
Resources and Going Further
So there you have it! It may not link you to a mystical age, but it will surprise anyone who takes a peek. There is a lot of functionality to the 4D Systems display modules that this project doesn't explore. They're touchscreen for instance, so there's no reason you couldn't have the book do something when you touch the panel, whether it just plays a sound or unlocks a door.
I'm definitely not the first or last to do this project and there have been some very impressive linking book builds before this, so I've included a few links below. The MYST fandom is a great place to find crafters and prop-makers doing really gorgeous work.
Other Linking Book Projects:
Resources:
And, don't forget to check out our Project Tutorials for more great ideas!