MIDI BLE Tutorial
 MTaylor
Create a Basic BLE Peripheral
The goal here is to make a program that meets the specification of MIDI BLE and appears when scanning for Bluetooth devices. The BLEPeripheral library does a good job of abstracting away the specifics of the communication but a bit of knowledge about how BLE works is useful to give meaning to the words used when setting up a BLE peripheral.
BLE is designed to allow a variety of devices, and therefore needs an expandable architecture. The term GATT is used, which stands for Generic Attribute Profile.
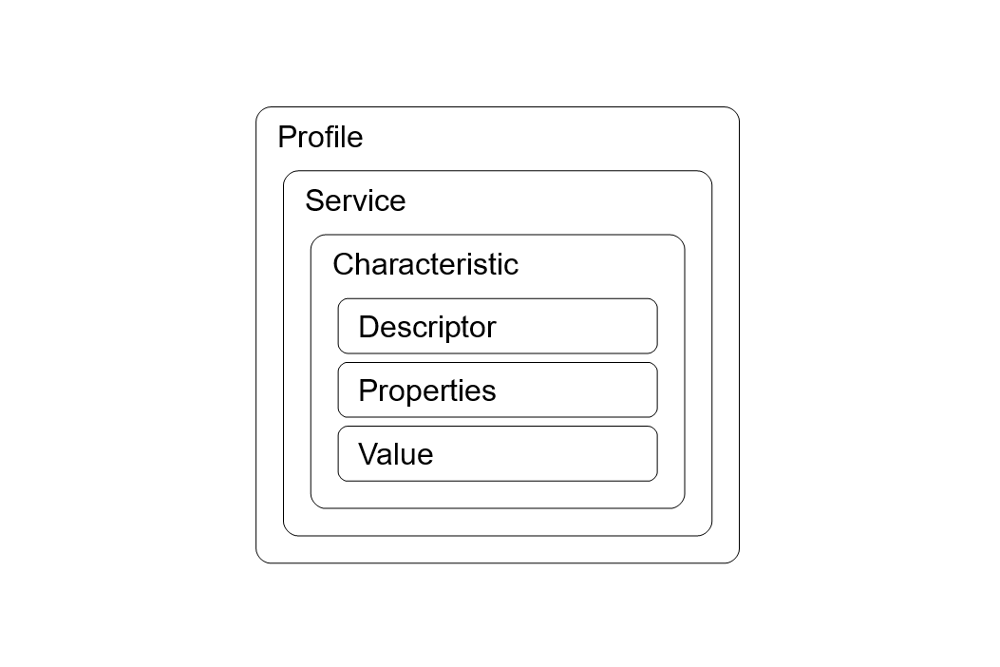
The profile describes the collection of objects which are required for a particular BLE system.
A profile can have multiple services, each which is a collection of one or more characteristic.
The characteristic contains the data that will be acted on. Each can only have a single value and a single property. For the nRF52832, that value can be up to 20 bytes.
Each service and each characteristic has a unique name which tells connected systems what kind of device it's dealing with. It's called a UUID (universally unique identifier), and can be 16 bits or 128 bits.
For more information, see bluetooth.com's documentation.
The MIDI BLE Profile
MIDI BLE is a very simple realization of the topology. There is one service, and one characteristic that are required.
As part of midi.org's published standard, a device shall have:
- The MIDI Service has a UUID of: 03B80E5A-EDE8-4B33-A751-6CE34EC4C700
- The MIDI Characteristic has a UUID of: 7772E5DB-3868-4112-A1A9-F2669D106BF3, and the following traits:
- write without response
- read
- notify
Next, the BLEPeripheral library is used to describe the topology -- its API is documented on GitHub. By using the API to tell the library how to form itself, the nRF52832 will become a MIDI BLE device, and data will be accessible through the characteristic's value.
To use the BLEPeripheral library, declare memory spaces for the various layers as persistent objects, then add them to the BLE Peripheral object. Then, the Peripheral object can be started and used.
The main object is declared. This is what will hold the other objects and operate the radio.
language:c
BLEPeripheral blePeripheral;
Individual layer objects (attributes) are declared for the service and characteristic. The characteristic is also constructed with a max value size of 20, which is the largest size that nRF52832 will allow.
language:c
BLEService service("03B80E5A-EDE8-4B33-A751-6CE34EC4C700");
BLECharacteristic characteristic("7772E5DB-3868-4112-A1A9-F2669D106BF3", BLERead | BLEWriteWithoutResponse | BLENotify, 20 );
Also, a descriptor is created. It is optional and tells the central to disable notification, meaning the BLE peripheral can cast data at the central without acknowledgement. Depending on how the central is programmed, this may or may not have an effect.
language:c
BLEDescriptor descriptor = BLEDescriptor("2902", 0);
Creating the objects alone will not have any effect. There's a few more things to do which are placed in a routine called setupBLE() for convenience. It is called once during setup(). The peripheral is named, told to advertise the UUID of the service, and given an initial value. Then, the peripheral is started with .begin() which connects it to the system. At this point, the BLE device should be discoverable.
language:c
void setupBLE()
{
    blePeripheral.setLocalName("BLE MIDI Starter"); //local name sometimes used by central
    blePeripheral.setDeviceName("BLE MIDI Starter"); //device name sometimes used by central
    blePeripheral.setAdvertisedServiceUuid(service.uuid()); //Advertise MIDI UUID

    // add attributes (services, characteristics, descriptors) to peripheral
    blePeripheral.addAttribute(service);
    blePeripheral.addAttribute(characteristic);
    blePeripheral.addAttribute(descriptor);

    // set initial value
    characteristic.setValue(0);

    blePeripheral.begin();
}
In the main program loop, a object is created locally and used to determine if the peripheral is connected to a central. The structure of this code is taken from the BLEPeripheral examples.
language:c
void loop()
{
    BLECentral central = blePeripheral.central();
    if (central) {
        while (central.connected()) {
            if (characteristic.written()) {
            }
        }

    }
}
Rolling it all together, a simple program can be written that establishes a connection to a BLE central. It turns on the green LED if the device is connected. If data is written to the device, it blinks the red LED and prints th value written to the serial terminal as hex.
language:c
#include <BLEPeripheral.h>

#define BLUE_STAT_PIN     7   // LED on pin 7
#define RED_STAT_PIN     11   // LED on pin 11
#define GREEN_STAT_PIN   12   // LED on pin 12
#define BTN_PIN           6   // User button

// create peripheral instance, see pinouts above
//const char * localName = "nRF52832 MIDI";
BLEPeripheral blePeripheral;
BLEService service("03B80E5A-EDE8-4B33-A751-6CE34EC4C700");
BLECharacteristic characteristic("7772E5DB-3868-4112-A1A9-F2669D106BF3", BLERead | BLEWriteWithoutResponse | BLENotify, 20 );
BLEDescriptor descriptor = BLEDescriptor("2902", 0);

void setup() {
    Serial.begin(115200);
    delay(3000);
    Serial.println("Program Started");

    //Setup diag leds
    pinMode(BLUE_STAT_PIN, OUTPUT);
    pinMode(RED_STAT_PIN, OUTPUT);
    pinMode(GREEN_STAT_PIN, OUTPUT);
    digitalWrite(BLUE_STAT_PIN, 1);
    digitalWrite(RED_STAT_PIN, 1);
    digitalWrite(GREEN_STAT_PIN, 1);

    //Setup nRF52832 user button
    pinMode(BTN_PIN, INPUT_PULLUP);

    setupBLE();

}


void loop()
{
    BLECentral central = blePeripheral.central();
    if (central) {
        while (central.connected()) {
            digitalWrite(GREEN_STAT_PIN, 0);
            //Check if data exists coming in from BLE
            if (characteristic.written()) {
                digitalWrite(RED_STAT_PIN, 0);

                //Receive the written packet and parse it out here.
                Serial.print("Rx size: ");
                Serial.println(characteristic.valueLength());
                uint8_t * buffer = (uint8_t*)characteristic.value();
                Serial.print("0x");
                for( int i = 0; i < characteristic.valueLength(); i++ ){
                    if( buffer[i] < 0x10 ) Serial.print("0");
                    Serial.print( buffer[i], HEX );
                }
                Serial.println();

                digitalWrite(RED_STAT_PIN, 1);
            }
        }

    }
    digitalWrite(BLUE_STAT_PIN, 1);
    digitalWrite(GREEN_STAT_PIN, 1);
    delay(500);
}

void setupBLE()
{
    blePeripheral.setLocalName("BLE MIDI Starter"); //local name sometimes used by central
    blePeripheral.setDeviceName("BLE MIDI Starter"); //device name sometimes used by central
    //blePeripheral.setApperance(0x0000); //default is 0x0000, what should this be?
    blePeripheral.setAdvertisedServiceUuid(service.uuid()); //Advertise MIDI UUID

    // add attributes (services, characteristics, descriptors) to peripheral
    blePeripheral.addAttribute(service);
    blePeripheral.addAttribute(characteristic);
    blePeripheral.addAttribute(descriptor);

    // set initial value
    characteristic.setValue(0);

    // set event handlers - Alternate ways of checking for BLE activity
    //characteristic.setEventHandler(BLEWritten, BLEWrittenCallback);
    //characteristic.setEventHandler(BLESubscribed, BLESubscribedCallback);
    //characteristic.setEventHandler(BLEUnsubscribed, BLEUnsubscribedCallback);

    blePeripheral.begin();
}
To test the program, it is loaded to the nRF52832, which is discovered by a computer that can send MIDI BLE data. The computer sends MIDI data for setting an instrument's configuration, and the following appears in the serial console. The data will be analyzed in the section "Encapsulating MIDI DATA".
Output:
Program Started
Rx size: 13
0xB9FDB06248FDB00600FDB0260A