MIDI BLE Tutorial
 MTaylor
Introduction
When new technologies are introduced, old technology is often warped into compliance of the new standards. MIDI is no exception and is surprisingly easy to work with over a Bluetooth Low Energy link.
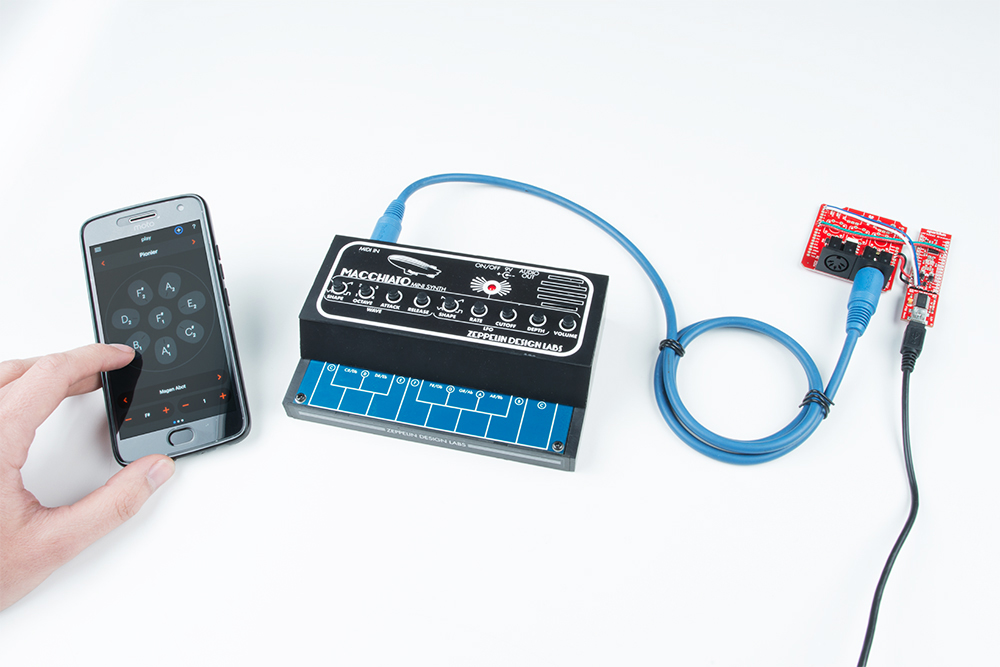
This tutorial uses an nRF52832 Breakout board as the BLE radio and the MIDI parsing processor. For the sake of learning, the breakout is connected to a standard MIDI shield. Serial MIDI to BLE is already available as a consumer product, but it's a good platform to talk about the various pieces of the problem.
This covers:
- Basic BLE Configuration for MIDI.
- Decoding MIDI BLE packets and doing something with them.
- Encoding MIDI BLE packets.
- Creating a full BLE to DIN conversion tool.
Parts or all of the code presented here can be used as a starting place to build MIDI BLE devices.
Background Requirements
The following is required to progress through this tutorial.
An understanding of the original MIDI specification. It is available in full at www.midi.org (Use midi a lot? Join and become a member for free!). The SparkFun MIDI Tutorial breaks down the specification in depth. If only a brief refresher is needed, midi.org's Summary of MIDI Messages is the specific page used to implement the MIDI protocol.
A computer or mobile device that can interface with MIDI BLE devices.
Code examples in this tutorial are maintained in the GitHub repo MIDI-BLE-Adapter. Clone it.
An installation of Arduino and board package for the nRF52832. Follow the nRF52832 Breakout Board Hookup Guide to install the board files, and BLEPeriphrial library.
- Download the Arduino program as a zip and unzip to a new location
- Make a new folder called 'portable' in the extracted location before you start Arduino for the first time. Upon seeing 'portable' Arduino knows to use this for packages.
- Create a folder called 'localSB' (name and location doesn't matter)
- Run Arduino and set your local sketchbook to your created folder, and Arduino will populate libraries into it.
MIDI BLE Supported Devices.
MIDI BLE has only been around for a couple years, so support is spotty. Take some time to Google your device plus "BLE MIDI" and see what comes up. Here's some general information. Have success? Please post device and OS info in the comments.
Mac
Go into your "System Report" through Utilities->System Information. MIDI BLE is available with "LMP Version" 0x06 or higher. More information available on checking your Mac in this imore.com article.
- Use Audio MIDI Settings to search for devices.
- Try Pocket MIDI to test communications.
iPhone
Generally, iOS 8 should have support for BLE MIDI but this is not tested.
Windows
Windows 10 machines that are fully updated should have MIDI BLE support.
The program MIDIBerry is pretty basic but can be used to connect BLE devices to other Windows programs.
Android
Android 6.0 marshmallow or later should have software support. Try the app MIDI BLE Connect and see if you can scan for devices.
Recommended Materials and Tools
Development Hardware
While just the nRF52832 Breakout and an FTDI are required to run the code, it's recommended to attach a MIDI shield. The next section details how to hook the two together.
MIDI Peripherals
Have a pile of midi devices available. When working with so many unknowns, it's nice to have something that is familiar and can be relied on to help narrow down where a problem is occurring.
Here are some options:
- A wired MIDI receiver that can display MIDI packets as they go by. This can be an Arduino UNO with another MIDI shield that is running the MIDI analysis software, or a computer with physical MIDI port with software.
- A wired MIDI transmitter. Usually a keyboard.
- A BLE MIDI receiver. On Mac the program "Pocket MIDI" works extremely well. For windows, MIDIBerry is OK.
- A BLE MIDI transmitter. Again, software on a computer will do the job.
Development Hardware
Hardware Hookup
Prepare the nRF52832 Breakout board by adding a header to the FTDI serial pins. Prepare the MIDI shield by soldering in the two MIDI jacks.
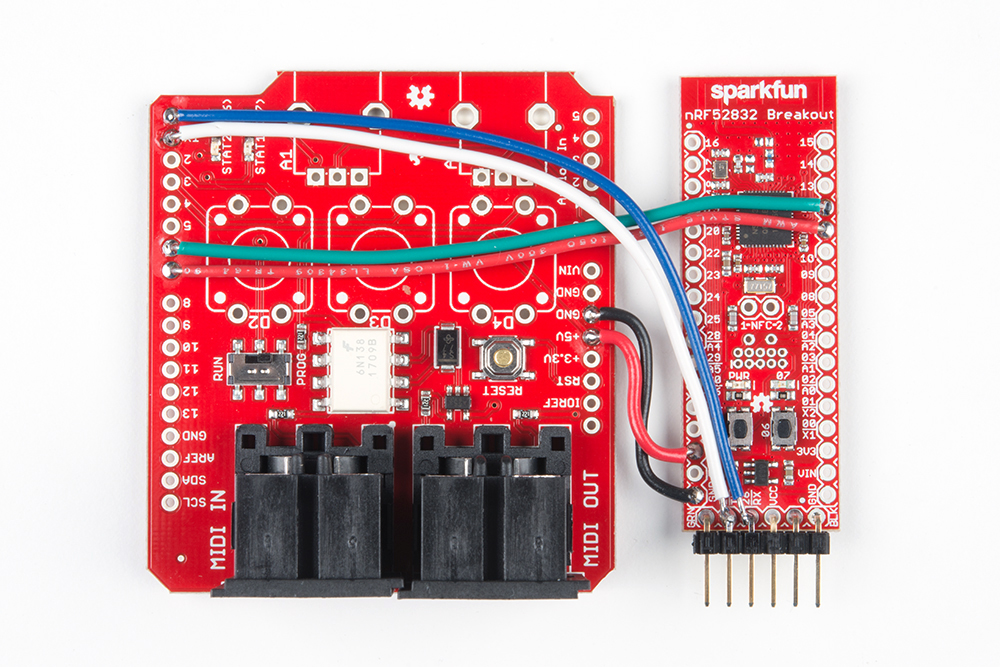
Make the following connections with loose wires. The RX and TX through holes are occupied by the FTDI pin header, tack them on to the backside of the pins.
| nRF52832 Breakout Board Pin |
MIDI Shield Pin |
|---|---|
| GND | GND |
| 3.3V |
5V |
| 26(RX) |
RX |
| 27(TX) |
TX |
| 11 | 7 (Red LED) |
| 12 |
6 (Green LED) |
Sanity Check
Take a moment to make sure the development chain is all up and working.
Can Code be Uploaded to the nRF52832?
Make sure that a basic blink sketch works. Try out driving the 3 status LEDs, active low. Test that serial messages are getting to your computer. After programming, the nRF82832 likes to freeze up its serial bus and requires a manual reset by the button. Familiarize yourself with getting the board into bootloader mode.
Are the Required Libraries Present?
Note: The examples assumes you are using the latest version of the Arduino IDE on your desktop. If this is your first time using Arduino, please review our tutorial on installing the Arduino IDE. If you have not previously installed an Arduino library, please check out our installation guide.
Make sure that the following includes can be added without breaking the build process.
language:c
#include <MIDI.h>
#include <BLEPeripheral.h>
Also, make sure that the MIDI library in use not baked into Arduino or from a dubious source. It should be the latest and greatest from FortySevenEffects' GitHub, and should be manually installed:
With verbose debugging on, the build log reveals that MIDI.cpp is being sourced from the local sketchbook library folder.
"C:\ArduinoConfigurations\arduino-1.8.2_nRF52\localSB\libraries\arduino_midi_library\src\MIDI.cpp" -o
Is the MIDI Shield Configured for "PROG"?
The switch on the midi shield directs the flow of data to the processor. When switched to "RUN" both the MIDI IN port and the FTDI's TX pin are connected to the nRF52832. Due to the way it's wired, the MIDI IN will overpower the FTDI and programs won't load. Alternately, in the "PROG" position, the MIDI IN port is disconnected and programming can occur.
Do You Have a Tasty Beverage?
Working with protocols can require a bit of patience. Hang in there!
Create a Basic BLE Peripheral
The goal here is to make a program that meets the specification of MIDI BLE and appears when scanning for Bluetooth devices. The BLEPeripheral library does a good job of abstracting away the specifics of the communication but a bit of knowledge about how BLE works is useful to give meaning to the words used when setting up a BLE peripheral.
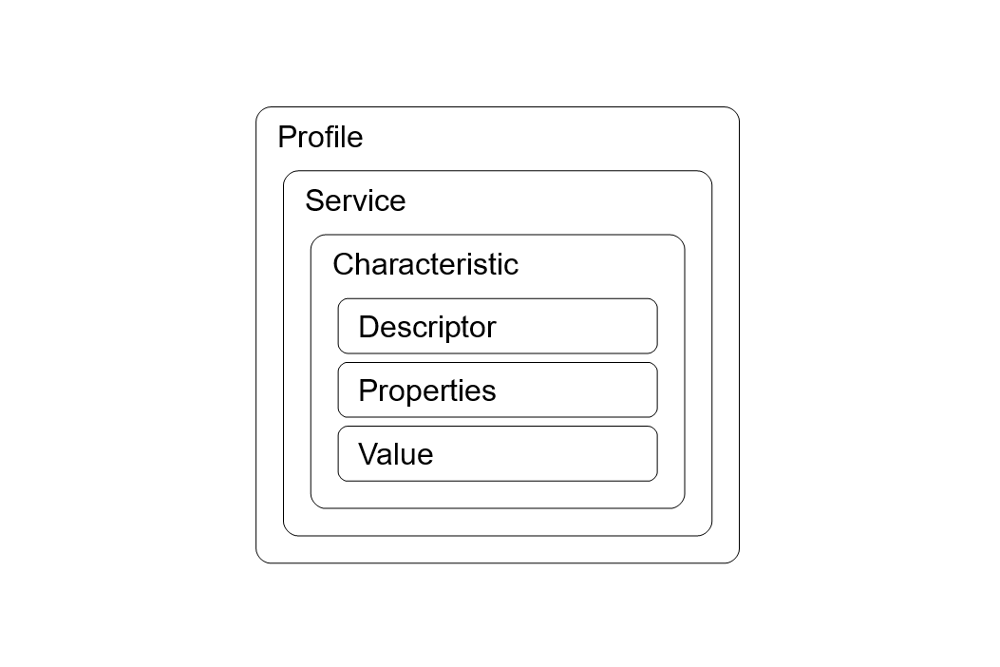
BLE is designed to allow a variety of devices, and therefore needs an expandable architecture. The term GATT is used, which stands for Generic Attribute Profile.
The profile describes the collection of objects which are required for a particular BLE system.
A profile can have multiple services, each which is a collection of one or more characteristic.
The characteristic contains the data that will be acted on. Each can only have a single value and a single property. For the nRF52832, that value can be up to 20 bytes.
Each service and each characteristic has a unique name which tells connected systems what kind of device it's dealing with. It's called a UUID (universally unique identifier), and can be 16 bits or 128 bits.
For more information, see bluetooth.com's documentation.
The MIDI BLE Profile
MIDI BLE is a very simple realization of the topology. There is one service, and one characteristic that are required.
As part of midi.org's published standard, a device shall have:
- The MIDI Service has a UUID of: 03B80E5A-EDE8-4B33-A751-6CE34EC4C700
- The MIDI Characteristic has a UUID of: 7772E5DB-3868-4112-A1A9-F2669D106BF3, and the following traits:
- write without response
- read
- notify
Next, the BLEPeripheral library is used to describe the topology -- its API is documented on GitHub. By using the API to tell the library how to form itself, the nRF52832 will become a MIDI BLE device, and data will be accessible through the characteristic's value.
To use the BLEPeripheral library, declare memory spaces for the various layers as persistent objects, then add them to the BLE Peripheral object. Then, the Peripheral object can be started and used.
The main object is declared. This is what will hold the other objects and operate the radio.
language:c
BLEPeripheral blePeripheral;
Individual layer objects (attributes) are declared for the service and characteristic. The characteristic is also constructed with a max value size of 20, which is the largest size that nRF52832 will allow.
language:c
BLEService service("03B80E5A-EDE8-4B33-A751-6CE34EC4C700");
BLECharacteristic characteristic("7772E5DB-3868-4112-A1A9-F2669D106BF3", BLERead | BLEWriteWithoutResponse | BLENotify, 20 );
Also, a descriptor is created. It is optional and tells the central to disable notification, meaning the BLE peripheral can cast data at the central without acknowledgement. Depending on how the central is programmed, this may or may not have an effect.
language:c
BLEDescriptor descriptor = BLEDescriptor("2902", 0);
Creating the objects alone will not have any effect. There's a few more things to do which are placed in a routine called setupBLE() for convenience. It is called once during setup(). The peripheral is named, told to advertise the UUID of the service, and given an initial value. Then, the peripheral is started with .begin() which connects it to the system. At this point, the BLE device should be discoverable.
language:c
void setupBLE()
{
    blePeripheral.setLocalName("BLE MIDI Starter"); //local name sometimes used by central
    blePeripheral.setDeviceName("BLE MIDI Starter"); //device name sometimes used by central
    blePeripheral.setAdvertisedServiceUuid(service.uuid()); //Advertise MIDI UUID

    // add attributes (services, characteristics, descriptors) to peripheral
    blePeripheral.addAttribute(service);
    blePeripheral.addAttribute(characteristic);
    blePeripheral.addAttribute(descriptor);

    // set initial value
    characteristic.setValue(0);

    blePeripheral.begin();
}
In the main program loop, a object is created locally and used to determine if the peripheral is connected to a central. The structure of this code is taken from the BLEPeripheral examples.
language:c
void loop()
{
    BLECentral central = blePeripheral.central();
    if (central) {
        while (central.connected()) {
            if (characteristic.written()) {
            }
        }

    }
}
Rolling it all together, a simple program can be written that establishes a connection to a BLE central. It turns on the green LED if the device is connected. If data is written to the device, it blinks the red LED and prints th value written to the serial terminal as hex.
language:c
#include <BLEPeripheral.h>

#define BLUE_STAT_PIN     7   // LED on pin 7
#define RED_STAT_PIN     11   // LED on pin 11
#define GREEN_STAT_PIN   12   // LED on pin 12
#define BTN_PIN           6   // User button

// create peripheral instance, see pinouts above
//const char * localName = "nRF52832 MIDI";
BLEPeripheral blePeripheral;
BLEService service("03B80E5A-EDE8-4B33-A751-6CE34EC4C700");
BLECharacteristic characteristic("7772E5DB-3868-4112-A1A9-F2669D106BF3", BLERead | BLEWriteWithoutResponse | BLENotify, 20 );
BLEDescriptor descriptor = BLEDescriptor("2902", 0);

void setup() {
    Serial.begin(115200);
    delay(3000);
    Serial.println("Program Started");

    //Setup diag leds
    pinMode(BLUE_STAT_PIN, OUTPUT);
    pinMode(RED_STAT_PIN, OUTPUT);
    pinMode(GREEN_STAT_PIN, OUTPUT);
    digitalWrite(BLUE_STAT_PIN, 1);
    digitalWrite(RED_STAT_PIN, 1);
    digitalWrite(GREEN_STAT_PIN, 1);

    //Setup nRF52832 user button
    pinMode(BTN_PIN, INPUT_PULLUP);

    setupBLE();

}


void loop()
{
    BLECentral central = blePeripheral.central();
    if (central) {
        while (central.connected()) {
            digitalWrite(GREEN_STAT_PIN, 0);
            //Check if data exists coming in from BLE
            if (characteristic.written()) {
                digitalWrite(RED_STAT_PIN, 0);

                //Receive the written packet and parse it out here.
                Serial.print("Rx size: ");
                Serial.println(characteristic.valueLength());
                uint8_t * buffer = (uint8_t*)characteristic.value();
                Serial.print("0x");
                for( int i = 0; i < characteristic.valueLength(); i++ ){
                    if( buffer[i] < 0x10 ) Serial.print("0");
                    Serial.print( buffer[i], HEX );
                }
                Serial.println();

                digitalWrite(RED_STAT_PIN, 1);
            }
        }

    }
    digitalWrite(BLUE_STAT_PIN, 1);
    digitalWrite(GREEN_STAT_PIN, 1);
    delay(500);
}

void setupBLE()
{
    blePeripheral.setLocalName("BLE MIDI Starter"); //local name sometimes used by central
    blePeripheral.setDeviceName("BLE MIDI Starter"); //device name sometimes used by central
    //blePeripheral.setApperance(0x0000); //default is 0x0000, what should this be?
    blePeripheral.setAdvertisedServiceUuid(service.uuid()); //Advertise MIDI UUID

    // add attributes (services, characteristics, descriptors) to peripheral
    blePeripheral.addAttribute(service);
    blePeripheral.addAttribute(characteristic);
    blePeripheral.addAttribute(descriptor);

    // set initial value
    characteristic.setValue(0);

    // set event handlers - Alternate ways of checking for BLE activity
    //characteristic.setEventHandler(BLEWritten, BLEWrittenCallback);
    //characteristic.setEventHandler(BLESubscribed, BLESubscribedCallback);
    //characteristic.setEventHandler(BLEUnsubscribed, BLEUnsubscribedCallback);

    blePeripheral.begin();
}
To test the program, it is loaded to the nRF52832, which is discovered by a computer that can send MIDI BLE data. The computer sends MIDI data for setting an instrument's configuration, and the following appears in the serial console. The data will be analyzed in the section "Encapsulating MIDI DATA".
Output:
Program Started
Rx size: 13
0xB9FDB06248FDB00600FDB0260A
Encapsulating MIDI Data
Paraphrased from the MIDI Tutorial,
Bytes of MIDI messages are divided into 2 major categories, based on the setting of the most significant bit. If a byte's MSB is a 0, it is a data byte with 7 usable bits of data. If the MSB is a 1, it's a status byte (or could be a special case if SysEx messages are used, but they are ignored here).
A serial MIDI packet is started with a status byte, then contains a number of data bytes depending on what type of packet is indicated by the status byte (see Summary of MIDI Messages for more information).
In the world of BLE, data is thought of in terms of characteristics, which is just a size of data that can be written to, and is available on both ends of the connection by the unseen negotiations of the link.
The Bluetooth LE MIDI Specification serves as the source material for the next section. Go register with midi.org to download it for free, and it helps them see who's using the information. They're a great organization and are allowing direct reprinting of their copyrighted material for this tutorial.
The specification allows a few types of MIDI packets to exist within a characteristic.
BLE Packet with One Full MIDI Message
The most basic type of MIDI BLE packet, or characteristic value, is one containing a single MIDI message.
The first and second bytes are overhead to the actual midi payload.
- The first byte describe the upper 6 bits of the timestamp and has the MSB set.
- The second byte describes the lower 7 bits of the timestamp and also has the MSB set.
- The remaining bytes are the payload. It's the original midi message that is being encapsulated.

Shown here, a MIDI message of 3 bytes is appended to a timestamp to create a BLE packet. If the midi message was only 2 bytes long, the BLE packet size would be 4 bytes, and so on.
Also notice that the MSB is set for any byte that isn't data. This will be useful when parsing out MIDI messages of other forms.
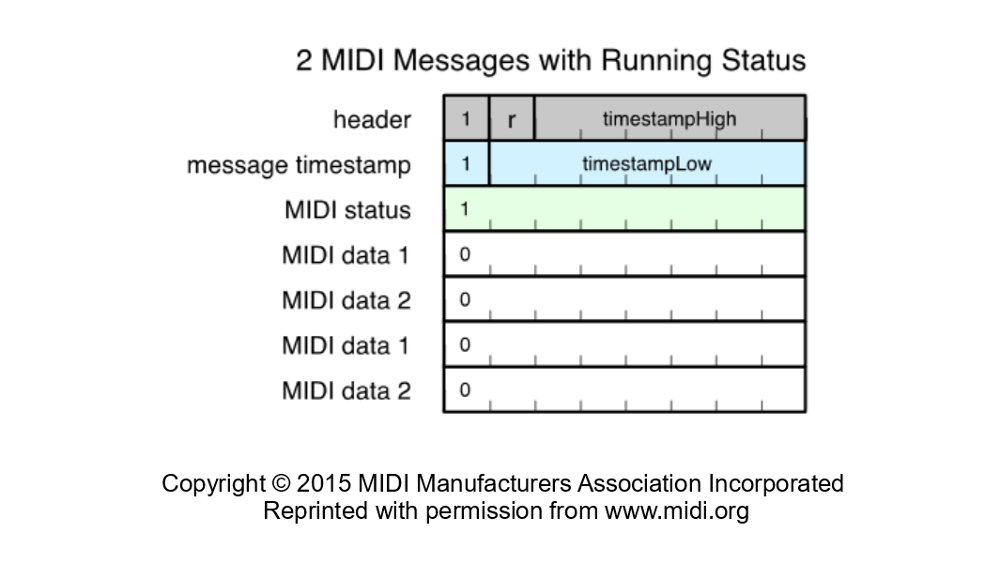
BLE Packet with Multiple Full MIDI Messages
A BLE characteristic can be written to a variable size, and can contain more than 1 MIDI message. When two or more MIDI messages are concatenated, the upper 6 bits of timestamp can be omitted because it can't rollover twice per BLE packet. All contained messages share the same upper timestamp bits and have their own lower bits.
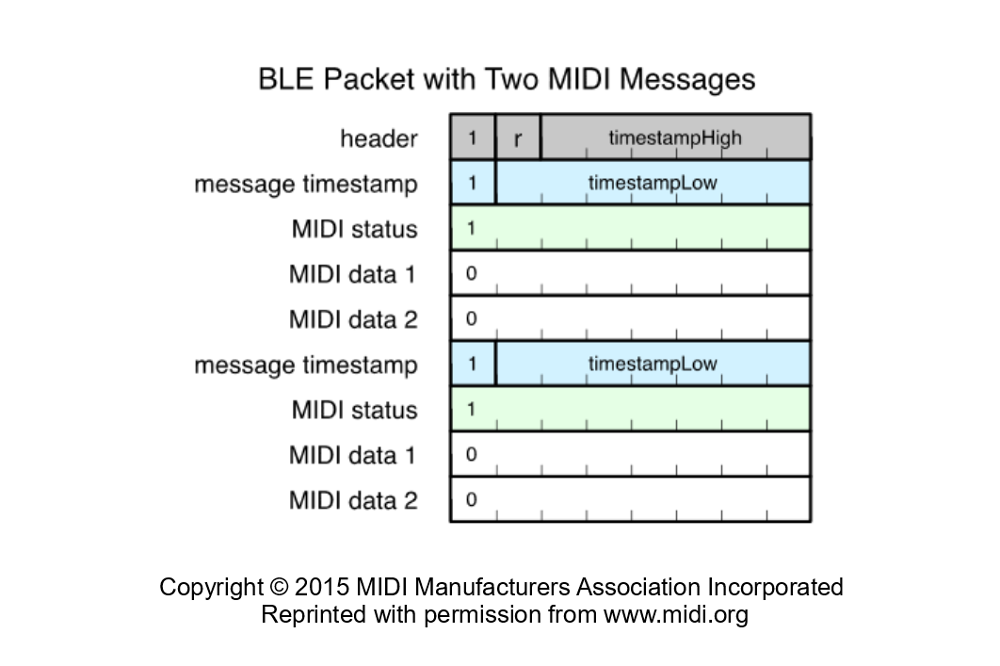
Here two MIDI messages are contained in a single characteristic. The second message has the same header byte and so it's omitted to reduce overhead.
Look at the output from the basic BLE Peripheral example.
0xB9FDB06248FDB00600FDB0260A
This has been hand decoded in the following table.
| Offset | Hex |
Binary | BLE Name |
MIDI Decode |
|---|---|---|---|---|
| 0x00 |
0xB9 | 10111001b | Header | |
| 0x01 | 0xFD | 11111101b | Timestamp | |
| 0x02 | 0xB0 | 10110000b | Status | Control Change Channel 0 |
| 0x03 | 0x62 | 01100010b | Data | Controller 98 |
| 0x04 | 0x48 | 01001000b | Data | 74 |
| 0x05 | 0xFD | 11111101b | Timestamp | |
| 0x06 | 0xB0 | 10110000b | Status | Control Change Channel 0 |
| 0x07 | 0x06 | 00000110b | Data | Controller 6 |
| 0x08 | 0x00 | 00000000b | Data | 0 |
| 0x09 | 0xFD | 11111101b | Timestamp | |
| 0x0A | 0xB0 | 10110000b | Status | Control Change Channel 0 |
| 0x0B | 0x26 | 00100110b | Data | Controller 38 |
| 0x0C | 0x0A | 00001010b | Data | 10 |
This is an NRPN message. It's three controller change commands sent sequentially. Just as the MIDI specification indicates, the packet is formed with single Header and unique timestamps for each message (although they all seemed to originate simultaneously).
BLE Packet with Running Status MIDI Messages
The last type of BLE packet that can exist is a running status message. In a message like this many MIDI messages all have the same timestamp and MIDI status, so the timestamp and status are only sent once followed by a block of data. The MIDI status indicates what size the data will be (by message type) and the data can be parsed accordingly.
From the previous example, the MacBook Air sent 3 messages that did have the same timestamp and status. It's unusual that it was instructed to send these as full messages rather than running status messages.
Using the FortySevenEffects MIDI Library
The gold standard for Arduino MIDI Libraries is the Arduino MIDI library written by GitHub user FortySevenEffects.
From the MIDI Tutorial,
- It can use hardware or software serial ports (leaving the hardware serial port for printing debug messages!).
- Incoming messages can be received by polling, or callbacks for specific messages can be installed.
- The library can filter for messages on a specific midi channel, or receive on all channels.
- It implements an optional "soft thru" port that can be configured to echo the input back to the output port.
It also has detailed documentation in doxygen format.
For some practical examples that demonstrate this library, take a look at the hookup guide for the SparkFun MIDI Shield.
The library will be configured in this way for the rest of this tutorial:
- Hardware Serial Port
- Messages Will be Received by Polling
- Device Receives OMNI Mode
- Soft Thru is Disabled
Adapting the library to operate on the nRF52832 is fairly straightforward. The HardwareSerial object can be passed to the MIDI_CREATE_INSTANCE function as normal and the library operates over the serial port. However, the baud rate is not correctly set. The nRF52832 board package only allows the standard discrete baud rates, so the port must be finagled after calling MIDI.begin()
Use the following code snippet to bend the port into 31250 baud.
language:c
#include "nrf52.h"

    ...

    MIDI.begin(MIDI_CHANNEL_OMNI);

    ...

    // The nRF52832 converts baud settings to the discrete standard rates.
    // Use the nrf52.h names to write a custom value, 0x7FFC80 after beginning midi
    NRF_UARTE_Type * myUart;
    myUart = (NRF_UARTE_Type *)NRF_UART0_BASE;
    myUart->BAUDRATE = 0x7FFC80;
The sketch "midi-lib-starter.ino" is an expanded version of the previous example, "ble-starter.ino", with the MIDI library included and configured. In the example, a note-on note-off pair of messages is sent out the serial port when the program starts in order to prove the system is working. During runtime, the nRF52832's user button can be pressed to send data out the port.
A function called parseMIDIonDIN() is called periodically when the BLE connection is valid. Inside, MIDI.read() is checked to see if new data is available. If so, the red LED is flashed but nothing else occurs. This is where MIDI data will be decoded and dealt with.
language:c
#include <MIDI.h>
#include "nrf52.h"
#include <BLEPeripheral.h>

#define LED_PIN    7 // LED on pin 7
#define RED_STAT_PIN    11 // LED on pin 7
#define GREEN_STAT_PIN    12 // LED on pin 7
#define BTN_PIN    6

uint8_t msgBuf[5];

unsigned long msOffset = 0;
#define MAX_MS 0x01FFF //13 bits, 8192 dec

// create peripheral instance, see pinouts above
//const char * localName = "nRF52832 MIDI";
BLEPeripheral blePeripheral;
BLEService service("03B80E5A-EDE8-4B33-A751-6CE34EC4C700");
BLECharacteristic characteristic("7772E5DB-3868-4112-A1A9-F2669D106BF3", BLERead | BLEWriteWithoutResponse | BLENotify, 20 );
BLEDescriptor descriptor = BLEDescriptor("2902", 0);

MIDI_CREATE_INSTANCE(HardwareSerial, Serial, MIDI);

void setup() {
    delay(1000);

    //Setup diag leds
    pinMode(LED_PIN, OUTPUT);
    pinMode(RED_STAT_PIN, OUTPUT);
    pinMode(GREEN_STAT_PIN, OUTPUT);
    pinMode(BTN_PIN, INPUT_PULLUP);
    digitalWrite(LED_PIN, 1);
    digitalWrite(RED_STAT_PIN, 1);
    digitalWrite(GREEN_STAT_PIN, 1);

    setupBLE();

    // Initiate MIDI communications, listen to all channels
    MIDI.begin(MIDI_CHANNEL_OMNI);
    MIDI.turnThruOff();

    // The nRF52832 converts baud settings to the discrete standard rates.
    // Use the nrf52.h names to write a custom value, 0x7FFC80 after beginning midi
    NRF_UARTE_Type * myUart;
    myUart = (NRF_UARTE_Type *)NRF_UART0_BASE;
    myUart->BAUDRATE = 0x7FFC80;

    //Write data to the serial output pin to make sure the serial output is working.
    //Sometimes serial output only allows 1 byte out then hangs.  Resetting the
    //nRF52832 resolves the issue
    digitalWrite(RED_STAT_PIN, 0);
    MIDI.sendNoteOn(42, 66, 1);
    delay(500);
    MIDI.sendNoteOff(42, 66, 1);
    digitalWrite(RED_STAT_PIN, 1);

}


void loop()
{
    BLECentral central = blePeripheral.central();
    //Send midi data by the press of the button to test while running.
    if(digitalRead(BTN_PIN) == 0){
        digitalWrite(GREEN_STAT_PIN, 0);
        MIDI.sendNoteOn(0x45, 80, 1);
        delay(100);
        MIDI.sendNoteOff(0x45, 80, 1);
        digitalWrite(GREEN_STAT_PIN, 1);
    }
    if (central) {
        while (central.connected()) {
            digitalWrite(GREEN_STAT_PIN, 0);
            //If connected, send midi data by the button here
            if(digitalRead(BTN_PIN) == 0){
                digitalWrite(GREEN_STAT_PIN, 0);
                MIDI.sendNoteOn(0x45, 80, 1);
                delay(100);
                MIDI.sendNoteOff(0x45, 80, 1);
                digitalWrite(GREEN_STAT_PIN, 1);
            }
            //Check if data exists coming in from BLE
            if (characteristic.written()) {
                digitalWrite(RED_STAT_PIN, 0);
                processPacket();
                digitalWrite(RED_STAT_PIN, 1);
            }
            //Check if data exists coming in from the serial port
            parseMIDIonDIN();
        }

    }
    digitalWrite(LED_PIN, 1);
    digitalWrite(GREEN_STAT_PIN, 1);
    delay(500);
}

void processPacket()
{
    //Receive the written packet and parse it out here.
    uint8_t * buffer = (uint8_t*)characteristic.value();
    uint8_t bufferSize = characteristic.valueLength();
    //hang to give the LED time to show (not necessary if routines are here)
    delay(10);
}

void parseMIDIonDIN()
{
    if (  MIDI.read())
    {
        digitalWrite(RED_STAT_PIN, 0);
        //hang to give the LED time to show (not necessary if routines are here)
        delay(10);
        digitalWrite(RED_STAT_PIN, 1);
    }
}

void setupBLE()
{
    blePeripheral.setLocalName("MIDI BLE Starter"); //local name sometimes used by central
    blePeripheral.setDeviceName("MIDI BLE Starter"); //device name sometimes used by central
    //blePeripheral.setApperance(0x0000); //default is 0x0000, what should this be?
    blePeripheral.setAdvertisedServiceUuid(service.uuid()); //Advertise MIDI UUID

    // add attributes (services, characteristics, descriptors) to peripheral
    blePeripheral.addAttribute(service);
    blePeripheral.addAttribute(characteristic);
    blePeripheral.addAttribute(descriptor);

    // set initial value
    characteristic.setValue(0);

    // set event handlers - Alternate ways of checking for BLE activity
    //characteristic.setEventHandler(BLEWritten, BLEWrittenCallback);
    //characteristic.setEventHandler(BLESubscribed, BLESubscribedCallback);
    //characteristic.setEventHandler(BLEUnsubscribed, BLEUnsubscribedCallback);

    blePeripheral.begin();
}
This code is useful if as a framework for using both the BLE MIDI configuration as well as the FortySevenEffects MIDI configuration. The next section will fill parseMIDIonDIN() with code which translates incoming MIDI messages into BLE characteristic messages.
DIN to BLE
The strategy for converting serial MIDI packets into BLE Characteristic packets is to
- Ignore All SysEx Messages
- Attach a Header to Each Incoming Message (and Timestamp)
- Write It to the Characteristic
Detect Incoming MIDI messages
The function parseMIDIonDIN() previously just checked MIDI.read() and blinked an LED if data was present. Now, that function is filled with a packet building and sending routine.
Calculating a Timestamp
To calculate the timestamp, the built-in millis() is used. The BLE standard only specifies 13 bits worth of millisecond data though, so it's bitwise anded with 0x1FFF for an ever repeating cycle of 13 bits.
This is done right after a MIDI message is detected. It's split into a 6 upper bits, 7 lower bits, and the MSB of both bytes are set to indicate that this is a header byte. Both bytes are placed into the first two position of an array in preparation for a MIDI message.
Interpreting MIDI Messages and Building Variable Length Characteristics
The MIDI Shield Hookup Guide contains a switch statement that's used to build a MIDI analyzer. This code is leveraged to build the interpreter. It calls MIDI.getType() and compares for midi scoped types, such as midi::NoteOff and midi::PitchBend to determine what type (and more importantly, length) of packet to build.
The array that's being build then gets the statysByte programmed in, then data if there is any. Afterwards, characteristic.setValue(...) is called. It's passed the array (a pointer) and a size, which is known by the results of MIDI.getType()
The Program Listing
language:c
#include <MIDI.h>
#include "nrf52.h"
#include <BLEPeripheral.h>

#define BLUE_STAT_PIN     7   // LED on pin 7
#define RED_STAT_PIN     11   // LED on pin 11
#define GREEN_STAT_PIN   12   // LED on pin 12
#define BTN_PIN           6   // User button

// create peripheral instance, see pinouts above
//const char * localName = "nRF52832 MIDI";
BLEPeripheral blePeripheral;
BLEService service("03B80E5A-EDE8-4B33-A751-6CE34EC4C700");
BLECharacteristic characteristic("7772E5DB-3868-4112-A1A9-F2669D106BF3", BLERead | BLEWriteWithoutResponse | BLENotify, 20 );
BLEDescriptor descriptor = BLEDescriptor("2902", 0);

MIDI_CREATE_INSTANCE(HardwareSerial, Serial, MIDI);

void setup() {
    delay(1000);

    //Setup diag leds
    pinMode(BLUE_STAT_PIN, OUTPUT);
    pinMode(RED_STAT_PIN, OUTPUT);
    pinMode(GREEN_STAT_PIN, OUTPUT);
    digitalWrite(BLUE_STAT_PIN, 1);
    digitalWrite(RED_STAT_PIN, 1);
    digitalWrite(GREEN_STAT_PIN, 1);

    //Setup nRF52832 user button
    pinMode(BTN_PIN, INPUT_PULLUP);

    setupBLE();

    // Initiate MIDI communications, listen to all channels
    MIDI.begin(MIDI_CHANNEL_OMNI);
    MIDI.turnThruOff();

    // The nRF52832 converts baud settings to the discrete standard rates.
    // Use the nrf52.h names to write a custom value, 0x7FFC80 after beginning midi
    NRF_UARTE_Type * myUart;
    myUart = (NRF_UARTE_Type *)NRF_UART0_BASE;
    myUart->BAUDRATE = 0x7FFC80;

    //Write data to the serial output pin to make sure the serial output is working.
    //Sometimes serial output only allows 1 byte out then hangs.  Resetting the
    //nRF52832 resolves the issue
    digitalWrite(RED_STAT_PIN, 0);
    MIDI.sendNoteOn(42, 66, 1);
    delay(500);
    MIDI.sendNoteOff(42, 66, 1);
    digitalWrite(RED_STAT_PIN, 1);

}

void loop()
{
    BLECentral central = blePeripheral.central();
    if(digitalRead(BTN_PIN) == 0){
        digitalWrite(GREEN_STAT_PIN, 0);
        MIDI.sendNoteOff(0x45, 80, 1);
        delay(100);
        digitalWrite(GREEN_STAT_PIN, 1);
    }
    if (central) {
        //Prep the timestamp
        msOffset = millis();

        digitalWrite(BLUE_STAT_PIN, 0);
        // central connected to peripheral

        while (central.connected()) {
            digitalWrite(GREEN_STAT_PIN, 0);
            //If connected, send midi data by the button here
            if(digitalRead(BTN_PIN) == 0){
                digitalWrite(GREEN_STAT_PIN, 0);
                MIDI.sendNoteOn(0x45, 80, 1);
                delay(100);
                MIDI.sendNoteOff(0x45, 80, 1);
                digitalWrite(GREEN_STAT_PIN, 1);
            }
            //Check if data exists coming in from BLE
            if (characteristic.written()) {
                digitalWrite(RED_STAT_PIN, 0);
                //hang to give the LED time to show (not necessary if routines are here)
                delay(10);
                digitalWrite(RED_STAT_PIN, 1);
            }
            //Check if data exists coming in from the serial port
            parseMIDIonDIN();
        }
    }
    //No longer connected.  Turn off the LEDs.
    digitalWrite(BLUE_STAT_PIN, 1);
    digitalWrite(GREEN_STAT_PIN, 1);
    //Delay to show off state for a bit
    delay(100);
}

//This function is called to check if MIDI data has come in through the serial port.  If found, it builds a characteristic buffer and sends it over BLE.
void parseMIDIonDIN()
{
    uint8_t msgBuf[5]; //Outgoing buffer

    //Calculate timestamp.
    uint16_t currentTimeStamp = millis() & 0x01FFF;

    msgBuf[0] = ((currentTimeStamp >> 7) & 0x3F) | 0x80; //6 bits plus MSB
    msgBuf[1] = (currentTimeStamp & 0x7F) | 0x80; //7 bits plus MSB

    //Check MIDI object for new data.
    if (  MIDI.read())
    {
        digitalWrite(RED_STAT_PIN, 0);
        uint8_t statusByte = ((uint8_t)MIDI.getType() | ((MIDI.getChannel() - 1) & 0x0f));
        switch (MIDI.getType())
        {
            //2 Byte Channel Messages
            case midi::NoteOff :
            case midi::NoteOn :
            case midi::AfterTouchPoly :
            case midi::ControlChange :
            case midi::PitchBend :
                msgBuf[2] = statusByte;
                msgBuf[3] = MIDI.getData1();
                msgBuf[4] = MIDI.getData2();
                characteristic.setValue(msgBuf, 5);
                break;
            //1 Byte Channel Messages
            case midi::ProgramChange :
            case midi::AfterTouchChannel :
                msgBuf[2] = statusByte;
                msgBuf[3] = MIDI.getData1();
                characteristic.setValue(msgBuf, 4);
                break;
            //System Common Messages
            case midi::TimeCodeQuarterFrame :
                msgBuf[2] = 0xF1;
                msgBuf[3] = MIDI.getData1();
                characteristic.setValue(msgBuf, 4);
                break;
            case midi::SongPosition :
                msgBuf[2] = 0xF2;
                msgBuf[3] = MIDI.getData1();
                msgBuf[4] = MIDI.getData2();
                characteristic.setValue(msgBuf, 5);
                break;
            case midi::SongSelect :
                msgBuf[2] = 0xF3;
                msgBuf[3] = MIDI.getData1();
                characteristic.setValue(msgBuf, 4);
                break;
            case midi::TuneRequest :
                msgBuf[2] = 0xF6;
                characteristic.setValue(msgBuf, 3);
                break;
                //Real-time Messages
            case midi::Clock :
                msgBuf[2] = 0xF8;
                characteristic.setValue(msgBuf, 3);
                break;
            case midi::Start :
                msgBuf[2] = 0xFA;
                characteristic.setValue(msgBuf, 3);
                break;
            case midi::Continue :
                msgBuf[2] = 0xFB;
                characteristic.setValue(msgBuf, 3);
                break;
            case midi::Stop :
                msgBuf[2] = 0xFC;
                characteristic.setValue(msgBuf, 3);
                break;
            case midi::ActiveSensing :
                msgBuf[2] = 0xFE;
                characteristic.setValue(msgBuf, 3);
                break;
            case midi::SystemReset :
                msgBuf[2] = 0xFF;
                characteristic.setValue(msgBuf, 3);
                break;
            //SysEx
            case midi::SystemExclusive :
//              {
//                  // Sysex is special.
//                  // could contain very long data...
//                  // the data bytes form the length of the message,
//                  // with data contained in array member
//                  uint16_t length;
//                  const uint8_t  * data_p;
//
//                  Serial.print("SysEx, chan: ");
//                  Serial.print(MIDI.getChannel());
//                  length = MIDI.getSysExArrayLength();
//
//                  Serial.print(" Data: 0x");
//                  data_p = MIDI.getSysExArray();
//                  for (uint16_t idx = 0; idx < length; idx++)
//                  {
//                      Serial.print(data_p[idx], HEX);
//                      Serial.print(" 0x");
//                  }
//                  Serial.println();
//              }
                break;
            case midi::InvalidType :
            default:
                break;
        }
        digitalWrite(RED_STAT_PIN, 1);
    }

}

void setupBLE()
{
    blePeripheral.setLocalName("DIN to BLE"); //local name sometimes used by central
    blePeripheral.setDeviceName("DIN to BLE"); //device name sometimes used by central
    //blePeripheral.setApperance(0x0000); //default is 0x0000, what should this be?
    blePeripheral.setAdvertisedServiceUuid(service.uuid()); //Advertise MIDI UUID

    // add attributes (services, characteristics, descriptors) to peripheral
    blePeripheral.addAttribute(service);
    blePeripheral.addAttribute(characteristic);
    blePeripheral.addAttribute(descriptor);

    // set initial value
    characteristic.setValue(0);

    blePeripheral.begin();
}
BLE to DIN
In the previous example of converting serial messages to BLE messages, the shortcut of "only send single, full MIDI message packets" was used. Going the other way, it's more difficult because the central can't be configured to only send one type of packet, they will be packetized as defined by the MIDI BLE standard. The program must separate the data which comes in many forms.
To do so, a routine is created (called processPacket) that has the following logical flow.
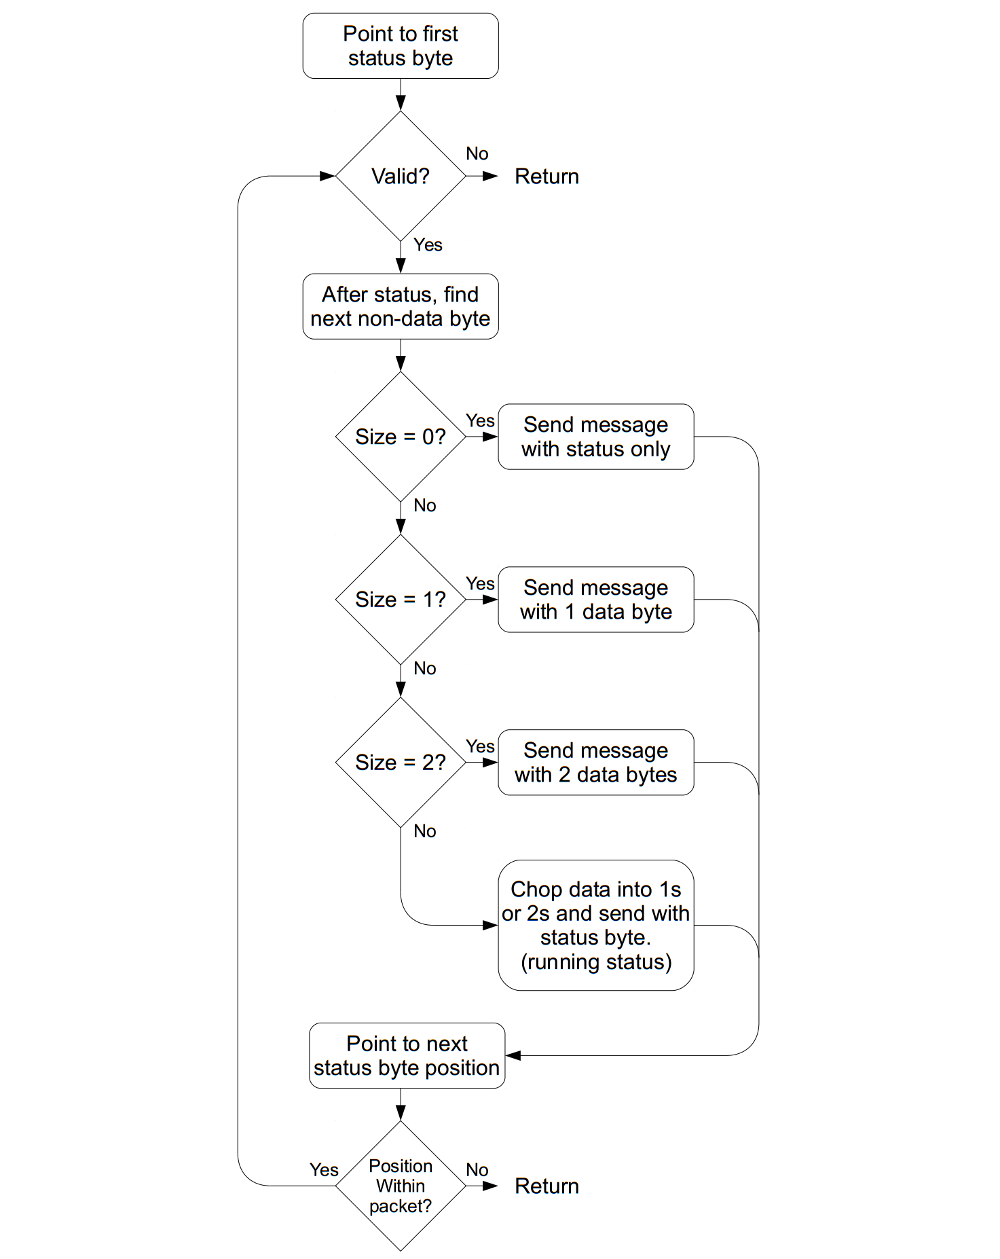
To implement, the program uses array indeces, left and right. The left one starts at array position 2 because it is always a status byte. Next, the right is moved to seek out the next status byte by looking at the MSB positions. Afterwards, the size of the data following the left status byte is known, and can be dealt with. The left index is then moved to the next status byte and the process is repeated until the indeces exceed the bounds.
Inside, it calls another routine (transmitMIDIonDIN) that interfaces the FortySevenEffects library. This is to isolate the functions from each other and provide a method of testing out the routines without having a full system running.
This code is the MIDI BLE Starter program with expanded processPacket function that translates incoming BLE packets into serial MIDI.
language:c
#include <MIDI.h>
#include "nrf52.h"
#include <BLEPeripheral.h>

#define BLUE_STAT_PIN     7   // LED on pin 7
#define RED_STAT_PIN     11   // LED on pin 11
#define GREEN_STAT_PIN   12   // LED on pin 12
#define BTN_PIN           6   // User button

unsigned long msOffset = 0;
#define MAX_MS 0x01FFF //13 bits, 8192 dec

// create peripheral instance, see pinouts above
//const char * localName = "nRF52832 MIDI";
BLEPeripheral blePeripheral;
BLEService service("03B80E5A-EDE8-4B33-A751-6CE34EC4C700");
BLECharacteristic characteristic("7772E5DB-3868-4112-A1A9-F2669D106BF3", BLERead | BLEWriteWithoutResponse | BLENotify, 20 );
BLEDescriptor descriptor = BLEDescriptor("2902", 0);

MIDI_CREATE_INSTANCE(HardwareSerial, Serial, MIDI);

void setup() {
    delay(1000);

    //Setup diag leds
    pinMode(BLUE_STAT_PIN, OUTPUT);
    pinMode(RED_STAT_PIN, OUTPUT);
    pinMode(GREEN_STAT_PIN, OUTPUT);
    digitalWrite(BLUE_STAT_PIN, 1);
    digitalWrite(RED_STAT_PIN, 1);
    digitalWrite(GREEN_STAT_PIN, 1);

    //Setup nRF52832 user button
    pinMode(BTN_PIN, INPUT_PULLUP);

    setupBLE();

    // Initiate MIDI communications, listen to all channels
    MIDI.begin(MIDI_CHANNEL_OMNI);
    MIDI.turnThruOff();

    // The nRF52832 converts baud settings to the discrete standard rates.
    // Use the nrf52.h names to write a custom value, 0x7FFC80 after beginning midi
    NRF_UARTE_Type * myUart;
    myUart = (NRF_UARTE_Type *)NRF_UART0_BASE;
    myUart->BAUDRATE = 0x7FFC80;

    //Write data to the serial output pin to make sure the serial output is working.
    //Sometimes serial output only allows 1 byte out then hangs.  Resetting the
    //nRF52832 resolves the issue
    digitalWrite(RED_STAT_PIN, 0);
    MIDI.sendNoteOn(42, 66, 1);
    delay(500);
    MIDI.sendNoteOff(42, 66, 1);
    digitalWrite(RED_STAT_PIN, 1);

}

void loop()
{
    BLECentral central = blePeripheral.central();
    if(digitalRead(BTN_PIN) == 0){
        digitalWrite(GREEN_STAT_PIN, 0);
        MIDI.sendNoteOff(0x45, 80, 1);
        delay(100);
        digitalWrite(GREEN_STAT_PIN, 1);
    }
    if (central) {
        //Prep the timestamp
        msOffset = millis();

        digitalWrite(BLUE_STAT_PIN, 0);
        // central connected to peripheral

        while (central.connected()) {
            digitalWrite(GREEN_STAT_PIN, 0);
            //If connected, send midi data by the button here
            if(digitalRead(BTN_PIN) == 0){
                digitalWrite(GREEN_STAT_PIN, 0);
                MIDI.sendNoteOn(0x45, 80, 1);
                delay(100);
                MIDI.sendNoteOff(0x45, 80, 1);
                digitalWrite(GREEN_STAT_PIN, 1);
            }
            //Check if data exists coming in from BLE
            if (characteristic.written()) {
                digitalWrite(RED_STAT_PIN, 0);
                processPacket();
                digitalWrite(RED_STAT_PIN, 1);
            }
        }
    }
    //No longer connected.  Turn off the LEDs.
    digitalWrite(BLUE_STAT_PIN, 1);
    digitalWrite(GREEN_STAT_PIN, 1);
    //Delay to show off state for a bit
    delay(100);
}

//This function decodes the BLE characteristics and calls transmitMIDIonDIN
//if the packet contains sendable MIDI data.
void processPacket()
{
    //Receive the written packet and parse it out here.
    uint8_t * buffer = (uint8_t*)characteristic.value();
    uint8_t bufferSize = characteristic.valueLength();

    //Pointers used to search through payload.
    uint8_t lPtr = 0;
    uint8_t rPtr = 0;
    //lastStatus used to capture runningStatus
    uint8_t lastStatus;
    //Decode first packet -- SHALL be "Full MIDI message"
    lPtr = 2; //Start at first MIDI status -- SHALL be "MIDI status"
    //While statement contains incrementing pointers and breaks when buffer size exceeded.
    while(1){
        lastStatus = buffer[lPtr];
        if( (buffer[lPtr] < 0x80) ){
            //Status message not present, bail
            return;
        }
        //Point to next non-data byte
        rPtr = lPtr;
        while( (buffer[rPtr + 1] < 0x80)&&(rPtr < (bufferSize - 1)) ){
            rPtr++;
        }
        //look at l and r pointers and decode by size.
        if( rPtr - lPtr < 1 ){
            //Time code or system
            transmitMIDIonDIN( lastStatus, 0, 0 );
        } else if( rPtr - lPtr < 2 ) {
            transmitMIDIonDIN( lastStatus, buffer[lPtr + 1], 0 );
        } else if( rPtr - lPtr < 3 ) {
            transmitMIDIonDIN( lastStatus, buffer[lPtr + 1], buffer[lPtr + 2] );
        } else {
            //Too much data
            //If not System Common or System Real-Time, send it as running status
            switch( buffer[lPtr] & 0xF0 )
            {
            case 0x80:
            case 0x90:
            case 0xA0:
            case 0xB0:
            case 0xE0:
                for(int i = lPtr; i < rPtr; i = i + 2){
                    transmitMIDIonDIN( lastStatus, buffer[i + 1], buffer[i + 2] );
                }
                break;
            case 0xC0:
            case 0xD0:
                for(int i = lPtr; i < rPtr; i = i + 1){
                    transmitMIDIonDIN( lastStatus, buffer[i + 1], 0 );
                }
                break;
            default:
                break;
            }
        }
        //Point to next status
        lPtr = rPtr + 2;
        if(lPtr >= bufferSize){
            //end of packet
            return;
        }
    }
}

//This function takes a midi packet as input and calls the appropriate library
//function to transmit the data.  It's a little redundant because the library
//reforms midi data from the calls and sends it out the serial port.
//
//Ideally, the MIDI BLE object would feed a MIDI library object as a serial
//object removing all of this code.
//
//A benefit of this redundant code is that it's easy to filter messages, and
//exposes how the library works.
void transmitMIDIonDIN( uint8_t status, uint8_t data1, uint8_t data2 )
{
    uint8_t channel = status & 0x0F;
    channel++;
    uint8_t command = (status & 0xF0) >> 4;
    switch(command)
    {
    case 0x08: //Note off
        MIDI.sendNoteOff(data1, data2, channel);
        break;
    case 0x09: //Note on
        MIDI.sendNoteOn(data1, data2, channel);
        break;
    case 0x0A: //Polyphonic Pressure
        MIDI.sendAfterTouch(data1, data2, channel);
        break;
    case 0x0B: //Control Change
        MIDI.sendControlChange(data1, data2, channel);
        break;
    case 0x0C: //Program Change
        MIDI.sendProgramChange(data1, channel);
        break;
    case 0x0D: //Channel Pressure
        MIDI.sendAfterTouch(data2, channel);
        break;
    case 0x0E: //Pitch Bend
        MIDI.send(midi::PitchBend, data1, data2, channel);
        break;
    case 0x0F: //System
        switch(status)
        {
            case 0xF1: //MTC Q frame
                MIDI.sendTimeCodeQuarterFrame( data1 );
                break;
            case 0xF2: //Song position
                MIDI.sendSongPosition(( (uint16_t)(data1 & 0x7F) << 7) | (data2 & 0x7F));
                break;
            case 0xF3: //Song select
                MIDI.sendSongSelect( data1 );
                break;
            case 0xF6: //Tune request
                MIDI.sendTuneRequest();
                break;
            case 0xF8: //Timing Clock
            case 0xFA: //Start
            case 0xFB: //Continue
            case 0xFC: //Stop
            case 0xFE: //Active Sensing
            case 0xFF: //Reset
                MIDI.sendRealTime( (midi::MidiType)status );
                break;
            default:
                break;
        }
        break;
    default:
        break;
    }
}

void setupBLE()
{
    blePeripheral.setLocalName("BLE to DIN"); //local name sometimes used by central
    blePeripheral.setDeviceName("BLE to DIN"); //device name sometimes used by central
    //blePeripheral.setApperance(0x0000); //default is 0x0000, what should this be?
    blePeripheral.setAdvertisedServiceUuid(service.uuid()); //Advertise MIDI UUID

    // add attributes (services, characteristics, descriptors) to peripheral
    blePeripheral.addAttribute(service);
    blePeripheral.addAttribute(characteristic);
    blePeripheral.addAttribute(descriptor);

    // set initial value
    characteristic.setValue(0);

    blePeripheral.begin();
}
Full MIDI BLE Converter
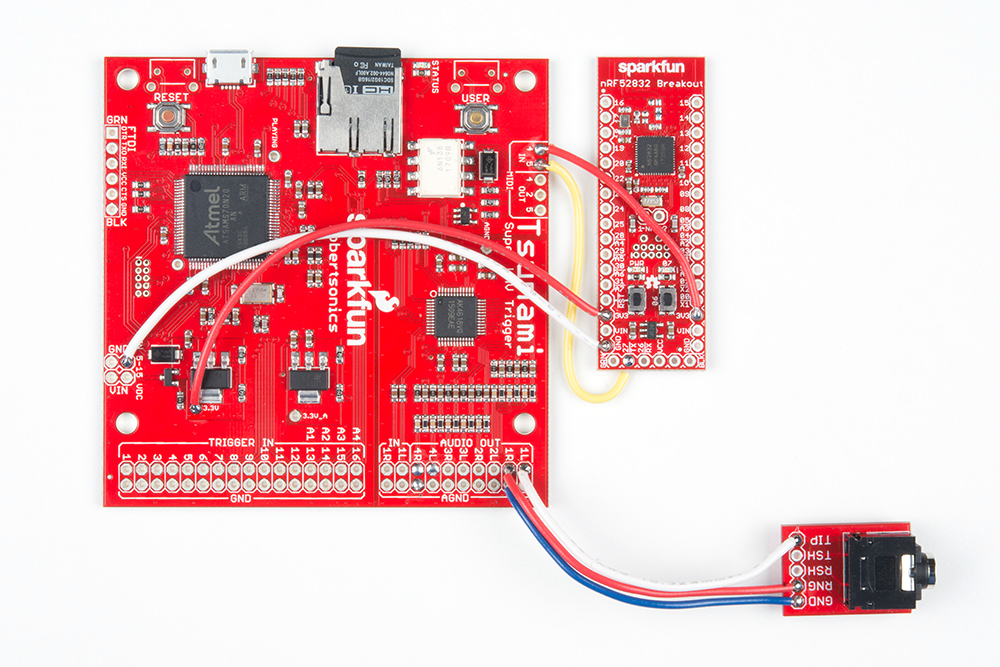
Combining the MIDI BLE Starter program, DIN to BLE program, and BLE to DIN program, a full program is written that converts MIDI messages both ways. Without the shield, this can be put on an nRF52832 that is connected to another processor's UART to add MIDI BLE to an existing MIDI device, such as the Tsunami.
language:c
#include <MIDI.h>
#include "nrf52.h"
#include <BLEPeripheral.h>

#define BLUE_STAT_PIN     7   // LED on pin 7
#define RED_STAT_PIN     11   // LED on pin 11
#define GREEN_STAT_PIN   12   // LED on pin 12
#define BTN_PIN           6   // User button

unsigned long msOffset = 0;
#define MAX_MS 0x01FFF //13 bits, 8192 dec

// create peripheral instance, see pinouts above
//const char * localName = "nRF52832 MIDI";
BLEPeripheral blePeripheral;
BLEService service("03B80E5A-EDE8-4B33-A751-6CE34EC4C700");
BLECharacteristic characteristic("7772E5DB-3868-4112-A1A9-F2669D106BF3", BLERead | BLEWriteWithoutResponse | BLENotify, 20 );
BLEDescriptor descriptor = BLEDescriptor("2902", 0);

MIDI_CREATE_INSTANCE(HardwareSerial, Serial, MIDI);

void setup() {
    delay(1000);

    //Setup diag leds
    pinMode(BLUE_STAT_PIN, OUTPUT);
    pinMode(RED_STAT_PIN, OUTPUT);
    pinMode(GREEN_STAT_PIN, OUTPUT);
    digitalWrite(BLUE_STAT_PIN, 1);
    digitalWrite(RED_STAT_PIN, 1);
    digitalWrite(GREEN_STAT_PIN, 1);

    //Setup nRF52832 user button
    pinMode(BTN_PIN, INPUT_PULLUP);

    setupBLE();

    // Initiate MIDI communications, listen to all channels
    MIDI.begin(MIDI_CHANNEL_OMNI);
    MIDI.turnThruOff();

    // The nRF52832 converts baud settings to the discrete standard rates.
    // Use the nrf52.h names to write a custom value, 0x7FFC80 after beginning midi
    NRF_UARTE_Type * myUart;
    myUart = (NRF_UARTE_Type *)NRF_UART0_BASE;
    myUart->BAUDRATE = 0x7FFC80;

    //Write data to the serial output pin to make sure the serial output is working.
    //Sometimes serial output only allows 1 byte out then hangs.  Resetting the
    //nRF52832 resolves the issue
    digitalWrite(RED_STAT_PIN, 0);
    MIDI.sendNoteOn(42, 66, 1);
    delay(500);
    MIDI.sendNoteOff(42, 66, 1);
    digitalWrite(RED_STAT_PIN, 1);

}

void loop()
{
    BLECentral central = blePeripheral.central();
    if(digitalRead(BTN_PIN) == 0){
        digitalWrite(GREEN_STAT_PIN, 0);
        MIDI.sendNoteOff(0x45, 80, 1);
        delay(100);
        digitalWrite(GREEN_STAT_PIN, 1);
    }
    if (central) {
        //Prep the timestamp
        msOffset = millis();

        digitalWrite(BLUE_STAT_PIN, 0);
        // central connected to peripheral

        while (central.connected()) {
            digitalWrite(GREEN_STAT_PIN, 0);
            //If connected, send midi data by the button here
            if(digitalRead(BTN_PIN) == 0){
                digitalWrite(GREEN_STAT_PIN, 0);
                MIDI.sendNoteOn(0x45, 80, 1);
                delay(100);
                MIDI.sendNoteOff(0x45, 80, 1);
                digitalWrite(GREEN_STAT_PIN, 1);
            }
            //Check if data exists coming in from BLE
            if (characteristic.written()) {
                digitalWrite(RED_STAT_PIN, 0);
                processPacket();
                digitalWrite(RED_STAT_PIN, 1);
            }
            //Check if data exists coming in from the serial port
            parseMIDIonDIN();
        }
    }
    //No longer connected.  Turn off the LEDs.
    digitalWrite(BLUE_STAT_PIN, 1);
    digitalWrite(GREEN_STAT_PIN, 1);
    //Delay to show off state for a bit
    delay(100);
}

//This function decodes the BLE characteristics and calls transmitMIDIonDIN
//if the packet contains sendable MIDI data.
void processPacket()
{
    //Receive the written packet and parse it out here.
    uint8_t * buffer = (uint8_t*)characteristic.value();
    uint8_t bufferSize = characteristic.valueLength();

    //Pointers used to search through payload.
    uint8_t lPtr = 0;
    uint8_t rPtr = 0;
    //lastStatus used to capture runningStatus
    uint8_t lastStatus;
    //Decode first packet -- SHALL be "Full MIDI message"
    lPtr = 2; //Start at first MIDI status -- SHALL be "MIDI status"
    //While statement contains incrementing pointers and breaks when buffer size exceeded.
    while(1){
        lastStatus = buffer[lPtr];
        if( (buffer[lPtr] < 0x80) ){
            //Status message not present, bail
            return;
        }
        //Point to next non-data byte
        rPtr = lPtr;
        while( (buffer[rPtr + 1] < 0x80)&&(rPtr < (bufferSize - 1)) ){
            rPtr++;
        }
        //look at l and r pointers and decode by size.
        if( rPtr - lPtr < 1 ){
            //Time code or system
            transmitMIDIonDIN( lastStatus, 0, 0 );
        } else if( rPtr - lPtr < 2 ) {
            transmitMIDIonDIN( lastStatus, buffer[lPtr + 1], 0 );
        } else if( rPtr - lPtr < 3 ) {
            transmitMIDIonDIN( lastStatus, buffer[lPtr + 1], buffer[lPtr + 2] );
        } else {
            //Too much data
            //If not System Common or System Real-Time, send it as running status
            switch( buffer[lPtr] & 0xF0 )
            {
            case 0x80:
            case 0x90:
            case 0xA0:
            case 0xB0:
            case 0xE0:
                for(int i = lPtr; i < rPtr; i = i + 2){
                    transmitMIDIonDIN( lastStatus, buffer[i + 1], buffer[i + 2] );
                }
                break;
            case 0xC0:
            case 0xD0:
                for(int i = lPtr; i < rPtr; i = i + 1){
                    transmitMIDIonDIN( lastStatus, buffer[i + 1], 0 );
                }
                break;
            default:
                break;
            }
        }
        //Point to next status
        lPtr = rPtr + 2;
        if(lPtr >= bufferSize){
            //end of packet
            return;
        }
    }
}

//This function takes a midi packet as input and calls the appropriate library
//function to transmit the data.  It's a little redundant because the library
//reforms midi data from the calls and sends it out the serial port.
//
//Ideally, the MIDI BLE object would feed a MIDI library object as a serial
//object removing all of this code.
//
//A benefit of this redundant code is that it's easy to filter messages, and
//exposes how the library works.
void transmitMIDIonDIN( uint8_t status, uint8_t data1, uint8_t data2 )
{
    uint8_t channel = status & 0x0F;
    channel++;
    uint8_t command = (status & 0xF0) >> 4;
    switch(command)
    {
    case 0x08: //Note off
        MIDI.sendNoteOff(data1, data2, channel);
        break;
    case 0x09: //Note on
        MIDI.sendNoteOn(data1, data2, channel);
        break;
    case 0x0A: //Polyphonic Pressure
        MIDI.sendAfterTouch(data1, data2, channel);
        break;
    case 0x0B: //Control Change
        MIDI.sendControlChange(data1, data2, channel);
        break;
    case 0x0C: //Program Change
        MIDI.sendProgramChange(data1, channel);
        break;
    case 0x0D: //Channel Pressure
        MIDI.sendAfterTouch(data2, channel);
        break;
    case 0x0E: //Pitch Bend
        MIDI.send(midi::PitchBend, data1, data2, channel);
        break;
    case 0x0F: //System
        switch(status)
        {
            case 0xF1: //MTC Q frame
                MIDI.sendTimeCodeQuarterFrame( data1 );
                break;
            case 0xF2: //Song position
                MIDI.sendSongPosition(( (uint16_t)(data1 & 0x7F) << 7) | (data2 & 0x7F));
                break;
            case 0xF3: //Song select
                MIDI.sendSongSelect( data1 );
                break;
            case 0xF6: //Tune request
                MIDI.sendTuneRequest();
                break;
            case 0xF8: //Timing Clock
            case 0xFA: //Start
            case 0xFB: //Continue
            case 0xFC: //Stop
            case 0xFE: //Active Sensing
            case 0xFF: //Reset
                MIDI.sendRealTime( (midi::MidiType)status );
                break;
            default:
                break;
        }
        break;
    default:
        break;
    }
}

//This function is called to check if MIDI data has come in through the serial port.  If found, it builds a characteristic buffer and sends it over BLE.
void parseMIDIonDIN()
{
    uint8_t msgBuf[5]; //Outgoing buffer

    //Calculate timestamp.
    unsigned long currentMillis = millis();
    if(currentMillis < 5000){
        if(msOffset > 5000){
            //it's been 49 days! millis rolled.
            while(msOffset > 5000){
                //roll msOffset - this should preserve current ~8 second count.
                msOffset += MAX_MS;
            }
        }
    }
    //if the offset is more than 2^13 ms away, move it up in 2^13 ms intervals
    while(currentMillis >= (unsigned long)(msOffset + MAX_MS)){
        msOffset += MAX_MS;
    }
    unsigned long currentTimeStamp = currentMillis - msOffset;
    msgBuf[0] = ((currentTimeStamp >> 7) & 0x3F) | 0x80; //6 bits plus MSB
    msgBuf[1] = (currentTimeStamp & 0x7F) | 0x80; //7 bits plus MSB

    //Check MIDI object for new data.
    if (  MIDI.read())
    {
        digitalWrite(RED_STAT_PIN, 0);
        uint8_t statusByte = ((uint8_t)MIDI.getType() | ((MIDI.getChannel() - 1) & 0x0f));
        switch (MIDI.getType())
        {
            //2 Byte Channel Messages
            case midi::NoteOff :
            case midi::NoteOn :
            case midi::AfterTouchPoly :
            case midi::ControlChange :
            case midi::PitchBend :
                msgBuf[2] = statusByte;
                msgBuf[3] = MIDI.getData1();
                msgBuf[4] = MIDI.getData2();
                characteristic.setValue(msgBuf, 5);
                break;
            //1 Byte Channel Messages
            case midi::ProgramChange :
            case midi::AfterTouchChannel :
                msgBuf[2] = statusByte;
                msgBuf[3] = MIDI.getData1();
                characteristic.setValue(msgBuf, 4);
                break;
            //System Common Messages
            case midi::TimeCodeQuarterFrame :
                msgBuf[2] = 0xF1;
                msgBuf[3] = MIDI.getData1();
                characteristic.setValue(msgBuf, 4);
                break;
            case midi::SongPosition :
                msgBuf[2] = 0xF2;
                msgBuf[3] = MIDI.getData1();
                msgBuf[4] = MIDI.getData2();
                characteristic.setValue(msgBuf, 5);
                break;
            case midi::SongSelect :
                msgBuf[2] = 0xF3;
                msgBuf[3] = MIDI.getData1();
                characteristic.setValue(msgBuf, 4);
                break;
            case midi::TuneRequest :
                msgBuf[2] = 0xF6;
                characteristic.setValue(msgBuf, 3);
                break;
                //Real-time Messages
            case midi::Clock :
                msgBuf[2] = 0xF8;
                characteristic.setValue(msgBuf, 3);
                break;
            case midi::Start :
                msgBuf[2] = 0xFA;
                characteristic.setValue(msgBuf, 3);
                break;
            case midi::Continue :
                msgBuf[2] = 0xFB;
                characteristic.setValue(msgBuf, 3);
                break;
            case midi::Stop :
                msgBuf[2] = 0xFC;
                characteristic.setValue(msgBuf, 3);
                break;
            case midi::ActiveSensing :
                msgBuf[2] = 0xFE;
                characteristic.setValue(msgBuf, 3);
                break;
            case midi::SystemReset :
                msgBuf[2] = 0xFF;
                characteristic.setValue(msgBuf, 3);
                break;
            //SysEx
            case midi::SystemExclusive :
//              {
//                  // Sysex is special.
//                  // could contain very long data...
//                  // the data bytes form the length of the message,
//                  // with data contained in array member
//                  uint16_t length;
//                  const uint8_t  * data_p;
//
//                  Serial.print("SysEx, chan: ");
//                  Serial.print(MIDI.getChannel());
//                  length = MIDI.getSysExArrayLength();
//
//                  Serial.print(" Data: 0x");
//                  data_p = MIDI.getSysExArray();
//                  for (uint16_t idx = 0; idx < length; idx++)
//                  {
//                      Serial.print(data_p[idx], HEX);
//                      Serial.print(" 0x");
//                  }
//                  Serial.println();
//              }
                break;
            case midi::InvalidType :
            default:
                break;
        }
        digitalWrite(RED_STAT_PIN, 1);
    }

}

void setupBLE()
{
    blePeripheral.setLocalName("nRF52832 MIDI"); //local name sometimes used by central
    blePeripheral.setDeviceName("nRF52832 MIDI"); //device name sometimes used by central
    //blePeripheral.setApperance(0x0000); //default is 0x0000, what should this be?
    blePeripheral.setAdvertisedServiceUuid(service.uuid()); //Advertise MIDI UUID

    // add attributes (services, characteristics, descriptors) to peripheral
    blePeripheral.addAttribute(service);
    blePeripheral.addAttribute(characteristic);
    blePeripheral.addAttribute(descriptor);

    // set initial value
    characteristic.setValue(0);

    blePeripheral.begin();
}
Resources and Going Further
Once you've figured out the basics, the nRF52832 can be deployed directly to a device to build a MIDI instrument or controller.
Checkout some of the details of the circuit described in the post:
If you're interested in building your own MIDI system, we have some products to help you get started.
- If you want to build your own MIDI device, you can start with the Arduino-compatible MIDI Shield. The hookup guide for the shield has several example sketches.
- The Tsunami Super WAV Trigger includes a MIDI port that can be wired to accept TTL Serial, and is a super easy way to may audio files play when keys are pressed.
- The Teensy series can produce synthesized audio through either the onboard DAC or through the Audio board and is quite powerful. It can be directly connected to the nRF52832 to create a BLE MIDI synth.
- If the shield is overkill, we've also got the raw MIDI connector.
- Dr. Bleep added MIDI to the second revision of the Bleep Drum.
For more information about MIDI and BLE protocols, check out the information listed below.
- MIDI.org is the official website of the MIDI Manufacturer's Association. Here you can find the original MIDI standard as well as the MIDI BLE standard.
- www.bluetooth.com offers full Bluetooth specifications including common GATT characteristics, declarations, descriptors, and services.
- The FortySevenEffects Arduino MIDI library is extremely user friendly and configurable, making a great layer to handle serial MIDI data.
- MIDI devices have long been a mainstay of DIY microcontroller projects. The MIDIbox is a platform for building a wide variety of MIDI devices.
- The MIDI Article at Wikipedia.
- If you're really serious about MIDI, you might want a printed copy of the Complete MIDI 1.0 Detailed Specification.