Lumenati Hookup Guide
Example Using a SAMD21 Mini Breakout
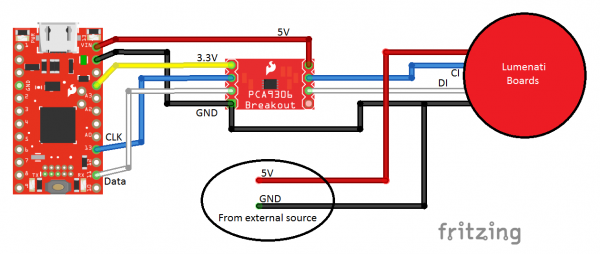
Our second example uses a SparkFun SAMD21 Breakout board, which is Arduino-based, a PCA9306 Level Translator Breakout, a 5V power supply and the Lumenati boards that we put together in the assembly section. The hookup will look like this:
The circuit is almost identical to the Raspberry Pi example, except that there's a SAMD21 Breakout where the Pi was. The specific connections to the SAMD21 are as follows:
| SAMD21 Pin label | Description | Goes to PCA9306 Pin |
|---|---|---|
| VIN | 3.3V (for low-side level shifting reference) | VREF1 |
| VCC | 5V (for high-side level shifting reference) | VREF2 |
| GND | GND (ground for level shifting reference) | GND |
| 11 | Data | SCL1 |
| 13 | Clock | SDA1 |
Again, the channels on the PCA9306 with regard to SCL and SDA are not electrically critical; either channel can do either function, clock or data. This swap just made our wiring slightly cleaner. Everything else in this circuit is identical to the RasPi example.
For the code, this time we're going to use the FastLED library. If you haven't already done so, now is a good time to install that library. Haven't installed a library in Arduino before? Click here for more info.
Our example code is as follows:
language:c
#include "FastLED.h"

//Number of LEDs
#define NUM_LEDS 20

//Define our clock and data lines
#define DATA_PIN 11
#define CLOCK_PIN 13

//Create the LED array
CRGB leds[NUM_LEDS];

void setup() {

      //Tell FastLED what we're using. Note "BGR" where you might normally find "RGB".
      //This is just to rearrange the order to make all the colors work right.
      FastLED.addLeds<APA102, DATA_PIN, CLOCK_PIN, BGR>(leds, NUM_LEDS);

      //Set global brightness
      FastLED.setBrightness(50);
}

void loop() {

  uint8_t x;
  uint16_t wait = 100;

  //Check out all these wacky colors! Have a look at teh FastLED documentation for more.
  //Turn on each LED in succession
  leds[0] = CRGB::Blue;
  FastLED.show();
  delay(wait);

  leds[1] = CRGB::Green;
  FastLED.show();
  delay(wait);

  leds[2] = CRGB::Purple;
  FastLED.show();
  delay(wait);

  leds[3] = CRGB::AliceBlue;
  FastLED.show();
  delay(wait);

  leds[4] = CRGB::DarkGoldenrod;
  FastLED.show();
  delay(wait);

  leds[5] = CRGB::DarkGreen;
  FastLED.show();
  delay(wait);

  leds[6] = CRGB::DeepSkyBlue;
  FastLED.show();
  delay(wait);

  leds[7] = CRGB::GreenYellow;
  FastLED.show();
  delay(wait);

  leds[8] = CRGB::LawnGreen;
  FastLED.show();
  delay(wait);

  leds[9] = CRGB::Maroon;
  FastLED.show();
  delay(wait);

  leds[10] = CRGB::FairyLight;
  FastLED.show();
  delay(wait);

  leds[11] = CRGB::Tomato;
  FastLED.show();
  delay(wait);

  leds[12] = CRGB::Turquoise;
  FastLED.show();
  delay(wait);

  leds[13] = CRGB::SpringGreen;
  FastLED.show();
  delay(wait);

  leds[14] = CRGB::Salmon;
  FastLED.show();
  delay(wait);

  leds[15] = CRGB::Sienna;
  FastLED.show();
  delay(wait);

  leds[16] = CRGB::SeaGreen;
  FastLED.show();
  delay(wait);

  leds[17] = CRGB::Teal;
  FastLED.show();
  delay(wait);

  leds[18] = CRGB::OrangeRed;
  FastLED.show();
  delay(wait);

  leds[19] = CRGB::RosyBrown;
  FastLED.show();
  delay(wait);

  //Shut them off
  for (x = 0; x < NUM_LEDS; x++)
  {
    leds[x] = CRGB::Black;
  }

  FastLED.show();
  delay(wait);

}
This example will look completely different from the RasPi example, partly because we wanted to show off some of the colors available by some crazy names in the library. The FastLED library offers a LOT of versatility, probably far more than you're ever going to need. Check their documentation for a full listing of functions.
If you've already done the RasPi example, you've already got the Arduino code in your possession, as well. It can be found in the folder SparkFun_Lumenati_Code\Firmware\SAMD21. If you haven't got it yet, click here to get it. Load Lumenati_demo.ino onto your SAMD21, and watch the show!
If you've done everything right, your LEDs should be doing this:

