Light-Emitting Diodes (LEDs)
 Nick Poole,
  bboyho
Get the Details
Don't go plugging any strange LEDs into your circuits, that's just not healthy. Get to know them first. And how better than to read the datasheet.
As an example we'll peruse the datasheet for our Basic Red 5mm LED.
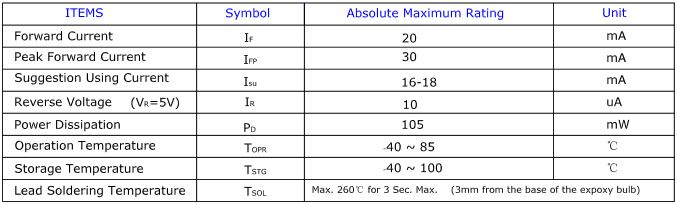
LED Current
Starting at the top and making our way down, the first thing we encounter is this charming table:
Ah, yes, but what does it all mean?
The first row in the table indicates how much current your LED will be able to handle continuously. In this case, you can give it 20mA or less, and it will shine its brightest at 20mA. The second row tells us what the maximum peak current should be for short bursts. This LED can handle short bumps to 30mA, but you don't want to sustain that current for too long. This datasheet is even helpful enough to suggest a stable current range (in the third row from the top) of 16-18mA. That's a good target number to help you make the resistor calculations we talked about.
The following few rows are of less importance for the purposes of this tutorial. The reverse voltage is a diode property that you shouldn't have to worry about in most cases. The power dissipation is the amount of power in milliWatts that the LED can use before taking damage. This should work itself out as long as you keep the LED within its suggested voltage and current ratings.
LED Voltage
Let's see what other kinds of tables they've put in here... Ah!
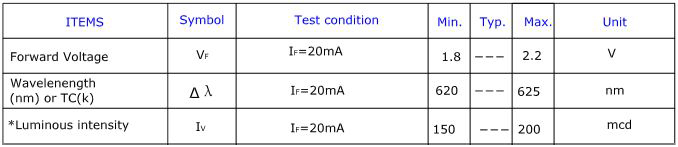
This is a useful little table! The first row tells us what the forward voltage drop across the LED will be. Forward voltage is a term that will come up a lot when working with LEDs. This number will help you decide how much voltage your circuit will need to supply to the LED. If you have more than one LED connected to a single power source, these numbers are really important because the forward voltage of all of the LEDs added together can't exceed the supply voltage. We'll talk about this more in-depth later in the delving deeper section of this tutorial.
LED Wavelength
The second row on this table tells us the wavelength of the light. Wavelength is basically a very precise way of explaining what color the light is. There may be some variation in this number so the table gives us a minimum and a maximum. In this case it's 620 to 625nm, which is just at the lower red end of the spectrum (620 to 750nm). Again, we'll go over wavelength in more detail in the delving deeper section.
LED Brightness
The last row (labeled "Luminous Intensity") is a measure of how bright the LED can get. The unit mcd, or millicandela, is a standard unit for measuring the intensity of a light source. This LED has an maximum intensity of 200 mcd, which means it's just bright enough to get your attention but not quite flashlight bright. At 200 mcd, this LED would make a good indicator.
Viewing Angle
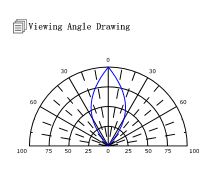
Next, we've got this fan-shaped graph that represents the viewing angle of the LED. Different styles of LEDs will incorporate lenses and reflectors to either concentrate most of the light in one place or spread it as widely as possible. Some LEDs are like floodlights that pump out photons in every direction; Others are so directional that you can't tell they're on unless you're looking straight at them. To read the graph, imagine the LED is standing upright underneath it. The "spokes" on the graph represent the viewing angle. The circular lines represent the intensity by percent of maximum intensity. This LED has a pretty tight viewing angle. You can see that looking straight down at the LED is when it's at its brightest, because at 0 degrees the blue lines intersect with the outermost circle. To get the 50% viewing angle, the angle at which the light is half as intense, follow the 50% circle around the graph until it intersects the blue line, then follow the nearest spoke out to read the angle. For this LED, the 50% viewing angle is about 20 degrees.
Dimensions
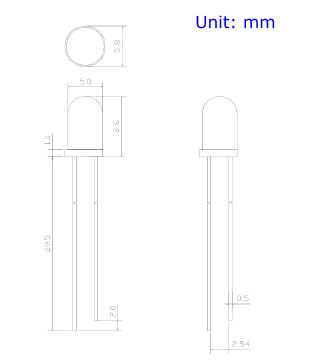
Finally, the mechanical drawing. This picture contains all of the measurements you'll need to actually mount the LED in an enclosure! Notice that, like most LEDs, this one has a small flange at the bottom. That comes in handy when you want to mount it in a panel. Simply drill a hole the perfect size for the body of the LED, and the flange will keep it from falling through!
Now that you know how to decipher the datasheet, let's see what kind of fancy LEDs you might encounter in the wild...