Installing libmraa on Ubilinux for Edison
 caseyd
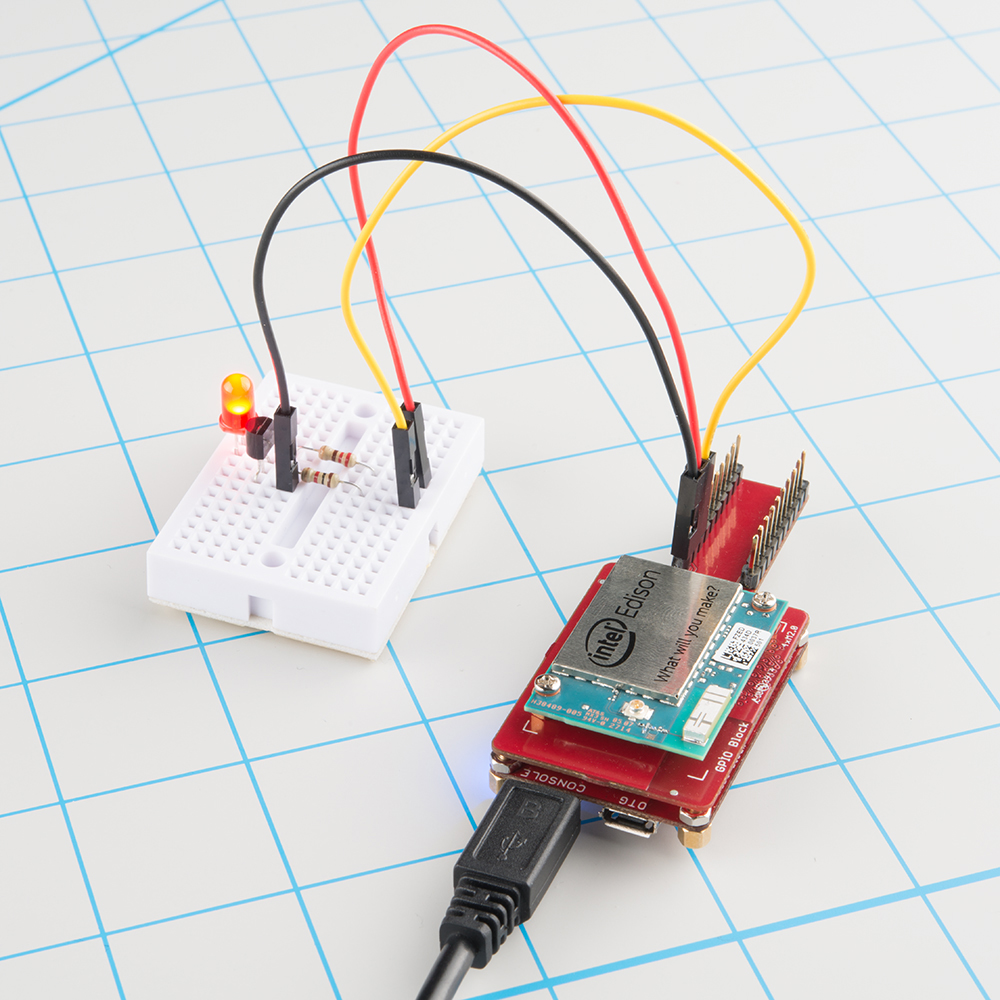
Blink an LED
Using C
If you want to use C, create a file with your favority text editor:
nano blink.c
Copy the following code into that file:
language:c
/* Blinky test using mraa */

#include <stdio.h>
#include <unistd.h>
#include <errno.h>
#include <signal.h>
#include <stdlib.h>

#include "mraa.h"

#define LED_PIN 31

int running = 0;

void sig_handler(int signo)
{
    if ( signo == SIGINT ) {
        printf("Closing GPIO\n", LED_PIN);
        running = -1;
    }
}

int main()
{
    /* Initialize mraa */
    mraa_result_t r = MRAA_SUCCESS;
    mraa_init();

    /* Create access to GPIO pin */
    mraa_gpio_context gpio;
    gpio = mraa_gpio_init(LED_PIN);
    if ( gpio == NULL ) {
        fprintf(stderr, "Error opening GPIO\n");
        exit(1);
    }

    /* Set GPIO direction to out */
    r = mraa_gpio_dir(gpio, MRAA_GPIO_OUT);
    if ( r != MRAA_SUCCESS ) {
        mraa_result_print(r);
    }

    /* Create signal handler so we can exit gracefully */
    signal(SIGINT, sig_handler);

    /* Turn LED off and on forever until SIGINT (Ctrl+c) */
    while ( running == 0 ) {

        r = mraa_gpio_write(gpio, 0);
        if ( r != MRAA_SUCCESS ) {
            mraa_result_print(r);
        }
        sleep(1);

        r = mraa_gpio_write(gpio, 1);
        if ( r != MRAA_SUCCESS ) {
            mraa_result_print(r);
        }
        sleep(1);
    }

    /* Clean up GPIO and exit */
    r = mraa_gpio_close(gpio);
    if ( r != MRAA_SUCCESS ) {
        mraa_result_print(r);
    }

    return r;
}
Save and exit the file ('Crtl-X' and 'y' for nano). Compile the program with:
gcc blink.c -o blink -lmraa
Note the "-lmraa" that tells the compiler to include the mraa library. Run the program by typing:
./blink
Important: You need to run blink as root! If you get an error such as “Invalid GPIO pin specified” or "FATAL error, libmraa program must be run as root (EUID 0), cannot proceed" it means that you do not have permissions to modify GPIO. Either switch to root using the “su” command or run the command with “sudo” (if you have “sudo” installed).
You should see your LED start turning on and off!
Using Python
For Python, use your favorite text editor to create this simple script, called something like blink.py. For example:
nano blink.py
In that file, enter the following:
language:python
import mraa
import time

# Setup
x = mraa.Gpio(31)
x.dir(mraa.DIR_OUT)

# Loop
while True:
    x.write(1)
    time.sleep(0.5)
    x.write(0)
    time.sleep(0.5)
Save and exit the file (if you are using nano, press 'Crtl-X' and 'y').
Run it with:
python blink.py
Important: You need to run blink.py as root! If you get an error such as "ValueError: Invalid GPIO pin specified" it means that you do not have permissions to modify GPIO. Either switch to root using the "su" command or run the command with "sudo" (if you have "sudo" installed).
Pin Map
You might have noticed that we used GP44 in hardware and GPIO 31 in our example code. This is because the mraa library uses a different number for the pins. If you would like to use mraa to control hardware, figure out which GPIO pins you plan to use on the table below (labeled "Edison Pin") and then use the MRAA Number in software.
Note that the "Edison Pin" numbers are the same GPIO pin numbers found on Linux in the Edison. They are also listed on the GPIO Block. The "Pinmode" allows you to change the function of each pin.
Notes:
- Input/output voltage on the GPIO Block is 3.3V by default
- Input/output voltage on the Arduino Breakout is 5V
- Input/output voltage on the Mini Breadboard is 1.8V
MRAA pin map table based on Intel's IOT Dev Kit Repository
| Edison Pin (Linux) | Arduino Breakout | Mini Breakout | MRAA Number | Pinmode0 | Pinmode1 | Pinmode2 |
|---|---|---|---|---|---|---|
| GP12 | 3 | J18-7 | 20 | GPIO-12 | PWM0 | |
| GP13 | 5 | J18-1 | 14 | GPIO-13 | PWM1 | |
| GP14 | A4 | J19-9 | 36 | GPIO-14 | ||
| GP15 | J20-7 | 48 | GPIO-15 | |||
| GP19 | J18-6 | 19 | GPIO-19 | I2C-1-SCL | ||
| GP20 | J17-8 | 7 | GPIO-20 | I2C-1-SDA | ||
| GP27 | J17-7 | 6 | GPIO-27 | I2C-6-SCL | ||
| GP28 | J17-9 | 8 | GPIO-28 | I2C-6-SDA | ||
| GP40 | 13 | J19-10 | 37 | GPIO-40 | SSP2_CLK | |
| GP41 | 10 | J20-10 | 51 | GPIO-41 | SSP2_FS | |
| GP42 | 12 | J20-9 | 50 | GPIO-42 | SSP2_RXD | |
| GP43 | 11 | J19-11 | 38 | GPIO-43 | SSP2_TXD | |
| GP44 | A0 | J19-4 | 31 | GPIO-44 | ||
| GP45 | A1 | J20-4 | 45 | GPIO-45 | ||
| GP46 | A2 | J19-5 | 32 | GPIO-46 | ||
| GP47 | A3 | J20-5 | 46 | GPIO-47 | ||
| GP48 | 7 | J19-6 | 33 | GPIO-48 | ||
| GP49 | 8 | J20-6 | 47 | GPIO-49 | ||
| GP77 | J19-12 | 39 | GPIO-77 | SD | ||
| GP78 | J20-11 | 52 | GPIO-78 | SD | ||
| GP79 | J20-12 | 53 | GPIO-79 | SD | ||
| GP80 | J20-13 | 54 | GPIO-80 | SD | ||
| GP81 | J20-14 | 55 | GPIO-81 | SD | ||
| GP82 | J19-13 | 40 | GPIO-82 | SD | ||
| GP83 | J19-14 | 41 | GPIO-83 | SD | ||
| GP84 | J20-8 | 49 | GPIO-84 | SD | ||
| GP109 | J17-11 | 10 | GPIO-109 | SPI-5-SCK | ||
| GP110 | J18-10 | 23 | GPIO-110 | SPI-5-CS0 | ||
| GP111 | J17-10 | 9 | GPIO-111 | SPI-5-CS1 | ||
| GP114 | J18-11 | 24 | GPIO-114 | SPI-5-MISO | ||
| GP115 | J17-12 | 11 | GPIO-115 | SPI-5-MOSI | ||
| GP128 | 2 | J17-14 | 13 | GPIO-128 | UART-1-CTS | |
| GP129 | 4 | J18-12 | 25 | GPIO-129 | UART-1-RTS | |
| GP130 | 0 | J18-13 | 26 | GPIO-130 | UART-1-RX | |
| GP131 | 1 | J19-8 | 35 | GPIO-131 | UART-1-TX | |
| GP134 | J20-3 | 44 | ||||
| GP135 | J17-5 | 4 | GPIO-135 | UART | ||
| GP165 | A5 | J18-2 | 15 | GPIO-165 | ||
| GP182 | 6 | J17-1 | 0 | GPIO-182 | PWM2 | |
| GP183 | 9 | J18-8 | 21 | GPIO-183 | PWM3 |