How to Use a Hot Air Rework Station
 Joel_E_B,
  bboyho, Ell C
How to Use a Hot Air Rework Station
Third hands or other vice grips help tremendously. Remember, metal heat sinks and PCBs with ground planes can make reworking take a lot longer.
Choose Your Nozzle
Choose the appropriate tip for the job. Attach the nozzles to the wand and tighten the screw using a screw driver to hold it in place.
Plug the 303D's North American standard plug into your very favorite US outlet (~110VAC). The heating element and blower will remain off until you flip the power switch to ON.
Power On
Flip said power switch to ON. The heating element will fire up and the air will get very hot, very quickly so aim the nozzle accordingly. The red LED next to the "SET TEMP" will pulse, indicating that “Hey, I’m ready to melt some stuff.” Wait for the hot-air station to warm up before using it.
Adjust Air and Temperature
There are two control knobs – one for airflow and one for temperature. Adjust them to suit your needs.
Rework
When you’ve got your settings honed in, carefully aim the nozzle at the area you are working on. Saying the magic spell (meltum, meltum, meltum), move the nozzle back and forth until the solder begins to flow (the solder should appear shiney and molten). Then carefully remove/reposition the part you want to rework using tweezers by nudging or grabbing the part. Keep in mind that hot-air is, well, hot.
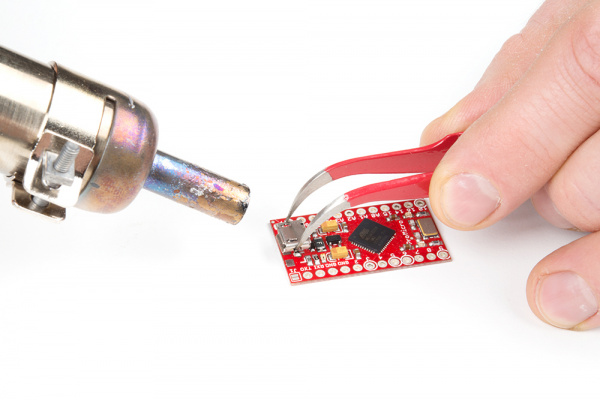
If you also see smoke, warping, or black goo coming from your board, remove the heat and turn your heat setting down.
Cool Down
When you are done, flip the power switch to OFF to allow the station to cool down when finished. The self-cooling will kick on and last for a few minutes.
Clean
Wash your board when you're finished to remove any water soluble flux left on the board, which can cause corrosion over time.
Demo Video
Below is a demo video from our pal Dave Stillman showing us how to use our SparkFun Hot-air Rework Station properly!