How to Run a Raspberry Pi Program on Startup
Method 3: systemd
systemd is the preferred method of starting applications on startup, but it is also one of the most complicated to use. With systemd, you have the benefit of being able to tell Linux to start certain programs only after certain services have started. As a result, it is a very robust tool for initializing your scripts and applications.
systemd is a relatively new suite of tools in the Linux world, and one of its intended purposes is to manage system processes after booting. When it was first released, systemd was meant to replace the init.d tool for starting programs. As of 2015, most of the major distributions include systemd, and since many kept init.d around for legacy support, you have the option of using either one. Be aware, however, that init.d may be deprecated, so systemd seems to be the future (for now).
systemd can be quite complicated, and this tutorial only covers the absolute basics to get you started running your programs on boot. If you would like to dig deeper into the world of systemd, we recommend reading this getting started guide.
Create a Unit File
A unit file is a plain text file that gives information to systemd about a service, device, mount point, etc. We'll create a unit file that starts our program as a service (a process that runs in the background). Below are two examples of unit files: the first runs the blink.py example before the graphical desktop loads (useful for headless environments), and the second runs the clock.py example after the graphical desktop loads (useful if you are making a dashboard or GUI).
Unit File (No GUI)
If your program does not require a GUI (such as our blink.py example), then you can use the following template to create a systemd service. If you do need a GUI (e.g. you require the X Windows System to have started), see the next section. Creating a unit file without requiring a GUI means you can also run your program on boot in a headless environment.
Create a new .service file in the systemd directory:
language:shell
sudo nano /lib/systemd/system/blink.service
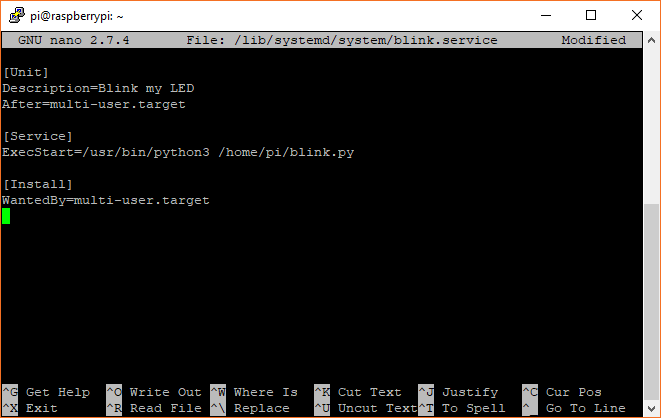
Enter the following text into the document:
[Unit]
Description=Blink my LED
After=multi-user.target

[Service]
ExecStart=/usr/bin/python3 /home/pi/blink.py

[Install]
WantedBy=multi-user.target
Feel free to change the Description as desired. The After key denotes when our program should run. multi-user.target is the system state where control is given over to the user (a "multi-user shell") but before the X Windows System is started. That means our program will run even without logging in! You can change this, depending on which services you need active before running your program (for example, network.target if you need networking). See here for a listing of all targets.
ExecStart is the command (or set of commands) used to start our program. Notice that we are using absolute paths to the version of Python we want as well as the location of our program.
WantedBy in the [Install] section specifies the target we want our service to be included with. In this example, we want our service to run when the multi-user.target unit is run (or, more specifically, just after it, based on the After parameter).
Save and exit with ctrl + x, followed by y when prompted to save, and then enter.
We need to tell systemd to recognize our service, so enter:
language:shell
sudo systemctl daemon-reload
Note that you will need to enter this command every time you change your .service file, as systemd needs to know it has been updated.
We then need to tell systemd that we want our service to start on boot, so enter:
language:shell
sudo systemctl enable blink.service
Reboot with sudo reboot to verify that your program works. The LED should begin blinking after the Pi boots!
Unit File (GUI)
If your program requires graphical components (as in our clock.py example), then the following template is recommended for creating a systemd service.
Create a new .service file in the systemd directory:
language:shell
sudo nano /lib/systemd/system/clock.service
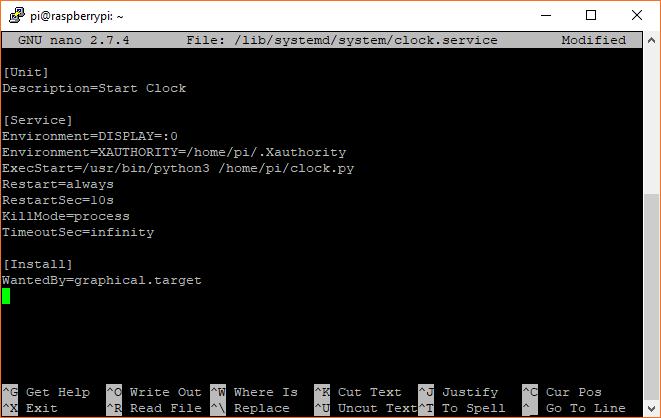
Enter the following text into the document:
[Unit]
Description=Start Clock

[Service]
Environment=DISPLAY=:0
Environment=XAUTHORITY=/home/pi/.Xauthority
ExecStart=/usr/bin/python3 /home/pi/clock.py
Restart=always
RestartSec=10s
KillMode=process
TimeoutSec=infinity

[Install]
WantedBy=graphical.target
Description can be any text you want to help you remember what this service does.
Under [Service], we specify some environment variables. We want to connect to our primary display (this assumes only one display is connected to our Pi), so we set DISPLAY to :0, and we tell our application where to find the necessary credentials to use the X windows system with XAUTHORITY. ExecStart is the command we want to run (starting our Python clock program, in this case).
Unfortunately with systemd, we cannot tell exactly when the X system will start, and we cannot necessarily guarantee that a user will be logged in (unless you have enabled auto-login with sudo raspi-config). To account for this, we will brute force our program to restart (with Restart) every 10 seconds (with RestartSec) if it fails or exits. KillMode tells systemd to kill off any processes associated with our program if the service fails (or exits), and TimeoutSec=infinity means that we don't ever want to stop trying to execute our program.
Save and exit with ctrl + x, followed by y when prompted to save, and then enter.
We need to tell systemd to recognize our service, so enter:
language:shell
sudo systemctl daemon-reload
Note that you will need to enter this command every time you change your .service file, as systemd needs to know it has been updated.
We then need to tell systemd that we want our service to start on boot, so enter:
language:shell
sudo systemctl enable clock.service
Reboot with sudo reboot to verify that your program works. You should see your Python clock program running after you have logged into your graphical desktop.
Troubleshooting
Nothing Happens
If your program does not seem to run on boot, several things could be going on. To get insight into the systemd service, try logging output to a file or checking on the status of the service (see the troubleshooting techniques below).
Debugging
Output from systemd (e.g. print() statements or error messages) is captured by the journalctl system and can be viewed with the following command:
language:shell
journalctl -u clock.log
This can off some insight into what's going on with your service or program.
Logging to a File
If journalctl is not living up to your expectations, you can try logging output to a file. To do that, change the ExecStart call to the following (using clock.py as an example):
ExecStart=/bin/bash -c '/usr/bin/python3 /home/pi/clock.py > /home/pi/clock.log 2>&1'
This starts a new bash shell, runs your program, and redirects the output (stdout) to a new clock.log text file. The 2>&1 command says that any errors (stderr) should also be redirected (written to) the same log file. Any output (e.g. from Python print() commands) or errors will then be saved to clock.log. You can view the log with the following command (note that you might need to stop the service and program before viewing the log):
language:shell
cat clock.log
Use a Specific Version of Python
Because your systemd unit file will likely run before .bashrc can alias the command python to Python 3, you might need to explicitly call the python3 command. To do that, just make sure that your call to Python is an absolute file location, for example, /usr/bin/python3.
Checking the Service
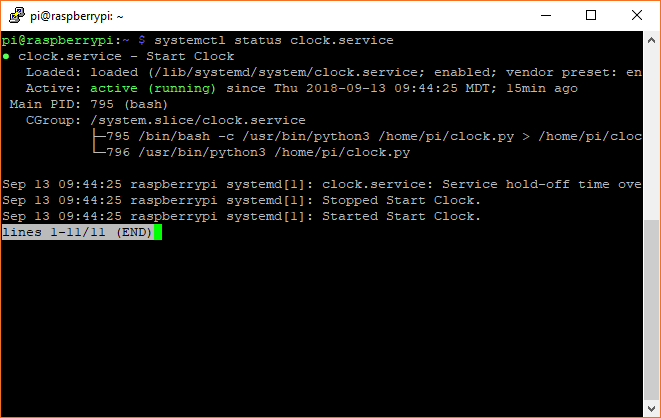
If you suspect that your service is not running, then you might want to check the status of it. To do that, enter the following command:
language:shell
systemctl status clock.service
This should show you if your service is running or if there were any errors.
Starting and Stopping the Service
For some services, like our clock.service example, you will need to stop the service before stopping the program. That's because even if you stop the program (e.g. our Python GUI clock), the service will simply restart it 10 seconds later! To stop a service, enter the following command:
language:shell
sudo systemctl stop clock.service
Note that stopping the service should send a stop command (SIGTERM--terminate signal) to your program. In most cases, this should stop the service and your program. If your program does not stop, see below on stopping your program.
To start a service (such as our clock.service example), you can enter the command:
language:shell
sudo systemctl start clock.service
This can be helpful to restart a service if you've made changes to it without having to reboot the system. Just remember to run sudo systemctl daemon-reload if you do make any changes to a .service file!
How to Stop Your Program
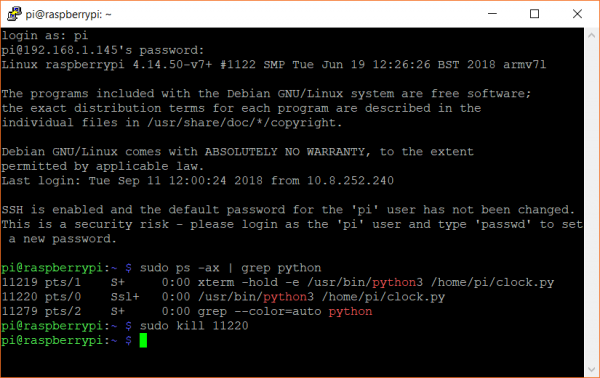
Even if you stop the service, your program may still be running in the background. Just like in the rc.local and autostart examples, we will need to hunt down the process ID number and kill it manually. Enter the following in a terminal:
language:shell
sudo ps -ax | grep python
ps -ax tells Linux to list out all the currently processes. We send that output to grep, which allows us to search for the keyword "python" (feel free to change it to the name of your program). Find the process ID (PID) number to the left of the listed process, and use the kill command to terminate that process:
language:shell
sudo kill <PID>
If you are using the clock.py example, you should see the application quit out.
How to Stop Your Program from Running on Boot
You can stop your service from running on boot with the following command (replacing clock.service with your particular service filename):
language:shell
sudo systemctl disable clock.service
Note that you do not need to delete the .service file, as disabling it will prevent it from running on startup. However, if you would like to delete the file, you can using the following commands (once again, replacing clock.service with your service filename):
language:shell
sudo rm /lib/systemd/system/clock.service
sudo systemctl daemon-reload
After that, reboot your system to make sure that your program no longer runs on boot.


