How to Run a Raspberry Pi Program on Startup
 Shawn Hymel
Example Code
In the rest of the tutorial, we will show starting Python programs on boot with two examples: blink.py and clock.py. Note that any program (compiled, script, etc.) can be used, but choosing the right method for starting your script is important. For example, using rc.local, while easy, does not give you access to the X server (the thing that gives you a GUI desktop). So, rc.local for a GUI program is not the right tool, and you should try another method.
The Linux boot sequence is a fairly complex sequence of events, which can easily be its own article for another time. If you would like to learn more about it, check out these links:
- 6 Stages of Linux Boot Process
- An Introduction to the Linux Boot and Startup Processes
- Understanding the Linux Boot Process (YouTube Video)
blink.py
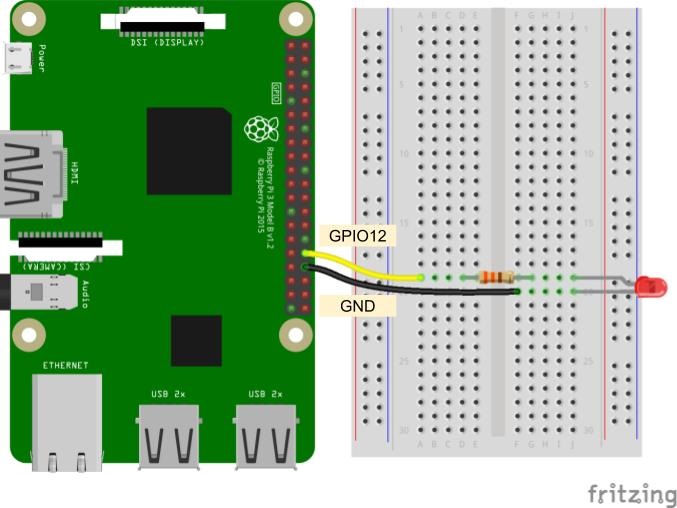
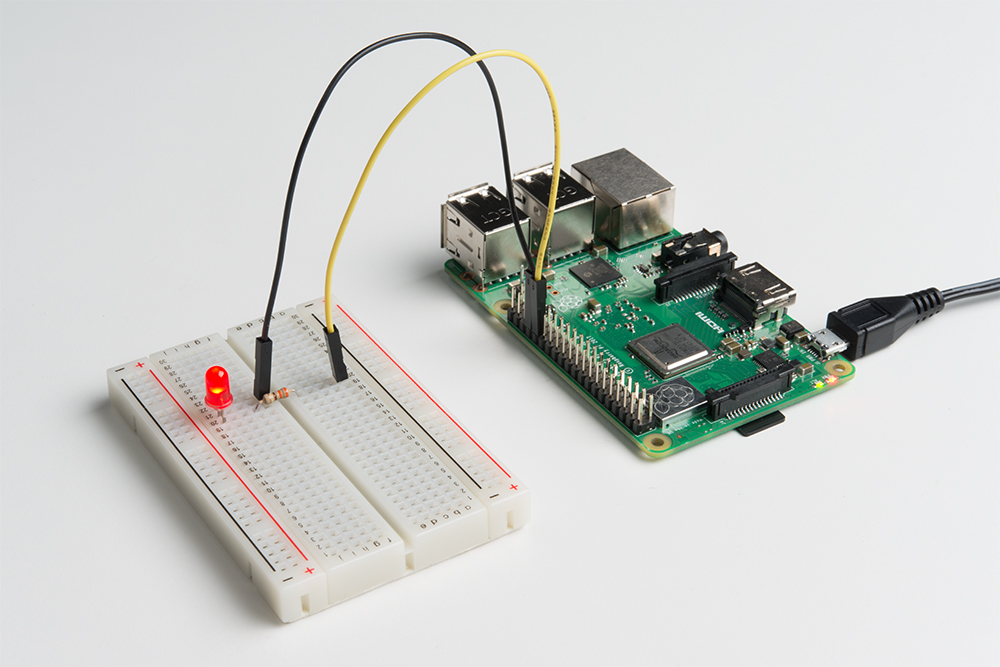
While external connections to hardware is not necessary to show how to run a program on boot, it can be a useful way to show that something is running in the background, even if you do not see anything on the screen. Connect an LED and a 330 Ω resistor between GPIO12 and GND on the Raspberry Pi.
On your Raspberry Pi, open a terminal, and make sure you are in your home directory:
language:shell
cd /home/pi
Open a new document named blink.py
language:shell
nano blink.py
Copy in the following code:
language:python
import time
import RPi.GPIO as GPIO

# Pin definitions
led_pin = 12

# Use "GPIO" pin numbering
GPIO.setmode(GPIO.BCM)

# Set LED pin as output
GPIO.setup(led_pin, GPIO.OUT)

# Blink forever
try:
    while True:
        GPIO.output(led_pin, GPIO.HIGH) # Turn LED on
        time.sleep(1)                   # Delay for 1 second
        GPIO.output(led_pin, GPIO.LOW)  # Turn LED off
        time.sleep(1)                   # Delay for 1 second

# When you press ctrl+c, nicely release GPIO resources
finally:
    GPIO.cleanup()
Save it with ctrl + x, press y when asked to save, and press enter. Run the program with the following:
language:shell
python blink.py
You should see the LED begin to blink on and off. Press ctrl + c to stop the program.
clock.py
The next example that we'll use is slightly more complicated, as it relies on a GUI made with the Tkinter package. We'll use this program when we want to demonstrate how to start a program on boot that requires the X windows system (for example, you want to make a graphical dashboard that is displayed on boot).
On your Raspberry Pi (in your home directory, /home/pi), open a new document with the name clock.py:
language:shell
nano clock.py
Copy in the following code:
language:python
import tkinter as tk
import tkinter.font as tkFont
import time

###############################################################################
# Parameters and global variables

# Default font size
font_size = -24

# Declare global variables
root = None
dfont = None
frame = None
dtime = None

# Global variable to remember if we are fullscreen or windowed
fullscreen = False

###############################################################################
# Functions

# Toggle fullscreen
def toggle_fullscreen(event=None):

    global root
    global fullscreen

    # Toggle between fullscreen and windowed modes
    fullscreen = not fullscreen
    root.attributes('-fullscreen', fullscreen)
    resize()

# Return to windowed mode
def end_fullscreen(event=None):

    global root
    global fullscreen

    # Turn off fullscreen mode
    fullscreen = False
    root.attributes('-fullscreen', False)
    resize()

# Automatically resize font size based on window size
def resize(event=None):

    global time_dfont
    global button_dfont
    global frame

    # Resize font based on frame height (minimum size of 12)
    # Use negative number for "pixels" instead of "points"
    new_size = -max(12, int((frame.winfo_height() / 2)))
    time_dfont.configure(size=new_size)
    new_size = -max(12, int((frame.winfo_height() / 30)))
    button_dfont.configure(size=new_size)


# Read values from the sensors at regular intervals
def update():

    global root
    global dtime

    # Get local time
    local_time = time.localtime()

    # Convert time to 12 hour clock
    hours = local_time.tm_hour
    if hours > 12:
        hours -= 12

    # Add leading 0s
    shours = str(hours)
    smin = str(local_time.tm_min)
    if hours < 10:
        shours = '0' + shours
    if local_time.tm_min < 10:
        smin = '0' + smin

    # Construct string out of time
    dtime.set(shours + ':' + smin)

    # Schedule the poll() function for another 500 ms from now
    root.after(500, update)

###############################################################################
# Main script

# Create the main window
root = tk.Tk()
root.title("My Clock")

# Create the main container
frame = tk.Frame(root, bg='black')

# Lay out the main container (expand to fit window)
frame.pack(fill=tk.BOTH, expand=1)

# Variables for holding temperature and light data
dtime = tk.StringVar()

# Create dynamic font for text
time_dfont = tkFont.Font(family='Courier New', size=font_size)
button_dfont = tkFont.Font(size=font_size)

# Create widgets
label_time = tk.Label(  frame,
                        textvariable=dtime,
                        font=time_dfont,
                        fg='red',
                        bg='black')
button_quit = tk.Button(frame,
                        text="Quit",
                        font=button_dfont,
                        command=root.destroy,
                        borderwidth=0,
                        highlightthickness=0,
                        fg='gray10',
                        bg='black')

# Lay out widgets in a grid in the frame
label_time.grid(row=0, column=0, padx=20, pady=20)
button_quit.grid(row=1, column=0, padx=5, pady=5, sticky=tk.E)

# Make it so that the grid cells expand out to fill window
frame.rowconfigure(0, weight=10)
frame.rowconfigure(1, weight=1)
frame.columnconfigure(0, weight=1)

# Bind F11 to toggle fullscreen and ESC to end fullscreen
root.bind('<F11>', toggle_fullscreen)
root.bind('<Escape>', end_fullscreen)

# Have the resize() function be called every time the window is resized
root.bind('<Configure>', resize)

# Schedule the poll() function to be called periodically
root.after(20, update)

# Start in fullscreen mode and run
toggle_fullscreen()
root.mainloop()
Save it with ctrl + x, press y when asked to save, and press enter. Run the program with the following:
language:shell
python clock.py
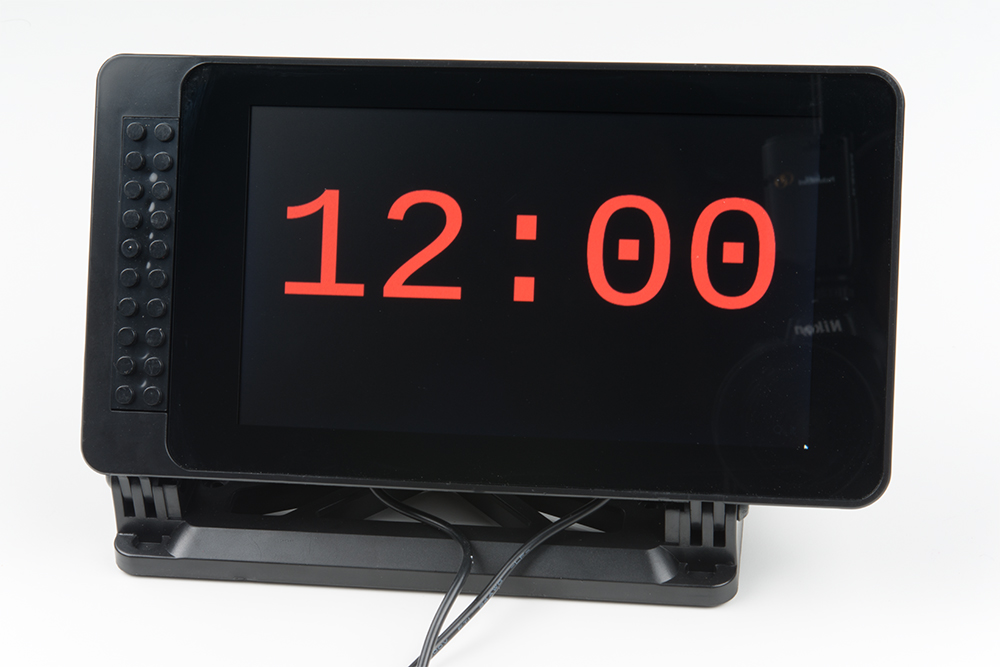
Your entire screen should be taken up by a rather large clock!
If you are interested in learning more about how this program was made (i.e. creating your own graphical user interface with Tkinter), check out our Python GUI Guide: Introduction to Tkinter.