HID Control of a Web Page
 Nate
Nate 
HID Communication
Moving data between a microcontroller and a computer is tricky. Up to this point the serial protocol and USB-to-Serial converters have filled the gap. Today we will show you how to listen to and control a USB HID based board via a webpage. This is very helpful if you're designing an interactive webpage that needs to respond to the physical world.
Human Interface Devices, or HID, was created to allow lots of different types of hardware to pass information back and forth over USB. A keyboard is a good HID example but a keyboard only passes data in one direction ('you pressed the k button'). Full duplex is more complicated but is much more valuable once you have it up and running.

Covered in This Tutorial
This is not a 'turn your Leonardo into a keyboard' example. This tutorial demonstrates full two-way HID communication. This technique is helpful if you need to control outputs such as motors, LEDs, and buzzers. We apologize, but certain tools used in this tutorial are Windows only. If you have similar tool chains to get RawHID working on Linux and Mac please let us know.
This tutorial is based heavily on the Teensy RawHID library by PJRC. None of this would be possible without Paul's awesome work developing the RawHID library. If you're thinking about making a true USB device, consider developing it with a Teensy from PJRC or from SparkFun. They are truly easy-to-use little devices.
The idea behind this tutorial came from a project where we needed to create a board the could output sensor data (analog values, digital values) to a web page. We also needed to control motors and LEDs based on where the user clicked on that same page. To do this we needed the board to be able to pass HID packets back and forth. Again, there are plenty of tutorials out there showing how to implement a joystick or a keyboard, but these are often one way and rarely talk directly to a webpage.
Required Materials
Here's a list of parts you may want to gather:
You can add all these parts to your cart then remove any you already have.
Suggested Reading/Viewing:
- Hexidecimal
- Trimpots as Voltage Dividers
- HID and USB Devices
Teensy Setup
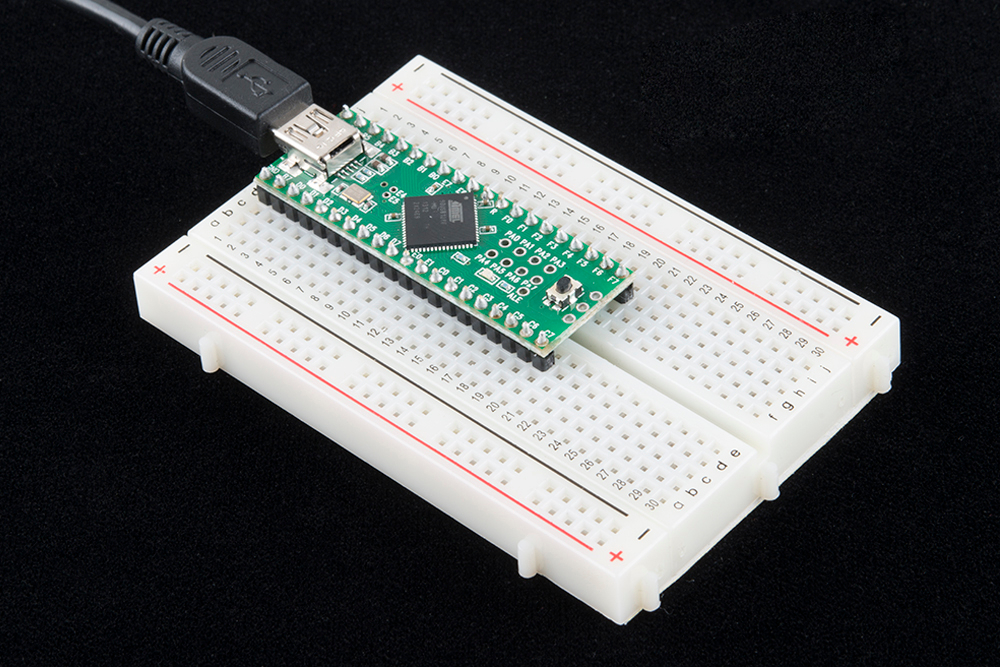
Let's start by having the Teensy report HID packets. At this point we only need to attach a USB cable to the Teensy.
To get use RawHID you'll need to install Teensyduino. For help installing Teensyduino see the PJRC site.
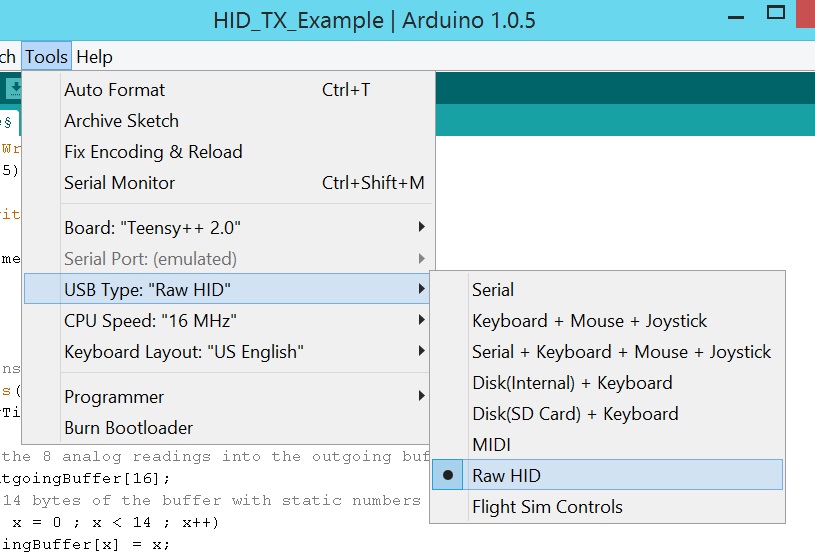
Once Teensyduino is installed, you'll have access to the Raw HID USB type as well as a basic example sketch. Before we continue there are some settings that can be modified. Find the usb_private.h file located in the \Arduino\hardware\teensy\cores\usb_rawhid folder, and open it in a text editor. The usb_private file contains the VID/PID, device string, and frame settings when using the RawHID library.
Vendor ID / Product ID
If you're just learning how to control HID there is no need to change the VID/PID settings. If you are rolling your own hardware you'll need to tweak the vendor ID and product ID. Don't have your own Vendor ID? That's kind of a problem, but, if you're just playing around, don't worry about it too much. If you're planning on selling 10,000 of your device then you'll need to spend the $5,000 to get your own VID.
Device String
This is the human readable string that is commonly shown when the USB is plugged in. It may sound fun to attach the 'NSA Webcam Controller' to your friend's computer, but let's leave the STR_PRODUCT alone for now.
Frame Size
The frame size (RAWHID_TX_SIZE and RAWHID_RX_SIZE) is what you should focus on within usb_private.h. How much data do you need to pass back and forth? For this tutorial, we are going to show how to read up to eight, 16-bit sensors, so we define RAWHID_TX_SIZE to be 16 bytes. To make things symetrical, let's set the size of the RAWHID_RX_SIZE to 16 bytes as well. These buffers can be any size (256 byte max), but try to be economical with your settings. Don't define a 256 byte array if you're just reading a temperature sensor. Edit usb_private.h, and set the TX/RX buffers to 16.
After you've edited the buffer sizes, save the file. If you're using Windows, you may need to save a local copy to your desktop, then copy/paste back into the \Arduino\hardware\teensy\cores\usb_rawhid directory.
Receiving HID Packets
Upload the HID_TX_Example onto the Teensy.
language:c
    /*
 Example HID to Webcontrol - Basic transmit over HID
 By: Nathan Seidle (SparkFun Electronics)
 Date: January 6th, 2014
 This code is public domain but you buy me a beer if you use this and we meet someday (Beerware license).

 This example shows how to transmit a counter over Raw HID.
*/

//Declare hardware pins
byte statLED = 6; //Teeny 2.0++ has status LED on pin 6

long readingTime; //Controls how often we send our trimpot value to the computer
unsigned int counter = 0; //Used to show packet count sent to computer

byte outgoingBuffer[16];

void setup()
{
  //Blink to show we're alive
  pinMode(statLED, OUTPUT);
  for(int i = 0 ; i < 5 ; i++)
  {
    digitalWrite(statLED, HIGH);
    delay(25);
    digitalWrite(statLED, HIGH);
    delay(25);
  }
  digitalWrite(statLED, HIGH); //Turn off LED

  //Fill the buffer with static numbers
  for(int x = 0 ; x < 16 ; x++)
    outgoingBuffer[x] = x;

  readingTime = millis();
}

void loop()
{
  //Send sensor readings to computer every 30ms, about 33Hz
  if (millis() - readingTime > 30) {
    readingTime += 30;

    //Fill the tail end with a counter
    outgoingBuffer[14] = counter >> 8; //MSB
    outgoingBuffer[15] = counter & 0xFF; //LSB
    counter++;

    //Send the read frame to the computer
    int response = RawHID.send(outgoingBuffer, 100);

  }
}
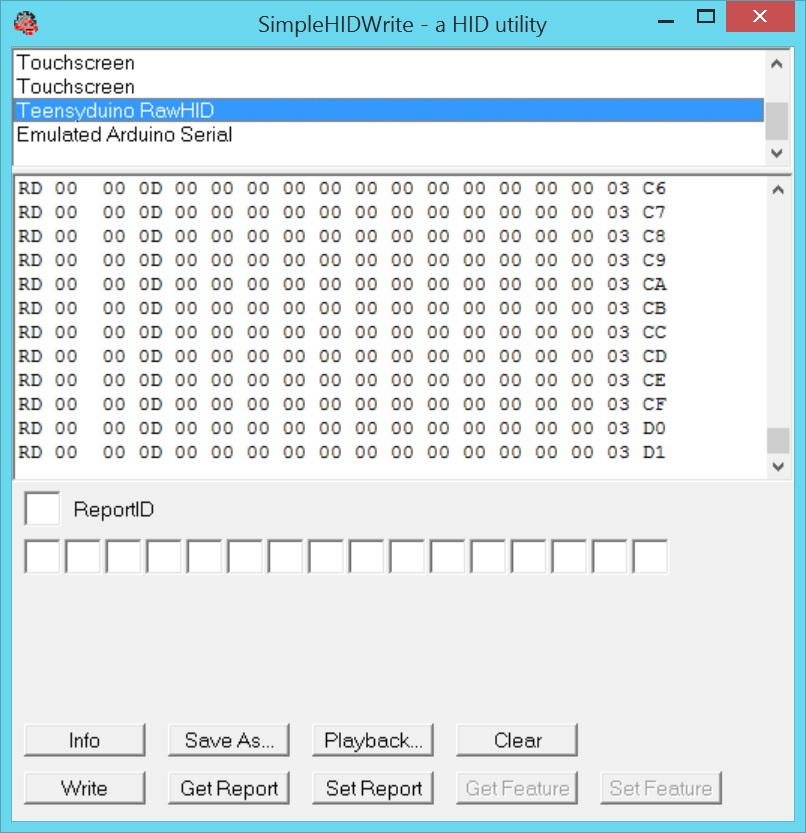
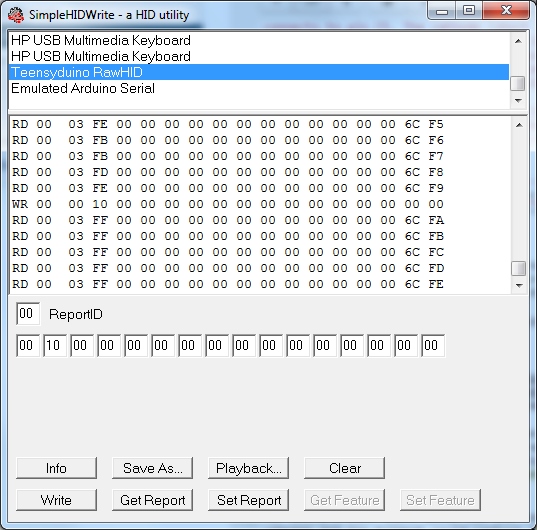
Upon uploading the code, you'll notice nothing is happening. The problem is that we can't easily see USB packets. In the old serial world days, we could open a terminal window and watch a COM port. In HID land we need to view packets on the USB bus. A handy Windows tool to do this is the SimpleHIDWrite.exe program developed by Jan Axelson. Open up SimpleHIDWrite, and select 'Teensyduino RawHID' from the device list.
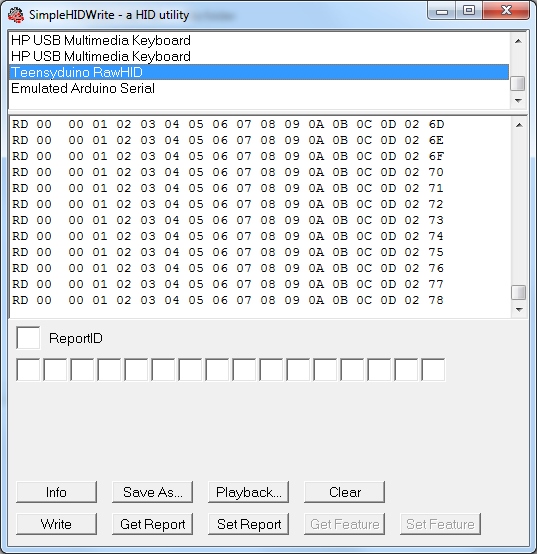
Here we see packets streaming by. The computer is receiving HID from the Teensy! We can see these 16 read bytes displayed in HEX. The last two bytes are our counter and increase with each read.
Don't see 16 bytes? That's probably because you weren't able to edit and save the frame setting in the usb_private.h file. Go back to the previous section, and double check that you have successfully edited the file.
Passing Variables

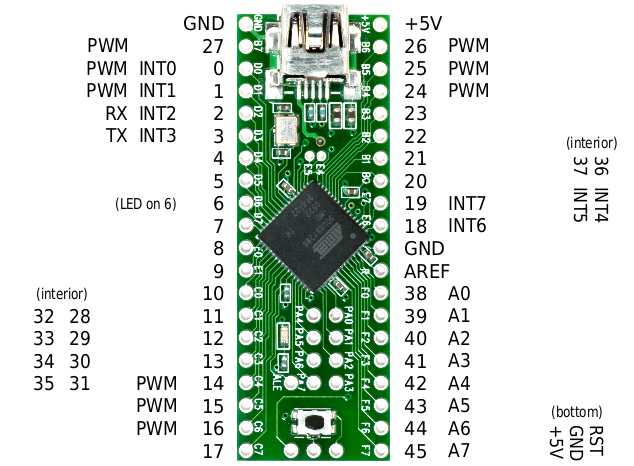
Now let's transmit the value of a trim pot. Attach a trimpot to pin A7 (labeled F7) on the Teensy. Not sure which Arduino pins are what on the Teensy? Check out this image or this page for a handy PDF.
Once you have the trimpot connected, upload the HID_TXTrimpot_Example to your Teensy.
language:c
/*
 Example HID to Webcontrol - Transmit analog value over HID
 By: Nathan Seidle (SparkFun Electronics)
 Date: January 6th, 2014
 This code is public domain but you buy me a beer if you use this and we meet someday (Beerware license).

 This example shows how to read a trimpot and send the value over Raw HID.
 */

//Declare hardware pins
byte statLED = 6; //Teeny 2.0++ has status LED on pin 6
byte trimpot = A7; //For the trimpot. This is labeled F7 on the Teensy2.0++

int trimpotValue; //Contains analog to digital value of the trimpot
long readingTime; //Controls how often we send our trimpot value to the computer
unsigned int counter = 0; //Used to show packet count sent to computer

byte outgoingBuffer[16]; //Holds the 16 bytes sent to computer

void setup()
{
  //Setup input/sensor ports
  pinMode(trimpot, INPUT_PULLUP);

  //Blink to show we're alive
  pinMode(statLED, OUTPUT);
  for(int i = 0 ; i < 5 ; i++)
  {
    digitalWrite(statLED, HIGH);
    delay(75);
    digitalWrite(statLED, LOW);
    delay(75);
  }
  digitalWrite(statLED, LOW); //Turn off LED

  //Fill the buffer with zeros
  for(int x = 0 ; x < 16 ; x++)
    outgoingBuffer[x] = 0;

  readingTime = millis();

}

void loop()
{
  //Send sensor readings to computer every 30ms, about 33Hz
  if (millis() - readingTime > 30) {
    readingTime += 30;

    //Read inputs
    trimpotValue = averageAnalogRead(trimpot);

    //Fill the head with the analog value
    outgoingBuffer[0] = trimpotValue >> 8;
    outgoingBuffer[1] = trimpotValue & 0xFF;

    //Fill the tail end with a counter
    outgoingBuffer[14] = counter >> 8; //MSB
    outgoingBuffer[15] = counter & 0xFF; //LSB
    counter++;

    //Send the read frame to the computer
    int response = RawHID.send(outgoingBuffer, 100);

  }
}

//Takes a series of readings on a given pin
//Returns the average
int averageAnalogRead(int pinToRead)
{
  byte numberOfReadings = 8;
  unsigned int runningValue = 0;

  for(int x = 0 ; x < numberOfReadings ; x++)
    runningValue += analogRead(pinToRead);
  runningValue /= numberOfReadings;

  return(runningValue);
}
This example takes an analog reading of the trimpot and passes the 10-bit number out bytes 0 and 1.
Open SimpleHID. You'll have to re-select the Teensy each time you load new code because it re-enumerates as an HID device. Twist the trimpot, and you'll see the values of the first two bytes change!
Pushing Values to a Webpage
Now that we can gather values and push them onto the HID bus, let's pipe them to a webpage. Milan Pipersky created a driver that allows a webpage to access HID hardware. Download and install the HID API Browser Plugin. This was created using FireBreath to allow multiple platforms and browsers get access to hardware. From their website:
FireBreath is a framework that allows easy creation of powerful browser plugins. A plugin built on FireBreath works as an NPAPI plugin or as an ActiveX control (windows only) and support could be added for other plugin types built in C++ as well.
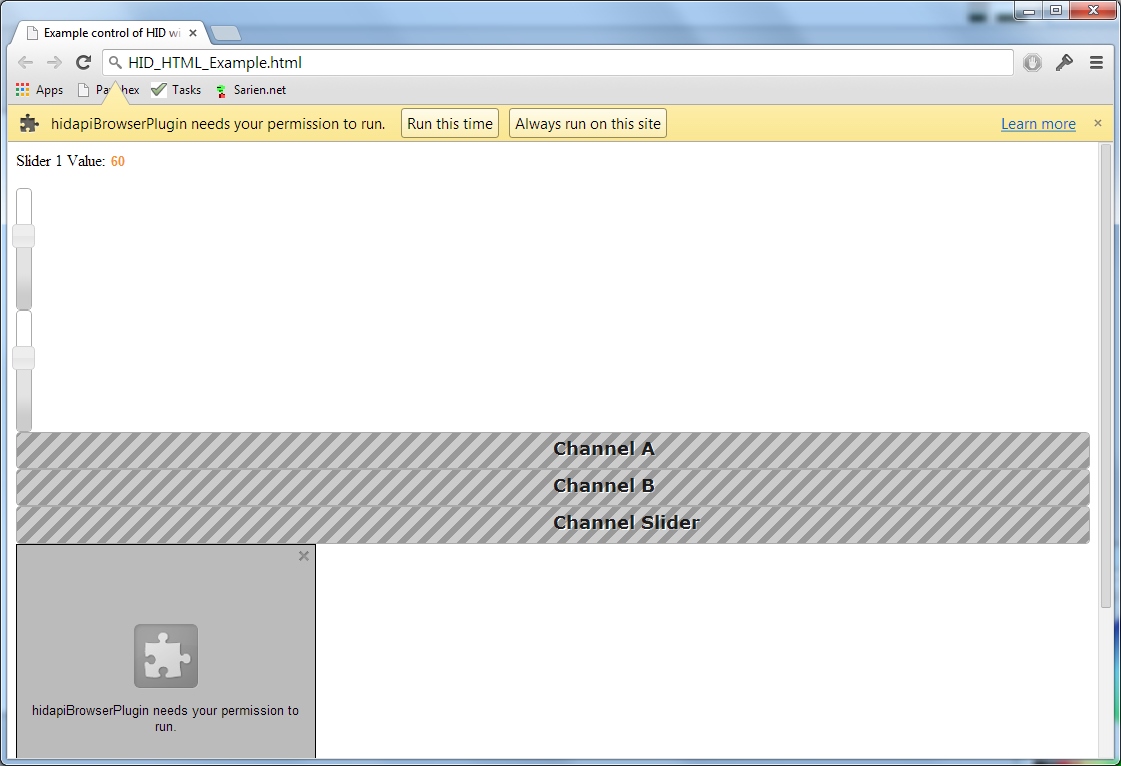
Next, open the example control html page. You will need to give permission to the plugin to run.
You should see a few messages and warnings to allow the plugin to function. Now twist the trimpot. You should see the progress bar change!
To me, controlling HTML from hardware is magic! From here you can begin to see the power that is possible. Any sensor that we can hook up to an Arduino can be directly displayed on a web page.
You could create a web-based game that responds to how loud the user yells at their controller or how hard they pound their desk. You could record sensor data such as temperature, UV light, sound and vibration levels. You could monitor buttons, switches on doors or movement in a room. Kind of fun to think about... But the real power is in controlling outputs!
Sending HID Packets
We've shown how to read sensors and display the readings. Now, let's control a motor from a webpage!
Download and compile the HID_TXRX_Example code onto the Teensy.
language:c
    /*
 Example HID to Webcontrol - Basic transmit and receive over HID
 By: Nathan Seidle (SparkFun Electronics)
 Date: January 6th, 2014
 This code is public domain but you buy me a beer if you use this and we meet someday (Beerware license).

 This example shows how to control output pins based on the incoming HID packets.
*/

//Declare hardware pins
byte statLED = 6; //Teeny 2.0++ has status LED on pin 6
byte trimpot = A7; //For the trimpot. This is labeled F7 on the Teensy2.0++

byte port1Pin = 16; //PWM output for motor. Labeled C6 on Teensy 2.0++
byte port2Pin = 15; //PWM output for LED. Labaled C5 on Teensy 2.0++

//Global variables
int trimpotValue; //Contains analog to digital value of the trimpot
long readingTime; //Controls how often we send our trimpot value to the computer
unsigned int counter = 0; //Used to show packet count sent to computer

byte outgoingBuffer[16]; //Holds the 16 bytes sent to computer

//These variables contain the commands from the computer
int port1Value;
int port2Value;

//These keep track of what has changed. We don't want to update analogWrites at 33Hz
int oldPort1Value;
int oldPort2Value;

//These defines help break the incoming 16 byte frame into pieces
#define PORT1 0
#define PORT2 2

void setup()
{
  //Setup input/sensor ports
  pinMode(trimpot, INPUT_PULLUP);

  //Setup output ports
  pinMode(port1Pin, OUTPUT);
  pinMode(port2Pin, OUTPUT);
  analogWrite(port1Pin, 0);
  analogWrite(port2Pin, 15);

  //Blink to show we're alive
  pinMode(statLED, OUTPUT);
  for(int i = 0 ; i < 5 ; i++)
  {
    digitalWrite(statLED, HIGH);
    delay(25);
    digitalWrite(statLED, LOW);
    delay(25);
  }
  digitalWrite(statLED, LOW); //Turn off LED

  //Fill the buffer with zeros
  for(int x = 0 ; x < 16 ; x++)
    outgoingBuffer[x] = 0;

  readingTime = millis();
}

void loop()
{
  byte incomingBuffer[16];

  //Check to see if we have received a frame from the computer
  int response = RawHID.recv(incomingBuffer, 0); // 0ms timeout = do not wait
  if (response > 0)
  {
    //Toggle the status LED when we receive a frame from the computer
    if(digitalRead(statLED) == LOW)
      digitalWrite(statLED, HIGH);
    else
      digitalWrite(statLED, LOW);

    //Decode the incoming buffer
    port1Value = incomingBuffer[PORT1] << 8 | incomingBuffer[PORT1 + 1]; //Combine MSB/LSB into int
    port2Value = incomingBuffer[PORT2] << 8 | incomingBuffer[PORT2 + 1];

    //Push values to output pins
    updateOutputs();
  }

  //Send sensor readings to computer every 30ms, about 33Hz
  if (millis() - readingTime > 30) {
    readingTime += 30;

    //Read inputs
    trimpotValue = averageAnalogRead(trimpot);

    //Fill the head with the analog value
    outgoingBuffer[0] = trimpotValue >> 8;
    outgoingBuffer[1] = trimpotValue & 0xFF;

    //Fill the tail end with a counter
    outgoingBuffer[14] = counter >> 8; //MSB
    outgoingBuffer[15] = counter & 0xFF; //LSB
    counter++;

    //Send the read frame to the computer
    response = RawHID.send(outgoingBuffer, 100);
  }
}

//Takes a series of readings on a given pin
//Returns the average
int averageAnalogRead(int pinToRead)
{
  byte numberOfReadings = 8;
  unsigned int runningValue = 0;

  for(int x = 0 ; x < numberOfReadings ; x++)
    runningValue += analogRead(pinToRead);
  runningValue /= numberOfReadings;

  return(runningValue);
}

//If the new port values are different from before then upate the output pins
void updateOutputs(void)
{
  //Port 1 - PWM control
  port1Value = map(port1Value, 0, 100, 0, 255); //Slider is 0 to 100. PWM goes from 0 to 255
  if(port1Value != oldPort1Value) //Only send new values to pin if the value is indeed new
  {
    oldPort1Value = port1Value; //Remeber this new value

      if(port1Value > 3) //Have a minimum threshold
      analogWrite(port1Pin, port1Value);
    else
      analogWrite(port1Pin, 0); //Turn off this pin if value is too close to zero
  }

  //Port 2 - PWM control
  port2Value = map(port2Value, 0, 100, 0, 255); //PWM goes from 0 to 255
  if(port2Value != oldPort2Value) //Only send new values to pin if the value is indeed new
  {
    oldPort2Value = port2Value; //Remeber this new value

      if(port2Value > 3) //Have a minimum threshold
      analogWrite(port2Pin, port2Value);
    else
      analogWrite(port2Pin, 0); //Turn off this pin if value is too close to zero
  }
}
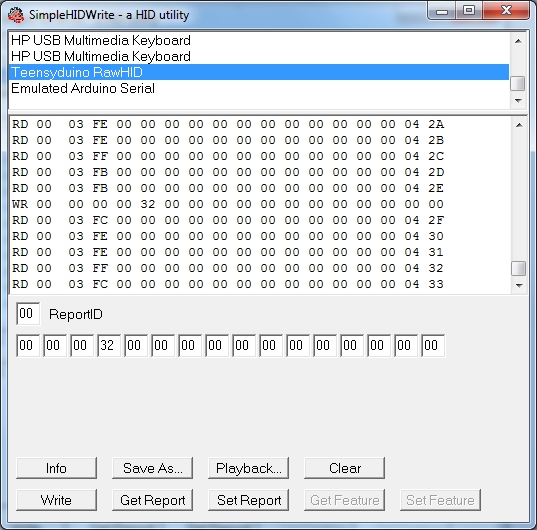
Let's double check that the proper code is running. Open SimpleHID, and select the Teensyduino from the list. Once you see data scrolling past, type 32 in the fourth byte, and hit Write. The LED on the Teensy should toggle. The status LED will toggle every time a HID frame is received from the computer. And as a bonus, by writing 0x32 into the fourth byte, you just set pin C5 to a 50% duty cycle (0x32 in HEX is 50 in decimal).
To prove it, add an LED to pin C5. The long leg of the LED is the anode and connects to pin C5. The cathode (short leg) connects to GND. Next, write a few different values (for example 05, 32, FE, and 00) into the fourth byte, and send them from SimpleHID. You should see the brightness of the LED change. Open the html page and slide the bottom slider up and down. You should see the brightness of the LED change, as you move the slider.
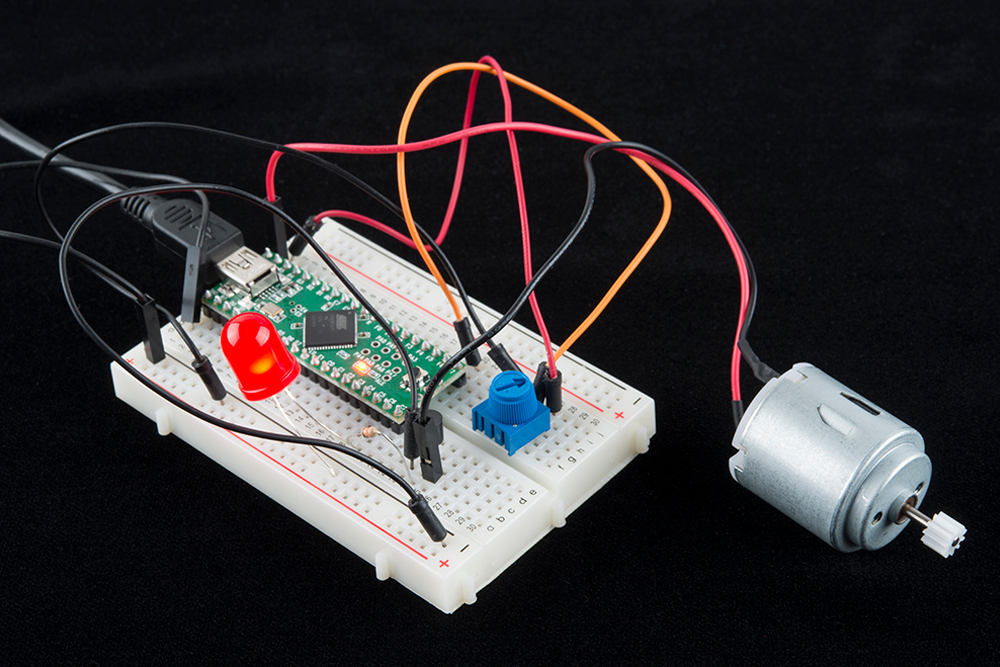
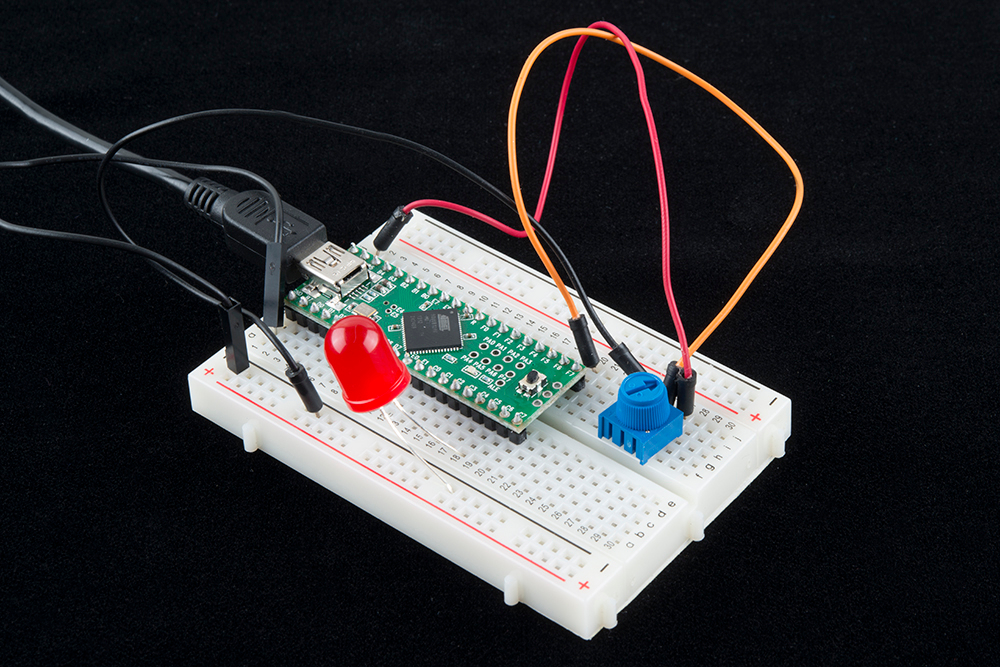
The final example requires that we use a 2N3904 transistor to control the motor. The Teensy can't drive the motor directly, but it can control the on/off valve of the 2N3904.
Grab the following parts:
- 2N3904 (or a similar NPN transistor that can handle 100mA or more)
- 330 ohm resistor (any resistor value from 100 to 5k should work)
- DC motor
Wire the transistor as follows:
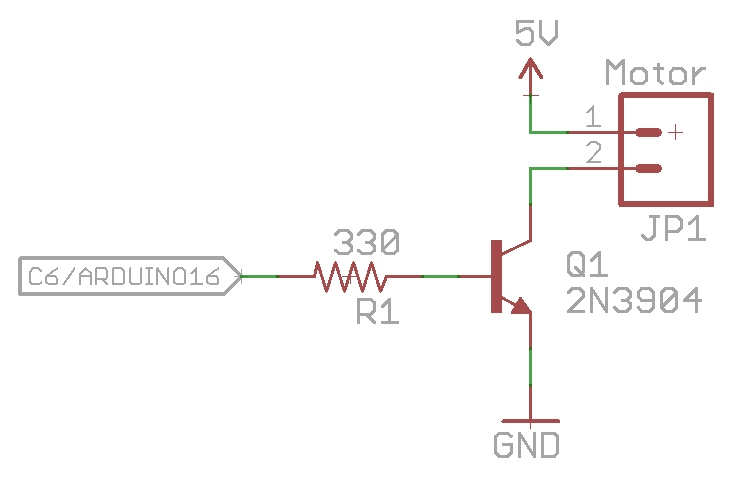
Once the motor has been wired to C6, use the top slider on the example HTML page to control the speed of the motor. You can also control the speed of the motor by using SimpleHID to write values (00, 05, FE, etc) to the 2nd byte.
For extra credit, think about how you would modify the code so that both the webpage and the trimpot could control the motor speed. Think you've got it? Give it a try!
For super credit, how would you make the slider control the motor speed as well as direction? Hint: You'll probably need an h-bridge.
Changing the Hardware
The Teensyduino RawHID library works best with the Teensy hardware (Teensy2.0++ is used in this tutorial). However, if you are a more adventurous user, you can use the RawHID library on any board that uses the ATmega32u4 or AT90USB1286. The Arduino IDE will generate a HEX file that can be located deep within the Arduino temporary compile folder. Using an external programmer (we prefer the AVR Pocket Programmer but you can also use an Arduino), you can load this HEX file onto any board. Using an external programmer is not as easy as the Teensy bootloader, but it means the LilyPad USB, Fio v3, Arduino Leonardo, and a whole gaggle of other development boards can benefit from the RawHID library. Roll your own hardware, and skip all the FTDI ICs and odd bit-bang USB libraries!
Resources and Going Further
Here's some additional tips and tricks we learned during this project:
- Working with USB type A devices and the USB A breakout
- Checkout this tutorial to change where the compiled HEX files are sent. This makes it a lot easier to find and load a HEX file on the fly. Stop using AVR studio or a prompt to load HEX files!
- Checkout AVRDUDESS for a great windows GUI to avrdude.
- Need an h-bridge to control the motor's direction? Checkout the Minimoto or Ardumoto.
Check out these other Internet of Things tutorials: