Displaying Sensor Data with Bluetooth
Introduction
Bluetooth-enabled technology has become ubiquitous in today’s world. The average person would be hard pressed not to use Bluetooth during their daily activities. Although Bluetooth may seem difficult to work with, it’s fairly straightforward to start incorporating Bluetooth into your projects.
In our previous Bluetooth tutorial Sending Sensor Data Via Bluetooth, we showed how to use Bluetooth to transmit data from a triple axis accelerometer. Continuing off of the first tutorial, we are going to expand this project to include more capabilities for visualizing and interacting with your accelerometer data once you're transmitting.
For a refresher on that tutorial, check it out here:
Sending Sensor Data via Bluetooth
The Project: Displaying Accelerometer Data Over Bluetooth
For this project, we are going to connect an accelerometer to the SparkFun Thing Plus ESP32 board in order to display axis data using a few different methods. We’ll keep this example as simple as possible by using Qwiic Connect hardware to eliminate the need for soldering. The hardware is simple; it includes an ESP32 Thing Plus Wroom, and a Qwiic SparkFun Triple Axis Accelerometer module. You’ll also need a USB to USB-C cable to load code from the Arduino IDE onto your board, as well as a power supply for the ESP32 Thing Plus Wroom. You can add all the items that you will need for this project to your cart using the wishlist below.
Each option for displaying data will have a slightly different hardware hookup.
Pick Your Display Method
For this tutorial, you are able to choose how you would like to display your data from the KX132 Triple Axis Accelerometer.
Option 1: Display Data on an OLED
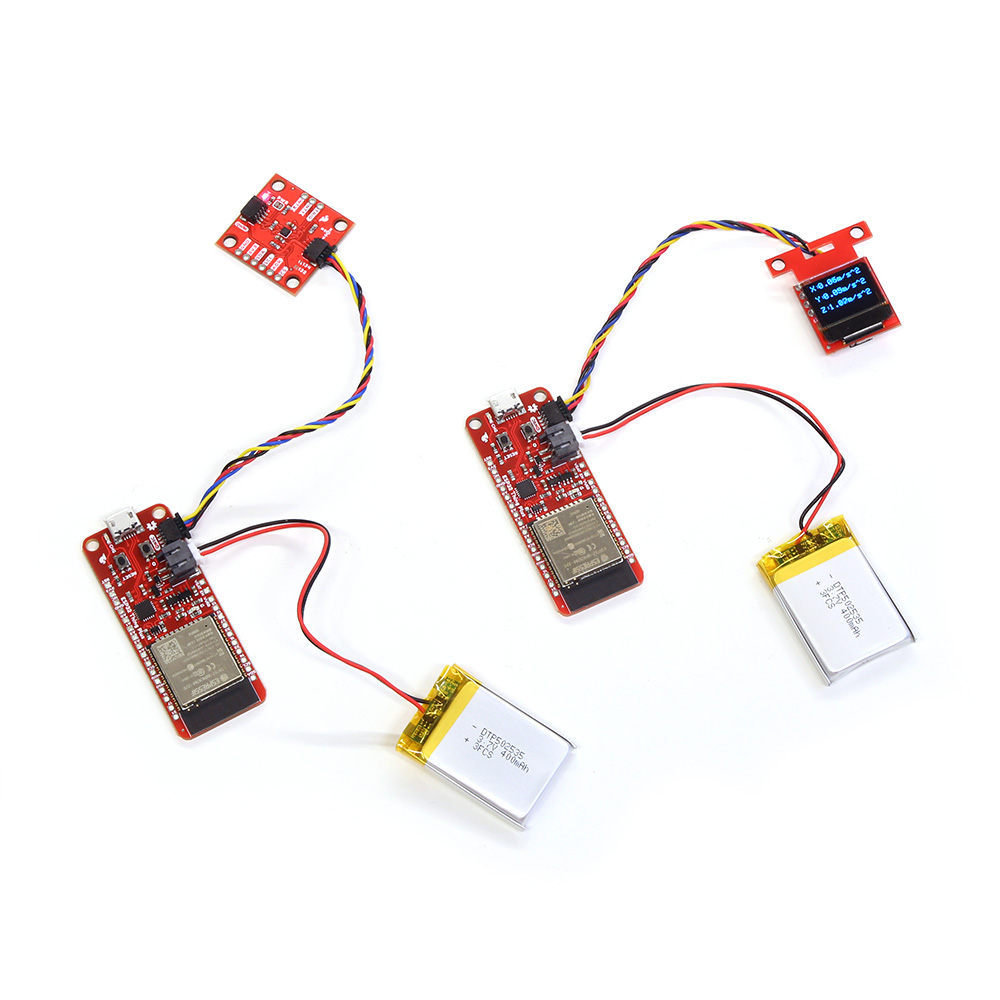
Following the instructions for Option 1 will teach you how to view accelerometer data on an OLED attached to the client ESP32 board. You will need two ESP32 Thing Plus C boards, a KX132 Triple Axis Accelerometer, a Micro OLED Breakout(Qwiic), a USB A to USB C cable, and a power supply. Again, we recommend using the Lithium Ion Battery with JST-PH Connector for the server ESP32 board’s power supply. However, there are a variety of power sources that will work with this application.
Option 2: Displaying Data With a Python Graph
Running this Python script with the sensor connected via Bluetooth generates live-updating graphs, providing a visual representation of the accelerometer's data. Although this is a basic template, the live updating plot offers an excellent way to simulate a dashboard experience without needing to purchase a license, while also allowing for personal customization.
Option 3: Display Data on your Mobile Device
Following the directions for Option 3 will show you how to display accelerometer data on your mobile device through a BLE app. For this section of the tutorial, you will need an ESP32 Thing Plus C board, a KX132 Triple Axis Accelerometer, and a USB A to USB C cable.
Option 1: Displaying Data With an OLED Screen
OLED displays are all the rage right now, and for good reason; use this option to display your data on the latest technology.
Option 1: Hardware Setup
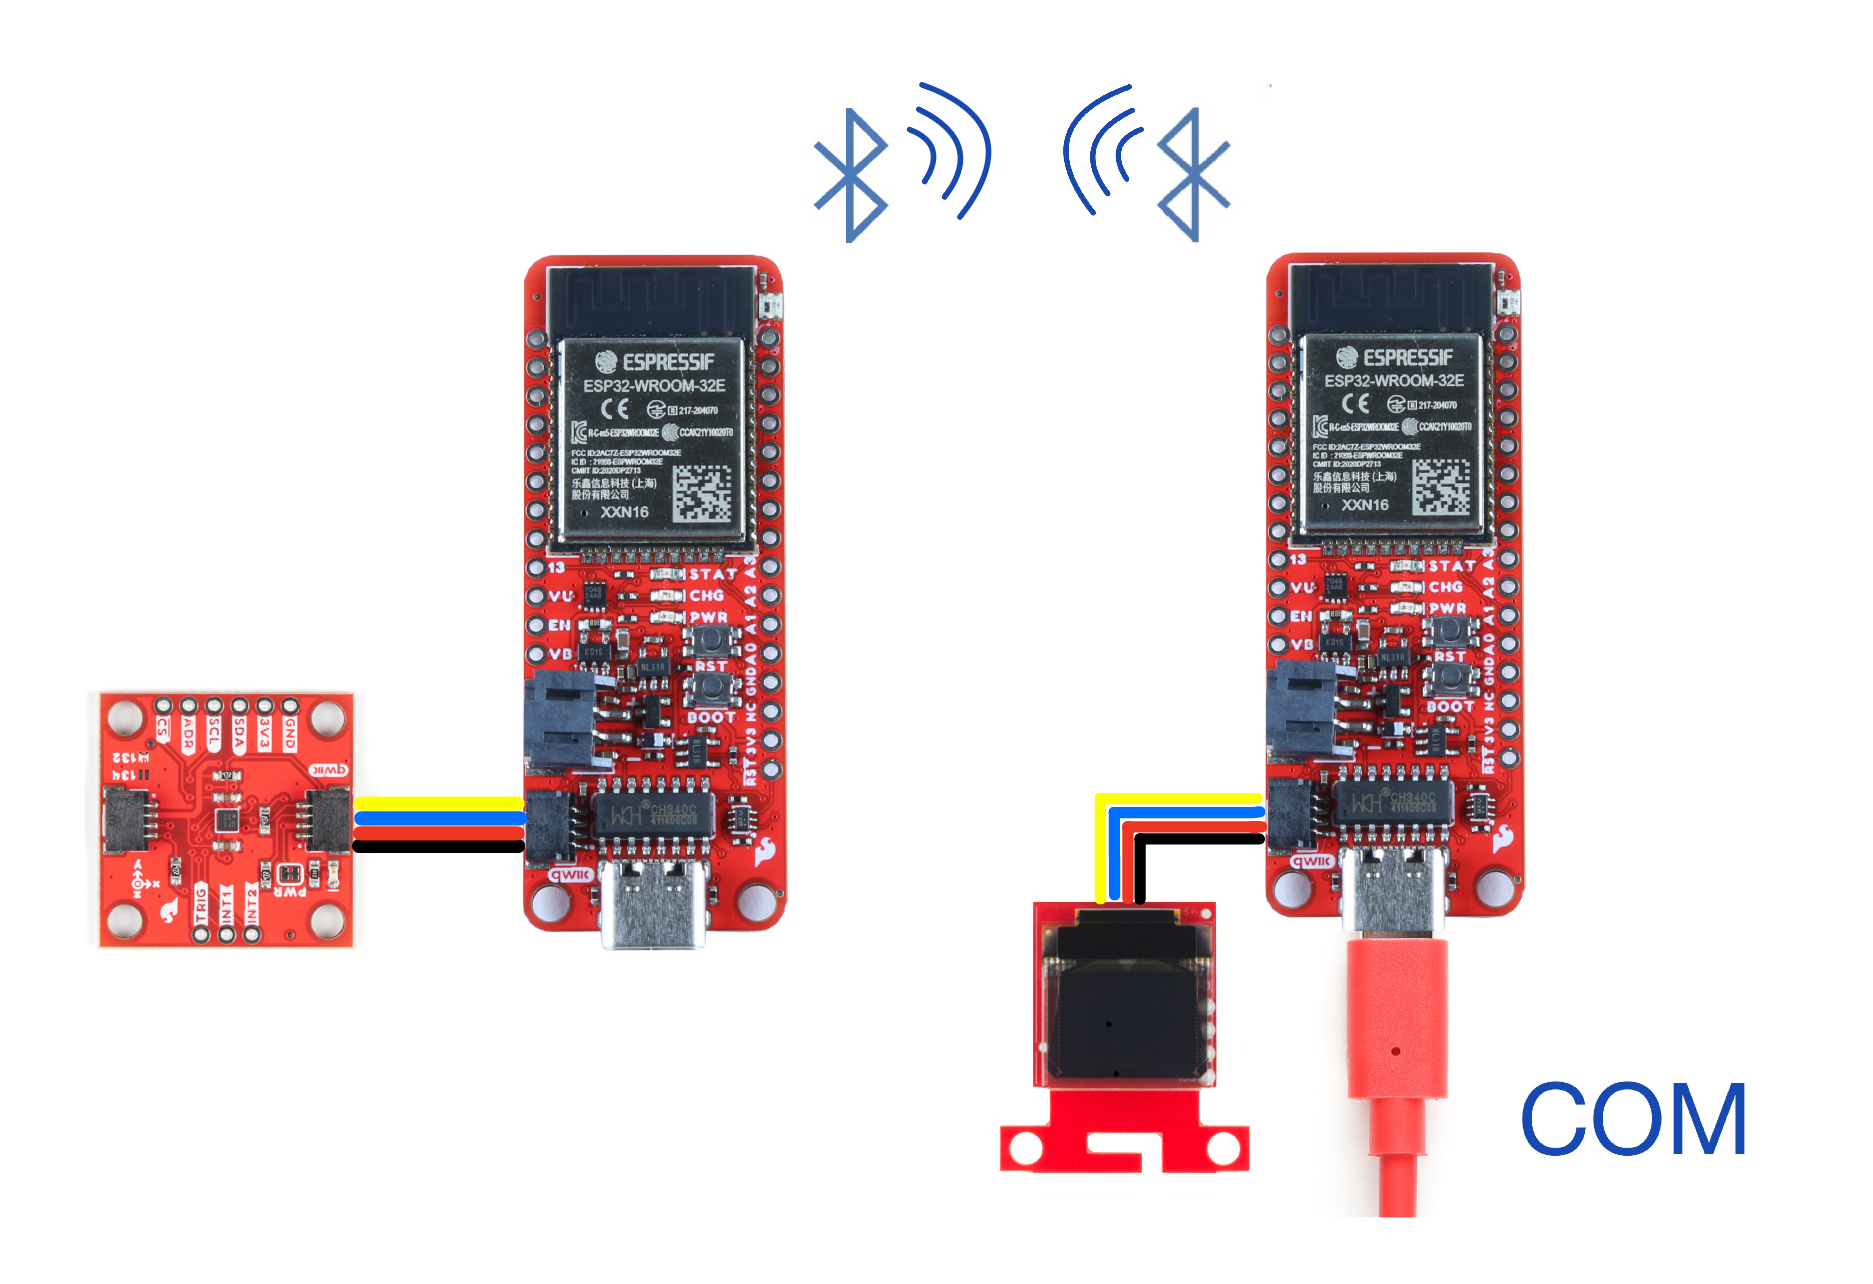
Rather than displaying accelerometer data on the serial monitor or a mobile device, option three of this tutorial connects one ESP32 board to an OLED. The other ESP32 board is connected to a KX132 Triple Axis Accelerometer and a power source.
Option 1: Uploading The Code
Similar to Option 1, you will need to designate one ESP32 board as the client and the other as the server. The client board is attached to the OLED breakout, while the server board is attached to the accelerometer.
Upload the following code to the client ESP32:
/*
This is the BLE OLED example.
Upload this code to your Client device, which should be
connected via I2C to your OLED display. This example will display
accelerometer data from your Server Device. Enjoy!

Created by: Aidan Lawall
*/
#include <SparkFun_Qwiic_OLED.h>

QwiicMicroOLED myOLED;
// QwiicTransparentOLED myOLED;
// QwiicNarrowOLED myOLED;

#include "BLEDevice.h"

char disptext1[16];
char disptext2[16];
char disptext3[16];
char buffer[16];
float result1;
float result2;
float result3;
// The remote service we wish to connect to.
static BLEUUID serviceUUID("4fafc201-1fb5-459e-8fcc-c5c9c331914b");
// The characteristic of the remote service we are interested in.
static BLEUUID    charUUID("beb5483e-36e1-4688-b7f5-ea07361b26a8");
static BLEUUID    charAccXUUID("fb6cf981-31cc-4f36-af06-1f2f3e919840");// use the same UUID as on the server
static BLEUUID    charAccYUUID("35b17f66-73d1-4c92-92f6-9032ef1987d3");
static BLEUUID    charAccZUUID("3cab9341-e65b-46e9-83ed-c8a7f2f841c2");
//#define CHARACTERISTIC_ACC_UUID
static boolean doConnect = false;
static boolean connected = false;
static boolean doScan = false;
static BLERemoteCharacteristic* pRemoteCharacteristic;
static BLERemoteCharacteristic* pRemoteCharacteristicACCx;
static BLERemoteCharacteristic* pRemoteCharacteristicACCy;
static BLERemoteCharacteristic* pRemoteCharacteristicACCz;
static BLEAdvertisedDevice* myDevice;

static void notifyCallback(
  BLERemoteCharacteristic* pBLERemoteCharacteristic,
  uint8_t* pData,
  size_t length,
  bool isNotify) {
    Serial.print("Notify callback for characteristic ");
    Serial.print(pBLERemoteCharacteristic->getUUID().toString().c_str());
    Serial.print(" of data length ");
    Serial.println(length);
    Serial.print("data: ");
    Serial.println((char*)pData);
}

class MyClientCallback : public BLEClientCallbacks {
  void onConnect(BLEClient* pclient) {
  }

  void onDisconnect(BLEClient* pclient) {
    connected = false;
    Serial.println("onDisconnect");
  }
};

bool connectToServer() {
    Serial.print("Forming a connection to ");
    Serial.println(myDevice->getAddress().toString().c_str());

    BLEClient*  pClient  = BLEDevice::createClient();
    Serial.println(" - Created client");

    pClient->setClientCallbacks(new MyClientCallback());

    // Connect to the remove BLE Server.
    pClient->connect(myDevice);  // if you pass BLEAdvertisedDevice instead of address, it will be recognized type of peer device address (public or private)
    Serial.println(" - Connected to server");
    pClient->setMTU(517); //set client to request maximum MTU from server (default is 23 otherwise)

    // Obtain a reference to the service we are after in the remote BLE server.
    BLERemoteService* pRemoteService = pClient->getService(serviceUUID);
    if (pRemoteService == nullptr) {
      Serial.print("Failed to find our service UUID: ");
      Serial.println(serviceUUID.toString().c_str());
      pClient->disconnect();
      return false;
    }
    Serial.println(" - Found our service");

    // Obtain a reference to the characteristic in the service of the remote BLE server.
    pRemoteCharacteristic = pRemoteService->getCharacteristic(charUUID);
    if (pRemoteCharacteristic == nullptr) {
      Serial.print("Failed to find our characteristic UUID: ");
      Serial.println(charUUID.toString().c_str());
      pClient->disconnect();
      return false;
    }
    Serial.println(" - Found our characteristic");
    //ACC X Obtain a reference to the characteristic in the service of the remote BLE server.
    pRemoteCharacteristicACCx = pRemoteService->getCharacteristic(charAccXUUID);
    if (pRemoteCharacteristicACCx == nullptr) {
      Serial.print("Failed to find our characteristic UUID x: ");
      Serial.println(charAccXUUID.toString().c_str());
      pClient->disconnect();
      return false;
    }
    Serial.println(" - Found our characteristic");
 //ACC Y Obtain a reference to the characteristic in the service of the remote BLE server.
    pRemoteCharacteristicACCy = pRemoteService->getCharacteristic(charAccYUUID);
    if (pRemoteCharacteristicACCy == nullptr) {
      Serial.print("Failed to find our characteristic UUID y: ");
      Serial.println(charAccYUUID.toString().c_str());
      pClient->disconnect();
      return false;
    }
    Serial.println(" - Found our characteristic");
     //ACC Z Obtain a reference to the characteristic in the service of the remote BLE server.
    pRemoteCharacteristicACCz = pRemoteService->getCharacteristic(charAccZUUID);
    if (pRemoteCharacteristicACCz == nullptr) {
      Serial.print("Failed to find our characteristic UUID z: ");
      Serial.println(charAccZUUID.toString().c_str());
      pClient->disconnect();
      return false;
    }
    Serial.println(" - Found our characteristic");
    // Read the value of the characteristic.
    if(pRemoteCharacteristic->canRead()) {
      std::string value = pRemoteCharacteristic->readValue();
      Serial.print("The characteristic value was: ");
      Serial.println(value.c_str());
    }

    if(pRemoteCharacteristic->canNotify())
      pRemoteCharacteristic->registerForNotify(notifyCallback);

    connected = true;
    return true;
}
/**
 * Scan for BLE servers and find the first one that advertises the service we are looking for.
 */
class MyAdvertisedDeviceCallbacks: public BLEAdvertisedDeviceCallbacks {
 /**
   * Called for each advertising BLE server.
   */
  void onResult(BLEAdvertisedDevice advertisedDevice) {
    Serial.print("BLE Advertised Device found: ");
    Serial.println(advertisedDevice.toString().c_str());

    // We have found a device, let us now see if it contains the service we are looking for.
    if (advertisedDevice.haveServiceUUID() && advertisedDevice.isAdvertisingService(serviceUUID)) {

      BLEDevice::getScan()->stop();
      myDevice = new BLEAdvertisedDevice(advertisedDevice);
      doConnect = true;
      doScan = true;

    } // Found our server
  } // onResult
}; // MyAdvertisedDeviceCallbacks


void setup() {
  Serial.begin(115200);
  Serial.println("Starting Arduino BLE Client application...");
  BLEDevice::init("");
  Wire.begin();
  // Retrieve a Scanner and set the callback we want to use to be informed when we
  // have detected a new device.  Specify that we want active scanning and start the
  // scan to run for 5 seconds.
  BLEScan* pBLEScan = BLEDevice::getScan();
  pBLEScan->setAdvertisedDeviceCallbacks(new MyAdvertisedDeviceCallbacks());
  pBLEScan->setInterval(1349);
  pBLEScan->setWindow(449);
  pBLEScan->setActiveScan(true);
  pBLEScan->start(5, false);

  if (myOLED.begin() == false)
    {
        Serial.println("Device begin failed. Freezing...");
        while (true)
            ;
    }
    Serial.println("Begin success");

} // End of setup.


// This is the Arduino main loop function.
void loop() {

  // If the flag "doConnect" is true then we have scanned for and found the desired
  // BLE Server with which we wish to connect.  Now we connect to it.  Once we are
  // connected we set the connected flag to be true.
  if (doConnect == true) {
    if (connectToServer()) {
      Serial.println("We are now connected to the BLE Server.");
    } else {
      Serial.println("We have failed to connect to the server; there is nothin more we will do.");
    }
    doConnect = false;
  }

  // If we are connected to a peer BLE Server, update the characteristic each time we are reached
  // with the current time since boot.
  if (connected) {
    String newValue = "Time since boot: " + String(millis()/1000);
    //Serial.println("Setting new characteristic value to \"" + newValue + "\"");

    // Set the characteristic's value to be the array of bytes that is actually a string.
   // pRemoteCharacteristic->writeValue(newValue.c_str(), newValue.length());//***********JKO
  }else if(doScan){
    BLEDevice::getScan()->start(0);  // this is just example to start scan after disconnect, most likely there is better way to do it in arduino
  }


// read the Characteristics and store them in a variable
// This also makes the print command do float handling
float XValue = pRemoteCharacteristicACCx->readFloat();
float YValue = pRemoteCharacteristicACCy->readFloat();
float ZValue = pRemoteCharacteristicACCz->readFloat();
Serial.print(XValue);
Serial.print("\t");
Serial.print(YValue);
Serial.print("\t");
Serial.println(ZValue);
myOLED.erase();
result1 = XValue;
result2 = YValue;
result3 = ZValue;
OLED();

delay(100); // Delay a 100 ms between loops.
} // End of loop

void OLED() {
    String accDataX = "X:"; // our message to display on OLED
    String accDataY = "Y:";
    String accDataZ = "Z:";

    myOLED.text(0, 0, accDataX);
    myOLED.text(0, 15, accDataY);
    myOLED.text(0, 30, accDataZ);


    //Change float "result" into string to display onto OLED
    sprintf(disptext1, "%sm/s^2", dtostrf(result1, 1, 2, buffer));
    sprintf(disptext2, "%sm/s^2", dtostrf(result2, 1, 2, buffer));
    sprintf(disptext3, "%sm/s^2", dtostrf(result3, 1, 2, buffer));

    myOLED.text(10, 0, disptext1, 1);
    myOLED.text(10, 15, disptext2, 1);
    myOLED.text(10, 30, disptext3, 1);
    myOLED.display();
  }
Upload the following code to the server ESP32:
/*
Based on Neil Kolban example for IDF: https://github.com/nkolban/esp32-snippets/blob/master/cpp_utils/tests/BLE%20Tests/SampleServer.cpp
Ported to Arduino ESP32 by Evandro Copercini
updates by chegewara.
More updates by Jonathan Otte
*/

#include <BLEDevice.h>
#include <BLEUtils.h>
#include <BLEServer.h>
#include <Wire.h>                 // Must include Wire library for I2C
#include <SparkFun_KX13X.h> // Click here to get the library: http://librarymanager/All#SparkFun_KX13X

SparkFun_KX132 kxAccel;
outputData myData; // Struct for the accelerometer's data
// See the following for generating UUIDs:
// https://www.uuidgenerator.net/

#define SERVICE_UUID        "4fafc201-1fb5-459e-8fcc-c5c9c331914b"
#define CHARACTERISTIC_UUID "beb5483e-36e1-4688-b7f5-ea07361b26a8"
#define CHARACTERISTIC_ACCX_UUID "fb6cf981-31cc-4f36-af06-1f2f3e919840"
#define CHARACTERISTIC_ACCY_UUID "35b17f66-73d1-4c92-92f6-9032ef1987d3"
#define CHARACTERISTIC_ACCZ_UUID "3cab9341-e65b-46e9-83ed-c8a7f2f841c2"
// makes the chracteristic globlal
static BLECharacteristic *pCharacteristicAccX;
static BLECharacteristic *pCharacteristicAccY;
static BLECharacteristic *pCharacteristicAccZ;
void setup() {

  Serial.begin(115200);
  Serial.println("Starting BLE work!");
  Wire.begin();
  //connect the accelerometer to the board using qwiic cables
  if (!kxAccel.begin())
  {
    Serial.println("Could not communicate with the the KX13X.");
    while (1)
      ;
  }
   if (kxAccel.softwareReset())
    Serial.println("Reset.");

  // Give some time for the accelerometer to reset.
  // It needs two, but give it five for good measure.
  delay(5);

  // Many settings for KX13X can only be
  // applied when the accelerometer is powered down.
  // However there are many that can be changed "on-the-fly"
  // check datasheet for more info, or the comments in the
  // "...regs.h" file which specify which can be changed when.
  kxAccel.enableAccel(false);

  kxAccel.setRange(SFE_KX132_RANGE16G); // 16g Range
  // kxAccel.setRange(SFE_KX134_RANGE16G);         // 16g for the KX134

  kxAccel.enableDataEngine(); // Enables the bit that indicates data is ready.
  // kxAccel.setOutputDataRate(); // Default is 50Hz
  kxAccel.enableAccel();
  BLEDevice::init("Long name works now");
  BLEServer *pServer = BLEDevice::createServer();
  BLEService *pService = pServer->createService(SERVICE_UUID);
  BLECharacteristic *pCharacteristic = pService->createCharacteristic(
                                         CHARACTERISTIC_UUID,
                                         BLECharacteristic::PROPERTY_READ |
                                         BLECharacteristic::PROPERTY_WRITE
                                       );
  pCharacteristicAccX = pService->createCharacteristic(
                                         CHARACTERISTIC_ACCX_UUID,
                                         BLECharacteristic::PROPERTY_READ |
                                         BLECharacteristic::PROPERTY_WRITE
                                       );
  pCharacteristicAccY = pService->createCharacteristic(
                                         CHARACTERISTIC_ACCY_UUID,
                                         BLECharacteristic::PROPERTY_READ |
                                         BLECharacteristic::PROPERTY_WRITE
                                       );
pCharacteristicAccZ = pService->createCharacteristic(
                                         CHARACTERISTIC_ACCZ_UUID,
                                         BLECharacteristic::PROPERTY_READ |
                                         BLECharacteristic::PROPERTY_WRITE
                                       );
  pCharacteristic->setValue("Hello World says Neil");
  pService->start();
  // BLEAdvertising *pAdvertising = pServer->getAdvertising();  // this still is working for backward compatibility
  BLEAdvertising *pAdvertising = BLEDevice::getAdvertising();
  pAdvertising->addServiceUUID(SERVICE_UUID);
  pAdvertising->setScanResponse(true);
  pAdvertising->setMinPreferred(0x06);
  pAdvertising->setMinPreferred(0x12);
  BLEDevice::startAdvertising();
  Serial.println("Characteristic defined!");
}

void loop() {
  // put your main code here, to run repeatedly:
  if (kxAccel.dataReady())
  {
    float tempX = myData.xData;//gives the pCharacteristic the pointer insted of the value
    pCharacteristicAccX->setValue(tempX);//setValue takes uint8_t, uint16_t, uint32_t, int, float, double and string
    float tempY =myData.yData;
    pCharacteristicAccY->setValue(tempY);
    float tempZ = myData.zData;
    pCharacteristicAccZ->setValue(tempZ);
    kxAccel.getAccelData(&myData);
    Serial.print(tempX, 4);
    Serial.print("\t");
    Serial.print(tempY, 4);
    Serial.print("\t");
    Serial.println(tempZ, 4);
  }
  delay(100);// 100 ms
}
Option 1: Results
After uploading the code above you will receive values (m/s2) for the X, Y, and Z directions. If this is not working for you, press the reset button on both ESP32 devices. This application can work for various sensors, simply substitute the sensor libraries and convert the data outputs. You have officially created an IoT network!
Option 2: Displaying Data With a Python Graph
A simple, no-frills option for when you want to see your data graphically displayed and updated in real time.
Option 2: Hardware
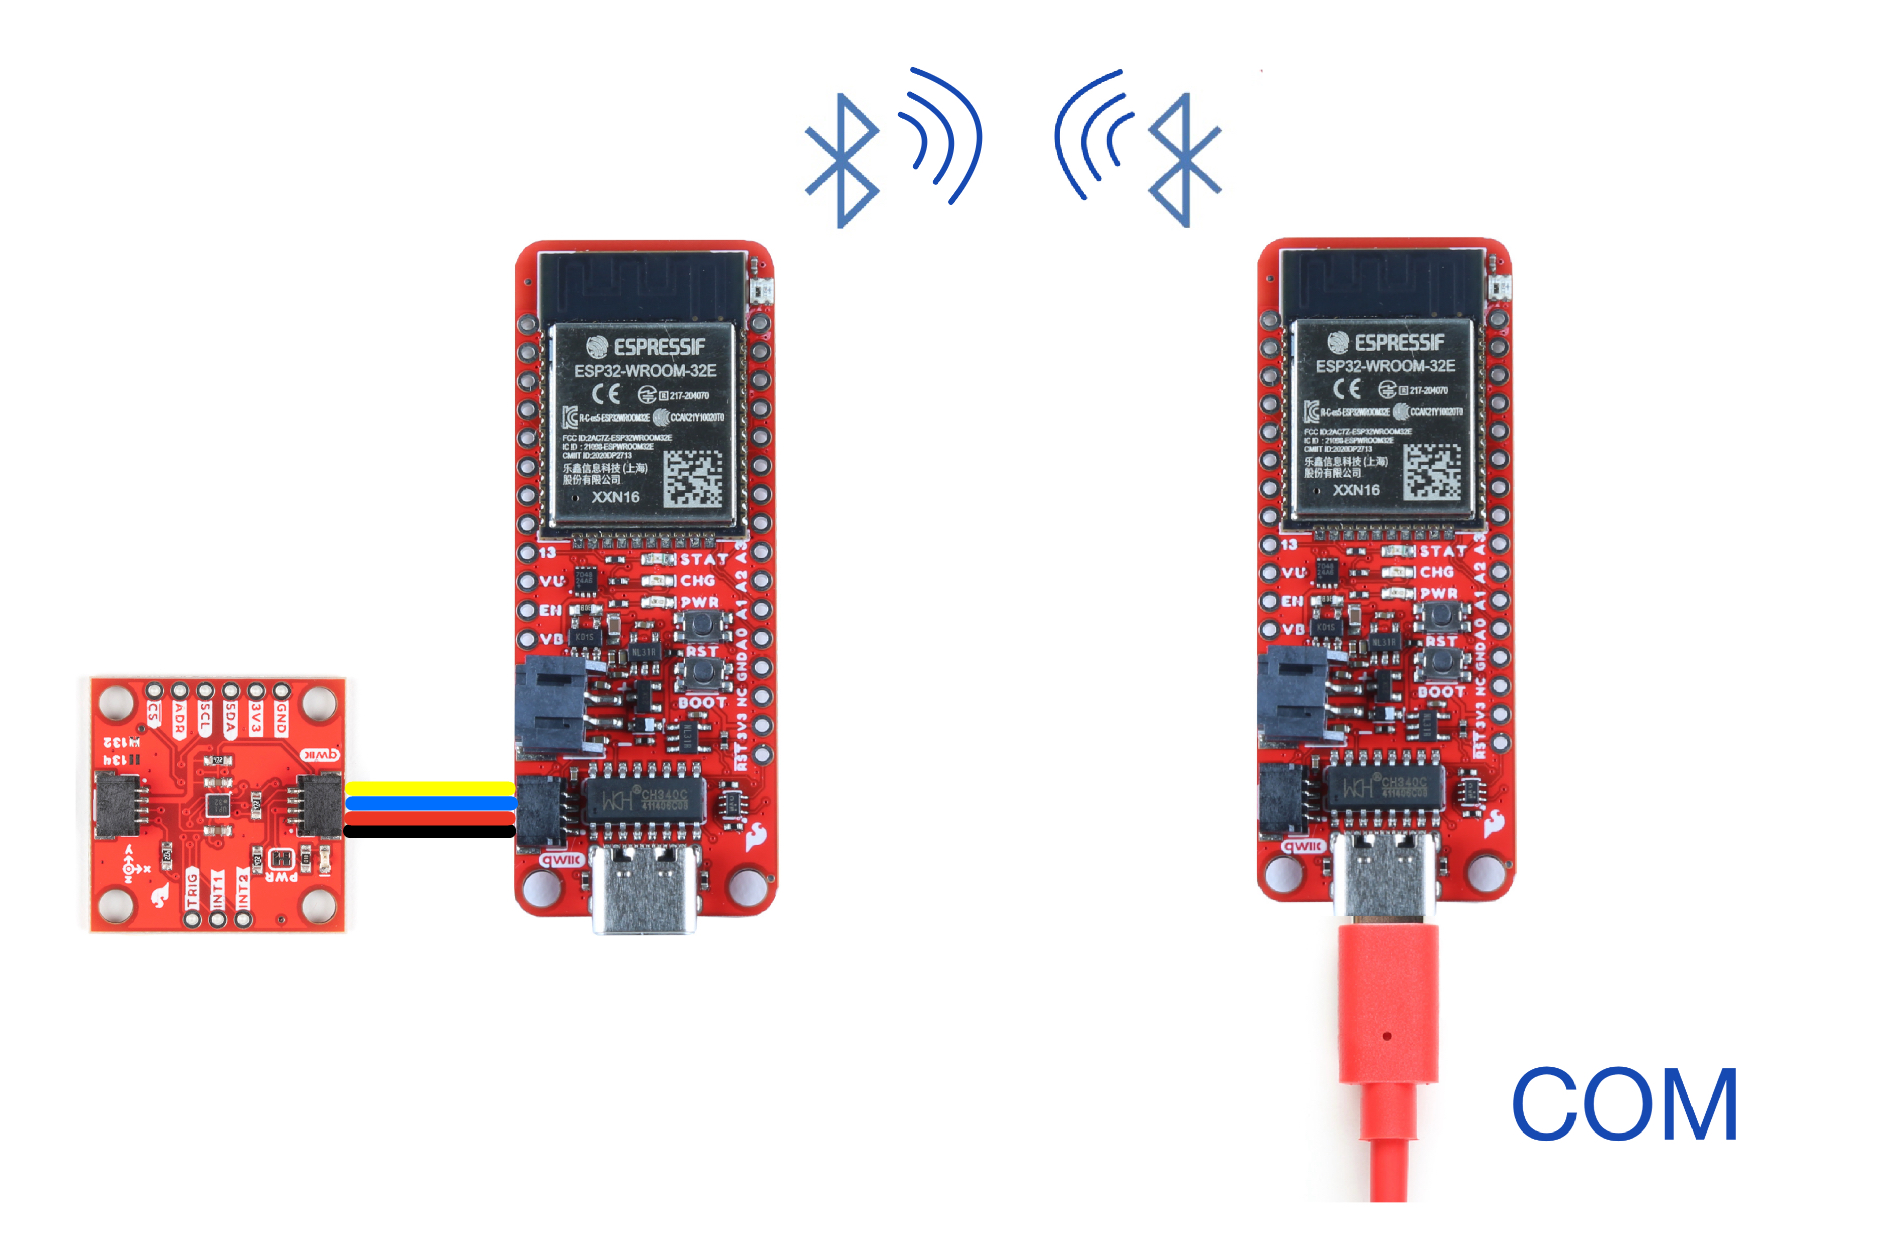
The set-up for Option 2 of this tutorial is fairly straightforward, simply connect the KX132 Triple Axis Accelerometer to the server ESP32 board via the Qwiic connection. You will also need to attach some form of power source to the client ESP32 board that is not connected to your computer.
Option 2: Uploading The Code
Designate one ESP32 as the client board and the other as the server.
Upload the following code to the client ESP32:
    /**
 * A BLE client example that is rich in capabilities.
 * There is a lot new capabilities implemented.
 * author unknown
 * updated by chegewara
 */

#include "BLEDevice.h"
//#include "BLEScan.h"

// The remote service we wish to connect to.
static BLEUUID serviceUUID("4fafc201-1fb5-459e-8fcc-c5c9c331914b");
// The characteristic of the remote service we are interested in.
static BLEUUID    charUUID("beb5483e-36e1-4688-b7f5-ea07361b26a8");
static BLEUUID    charAccXUUID("fb6cf981-31cc-4f36-af06-1f2f3e919840");// use the same UUID as on the server
static BLEUUID    charAccYUUID("35b17f66-73d1-4c92-92f6-9032ef1987d3");
static BLEUUID    charAccZUUID("3cab9341-e65b-46e9-83ed-c8a7f2f841c2");
//#define CHARACTERISTIC_ACC_UUID
static boolean doConnect = false;
static boolean connected = false;
static boolean doScan = false;
static BLERemoteCharacteristic* pRemoteCharacteristic;
static BLERemoteCharacteristic* pRemoteCharacteristicACCx;
static BLERemoteCharacteristic* pRemoteCharacteristicACCy;
static BLERemoteCharacteristic* pRemoteCharacteristicACCz;
static BLEAdvertisedDevice* myDevice;

static void notifyCallback(
  BLERemoteCharacteristic* pBLERemoteCharacteristic,
  uint8_t* pData,
  size_t length,
  bool isNotify) {
    Serial.print("Notify callback for characteristic ");
    Serial.print(pBLERemoteCharacteristic->getUUID().toString().c_str());
    Serial.print(" of data length ");
    Serial.println(length);
    Serial.print("data: ");
    Serial.println((char*)pData);
}

class MyClientCallback : public BLEClientCallbacks {
  void onConnect(BLEClient* pclient) {
  }

  void onDisconnect(BLEClient* pclient) {
    connected = false;
    Serial.println("onDisconnect");
  }
};

bool connectToServer() {
    Serial.print("Forming a connection to ");
    Serial.println(myDevice->getAddress().toString().c_str());

    BLEClient*  pClient  = BLEDevice::createClient();
    Serial.println(" - Created client");

    pClient->setClientCallbacks(new MyClientCallback());

    // Connect to the remove BLE Server.
    pClient->connect(myDevice);  // if you pass BLEAdvertisedDevice instead of address, it will be recognized type of peer device address (public or private)
    Serial.println(" - Connected to server");
    pClient->setMTU(517); //set client to request maximum MTU from server (default is 23 otherwise)

    // Obtain a reference to the service we are after in the remote BLE server.
    BLERemoteService* pRemoteService = pClient->getService(serviceUUID);
    if (pRemoteService == nullptr) {
      Serial.print("Failed to find our service UUID: ");
      Serial.println(serviceUUID.toString().c_str());
      pClient->disconnect();
      return false;
    }
    Serial.println(" - Found our service");

    // Obtain a reference to the characteristic in the service of the remote BLE server.
    pRemoteCharacteristic = pRemoteService->getCharacteristic(charUUID);
    if (pRemoteCharacteristic == nullptr) {
      Serial.print("Failed to find our characteristic UUID: ");
      Serial.println(charUUID.toString().c_str());
      pClient->disconnect();
      return false;
    }
    Serial.println(" - Found our characteristic");
    //ACC X Obtain a reference to the characteristic in the service of the remote BLE server.
    pRemoteCharacteristicACCx = pRemoteService->getCharacteristic(charAccXUUID);
    if (pRemoteCharacteristicACCx == nullptr) {
      Serial.print("Failed to find our characteristic UUID x: ");
      Serial.println(charAccXUUID.toString().c_str());
      pClient->disconnect();
      return false;
    }
    Serial.println(" - Found our characteristic");
 //ACC Y Obtain a reference to the characteristic in the service of the remote BLE server.
    pRemoteCharacteristicACCy = pRemoteService->getCharacteristic(charAccYUUID);
    if (pRemoteCharacteristicACCy == nullptr) {
      Serial.print("Failed to find our characteristic UUID y: ");
      Serial.println(charAccYUUID.toString().c_str());
      pClient->disconnect();
      return false;
    }
    Serial.println(" - Found our characteristic");
     //ACC Z Obtain a reference to the characteristic in the service of the remote BLE server.
    pRemoteCharacteristicACCz = pRemoteService->getCharacteristic(charAccZUUID);
    if (pRemoteCharacteristicACCz == nullptr) {
      Serial.print("Failed to find our characteristic UUID z: ");
      Serial.println(charAccZUUID.toString().c_str());
      pClient->disconnect();
      return false;
    }
    Serial.println(" - Found our characteristic");
    // Read the value of the characteristic.
    if(pRemoteCharacteristic->canRead()) {
      std::string value = pRemoteCharacteristic->readValue();
      Serial.print("The characteristic value was: ");
      Serial.println(value.c_str());
    }

    if(pRemoteCharacteristic->canNotify())
      pRemoteCharacteristic->registerForNotify(notifyCallback);

    connected = true;
    return true;
}
/**
 * Scan for BLE servers and find the first one that advertises the service we are looking for.
 */
class MyAdvertisedDeviceCallbacks: public BLEAdvertisedDeviceCallbacks {
 /**
   * Called for each advertising BLE server.
   */
  void onResult(BLEAdvertisedDevice advertisedDevice) {
    Serial.print("BLE Advertised Device found: ");
    Serial.println(advertisedDevice.toString().c_str());

    // We have found a device, let us now see if it contains the service we are looking for.
    if (advertisedDevice.haveServiceUUID() && advertisedDevice.isAdvertisingService(serviceUUID)) {

      BLEDevice::getScan()->stop();
      myDevice = new BLEAdvertisedDevice(advertisedDevice);
      doConnect = true;
      doScan = true;

    } // Found our server
  } // onResult
}; // MyAdvertisedDeviceCallbacks


void setup() {
  Serial.begin(115200);
  Serial.println("Starting Arduino BLE Client application...");
  BLEDevice::init("");

  // Retrieve a Scanner and set the callback we want to use to be informed when we
  // have detected a new device.  Specify that we want active scanning and start the
  // scan to run for 5 seconds.
  BLEScan* pBLEScan = BLEDevice::getScan();
  pBLEScan->setAdvertisedDeviceCallbacks(new MyAdvertisedDeviceCallbacks());
  pBLEScan->setInterval(1349);
  pBLEScan->setWindow(449);
  pBLEScan->setActiveScan(true);
  pBLEScan->start(5, false);
} // End of setup.


// This is the Arduino main loop function.
void loop() {

  // If the flag "doConnect" is true then we have scanned for and found the desired
  // BLE Server with which we wish to connect.  Now we connect to it.  Once we are
  // connected we set the connected flag to be true.
  if (doConnect == true) {
    if (connectToServer()) {
      Serial.println("We are now connected to the BLE Server.");
    } else {
      Serial.println("We have failed to connect to the server; there is nothin more we will do.");
    }
    doConnect = false;
  }

  // If we are connected to a peer BLE Server, update the characteristic each time we are reached
  // with the current time since boot.
  if (connected) {
    String newValue = "Time since boot: " + String(millis()/1000);
    //Serial.println("Setting new characteristic value to \"" + newValue + "\"");

    // Set the characteristic's value to be the array of bytes that is actually a string.
   // pRemoteCharacteristic->writeValue(newValue.c_str(), newValue.length());//***********JKO
  }else if(doScan){
    BLEDevice::getScan()->start(0);  // this is just example to start scan after disconnect, most likely there is better way to do it in arduino
  }


// read the Characteristics and store them in a variable
// This also makes the print command do float handling
float XValue = pRemoteCharacteristicACCx->readFloat();
float YValue = pRemoteCharacteristicACCy->readFloat();
float ZValue = pRemoteCharacteristicACCz->readFloat();
Serial.print(XValue);
Serial.print("\t");
Serial.print(YValue);
Serial.print("\t");
Serial.println(ZValue);

delay(100); // Delay a 100 ms between loops.
} // End of loop
Upload the following code to the server ESP32:
/*
    Based on Neil Kolban example for IDF: https://github.com/nkolban/esp32-snippets/blob/master/cpp_utils/tests/BLE%20Tests/SampleServer.cpp
    Ported to Arduino ESP32 by Evandro Copercini
    updates by chegewara
*/

#include <BLEDevice.h>
#include <BLEUtils.h>
#include <BLEServer.h>
#include <Wire.h>                 // Must include Wire library for I2C
#include <SparkFun_KX13X.h> // Click here to get the library: http://librarymanager/All#SparkFun_KX13X

SparkFun_KX132 kxAccel;
outputData myData; // Struct for the accelerometer's data
// See the following for generating UUIDs:
// https://www.uuidgenerator.net/

#define SERVICE_UUID        "4fafc201-1fb5-459e-8fcc-c5c9c331914b"
#define CHARACTERISTIC_UUID "beb5483e-36e1-4688-b7f5-ea07361b26a8"
#define CHARACTERISTIC_ACCX_UUID "fb6cf981-31cc-4f36-af06-1f2f3e919840"
#define CHARACTERISTIC_ACCY_UUID "35b17f66-73d1-4c92-92f6-9032ef1987d3"
#define CHARACTERISTIC_ACCZ_UUID "3cab9341-e65b-46e9-83ed-c8a7f2f841c2"
// makes the chracteristic globlal
static BLECharacteristic *pCharacteristicAccX;
static BLECharacteristic *pCharacteristicAccY;
static BLECharacteristic *pCharacteristicAccZ;
void setup() {

  Serial.begin(115200);
  Serial.println("Starting BLE work!");
  Wire.begin();
  //connect the accelerometer to the board using qwiic cables
  if (!kxAccel.begin())
  {
    Serial.println("Could not communicate with the the KX13X.");
    while (1)
      ;
  }
   if (kxAccel.softwareReset())
    Serial.println("Reset.");

  // Give some time for the accelerometer to reset.
  // It needs two, but give it five for good measure.
  delay(5);

  // Many settings for KX13X can only be
  // applied when the accelerometer is powered down.
  // However there are many that can be changed "on-the-fly"
  // check datasheet for more info, or the comments in the
  // "...regs.h" file which specify which can be changed when.
  kxAccel.enableAccel(false);

  kxAccel.setRange(SFE_KX132_RANGE16G); // 16g Range
  // kxAccel.setRange(SFE_KX134_RANGE16G);         // 16g for the KX134

  kxAccel.enableDataEngine(); // Enables the bit that indicates data is ready.
  // kxAccel.setOutputDataRate(); // Default is 50Hz
  kxAccel.enableAccel();
  BLEDevice::init("Long name works now");
  BLEServer *pServer = BLEDevice::createServer();
  BLEService *pService = pServer->createService(SERVICE_UUID);
  BLECharacteristic *pCharacteristic = pService->createCharacteristic(
                                         CHARACTERISTIC_UUID,
                                         BLECharacteristic::PROPERTY_READ |
                                         BLECharacteristic::PROPERTY_WRITE
                                       );
  pCharacteristicAccX = pService->createCharacteristic(
                                         CHARACTERISTIC_ACCX_UUID,
                                         BLECharacteristic::PROPERTY_READ |
                                         BLECharacteristic::PROPERTY_WRITE
                                       );
  pCharacteristicAccY = pService->createCharacteristic(
                                         CHARACTERISTIC_ACCY_UUID,
                                         BLECharacteristic::PROPERTY_READ |
                                         BLECharacteristic::PROPERTY_WRITE
                                       );
pCharacteristicAccZ = pService->createCharacteristic(
                                         CHARACTERISTIC_ACCZ_UUID,
                                         BLECharacteristic::PROPERTY_READ |
                                         BLECharacteristic::PROPERTY_WRITE
                                       );
  pCharacteristic->setValue("Hello World says Neil");
  pService->start();
  // BLEAdvertising *pAdvertising = pServer->getAdvertising();  // this still is working for backward compatibility
  BLEAdvertising *pAdvertising = BLEDevice::getAdvertising();
  pAdvertising->addServiceUUID(SERVICE_UUID);
  pAdvertising->setScanResponse(true);
  pAdvertising->setMinPreferred(0x06);
  pAdvertising->setMinPreferred(0x12);
  BLEDevice::startAdvertising();
  Serial.println("Characteristic defined!");
}

void loop() {
  // put your main code here, to run repeatedly:
  if (kxAccel.dataReady())
  {
    float tempX = myData.xData;//gives the pCharacteristic the pointer insted of the value
    pCharacteristicAccX->setValue(tempX);//setValue takes uint8_t, uint16_t, uint32_t, int, float, double and string
    float tempY =myData.yData;
    pCharacteristicAccY->setValue(tempY);
    float tempZ = myData.zData;
    pCharacteristicAccZ->setValue(tempZ);
    kxAccel.getAccelData(&myData);
    Serial.print(tempX, 4);
    Serial.print("\t");
    Serial.print(tempY, 4);
    Serial.print("\t");
    Serial.println(tempZ, 4);
  }
  delay(100);// 100 ms
}
You will also need to run this Python script, which uses matplotlib to give a live plot of your data, so you can monitor at a glance.
import serial.tools.list_ports as port_list
import serial
import numpy as np
import matplotlib.pyplot as plt
import re
import threading
import time

comPort = "";
np.set_printoptions(precision=5, suppress=True)

ports = list(port_list.comports())
for p in ports:
    print ("Found Device on "+p[0]+" - "+p[1])
    if 'USB-SERIAL CH340' in p[1]:
       comPort = p[0]
       print ("Thing Plus on "+p[0]+" - "+p[1])

serialPort = serial.Serial(port=comPort, baudrate=115200)

serialString = ""  # Used to hold data coming over UART

dataGrid = []
dataGrid = np.empty([1,3])
#plt.ioff()
#plt.show()
class PHThread (threading.Thread):
   def __init__(self, threadID, name):
      threading.Thread.__init__(self)
      self.threadID = threadID
      self.name = name
   def run(self):
      print( "Starting " + self.name)
      PlotHandler()
      print( "Exiting " + self.name)
class DCThread (threading.Thread):
   def __init__(self, threadID, name):
      threading.Thread.__init__(self)
      self.threadID = threadID
      self.name = name
   def run(self):
      print( "Starting " + self.name)
      DataCollector()
      print( "Exiting " + self.name)

def PlotHandler():
    while 1:
        plt.plot(np.array([3, 8, 1, 10]),'-r')
        #plt.plot(dataGrid[:,1],'-g')
        #plt.plot(dataGrid[:,2],'-b')
        plt.title("ACC data")
        plt.xlabel("Data")
        plt.ylabel("Samples")
        plt.grid()
        plt.show(block=False)
        time.sleep(0.1)

def DataCollector():
    data = np.zeros(450)
    while 1:
        # Wait until there is data waiting in the serial buffer
        if serialPort.in_waiting > 0:
            # Read data out of the buffer until a carraige return / new line is found
            serialString = serialPort.readline()
            # Print the contents of the serial data
            try:
                str = serialString.decode("Ascii").rstrip()
            except:
                pass

            fields = str.split('\t')
            nums = [float(fields[0]), float(fields[1]), float(fields[2])]
            data = np.append(data,nums,axis=0)
            if(np.shape(data)[0] > 450):
                data = data[-450:]
            # Print the contents of the serial data
            #print(str)
            #print(data)
            global dataGrid
            dataGrid = data.reshape(-1,3)


#try:
#PH = PHThread(1,"PH")
#PH.start()
DC = DCThread(2,"DC")
DC.start()
#except:
 #   print( "Error: unable to start thread")

while 1:
    plt.clf()
    plt.ylim(-3,3)
    plt.xlim(0,160)
    plt.plot(dataGrid[:,0],'-r',label = 'x')
    plt.plot(dataGrid[:,1],'-g',label = 'y')
    plt.plot(dataGrid[:,2],'-b',label = 'z')
    plt.plot(150,dataGrid[-1,0], 'or',markersize = 7)
    plt.plot(150,dataGrid[-1,1], '*g',markersize = 7)
    plt.plot(150,dataGrid[-1,2], 'Xb',markersize = 7)
    plt.title("ACC data")
    plt.xlabel("Samples")
    plt.ylabel("G-force")
    plt.legend()
    #plt.grid()
    plt.show(block=False)
    plt.pause(0.05)
    #time.sleep(0.1)
This example code is geared specifically towards our hardware setup. For another example of a live-updating Python graph, check out this tutorial.
Option 2: Results
Running this python script with the sensor hooked up via Bluetooth gives us this live updating graphs, that can show you visually what your accelerometer is experiencing. While this is a simple template, using the live updating plot is a great way to emulate the dashboard experience without paying for a license with room for personal customization.
Option 3: Displaying Data With a Phone
Utilizing your phone as a dashboard is a convenient way to display data. There’s no sense in carting around a laptop when a smartphone can easily fit in the palm of your hand.
Option 3: Hardware
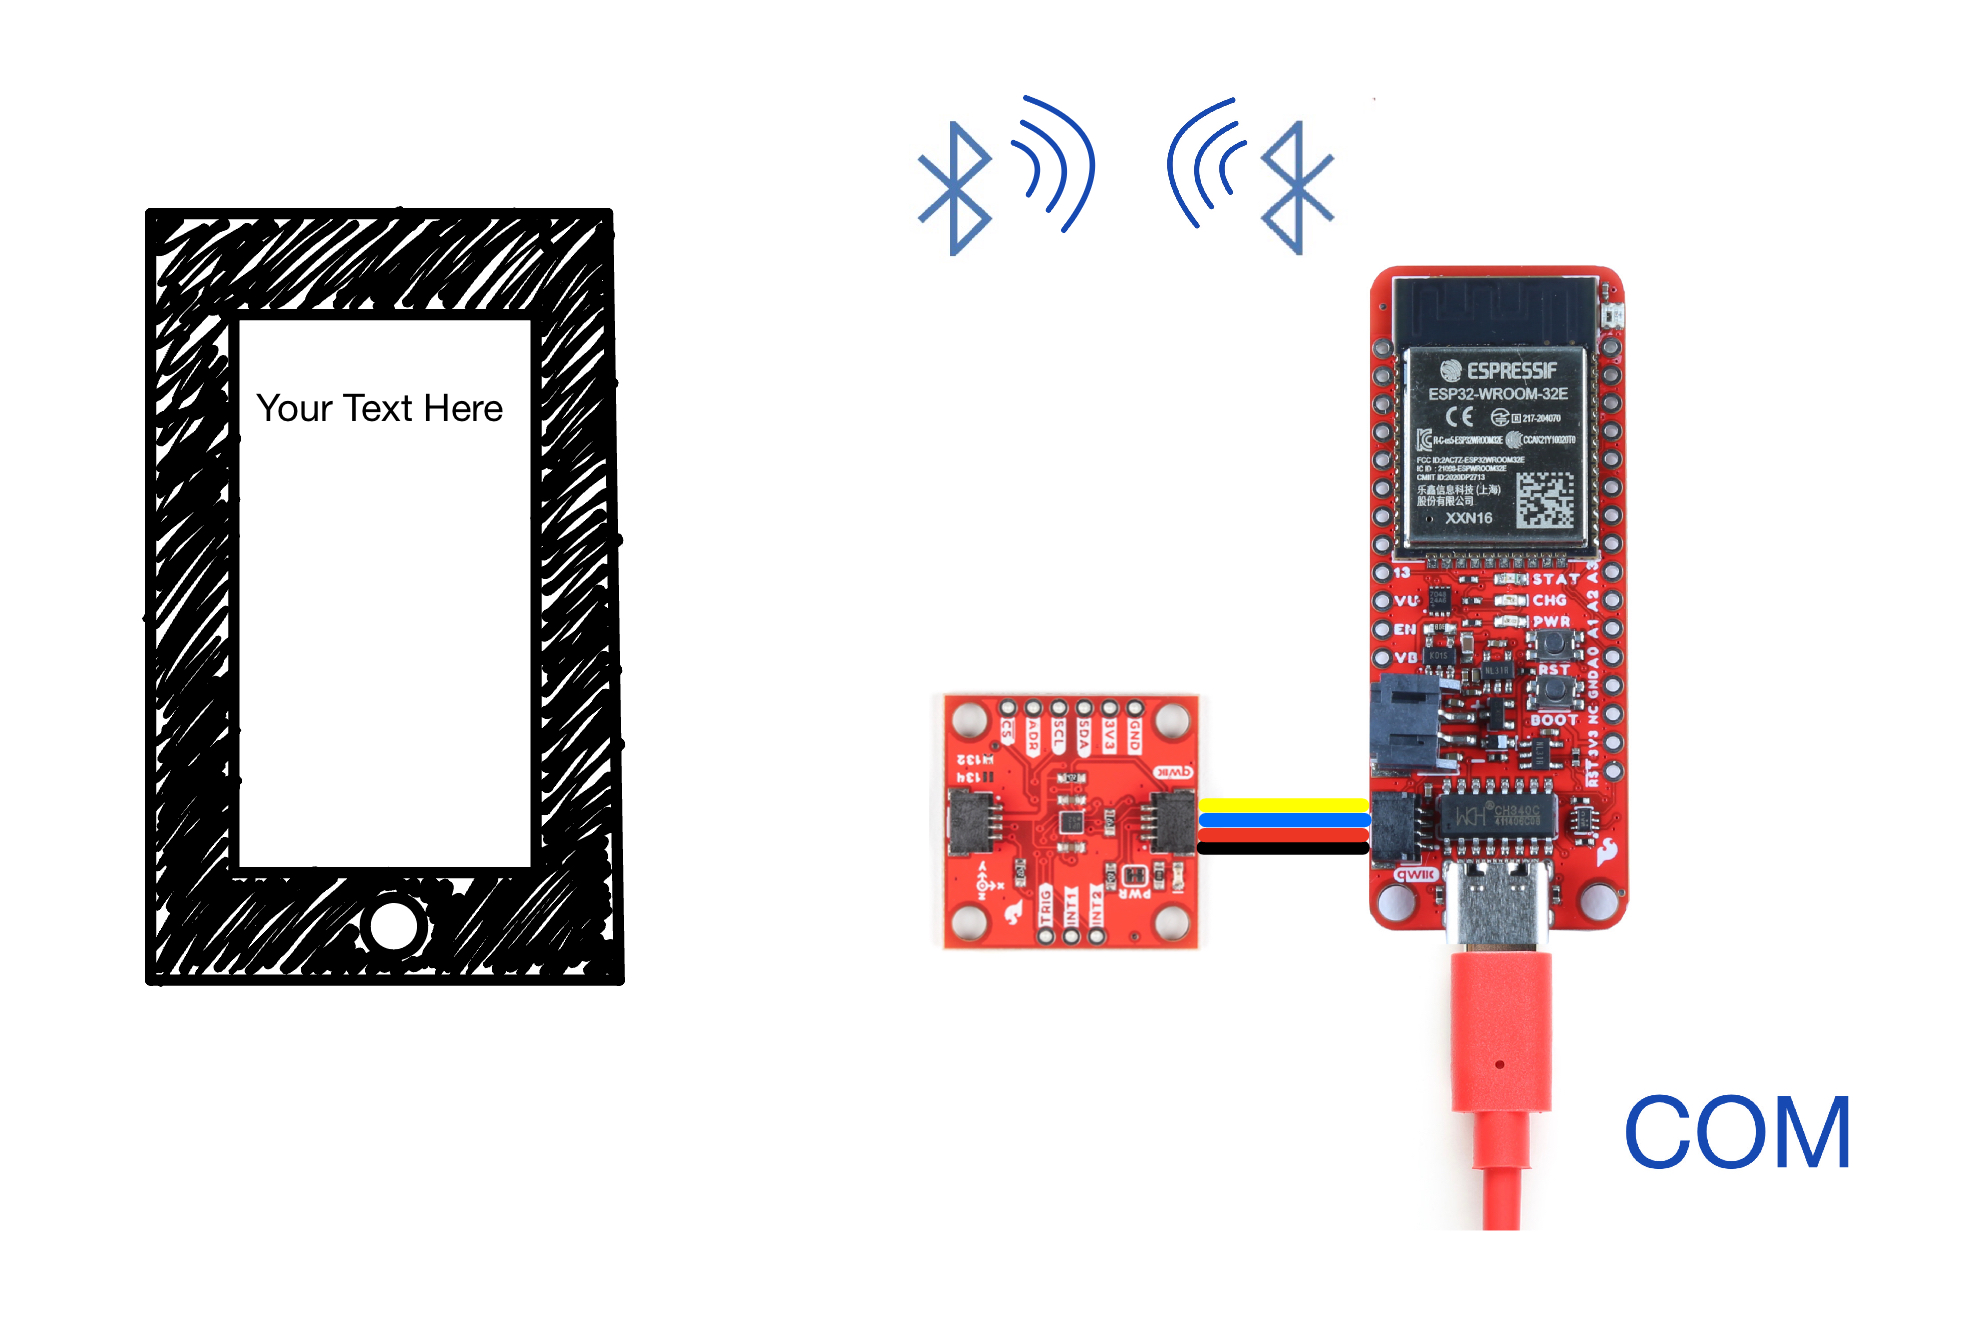
Option 2 of this tutorial attaches an accelerometer to an ESP32 board that is connected to your computer. Following the instructions for this option also requires that you have a mobile device with a BLE app installed.
Option 3: Uploading The Code
Upload the following code to your ESP32 Thing Plus C:
#include "BluetoothSerial.h"
#include <Wire.h>
#include <SparkFun_KX13X.h> // Click here to get the library: http://librarymanager/All#SparkFun_KX13X

SparkFun_KX132 kxAccel;
outputData myData; // Struct for the accelerometer's data

/* Check if Bluetooth configurations are enabled in the SDK */
/* If not, then you have to recompile the SDK */
#if !defined(CONFIG_BT_ENABLED) || !defined(CONFIG_BLUEDROID_ENABLED)
#error Bluetooth is not enabled! Please run `make menuconfig` to and enable it
#endif
BluetoothSerial SerialBT;

float tempX = 0.0; //gives the characteristic the pointer instead of the value
float tempY = 0.0;
float tempZ = 0.0;
String FullString = "";

void setup() {
  Serial.begin(115200);
  Wire.begin();

  SerialBT.begin(" SparkFun Server");
  Serial.println("Bluetooth Started! Ready to pair...");

  //connect the accelerometer to the board using qwiic cables
  if (!kxAccel.begin())
  {
    Serial.println("Could not communicate with the the KX13X.");
    while (1)
      ;
  }
   if (kxAccel.softwareReset())
    Serial.println("Reset.");

  // Give some time for the accelerometer to reset.
  // It needs two, but give it five for good measure.
  delay(5);

  // Many settings for KX13X can only be
  // applied when the accelerometer is powered down.
  // However there are many that can be changed "on-the-fly"
  // check datasheet for more info, or the comments in the
  // "...regs.h" file which specify which can be changed when.
  kxAccel.enableAccel(false);

  kxAccel.setRange(SFE_KX132_RANGE16G); // 16g Range
  // kxAccel.setRange(SFE_KX134_RANGE16G);         // 16g for the KX134

  kxAccel.enableDataEngine(); // Enables the bit that indicates data is ready.
  // kxAccel.setOutputDataRate(); // Default is 50Hz
  kxAccel.enableAccel();
}

void loop() {
  if (kxAccel.dataReady())
  {
    tempX = myData.xData;//gives the pCharacteristic the pointer insted of the value
    tempY =myData.yData;
    tempZ = myData.zData;
    kxAccel.getAccelData(&myData);
  }
  FullString = "X = " + String(tempX,3) + " Y = " + String(tempY,3) + " Z = "+ String(tempZ,3) + "\r\n";
  for(int i = 0; i < FullString.length(); i++)
  {
    SerialBT.write(FullString.c_str()[i]);
    Serial.write(FullString.c_str()[i]);
  }
  delay(20);
}
Next, download a BLE app. We used "Serial Bluetooth Terminal", which can be found here on the Google Play Store. If you have a different phone OS, there are many apps like it available for different phones. Connect to your ESP32 over Bluetooth through your BLE app.
Option 3: Results
Our accelerometer gave a live datafeed to the cell phone through the app. Establishing a connection to a phone using Bluetooth is a great jumping off point for countless applications.
Troubleshooting
If you’re having trouble uploading code to either of the ESP32 boards, ensure that the CH340C driver is installed correctly by following the instructions outlined in Step One of this tutorial. You should also ensure that “Sparkfun ESP32 Thing Plus C” is the selected board. You can confirm this by clicking on the “Tools” tab at the top of the Arduino IDE and then looking to see what the “Board” is listed as. Note that there are multiple boards with names that are similar to “Sparkfun ESP32 Thing Plus C”. Take care to choose the correct board.
Resources and Going Further
Given a few modifications to the code, this project can be adjusted to accommodate a wide variety of sensors. Instead of the KX132 Triple Axis Accelerometer, try sending data from STTS22H Temperature Sensor or the SGP40 Air Quality Sensor! Collecting and storing data over a longer period of time could also be a useful extension of this project
The following tutorials may also be useful:
I2C
Bluetooth Basics
Triple Axis Accelerometer Breakout - KX13x (Qwiic) Hookup Guide
ESP32 Thing Plus (USB-C) Hookup Guide
Recognition
This tutorial was developed by a team of high school students from The Innovation Center at St. Vrain Valley School District. Special thanks to Frances Hudson, Aidan Lawall, and Jonathan Otte for their work on this tutorial. The Innovation Center is an educational center in Longmont, CO that connects students to real-world experiences in aviation, engineering, media production, and more.