DeadOn RTC Breakout Hookup Guide
 jimblom
Using the SparkFun DS3234 Arduino Library
We've written an Arduino library for the DS3234, which takes care of all of the SPI communication, bit-shifting, register-writing, and clock-managing; it even sets the time of your RTC automatically! Grab the most recent version of the library from our SparkFun_DS3234_RTC_Arduino_Library GitHub repository, or click the link below:
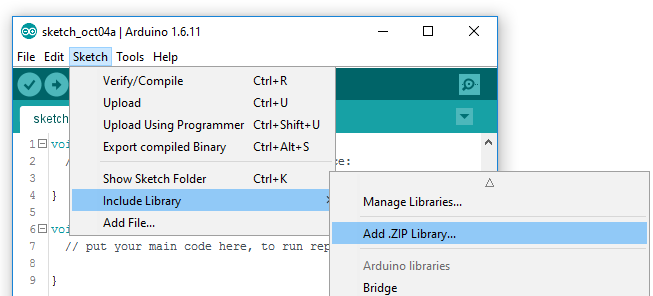
Then follow along with our How to Install an Arduino Library tutorial for help installing the library. If you download the library's ZIP file, you can use Arduino's "Add ZIP Library..." feature to install the source and example files with just a couple clicks.
Using the DS3234_RTC_Demo Example
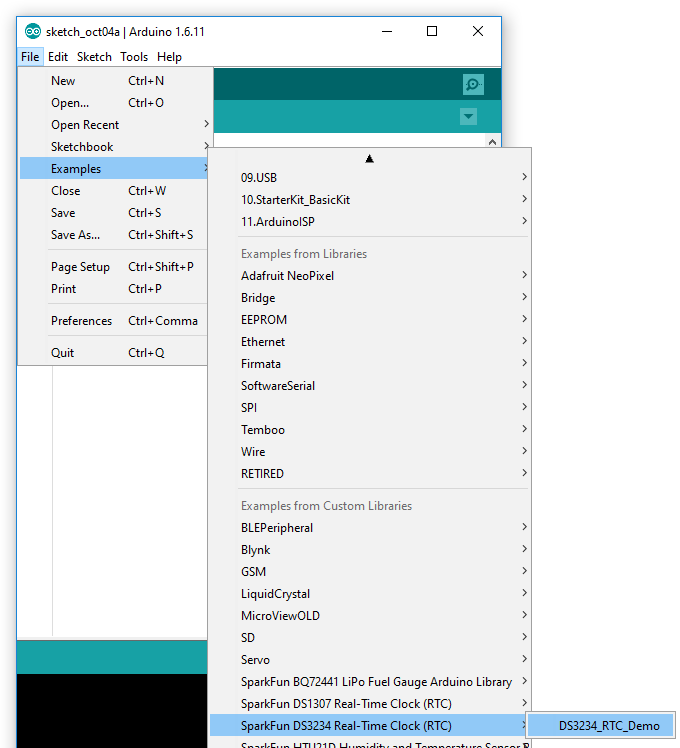
Once you've downloaded the library, open the DS3234_Demo by navigating to File > Examples > SparkFun DS3234 Real Time Clock (RTC) > DS3234_RTC_Demo:
If you don't have the SQW pin connected -- used in this example as the alarm interrupt -- comment out the #define INTERRUPT_PIN 2 line, toward the top of the sketch. The loop will instead poll the DS3234 for the alarm status.
Make sure your board and port are set correctly and upload! Then click over to the Serial Monitor. Make sure the baud rate is set to 9600 bps, and you should begin to see the seconds fly by:
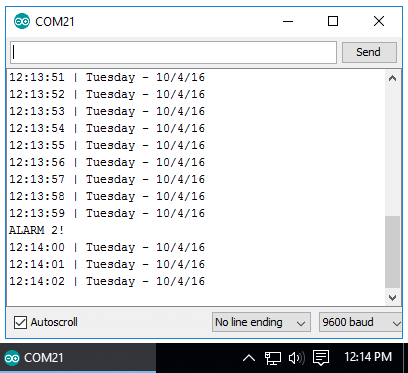
The alarms are configured to ring every thirty seconds -- alarm 2 triggering at the top of the minute, and alarm 1 triggering at 30-seconds on the minute.
Using the SparkFun DS3234 Arduino Library
The example demonstrates almost all of the DS3234's functionality. Here's a quick primer on how to incorporate the library into your project:
Initialization
To begin, make sure you include the SparkFunDS3234RTC.h library. Above that, you'll need to include SPI.h the Arduino SPI library:
language:c
#include <SPI.h>
#include <SparkFunDS3234RTC.h>
The DS3234 library defines an object conveniently named rtc to access all of the functions and data of the RTC module. To initialize the RTC, begin by calling the rtc.begin(<cs_pin>) function in your setup() area:
language:c
#define DS13074_CS_PIN 10

void setup()
{
    ...
    rtc.begin(DS13074_CS_PIN);
    ...
}
The begin() function takes one parameter -- the SPI slave-select pin, "SS." In our example circuit we connected SS to Arduino pin 10, though it can be connected to any other pin.
Setting the Time
Once the RTC is initialized, you can set the RTC's time. There are a few options here. We recommend using either the rtc.autoTime() function, which sets the RTC's clock your computer's date and time (based on the time of compilation), or rtc.setTime(<second>, <minute>, <hour>, <day>, <date>, <month>, <year>), which allows you to precisely set the clock.
The demo example defaults to using rtc.autoTime(), which sets your RTC's time and date to your computer's time and date. It may end up being a handful of seconds off, as time continues ticking while the code is uploaded.
Set and Forget!
Once the RTC's time and date register have been set – using either the autoTime or setTime functions – you may never have to set the clock again!
Consider commenting out the autoTime or setTime entirely once you've perfectly configured the clock.
If you want to manually set the time, use the setTime() function. For example:
language:c
// Set to 13:37:42 (1:37:42 PM)
int hour = 13;
int minute = 37;
int second = 42;
// Set to Monday October 31, 2016:
int day = 2; // Sunday=1, Monday=2, ..., Saturday=7.
int date = 31;
int month = 10;
int year = 16;

rtc.setTime(second, minute, hour, day, date, month, year);
12-Hour Mode
The RTC defaults to 24-hour mode, but does support 12-hour mode with an AM/PM bit. If you’d like to use 12-hour mode, simply call rtc.set12Hour() (or rtc.set24Hour() to switch back to 24-hour mode).
To set the time in 12-hour mode, an extra parameter – AM or PM – should be added after ther `hour` variable. For example:
setTime(14, 42, 7, PM, 1, 28, 12, 16); // Set time to 7:42:14 PM, Sunday December, 28
Reading the Time
Once the clock is set, it will automatically begin incrementing second-by-second, minute-by-minute, year-by-year. To read the time and date values, begin by calling rtc.update(). This will command the DS3234 to read all of its data registers in one, fell swoop.
After the RTC data is updated, you can read those updated values by calling rtc.hour(), rtc.minute(), rtc.second(), etc. For example:
language:c
rtc.update(); / Update RTC data

// Read the time:
int s = rtc.second();
int m = rtc.minute();
int h = rtc.hour();

// Read the day/date:
int dy = rtc.day();
int da = rtc.date();
int mo = rtc.month();
int yr = rtc.year();
"Day" is the "day of the week", e.g. Sunday, Monday, Tuesday... rtc.day() returns an integer between 1 and 7, where 1 is Sunday and 7 is Saturday (sorry week-starts-on-Monday truthers). Alternatively, you can call rtc.dayChar() or rtc.dayStr(), which return a character or full-string representation of the day of the week.
Setting/Reading Alarms
The DS3234's pair of alarms can be set with the setAlarm1(<second>, <minute>, <hour>, <date>, <day/date>) and setAlarm2(<minute>, <hour>, <date>, <day/date>) functions. Alarm 1's resolution can go as low as seconds, while Alarm 2 is limited to minutes.
All variables in the setAlarm functions are optional. If they're not explicitly set, a variable will default to 255, and will be masked out of the alarm checking. An alarm triggers whenever any of its non-masked-out variables exactly match the current time and/or day/date.
Here are a few alarm-setting examples, to show off how the functions can be used:
language:c
// With no values passed, the alarms will trigger every second/minute:
setAlarm1(); // Alarm 1 triggers every second
SetAlarm2(); // Alarm 2 triggers every minute
// With one value passed, the alarms will trigger on second/minute matches:
setAlarm1(25); // Alarm 1: whenever SECONDS are 25 (e.g. 2:01:25, 2:02:25, etc...)
setAlarm2(45); // Alarm 2: whenever MINUTES are 45 (e.g. 13:45, 14:45, etc...)
// With two values passed, alarms will trigger on second/minute or minute/hour matches:
setAlarm1(19, 15); // Alarm 1: whenever SECONDS are 19 and MINUTES 15 (e.g. XX:15:19)
setAlarm2(0, 30); // Alarm 2: midnight:30
// Three values passed: Alarm 1 triggers at specific time, Alarm 2 triggers at time/day-of-month
setAlarm1(17, 33, 19); // Alarm 1: 19:33:17 (7:33:17 PM)
setAlarm2(0, 1, 2); // Alarm 2: 1:00 on the 2nd day of the month
// Four values passed:  Alarm 1 triggers at specific time/day-of-month, Alarm 2 triggers at time/day-of-week
setAlarm1(11, 11, 11, 19); // Alarm 1: 11:11:11 on the 19th day of the month
setAlarm2(17, 7, 1, true); // Alarm 2: 7:17:00 on a Monday (1)
// If last parameter in alarm 1 or alarm 2 is true, it will alarm on a weekday match
setAlarm1(4, 5, 6, 7, true); // Alarm 1: 6:05:04 on Saturday (7)
Alarming in 12-Hour Mode
If you're using the DS3234 in 12-hour mode, you'll need to add an AM or PM after the `hour` variable. For example:
setAlarm1(45, 30, 2, PM); // Set alarm 1 for 2:30:45 PM
setAlarm2(0, 6, AM; // Set alarm 2 for 6:00 AM
To monitor the state of either alarm, call the rtc.alarm1() and rtc.alarm2() functions. These will check a status flag in the DS3234 and return true if the alarm has triggered.
language:c
if (rtc.alarm1())
    Serial.println("ALARM 1 is triggered!");
if (rtc.alarm2())
    Serial.println("ALARM 2 is triggered!");
Finally, to use the SQW pin as an interrupt, call the rtc.enableAlarmInterrupt(); function. The interrupt is active-low, which means you'll want to pull the pin high through a resistor (or an internal pull-up). When the pin reads low, an interrupt has occurred, which means its time to read either/both of the alarm() functions.
For more on using the SparkFun DS3234 Arduino Library consider reading through the header file, which documents all of the Arduino sketch-available functions.