Connecting Thing Plus Matter to Google Nest Hub
Google Nest Hub Matter Device Setup
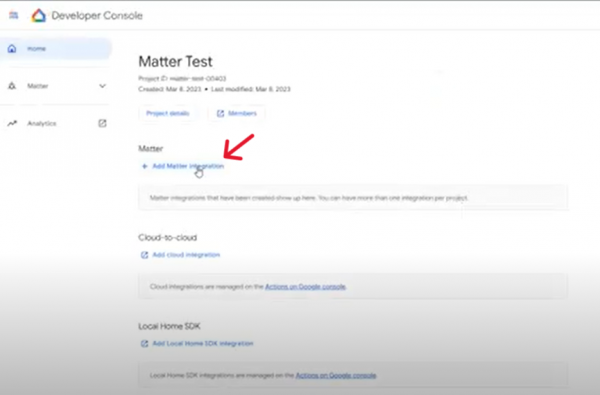
And that’s it for the Thing Plus Matter side of things, so let’s talk about getting your Google Nest Hub set up! You’ll want to go to your Google Home Console and sign in with the same account that your hub is connected to. Once you’re logged in, go ahead and create a project. This will pull up a page to either add this project to an existing one, or create a new one; we’re going to create a new one and name it something fun, like ‘Matter Test’. With our project created, we’re going to select ‘Add Matter Integration’ inside the Developer Console.
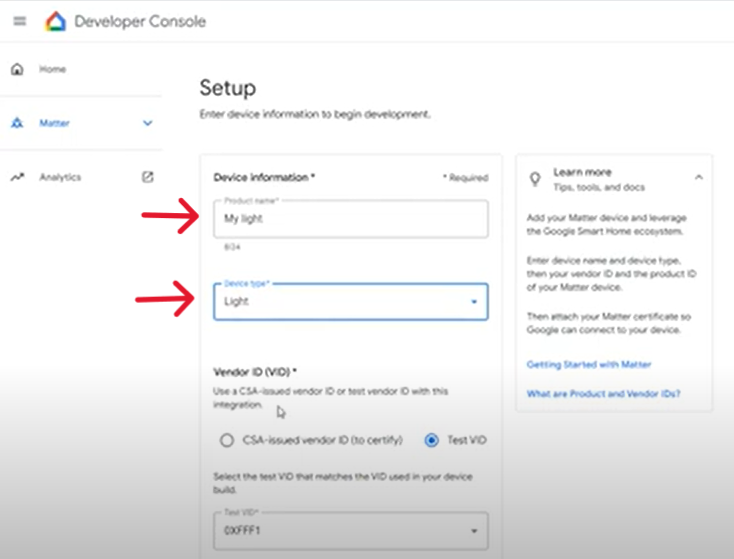
From there, we’ll need to enter some device information to the setup page. First, a fancy name for it and the type of device we’re creating, which in this case is a light.
We also need to include a Test Vendor ID (VID) and Product ID (PID) for our device. To locate these, open up your preferred serial terminal (for this demo, we used PuTTY) with your board connected via USB. Select the COM port for your board, set the baud rate to 115200 and the connection type as Serial, then open up the terminal.
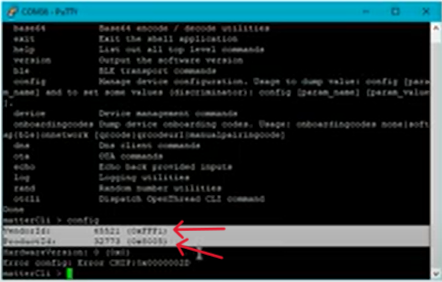
Once inside, type in ‘help’ and hit enter. This will produce a list of commands available to you, of which we will be using ‘config’, so go ahead and type that in next.
This will output our VID and PID, which you can now input into the device setup page on the Google Home Developer Console (we’ll be using the hexadecimal values). With that done, we can hit ‘Continue’ and move on! There will be a page brought up where you can customize the images for your device, but we’re just going to leave it as is for now.
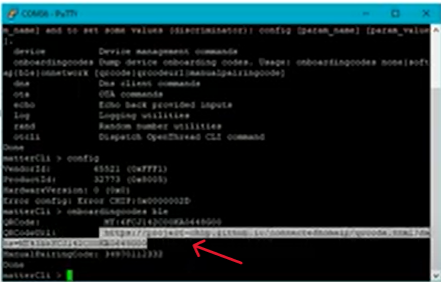
Since we’ve got it open, we’ll go ahead and input ‘onboardingcodes ble’ into our serial terminal. This will output a link to a QR code for the test certificate to our board. Copy that link and throw it into a web browser; we’ll need it later. If, for some reason, you are unable to acquire the link via serial terminal, it is available here!
Woohoo! Almost there! Next we need to commission our Thing Plus Matter to the Google Nest Hub; to do this, go ahead and get your Android device paired with the hub. Once that’s done, open up the Google Home app and click the ‘+’ in the top left corner, then select ‘Setup a Device’. Create a new device and select which home your Google Nest Hub is connected to; this will prompt a bluetooth scan to start running. This scan can be a bit finicky sometimes, so if for some reason it does not detect your device, you will be prompted to select a device type: select ‘Matter Enabled Device’ and scan the QR code we pulled up earlier. The commissioning process will automatically begin at this point, and takes about a minute or so to wrap up. Once connected, select a room and set a name for the device; this should complete the setup process and the device should appear as a light both in your Google Home app and on the Nest Hub, and you will be able to control the onboard LED from either of those devices!


