Basic Servo Control for Beginners
 El Duderino
Controlling a Servo with Arduino and Servo Library
Our second example circuit requires much less assembly and no soldering but it involves uploading and using code with the Arduino IDE. If you are not familiar with Arduino or do not have it installed on your computer, take a look through the guides below to install the IDE and get started with Arduino.
What is an Arduino?
Installing Arduino IDE
The SparkFun RedBoard Qwiic will act as our servo motor driver and controller using Pulse-Width Modulation (PWM).
Required Materials
To follow along with this example, you will need the materials listed below. Depending on what parts you already have or if you would like to use another development board or servo, you may want to adjust the items in your cart.
Hardware Assembly
All we need to do for this circuit is connect our Servo Motor to our RedBoard like the diagram below demonstrates:
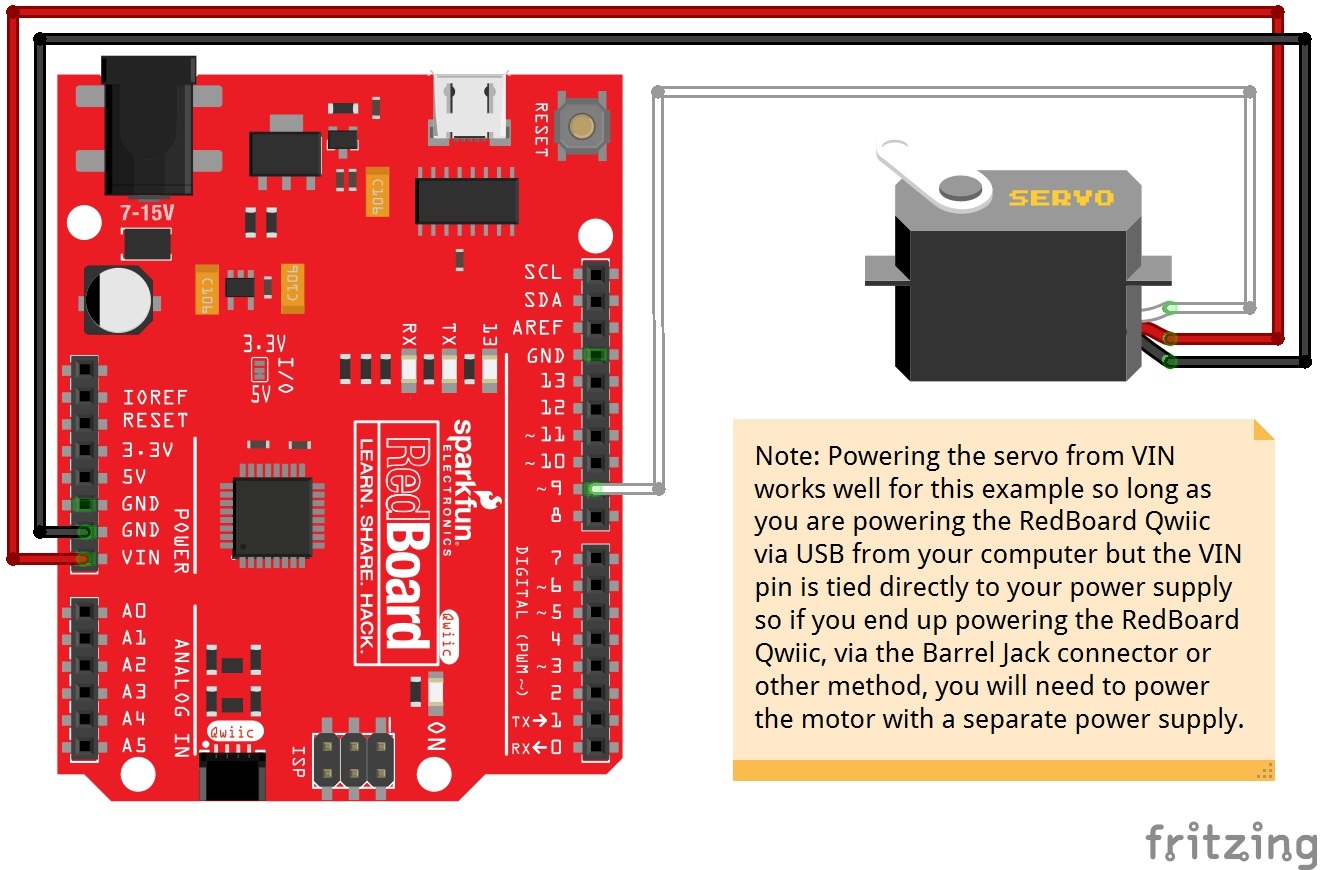
Though setting this circuit up is very simple since we are just using three pins on our RedBoard Qwiic, note that the Servo's power pin is connected to VIN and not 5V. The 5V pin can only source up to 250mA which is not enough to drive most servos so we use the VIN pin instead.
Arduino Code
Once you have your circuit wired up, it's time to upload some code! Connect your RedBoard (or other development board) to your computer with a USB cable and take note of the Port it shows up on. Now, open the Arduino IDE, copy the code below and paste it into a new sketch (making sure to delete the default code template).
Next, we need to select the board type (in this case Arduino/Genuino Uno) and COM port that the board enumerated to in the Tools menu. Then click the "Upload" button. If there were no errors during compilation and uploading, you should now see your servo moving back and forth.
language:c
/******************************************************************************
servo-sketch.ino
Example sketch for connecting a servo to a SparkFun RedBoard
  Servo Motor: (https://www.sparkfun.com/products/11965)
  SparkFun RedBoard: (https://www.sparkfun.com/products/13975)
Byron Jacquot@ SparkFun Electronics
May 17, 2016

**SparkFun code, firmware, and software is released under the MIT License(http://opensource.org/licenses/MIT).**

Development environment specifics:
Arduino 1.6.5
******************************************************************************/

#include <Servo.h>

Servo my_servo;

uint32_t next;

void setup()
{
  // the 1000 & 2000 set the pulse width
  // mix & max limits, in microseconds.
  // Be careful with shorter or longer pulses.
  my_servo.attach(9, 1000, 2000);

  next = millis() + 500;
}

void loop()
{
  static bool rising = true;

  if(millis() > next)
  {
    if(rising)
    {
      my_servo.write(180);
      rising = false;
    }
    else
    {
      my_servo.write(0);
      rising = true;
    }

    // repeat again in 3 seconds.
    next += 3000;
  }

}
Tips and Troubleshooting
Compilation/Upload Errors
If you run into any compilation or upload errors, the most common pitfall is the wrong Port was selected. Double check which port your RedBoard is on and retry. If you have multiple ports showing up in the "Port" menu, take note of which ports are available before plugging in your RedBoard and then select the new port that shows up in that menu after connecting it.
Another potential issue is if your code was not copied properly. The usual culprit for this is the code template was not entirely deleted/overwritten by the example. Take a quick look at your code and make sure you do not have any duplicated void loop();'s or void setup();'s or other rogue bits of code left over from the default template. The error printout at the bottom of the screen will give more thorough information on what the error is and can point you to any compiler errors in your code.
Servo Movement Problems
If your servo is not moving at all, you probably have a wire misplaced. Try rewiring the connections to ensure that your wiring has the servo connected to the correct pins on your RedBoard.
If your servo is jittery or seems like it is locking up, you may be driving it beyond the servo's pulse range. Check your servo's datasheet and adjust the second and third values in the servo.attach(9, 1000, 2000); function in the setup.