Analog MEMS Microphone Breakout - SPH8878LR5H-1 Hookup Guide
Contributors:
 El Duderino,
  jenfoxbot
El Duderino, jenfoxbot 
Resources and Going Further
Now that you've connected your MEMS microphone breakout, it's time to incorporate it into your own project! For more information on the board, check out the resources below:
- Datasheet (SPH8878LR5H-1)
- Schematic
- Eagle Files
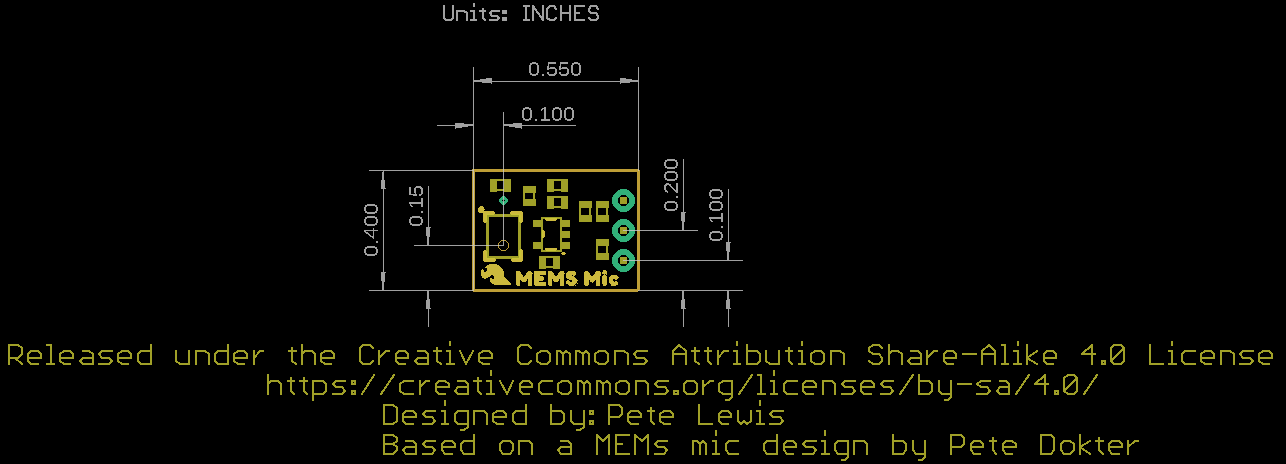
- Board Dimensions
- Hardware GitHub Repository
- Example Code GitHub Repository
If you run into trouble getting, or understanding, an audio signal output from the MEMS mic breakout board, try using a multimeter and/or an oscilloscope to measure the voltage output of the signal in quiet and loud settings. If you're still stuck, check out our forums and we'll help you troubleshoot.
After you've read in the MEMS microphone and have a good handle on the signal output, you're ready to start using it for practical microphone applications! Here are a few ideas to get you started:
- Build a music visualizer! Here's a sample sketch for the music visualizer shown in the SparkFun Simple Sketches example.
- Record sounds and play them back! You'll also need a speaker, an amplifier transistor, some pushbuttons, and some code. Here's an open-source mbed example. (The example was initially written for the ADMP401 but should work just fine with the latest release).
- Make a sound-reactive EL Wire costume and replace the Sound Detector with the MEMS Microphone!
- Make a Bark Back Pet Monitor with a Raspberry Pi to record the sound levels in your home, upload the data MQTT, and trigger an audio player to when the volume reaches a threshold.
Or check out these other audio related tutorials below.
Binary Blaster Assembly Guide
Learn how to assemble and play the Binary Blaster Game from SparkFun Electronics.
Vox Imperium: Stormtrooper Voice Changer
Add some flair to your Imperial uniform by changing your voice using a Teensy 3.2 and Prop Shield.
Papa Soundie Audio Player Hookup Guide
Add sound effects to your project, prop or costume with Papa Soundie Audio Player.
SparkFun gator:bit v2 Hookup Guide
The gator:bit v2 is a breakout board for the BBC micro:bit. The gator:bit exposes almost every pin on the micro:bit to clippable pad with circuit protection. It also has as built-in addressable LEDs and a built-in buzzer.