ADXL345 Hookup Guide
 TheDarkSaint
Example Code
Now that you have the example sketch open, let's go through and take a look at all the ways we can customize the ADXL345.
SPI or I2C?
The first important selection to make is under the COMMUNICATION SECTION. This is where you will let the library know whether you have setup your hardware for SPI or I2C communication.
language:c
/*********** COMMUNICATION SELECTION ***********/
/*    Comment Out The One You Are Not Using    */
ADXL345 adxl = ADXL345(10);           // USE FOR SPI COMMUNICATION, ADXL345(CS_PIN);
//ADXL345 adxl = ADXL345();             // USE FOR I2C COMMUNICATION
Make sure to comment out // the line of code you are not using. By default, the code has you utilizing SPI communication.
Setup
The most complex part of the example code is the void setup() section. This is where you'll be able to configure your settings and sensing feature thresholds.
language:c
/******************** SETUP ********************/
/*          Configure ADXL345 Settings         */
void setup(){

Serial.begin(9600);                 // Start the serial terminal
Serial.println("SparkFun ADXL345 Accelerometer Hook Up Guide Example");
Serial.println();

adxl.powerOn();                     // Power on the ADXL345

adxl.setRangeSetting(16);           // Give the range settings
                                    // Accepted values are 2g, 4g, 8g or 16g
                                    // Higher Values = Wider Measurement Range
                                    // Lower Values = Greater Sensitivity

adxl.setSpiBit(0);                  // Configure the device to be in 4 wire SPI mode when set to '0' or 3 wire SPI mode when set to 1
                                    // Default: Set to 1
                                    // SPI pins on the ATMega328: 11, 12 and 13 as reference in SPI Library

adxl.setActivityXYZ(1, 0, 0);       // Set to activate movement detection in the axes "adxl.setActivityXYZ(X, Y, Z);" (1 == ON, 0 == OFF)
adxl.setActivityThreshold(75);      // 62.5mg per increment   // Set activity   // Inactivity thresholds (0-255)

adxl.setInactivityXYZ(1, 0, 0);     // Set to detect inactivity in all the axes "adxl.setInactivityXYZ(X, Y, Z);" (1 == ON, 0 == OFF)
adxl.setInactivityThreshold(75);    // 62.5mg per increment   // Set inactivity // Inactivity thresholds (0-255)
adxl.setTimeInactivity(10);         // How many seconds of no activity is inactive?

adxl.setTapDetectionOnXYZ(0, 0, 1); // Detect taps in the directions turned ON "adxl.setTapDetectionOnX(X, Y, Z);" (1 == ON, 0 == OFF)

// Set values for what is considered a TAP and what is a DOUBLE TAP (0-255)
adxl.setTapThreshold(50);           // 62.5 mg per increment
adxl.setTapDuration(15);            // 625 μs per increment
adxl.setDoubleTapLatency(80);       // 1.25 ms per increment
adxl.setDoubleTapWindow(200);       // 1.25 ms per increment

// Set values for what is considered FREE FALL (0-255)
adxl.setFreeFallThreshold(7);       // (5 - 9) recommended - 62.5mg per increment
adxl.setFreeFallDuration(30);       // (20 - 70) recommended - 5ms per increment

// Setting all interupts to take place on INT1 pin
//adxl.setImportantInterruptMapping(1, 1, 1, 1, 1);     // Sets "adxl.setEveryInterruptMapping(single tap, double tap, free fall, activity, inactivity);"
                                                        // Accepts only 1 or 2 values for pins INT1 and INT2. This chooses the pin on the ADXL345 to use for Interrupts.
                                                        // This library may have a problem using INT2 pin. Default to INT1 pin.

// Turn on Interrupts for each mode (1 == ON, 0 == OFF)
adxl.InactivityINT(1);
adxl.ActivityINT(1);
adxl.FreeFallINT(1);
adxl.doubleTapINT(1);
adxl.singleTapINT(1);

//attachInterrupt(digitalPinToInterrupt(interruptPin), ADXL_ISR, RISING);   // Attach Interrupt

}
The comments can help guide you as to what each function does along with recommended ranges to stay within where applicable. More detailed information of the sensing functions and interrupts can be found on the ADXL345 Datasheet.
Main Code
The main example code was kept very simple. It focuses on not only reading the accelerometer values but also checking to see if any interrupts have occurred.
language:c
/****************** MAIN CODE ******************/
/*     Accelerometer Readings and Interrupt    */
void loop(){

// Accelerometer Readings
int x,y,z;
adxl.readAccel(&x, &y, &z);         // Read the accelerometer values and store them in variables declared above x,y,z

// Output Results to Serial
/* UNCOMMENT TO VIEW X Y Z ACCELEROMETER VALUES */
//Serial.print(x);
//Serial.print(", ");
//Serial.print(y);
//Serial.print(", ");
//Serial.println(z);

ADXL_ISR();
// You may also choose to avoid using interrupts and simply run the functions within ADXL_ISR();
//  and place it within the loop instead.
// This may come in handy when it doesn't matter when the action occurs.

}
Currently, the sketch will only output free fall detection, inactivity/activity, and single/double tap detection to the Serial Monitor.
In order to print the measured accelerometer values to the Serial Monitor, just remember to uncomment the following section to look like this:
language:c
// Output Results to Serial
/* UNCOMMENT TO VIEW X Y Z ACCELEROMETER VALUES */
Serial.print(x);
Serial.print(", ");
Serial.print(y);
Serial.print(", ");
Serial.println(z);
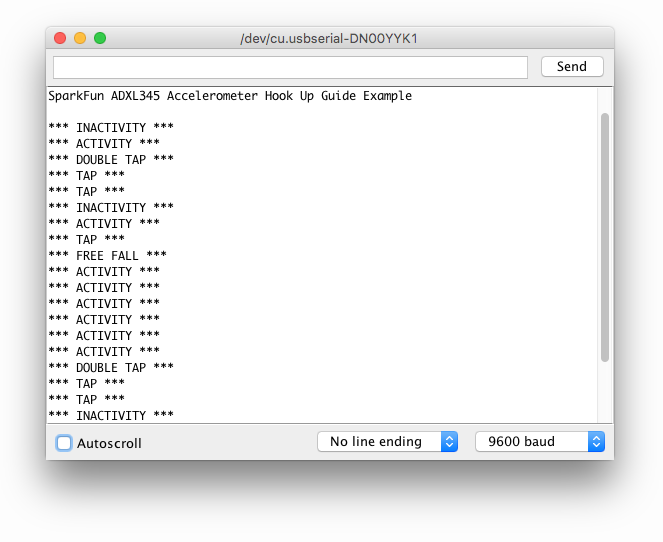
Serial Monitor Output
Let's see it in action! Go to Tools on your Arduino IDE, set your board and port, and upload the SparkFun_ADXL345_Example.ino sketch to your Arduino or compatible board. If you need further assistance in uploading your sketch this might be helpful: Uploading a Sketch.
The following two Serial Monitor outputs are what you should expect whether you have commented out the accelerometer values from being displayed or not.
Accelerometer Values Excluded
This is what your outputs will look like with the sensing features are triggered.
Accelerometer Values Included
This is the data you should see when you have uncommented the X, Y and Z Serial.print() lines of code. Also, keep in mind you will still see when the sensing features are triggered, it just might be harder to catch amongst the data stream.
