Using the SparkFun PicoBoard and Scratch
 bri_huang
Introduction
Scratch is an amazing tool to teach kids how to program. Often, we focus on creating fun animations, games, presentations, and music videos in Scratch. But, imagine how how cool it would be if you could add physical interactivity into your Scratch animation. For example, what if your Scratch character started to dance when you turned off the lights in your room or stopped as soon as the lights turned back on! With the PicoBoard, we can do all of this and more.
What is the PicoBoard?
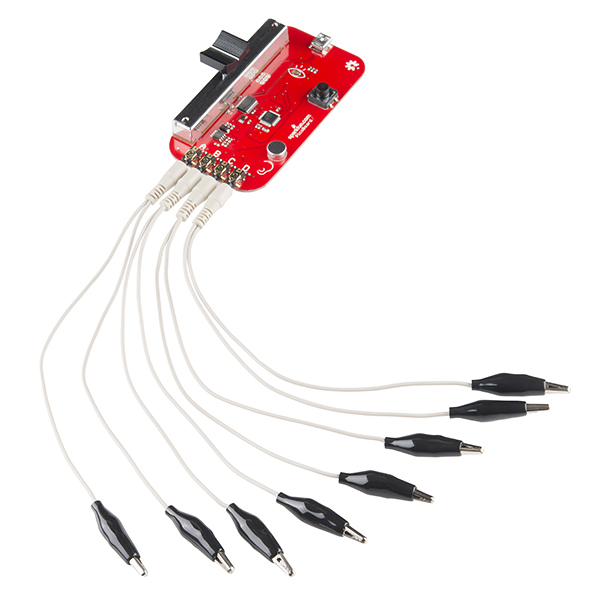
The PicoBoard is a piece of hardware called a sensor board that can be combined with MIT's Scratch programming environment to allow your Scratch programs to react (and even respond) to events happening outside of the computer. (If you're unfamiliar with Scratch and would like to learn more about it, read the Science Buddies Introduction to Scratch page.) A sensor is a device that detects (senses) and measures the presence or absence of something. The PicoBoard is actually made up of several different types of sensors so it can detect many different "somethings," including sound and light.
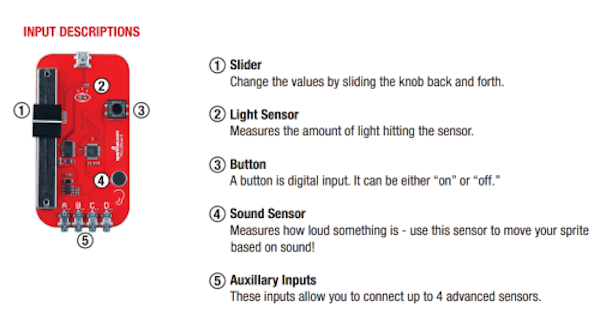
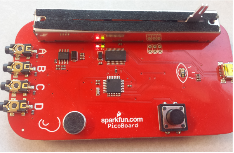
The PicoBoard has several sensors that can be used directly with the Scratch programming environment:
Slider: Changes values from 0 to 100 based on the position of the slider.
Light Sensor: Changes values from 0 to 100 based on the amount of light on this sensor.
Button: The position or state of the button controls the button pressed value (true or false).
Sound Sensor: Changes values from 0 to 100 based on the amount of sound it detects.
Auxiliary Connections (A,B,C,& D): Alligator Clips: These are generic connections to any resistive sensor. As the resistance changes, so does the input value. This sensor can also be setup as a digital detector to detect whether the alligator clips are connected.
Download Scratch 1.4
Note: Currently, the PicoBoard is only compatible with Scratch 1.4.
To get started, you will need to install Scratch 1.4 for your computer. Visit scratch.mit.edu/scratch_1.4/ to download version 1.4 of Scratch.
At this moment, the interface between Scratch 2.0 and the PicoBoard is currently under development. We are still working out the kinks of this. We recommend using the older and stable (v1.4) version of Scratch for interfacing to the PicoBoard.
Installing Drivers
In addition to installing Scratch, you will need to install the FTDI drivers for your computer. The FTDI driver will allow the PicoBoard hardware to communicate with your computer. Follow our guide here on how to install and setup the drivers for your machine.
Connecting the PicoBoard
Using the USB cable, connect the PicoBoard to your computer, and open up Scratch. To test the functionality, let’s play with the Scratch sprite’s size feature using this block. Find these blocks and string them together. Move the (slider sensor value) block into the set size block to replace the size by the sensor value.
Find the "Green Flag" Hat block and forever block under the Control palette, the set size block under the Looks palette, and the sensor value block under the Sensing palette.
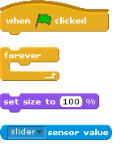
Assemble the blocks together so that it looks like this:
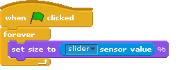
Click the green flag or the “hat” block to start your program. In a few seconds, you should see the red / green lights on your PicoBoard start flashing. Move the slider back and forth and watch what happens!
->The red / green lights indicate data is being received (RX) and transmitted (TX) between the PicoBoard and your computer.<-
The Sensor value reporter block can be used in place of any value field (blank / number) in Scratch. Experiment with any of the other Scratch blocks such as move ( ) steps or go to x: ( ) y: ( ). Any of these values can be replaced by the sensor value from the PicoBoard.
Find your favorite Scratch program and re-mix it using the Sensor blocks!