Sensor System Hookup Guide
 MikeGrusin
Recording Data with the Sensor System
1. Insert the MicroSD Card into the Sensor System
With the Sensor System unplugged from any power supplies, gently insert the microSD card into the slot on the right side of the front panel. It will only fit one way; the gold pads on the microSD card should be facing down and the label should be facing up.

Note that this microSD socket does not "click" like some sockets do. Simply press the card into the slot until it stops. A portion of the microSD card will protrude from the panel, allowing you to remove it later.
3. Plug the USB Power Cable into the Sensor System
The Sensor System runs on USB power. This could come from a Wall Adapter, or a USB Battery Pack for portable use.
Plug the micro-B USB end of the cable into the Sensor System. This connector has a subtle "D" shape to it, and will only fit one way. It should snap securely into the Sensor System.

Now plug the other end of the USB Cable into your USB power supply if it isn't already.
4. Turn On the Sensor System
Briefly press the power button on the left side of the Sensor System's front panel. The STAT LED will blink once or twice, then light up solid red if everything is plugged in correctly.

If the LED keeps blinking, the number of blinks can help you find the problem. See the Troubleshooting section below.
5. Begin Recording Data
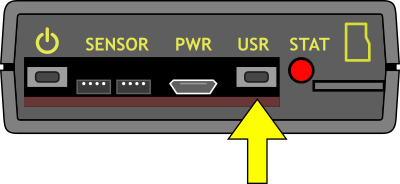
When your Sensor System is in the location you want to study and you're ready to begin recording, briefly press the USR button on the front panel of the Sensor System. The LED will turn green and flash each time it records new data.
6. Stop Recording Data
When you're finished recording data, briefly press the USR button on the front panel of the Sensor System. The LED will turn red to indicate that recording has stopped.
7. Turn Off the Sensor System
Briefly press the power button on the left side of the front panel of the Sensor System. The LED will turn off.

8. Remove the MicroSD Card
Once the Sensor System is turned off, grip the protruding end of the microSD card and gently pull it out of the Sensor System. You can now insert the microSD card into an adapter (USB reader or full-size SD card) and read the data using your computer.