RETIRED (Phant Examples) - ESP8266 Thing Hookup Guide
This Tutorial is Retired!
This tutorial covers concepts or technologies that are no longer current. It's still here for you to read and enjoy, but may not be as useful as our newest tutorials.
 jimblom
Introduction
Phant is No Longer in Operation
An archived tutorial of our first and third ESP8266 Thing board examples used in our ESP8266 Thing Board Hookup Guide. Example 1 showed you how you can use the Thing Board to post data to data.sparkfun.com. Example 2 put the Thing to sleep to save that sweet battery juice.
Suggested Reading
Before continuing on with this tutorial, you may want to familiarize yourself with some of these topics if they’re unfamiliar to you:
ESP8266 Thing Hookup Guide
Example Sketch: Posting to Phant
Our main goal for creating the ESP8266 Thing was finding a good platform to interact with our free online data storage service: data.sparkfun.com.
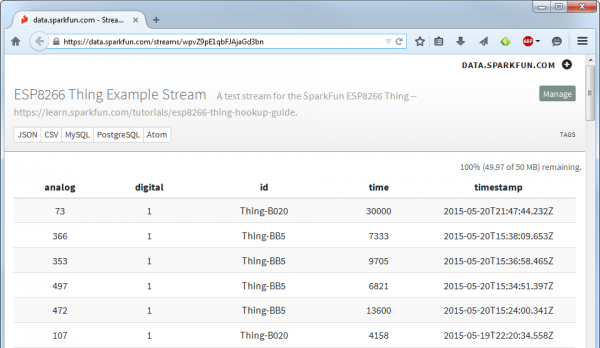
Here's a simple example sketch that posts four values to a test stream. Feel free to use that stream temporarily to make sure your Thing is working (don't abuse it please!).
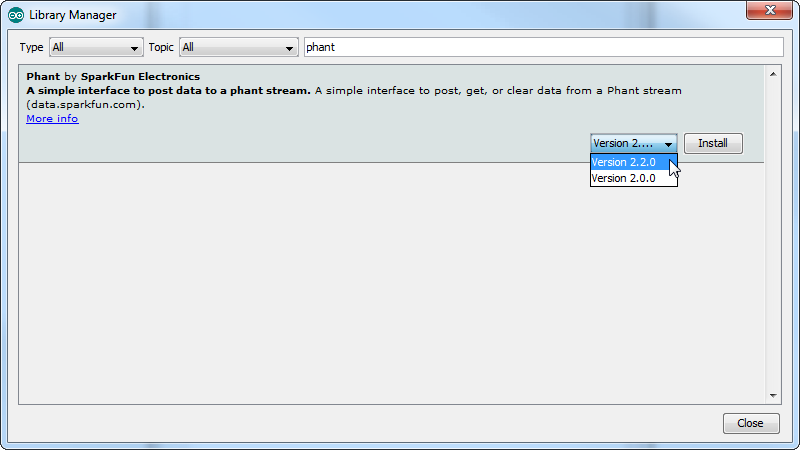
Install the Phant Library! This example makes use of the SparkFun Phant Arduino library, to make assembling Phant POSTs as easy as possible. The Phant library can be installed using Arduino's Library Manager. Go to the Sketch > Include Library > Manage Libraries..., then search for "Phant" to find the library. Install the latest version (or at least 2.2.0).
Or you can grab the Phant library from our phant-arduino repository, and follow along with our Installing an Arduino Library for help installing the library.
Copy the code below, or download the example sketch.
Before uploading your code to the Thing, make sure you modify the WiFiSSD and WiFiPSK variables, setting them to the SSID and password of your WiFi network. The rest of the sketch should just work.
language:c
// Include the ESP8266 WiFi library. (Works a lot like the
// Arduino WiFi library.)
#include <ESP8266WiFi.h>
// Include the SparkFun Phant library.
#include <Phant.h>

//////////////////////
// WiFi Definitions //
//////////////////////
const char WiFiSSID[] = "WiFi_Network";
const char WiFiPSK[] = "WiFi_Password";

/////////////////////
// Pin Definitions //
/////////////////////
const int LED_PIN = 5; // Thing's onboard, green LED
const int ANALOG_PIN = A0; // The only analog pin on the Thing
const int DIGITAL_PIN = 12; // Digital pin to be read

////////////////
// Phant Keys //
////////////////
const char PhantHost[] = "data.sparkfun.com";
const char PublicKey[] = "wpvZ9pE1qbFJAjaGd3bn";
const char PrivateKey[] = "wzeB1z0xWNt1YJX27xdg";

/////////////////
// Post Timing //
/////////////////
const unsigned long postRate = 30000;
unsigned long lastPost = 0;

void setup()
{
  initHardware();
  connectWiFi();
  digitalWrite(LED_PIN, HIGH);
}

void loop()
{
  if (lastPost + postRate <= millis())
  {
    if (postToPhant())
      lastPost = millis();
    else
      delay(100);
  }
}

void connectWiFi()
{
  byte ledStatus = LOW;

  // Set WiFi mode to station (as opposed to AP or AP_STA)
  WiFi.mode(WIFI_STA);

  // WiFI.begin([ssid], [passkey]) initiates a WiFI connection
  // to the stated [ssid], using the [passkey] as a WPA, WPA2,
  // or WEP passphrase.
  WiFi.begin(WiFiSSID, WiFiPSK);

  // Use the WiFi.status() function to check if the ESP8266
  // is connected to a WiFi network.
  while (WiFi.status() != WL_CONNECTED)
  {
    // Blink the LED
    digitalWrite(LED_PIN, ledStatus); // Write LED high/low
    ledStatus = (ledStatus == HIGH) ? LOW : HIGH;

    // Delays allow the ESP8266 to perform critical tasks
    // defined outside of the sketch. These tasks include
    // setting up, and maintaining, a WiFi connection.
    delay(100);
    // Potentially infinite loops are generally dangerous.
    // Add delays -- allowing the processor to perform other
    // tasks -- wherever possible.
  }
}

void initHardware()
{
  Serial.begin(9600);
  pinMode(DIGITAL_PIN, INPUT_PULLUP);
  pinMode(LED_PIN, OUTPUT);
  digitalWrite(LED_PIN, LOW);
  // Don't need to set ANALOG_PIN as input,
  // that's all it can be.
}

int postToPhant()
{
  // LED turns on when we enter, it'll go off when we
  // successfully post.
  digitalWrite(LED_PIN, HIGH);

  // Declare an object from the Phant library - phant
  Phant phant(PhantHost, PublicKey, PrivateKey);

  // Do a little work to get a unique-ish name. Append the
  // last two bytes of the MAC (HEX'd) to "Thing-":
  uint8_t mac[WL_MAC_ADDR_LENGTH];
  WiFi.macAddress(mac);
  String macID = String(mac[WL_MAC_ADDR_LENGTH - 2], HEX) +
                 String(mac[WL_MAC_ADDR_LENGTH - 1], HEX);
  macID.toUpperCase();
  String postedID = "Thing-" + macID;

  // Add the four field/value pairs defined by our stream:
  phant.add("id", postedID);
  phant.add("analog", analogRead(ANALOG_PIN));
  phant.add("digital", digitalRead(DIGITAL_PIN));
  phant.add("time", millis());

  // Now connect to data.sparkfun.com, and post our data:
  WiFiClient client;
  const int httpPort = 80;
  if (!client.connect(PhantHost, httpPort))
  {
    // If we fail to connect, return 0.
    return 0;
  }
  // If we successfully connected, print our Phant post:
  client.print(phant.post());

  // Read all the lines of the reply from server and print them to Serial
  while(client.available()){
    String line = client.readStringUntil('\r');
    //Serial.print(line); // Trying to avoid using serial
  }

  // Before we exit, turn the LED off.
  digitalWrite(LED_PIN, LOW);

  return 1; // Return success
}
After loading the code onto your Thing, it will begin to run. The status LED connected to pin 5 will initially blink at about 2 Hz. After the Thing connects to your network, the green LED will turn solid and post to the test stream. At that point the LED will go dark, only blinking every 30s-or-so as the Thing posts to Phant again.
If the LED never stops blinking, your Thing is probably having trouble connecting to the WiFi network. Make sure the SSID and PSK variables are set correctly.
Four values are posted to the Phant stream: the reading from the ADC pin, a digital reading from pin 12, the Thing's ID ("Thing" appendd with the last two MAC bytes), and a time variable loaded from the millis() function. Load up the test stream to check for your Thing's signature there!
Read through the comments in the code to get a line-by-line breakdown of what's going on in the sketch.
Example Sketch: Goodnight Thing (Sleep Mode)
One of the Thing's most unique features is the integrated support for LiPo batteries. Unfortunately, the ESP8266 is still a pretty power hungry device. If you want your project to run off a battery for more than a few hours, you have two options: get a huge battery or cleverly put the Thing to sleep.
To use the Thing's sleep capability, you'll need to wire the XPD pin up to the ESP8266's reset line. RST isn't broken out, but the DTR pin will work for our application as well.
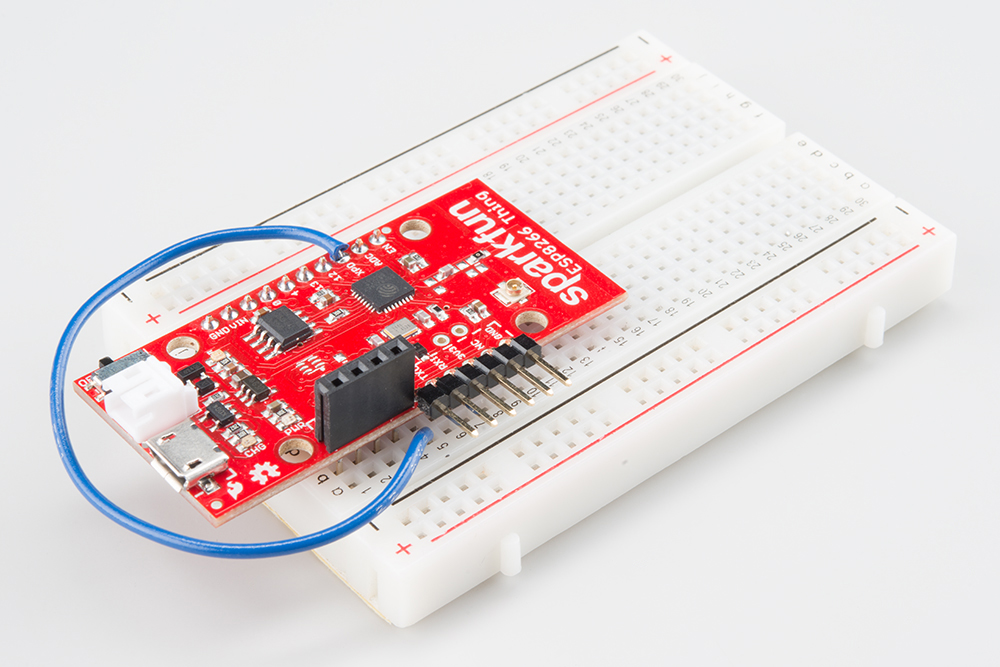
After you tell the ESP8266 to sleep, it'll wait a specified number of microseconds, then trigger the XPD pin to toggle the reset line. When the ESP8266 wakes up, it'll begin back at the start of the sketch.
Let's riff off the first example in this tutorial -- posting to Phant -- but take advantage of sleeping to greatly increase the battery life. Here's some example code (or click here to download):
Once again, make sure you modify the WiFiSSID and WiFiPSK variables near the top of the sketch.
language:c
// Include the ESP8266 WiFi library. (Works a lot like the
// Arduino WiFi library.)
#include <ESP8266WiFi.h>
// Include the SparkFun Phant library.
#include <Phant.h>

//////////////////////
// WiFi Definitions //
//////////////////////
const char WiFiSSID[] = "WiFi_Network";
const char WiFiPSK[] = "WiFi_Password";

/////////////////////
// Pin Definitions //
/////////////////////
const int LED_PIN = 5; // Thing's onboard, green LED
const int ANALOG_PIN = A0; // The only analog pin on the Thing
const int DIGITAL_PIN = 12; // Digital pin to be read

////////////////
// Phant Keys //
////////////////
const char PhantHost[] = "data.sparkfun.com";
const char PublicKey[] = "wpvZ9pE1qbFJAjaGd3bn";
const char PrivateKey[] = "wzeB1z0xWNt1YJX27xdg";

// Time to sleep (in seconds):
const int sleepTimeS = 30;

void setup()
{
  initHardware();
  connectWiFi();
  digitalWrite(LED_PIN, HIGH);
  while (postToPhant() != 1)
  {
    delay(100);
  }
  digitalWrite(LED_PIN, LOW);
  // deepSleep time is defined in microseconds. Multiply
  // seconds by 1e6
  ESP.deepSleep(sleepTimeS * 1000000);
}

void loop()
{
}

void connectWiFi()
{
  byte ledStatus = LOW;

  // Set WiFi mode to station (as opposed to AP or AP_STA)
  WiFi.mode(WIFI_STA);
  // WiFI.begin([ssid], [passkey]) initiates a WiFI connection
  // to the stated [ssid], using the [passkey] as a WPA, WPA2,
  // or WEP passphrase.
  WiFi.begin(WiFiSSID, WiFiPSK);

  // Use the WiFi.status() function to check if the ESP8266
  // is connected to a WiFi network.
  while (WiFi.status() != WL_CONNECTED)
  {
    // Blink the LED
    digitalWrite(LED_PIN, ledStatus); // Write LED high/low
    ledStatus = (ledStatus == HIGH) ? LOW : HIGH;

    // Delays allow the ESP8266 to perform critical tasks
    // defined outside of the sketch. These tasks include
    // setting up, and maintaining, a WiFi connection.
    delay(100);
    // Potentially infinite loops are generally dangerous.
    // Add delays -- allowing the processor to perform other
    // tasks -- wherever possible.
  }
}

void initHardware()
{
  Serial.begin(9600);
  pinMode(DIGITAL_PIN, INPUT_PULLUP);
  pinMode(LED_PIN, OUTPUT);
  digitalWrite(LED_PIN, LOW);
  // Don't need to set ANALOG_PIN as input,
  // that's all it can be.
}

int postToPhant()
{
  // LED turns on when we enter, it'll go off when we
  // successfully post.
  digitalWrite(LED_PIN, HIGH);

  // Declare an object from the Phant library - phant
  Phant phant(PhantHost, PublicKey, PrivateKey);

  // Do a little work to get a unique-ish name. Append the
  // last two bytes of the MAC (HEX'd) to "Thing-":
  uint8_t mac[WL_MAC_ADDR_LENGTH];
  WiFi.macAddress(mac);
  String macID = String(mac[WL_MAC_ADDR_LENGTH - 2], HEX) +
                 String(mac[WL_MAC_ADDR_LENGTH - 1], HEX);
  macID.toUpperCase();
  String postedID = "Thing-" + macID;

  // Add the four field/value pairs defined by our stream:
  phant.add("id", postedID);
  phant.add("analog", analogRead(ANALOG_PIN));
  phant.add("digital", digitalRead(DIGITAL_PIN));
  phant.add("time", millis());

  // Now connect to data.sparkfun.com, and post our data:
  WiFiClient client;
  const int httpPort = 80;
  if (!client.connect(PhantHost, httpPort))
  {
    // If we fail to connect, return 0.
    return 0;
  }
  // If we successfully connected, print our Phant post:
  client.print(phant.post());

  // Read all the lines of the reply from server and print them to Serial
  while(client.available()){
    String line = client.readStringUntil('\r');
    //Serial.print(line); // Trying to avoid using serial
  }

  // Before we exit, turn the LED off.
  digitalWrite(LED_PIN, LOW);

  return 1; // Return success
}
This sketch accomplishes the same feat as that in our first example -- it posts some data to a data.sparkfun.com stream every 30 seconds. But there's one huge difference: sleep.
Notice there's nothing in the loop(). The program halts when the ESP.deepSleep(30000000) is called. After 30 seconds, when the ESP8266 wakes up, it'll start running code back at the beginning of setup().
If you put a multimeter in-line to measure the current draw, the Thing would pull about 80mA for the ~5 seconds it takes to connect and post to Phant. Then, while it sleeps for about 30 seconds, the current draw would be around 8mA. An average of about 18mA per second.
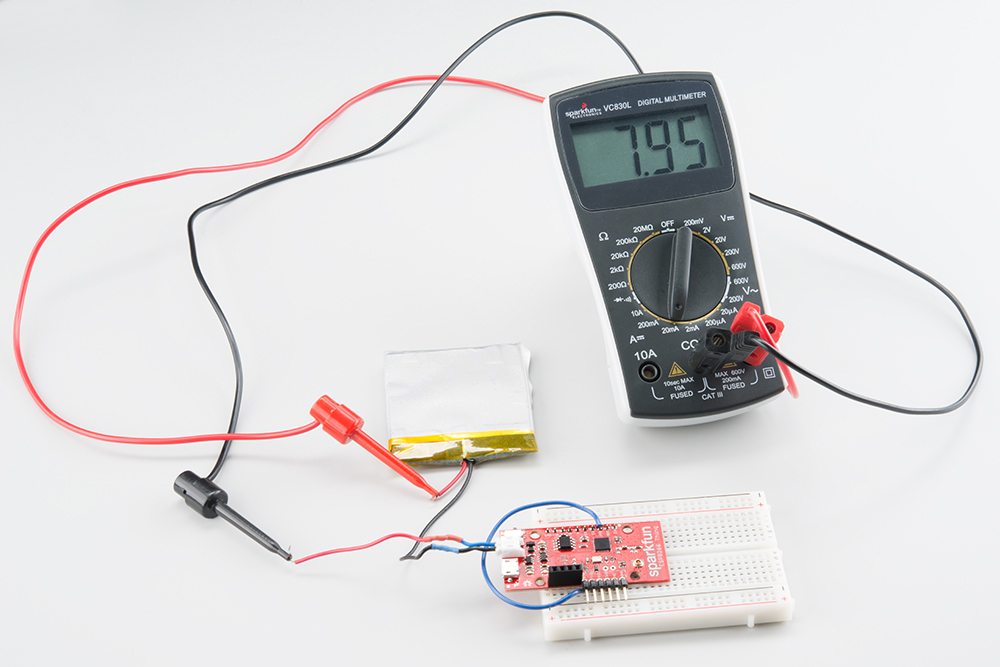
Most of the current draw in sleep mode is from the power LED indicator -- if you want to save even more juice, you may consider removing the LED (or current-limiting resistor) or even cutting a trace. (Hint: cut the trace running through middle of the 'R' in "PWR".)
Resources and Going Further
Need a little project inspiration for using the ESP8266 in web client mode with a different data-streaming service and/or IoT platform? Check out this tutorial to log data with ThingSpeak.