Retired - Electric Imp Breakout Hookup Guide v2
This Tutorial is Retired!
This tutorial covers concepts or technologies that are no longer current. It's still here for you to read and enjoy, but may not be as useful as our newest tutorials.
 jimblom
Example 2: Web Control (Request)
Some of the most fun you can have with the electric imp is connecting it to the Internet, and interfacing it with web pages. In this example, we’ll use a simple HTML/Javascript web page to control some LEDs connected to the imp.
This time, we'll not only be writing code for the imp, but the agent as well. This example code will show how to pass data from the imp to the agent, and how to write a simple web page to interact with the agent half of the code.
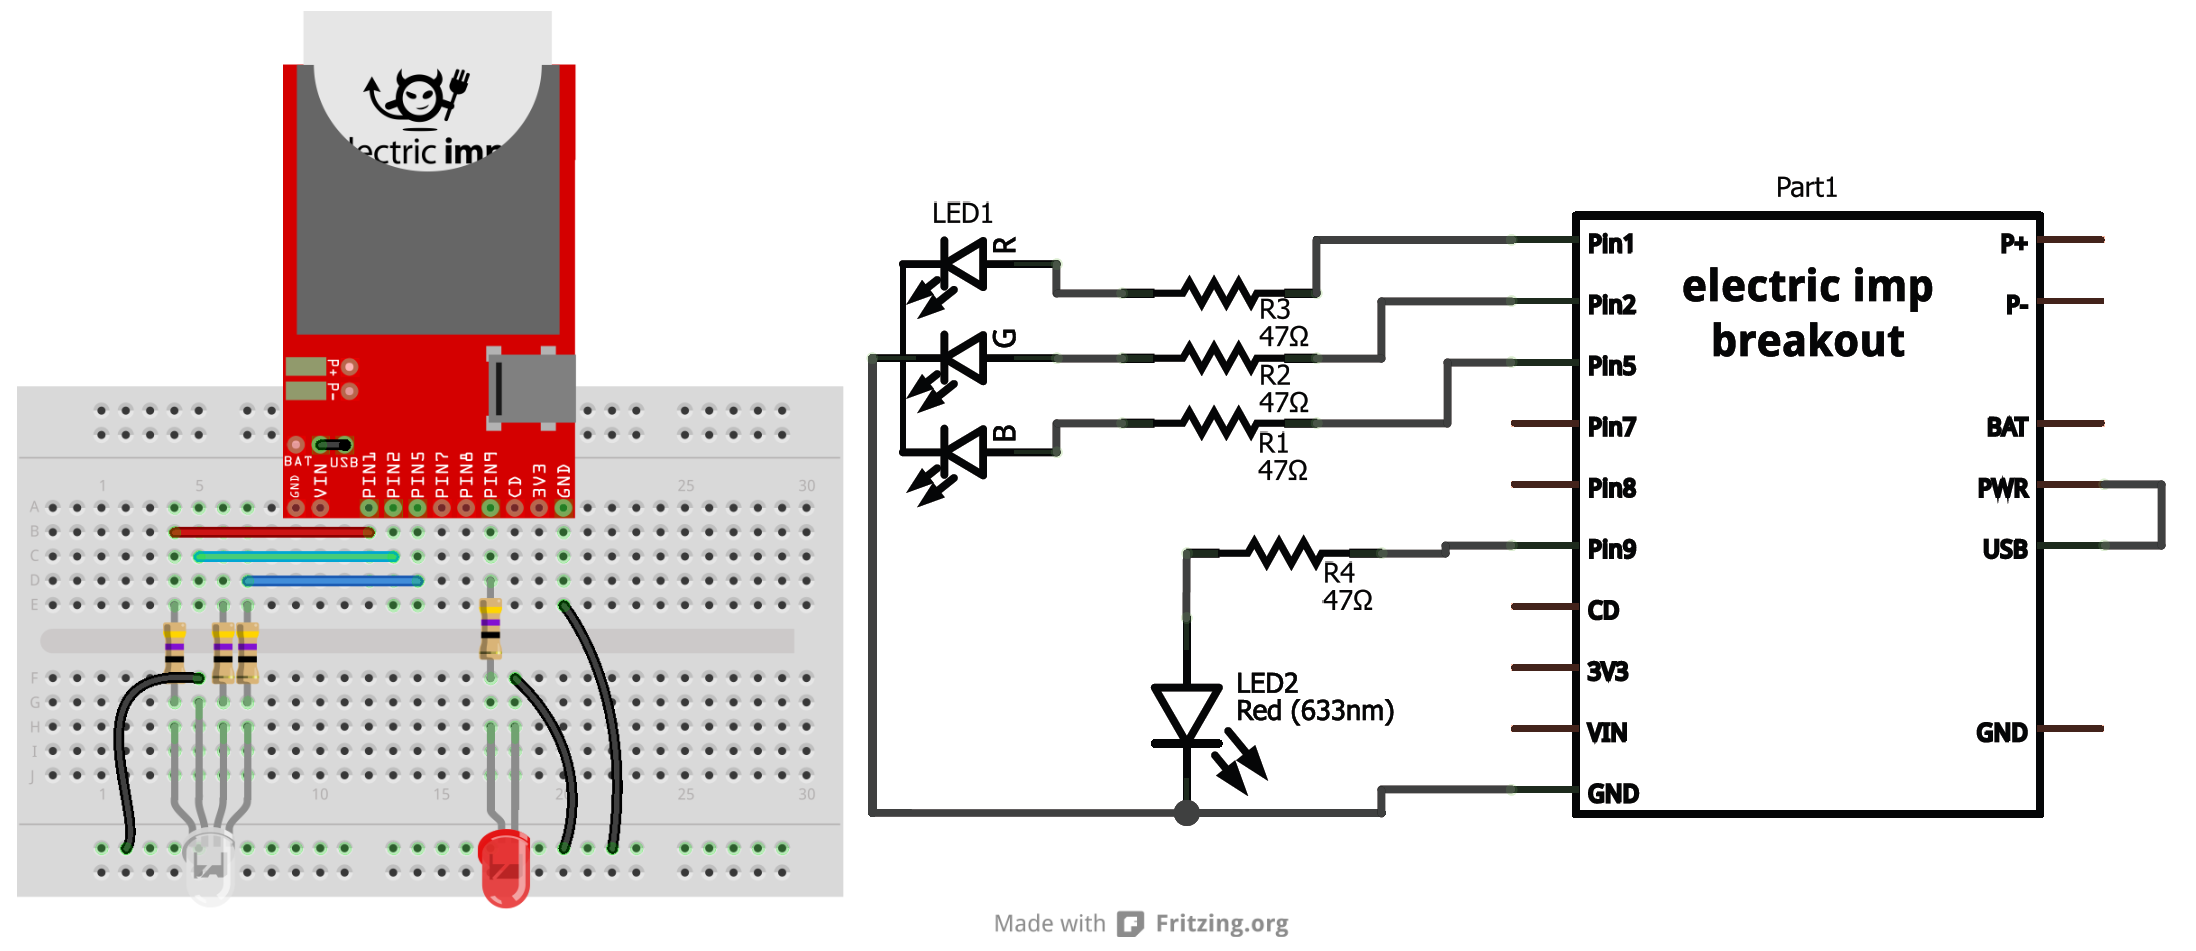
The Circuit
The circuit for this example is very simple: a common-cathode RGB LED is connected to the imp's pins 1, 2, and 5 (red, green, and blue anodes respectively), and another basic red LED is connected to pin 9 of the imp. Don't forget to add some current limiting resistors (in the range of 50-100Ω)!
The imp (Device) Code
Create a new model, as you did in the last example. We'll call this one LED Web Control. Copy and paste the code below into the Device section of the IDE.
language:javascript
/* Electric Imp Web-controlled LEDs
    by: Jim Lindblom
    SparkFun Electronics
    date: November 1, 2013
    license: Beerware. Please use, reuse, and modify this code.
    If you find it useful, buy me a beer some day!

    This is a simple electric imp example, which shows how to interface
    the imp with an agent and webpage. This example code goes hand-in-hand with
    an HTML webpage. Check out this page for more information:
    https://learn.sparkfun.com/tutorials/electric-imp-breakout-hookup-guide/example-2-web-control
    This will show how you can use html color, text, and radio form inputs
    to control LEDs on/off, PWM them, and set a timer to turn them off.

    Circuit:
    A common cathode RGB LED is connected to the imp's pins 1, 2, and 5.
    The red anode connects to 1 through a 47 Ohm resistor, green 2, and blue 5.
    The cathode of the LED connects to ground.
    Another simple, red LED is connected to the imp to imp pin 9, through
    another 47 Ohm resistor. The cathode of the LED is grounded.
*/

imp.configure("LED Web Control", [], []); // Configure the imp

///////////////
// Pin Setup //
///////////////
// Setup reference variables for our pins:
redPin <- hardware.pin1;   // R of RGB
greenPin <- hardware.pin2; // G of RGB
bluePin <- hardware.pin5;  // B of RGB
ledPin <- hardware.pin9;   // Lonely red LED

// Configure our pins:
ledPin.configure(DIGITAL_OUT);        // Simple digital output
redPin.configure(PWM_OUT, 0.01, 0);   // PWM output 10ms clock, off
greenPin.configure(PWM_OUT, 0.01, 0); // PWM output 10ms clock, off
bluePin.configure(PWM_OUT, 0.01, 0);  // PWM output 10ms clock, off

/////////////////////////////////
// Agent Function Declarations //
/////////////////////////////////
// setLed will turn the lonely red LED on or off.
// This function will be called by the agent.
function setLed(ledState)
{
    ledPin.write(ledState);
}

// setRGB will take a table input, and set the RGB LED accordingly.
// the table input should have parameters 'r', 'g', and 'b'.
// This function will be called by the agent.
function setRGB(rgbValue)
{
    bluePin.write(rgbValue.b/255.0);
    redPin.write(rgbValue.r/255.0);
    greenPin.write(rgbValue.g/255.0);
}

// setUser will print out to the log the name of the LED changer
// This function will be called by the agent.
function setUser(suspect)
{
    server.log(suspect + " set the LEDs.");
}

// setTimer will turn the LEDs off after a specified number of seconds
// This function will be called by the agent.
function setTimer(time)
{
    if (time != 0)
        imp.wakeup(time, ledsOff); // Call ledsOff in 'time' seconds.
}

///////////////////////////////////
// Important Agent Handler Stuff //
///////////////////////////////////
// Each object that the agent can send us needs a handler, which we define with
// the agent.on function.  The first parameter in agent.on is an identifier
// string which must be matched by the sending agent. The second parameter is
// the name of a function to be called. These functions are already defined up
// above.
agent.on("led", setLed);
agent.on("rgb", setRGB);
agent.on("user", setUser);
agent.on("timer", setTimer);

//////////////////////
// Helper Functions //
//////////////////////

// ledsOff just turns all LEDs off.
function ledsOff()
{
    ledPin.write(0);
    redPin.write(0);
    greenPin.write(0);
    bluePin.write(0);
}
The key bit of new code in this example is the agent.on function call. Run during the setup portion of the code, these function calls set up a handler function to be called whenever the agent sends a specific string to the imp. For example, the agent.on("led", setLed); functions says that whenever a message tagged with an "led" string is received from the agent, call the setLed() function.
How do we send messages from the agent to the imp? Looks like it's time to start using the other half of the IDE window...
The Agent Code
The agent is a piece of squirrel code living and running in the electric imp cloud. While the imp is managing all of its hardware pins, the agent can be off mingling with other servers and dealing with Internet traffic. There are built in functions which allow the imp to send data to the agent, and vice-versa.
In this example, we'll set the agent up to listen for HTTP requests. Upon receiving a request, the agent will parse the query, and relay the important information back to the imp.
Copy and paste this code into the Agent half of your LED Web Control model:
language:javascript
/* Agent for imp Web-Controlled LEDs
    by: Jim Lindblom
    SparkFun Electronics
    date: November 1, 2013
    license: Beerware. Please use, reuse, and modify this code.
    If you find it useful, buy me a beer some day!

    This is the agent portion of the LED Web Controller. It defines how http
    requests to https://agent.electricimp.com/XXXXXXXXXXXX are handled. Check
    your agent URL to find out what, exactly, XXXXXXXXXXXX is.

    For example, if your agent url is https://agent.electricimp.com/UpyYpRLmBB7m
    sending https://agent.electricimp.com/UpyYpRLmBB7m?led=0 should turn the
    lonely red led off.  https://agent.electricimp.com/UpyYpRLmBB7m?led=1 would
    turn the LED on.

    * There are also request handlers for "rgb", which should be a #RRGGBB
      formatted string. E.g: https://agent.electricimp.com/UpyYpRLmBB7m?rgb=%238500b7
    * A "user" request handler can receive a string. E.g.: https://agent.electricimp.com/UpyYpRLmBB7m?user=Jim
    * And a "timer" handler looks for a number-looking string. E.g.:
      https://agent.electricimp.com/UpyYpRLmBB7m?timer=10

    The parameters can be combined in one request. E.g.:
    https://agent.electricimp.com/UpyYpRLmBB7m?led=1&rgb=%237f3fff&timer=10&user=Jim
*/

// At the start, print a message to say we're online, and print the agent URL:
server.log("LED Web Control Agent Online: " + http.agenturl());

// requestHandler handles all http requests coming into the agent. It's only
// setup to look for a select few requests: "led", "rgb", "user" and "timer".
function requestHandler(request, response)  {

    try { // Try provides us with exception handling, in case a runtime error occurs

        // check if the user sent led as a query parameter
        if ("led" in request.query) {
            // if they did, and led=1.. set our variable to 1
            if ((request.query.led == "1") || (request.query.led == "0"))
            {
                // convert the led query parameter to an integer
                local ledStatus = request.query.led.tointeger();

                // send "led" message to device, and send ledState as the data
                device.send("led", ledStatus);
            }
        }
        // check if an "rgb" query was received:
        if ("rgb" in request.query) {
            // colors are sent as a string, we've got to do some work to convert
            // them to a number, which is eventually what we'll need to do
            // pwm on our RGB led pins.
            local color = request.query.rgb; // get the query into a variable
            if (color[0] == '#') { // The request should start with '#' (%23)
                // We'll construct a table with three parameters: r, g, and b
                // Do some work to convert r, g, and b from ASCII characters
                // to 0-255 values.
                local returnTable = {
                    r = ASCIItoHex(color[1])*16 + ASCIItoHex(color[2])
                    g = ASCIItoHex(color[3])*16 + ASCIItoHex(color[4])
                    b = ASCIItoHex(color[5])*16 + ASCIItoHex(color[6])
                };
                device.send("rgb", returnTable); // send our color table to the imp
            }
        }
        // check if a "user" query was received.
        if ("user" in request.query) {
            device.send("user", request.query.user); // Simply pass the value out to the imp.
        }
        // check if a "timer" query was received:
        if ("timer" in request.query) {
            // convert to an integer, and pass it out to the imp.
            device.send("timer", request.query.timer.tointeger());
        }
        // send a response back saying everything was OK.
        response.send(200, "OK");
    }
    catch (ex) {
        response.send(500, "Internal Server Error: " + ex);
    }
}

// Set up a handler for HTTP requests. This is the function that we defined above.
// https://electricimp.com/docs/api/http/onrequest/
http.onrequest(requestHandler);

//////////////////////
// Helper Functions //
/////////////////////////////

// This function converts an ASCII character to a number
function ASCIItoHex(colorNibble) {
    if ((colorNibble >= '0') && (colorNibble <= '9')) {
        return colorNibble - 48;
    }
    else if ((colorNibble >= 'a') && (colorNibble <= 'f')) {
        return colorNibble - 87;
    }
    else if ((colorNibble >= 'A') && (colorNibble <= 'F')) {
        return colorNibble - 55;
    }
}
Check out the comments in the code for a line-by-line dissection. Most of the code on the agent is an HTTP request handler (the requestHandler(request, response) function). This function uses a series of if statements to check for a specific request parameter key (like "led" or "rgb"). In those if statements, the agent decides what to do with the parameter value (if anything) and sends a message to the imp using the device.send function.
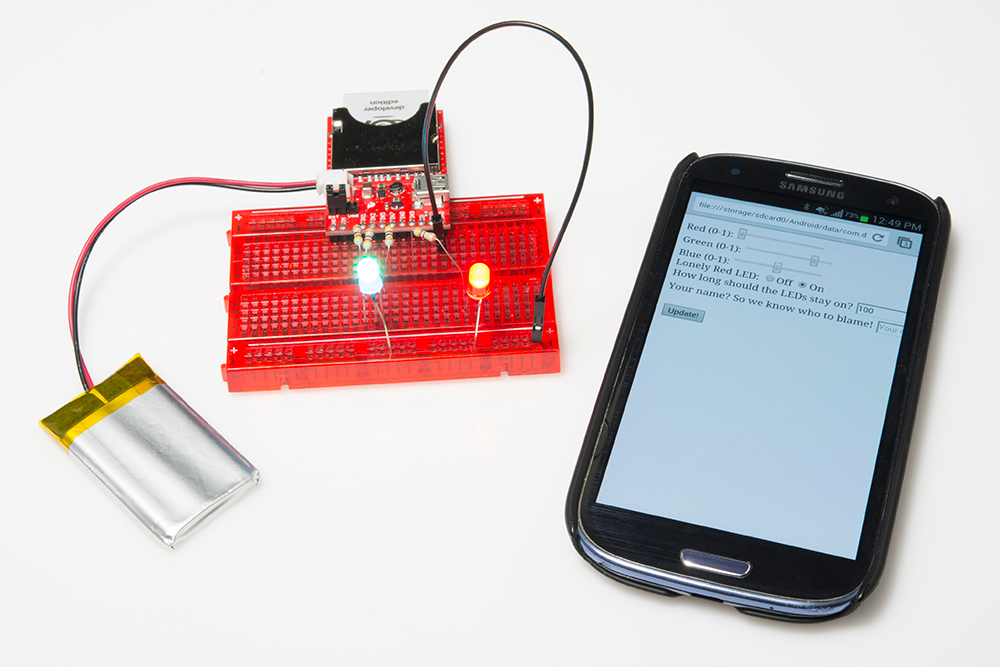
With both of those halves of code added to your model, and the circuit built, build and run the model. Time to test it out!
Testing the Model
After initially running the model, you shouldn't see anything happen to your imp or the LEDs it's connected to. To change that, we need to send an HTTP request to the agent.
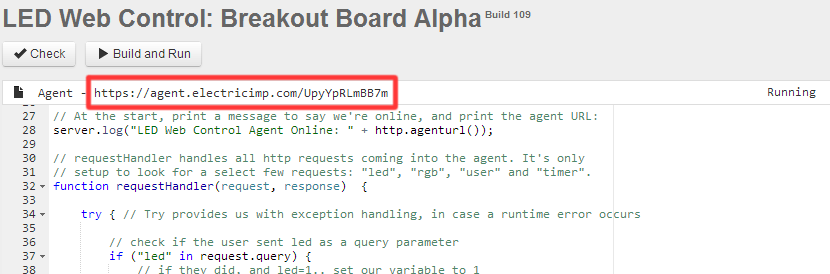
First, we need to locate the URL of our agent, which is printed at the top of your Agent window. It'll be something like https://agent.electricimp.com/0123456789ABCDEF. Each imp gets its own, unique, agent URL.
We can send requests to the agent by adding URL query strings onto the agent URL. For example, type https://agent.electricimp.com/UpyYpRLmBB7m?led=1 (make sure you replace my unique code with your own!) into your browser's address bar and go. Notice anything happen on your imp circuit? The lonely red LED should have turned on! Look through the agent code to see what other parameters we can send.
We can even add multiple parameters to the same request, for example try going to https://agent.electricimp.com/UpyYpRLmBB7m?led=1&rgb=%234080ff&timer=10 in your browser. This request turns on the LED, but it also sends an RGB string to control the RGB LED and it sets a timer to turn all LEDs off.
This is very cool, but typing these parameters into an address bar is a pain! Let's write a simple HTML webpage to take a form input and do all of that for us!
The HTML Code
This is the last piece to the puzzle -- a simple HTML page that takes a form input, and sends that information out to our electric imp agent.
Create a local file on your computer called impControl.html. Open it with a text editor, and paste the below code into it.:
<html>
<head>
</head>

<body onLoad=updateURL()>

<h4>What is your agent's url?</h4>
<form name="url">
https://agent.electricimp.com/<input type="text" name="agentUrl" placeholder="UpyYpRLmBB7m" onChange=updateURL()>
</form>

<h4>Imp Inputs:</h4>
<form name="leds" id="ledSend" method="get">
Lonely Red LED: <input type="radio" name="led" value="0" checked>Off
                <input type="radio" name="led" value="1">On<br>
Set the RGB LED: <input type="color" name="rgb">  (Chrome/Opera use color input, other browsers format as "#XXXXXX", where X is 0-9, a-f, or A-F.) <br>
How long should the LEDs stay on? <input type="text" name="timer" value="10">seconds<br>
Your name? So we know who to blame! <input type="text" name="user" placeholder="Your name here"><br>
<br>
<input type="submit" value="Update!">
</form>

</body>

<script language="javascript">

 function updateURL() {
    ledForm = document.leds;
    urlForm = document.url;
    ledForm.action = "https://agent.electricimp.com/" + urlForm.agentUrl.value;
}

</script>

</html>
Then save and open the file with your browser of choice. A simple web page like this should show up:
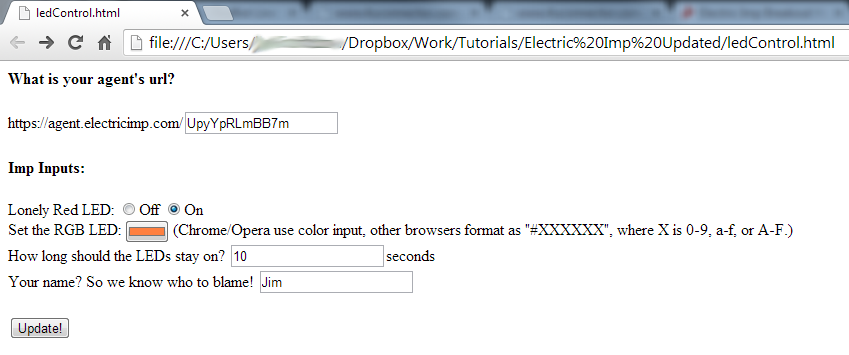
Make sure you type in the correct, unique code for your agent URL. Then play with the rest of the form inputs. The On/Off radio buttons turn the lonely red LED on or off. The RGB color selector sets the color of the RGB LED. The duration text box will turn all LEDs off after a set number of seconds. And the name textbox will print your name in your imp’s console. Try it out!
The code should be pretty easy to pattern-match and modify. The agent checks for specific values (like "led" or "rgb"), which are set by the name identifiers in the HTML form. To add, subtract, or modify those, simply add/remove/modify the form inputs, and add an if statement to look for it in the agent.