$4.95
The Qwiic Proximity Sensor is a simple IR presence and ambient light sensor utilizing the VCNL4040. This sensor is excellent for detecting if something has appeared in front of the sensor; detecting objects qualitatively up to 20cm away. This means you can detect if something is there, and if it is closer or further away since the last reading, but it’s difficult to say it is 7.2cm away. If you need quantitative distance readings for exact distances, check out the SparkFun 2 meter and 4 meter Time of Flight (ToF) sensors with mm accuracy.
We often see this type of sensor on automatic towel dispensers, automatic faucets, etc. However, the VCNL4040 has no dead zone and can read all the way up to the face of the sensor. The SparkFun Proximity VCNL4040 sensor is a great digital alternative to the popular analog PIR sensors. The Qwiic Proximity Sensor also has an ambient light sensor built it which is excellent if you need a digital light sensor for your next glitter cannon.
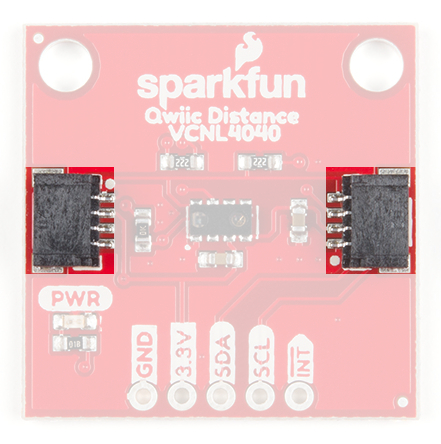
This board is one of our many Qwiic compatible boards! Simply plug and go. No soldering, no figuring out which is SDA or SCL, and no voltage regulation or translation required!
The Qwiic Proximity Sensor does need a few additional items for you to get started. You may already have a few of these items, so feel free to modify your cart as necessary.
If you're unfamiliar with jumper pads or I2C be sure to checkout some of these foundational tutorials.
The Qwiic Proximity Sensor utilizes the Qwiic connect system. We recommend familiarizing yourself with the Logic Levels and I2C tutorials (above) before using it. Click on the banner above to learn more about our Qwiic products.
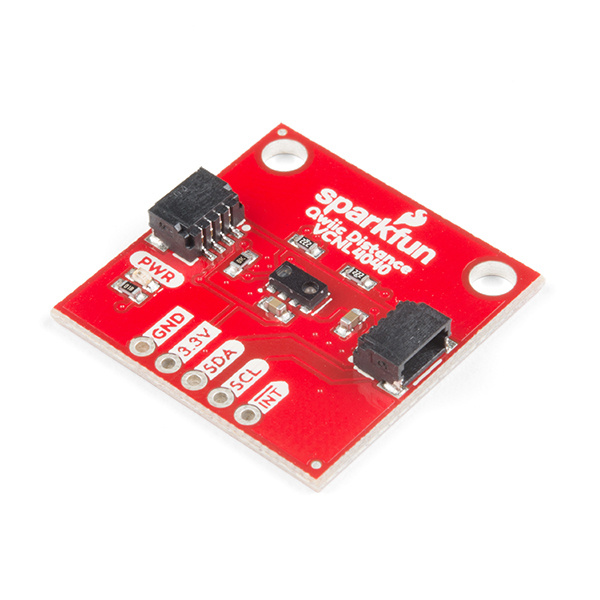
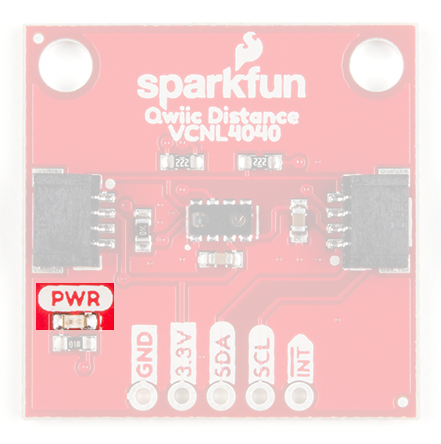
There is a power status LED to help make sure that your Qwiic Joystick is getting power. You can power the board either through the polarized Qwiic connector system or the breakout pins (PWR and GND) provided. This Qwiic system is meant to use 3.3V, be sure that you are NOT using another voltage when using the Qwiic system.
The VCNL4040 is a proximity sensor (PS), ambient light sensor (ALS), and a high power IR emitter (IRED) integrated into a single package. The ambient light sensor and proximity sensor operate in a parallel structure. The combination of the two sensors along with the IR emitter form the proximity detector.
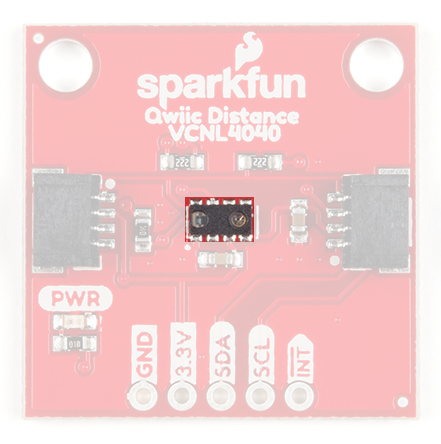
The sensor has an operating voltage range from 2.5V to 3.6V. It is recommended that you use this board with the intended 3.3V of the Qwiic connect system. The VCNL4040 also includes excellent temperature compensation. For any details not covered in this guide, please refer to the datasheet.
The IR emmiter is immune to red glow with a 940 nm wavelength (for those discrete applications) and the sink current is programmable (200 mA default). For more details on the IR emitter, please refer to the datasheet.
The VCNL4040 offers a 16-bit high resolution ALS with ±10 % accuracy and is immune to fluorescent light flicker. With an ambient light sensing capability down to 0.01 lux/step, the VCNL4040 works well under a low transmittance lens design (dark lens). In addition, the patented FiltronTM technology offers great background light cancellation capability (including sunlight) without utilizing microcontroller resources.
The proximity sensor features smart persistence, which prevents the misjudgment of proximity sensing but also keeps a fast response time. In active force mode, a single measurement can be requested for more design flexibility and/or power saving.
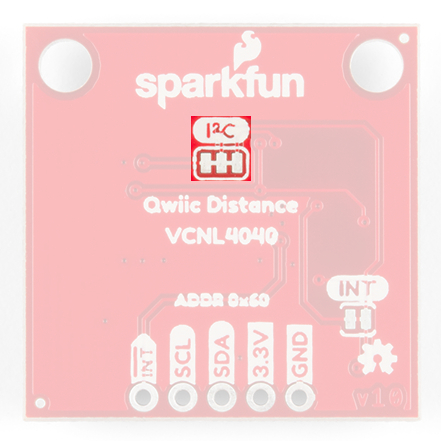
The sensor has a single slave address 0x60 (HEX) of 7-bit addressing, following I2C protocol.
The simplest way to use the Qwiic Proximity Sensor is through the Qwiic connect system. The connectors are polarized for the I2C connection and power. (*They are tied to their corresponding breakout pins.)
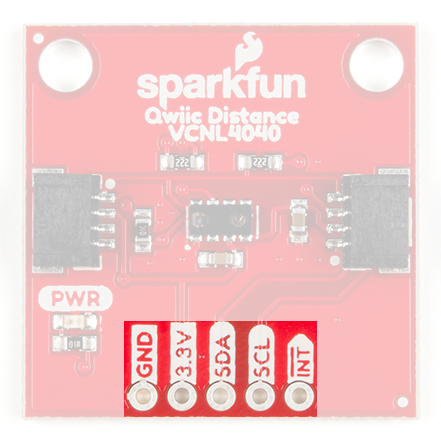
However, the board also provides five labeled breakout pins. You can connect these lines to the I2C bus of your microcontroller and power pins (3.3V and GND), if it doesn't have a Qwiic connector. The interrupt pin is broken out to use for triggered events.

Cutting the I2C jumper will remove the 2.2 kΩ pull-up resistors from the I2C bus. If you have many devices on your I2C bus you may want to remove these jumpers. Not sure how to cut a jumper? Read here!
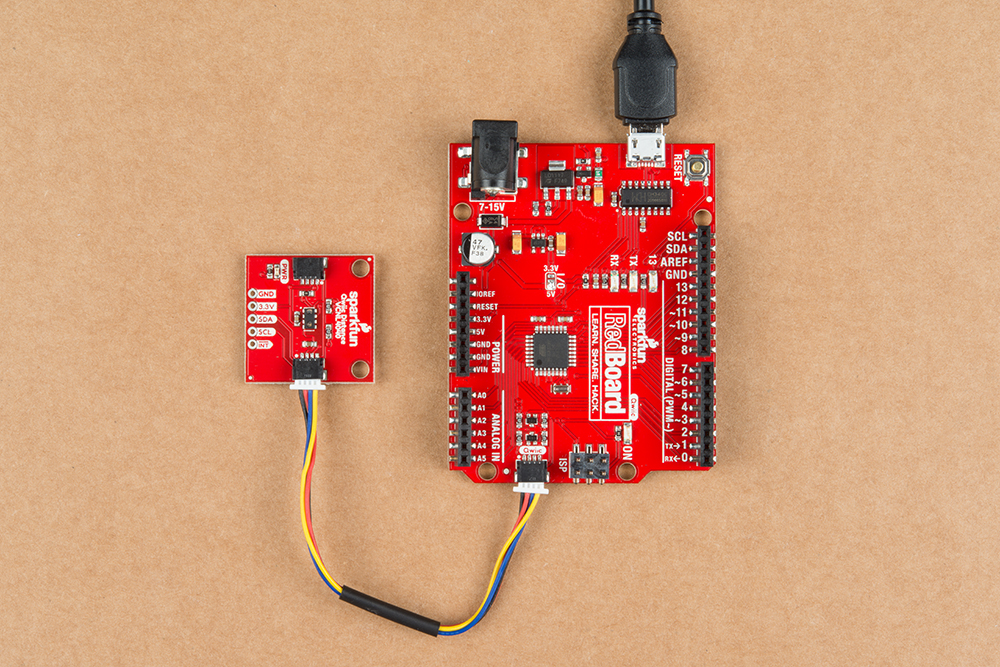
With the Qwiic connector system, assembling the hardware is simple. All you need to do is connect your Qwiic Proximity Senor to the RedBoard Qwiic with a Qwiic cable. Otherwise, you can use the I2C pins, if you don't have a Qwiic connector on your microcontroller board. Just be aware of your input voltage and any logic level shifting you may need to do.
We’ve written an Arduino library to flex every feature of this sensor. You can grab it from the Arduino Library Manager by searching for 'SparkFun VCNL4040'. Otherwise you can get it from the GitHub repository or use the download button below.
The Arduino library is commented and the functions should be self-explanatory. However, below is a detailed list of the available library functions.
.begin - Check communication with sensor and set it to default I2C Wire library settings
.isConnected - Checks connection
.setLEDCurrent - Sets the IR LED sink current to one of 8 settings (75, 100, 120, 140, 160, 180, and 200 mA).
.setIRDutyCycle - Sets duty cycle of the IR LED (40 max.)
.setProxInterruptPersistance - Sets the Prox interrupt persistance value.
The PS persistence function (PS_PERS, 1, 2, 3, 4) helps to avoid false trigger of the PS INT. It defines the amount of consecutive hits needed in order for a PS interrupt event to be triggered.
.setAmbientInterruptPersistance - Sets the Ambient interrupt persistance value
The ALS persistence function (ALS_PERS, 1, 2, 4, 8) helps to avoid false trigger of the ALS INT. It defines the amount of consecutive hits needed in order for a ALS interrupt event to be triggered.
.setProxIntegrationTime - Sets the integration time for the proximity sensor
.setAmbientIntegrationTime - Sets the integration time for the ambient light sensor
.powerOnProximity - Power on the prox sensing portion of the device
.powerOffProximity - Power off the prox sensing portion of the device
.powerOnAmbient - Power on the ALS sensing portion of the device
.powerOffAmbient - Power off the ALS sensing portion of the device
.setProxResolution - Sets the proximity resolution to 12 or 16 bit
.enableAmbientInterrupts - Enables ALS interrupt
.disableAmbientInterrupts - Disables ALS interrupt
.enableSmartPersistance - Turn on smart presistance
.disableSmartPersistance - Turn off smart presistance
To accelerate the PS response time, smart persistence prevents the misjudgment of proximity sensing, but also keeps a fast response time.
.enableActiveForceMode - Enables active force mode
.disableActiveForceMode - Disable active force mode
An extreme power saving way to use PS is to apply PS active force mode. Anytime host would like to request one proximity measurement, enable the active force mode. This triggers a single PS measurement, which can be read from the PS result registers. VCNL4040 stays in standby mode constantly.
.takeSingleProxMeasurement - Sets trigger bit so sensor takes a force mode measurement and returns to standby.
.enableWhiteChannel - Enables the white measurement channel
.disableWhiteChannel - Disables the white measurement channel
.enableProxLogicMode - Enables the proximity detection logic output mode
.disableProxLogicMode - Disables the proximity detection logic output mode
When this mode is selected, the INT pin is pulled low when an object is close to the sensor (value is above high threshold) and is reset to high when the object moves away (value is below low threshold). Register: PS_THDH / PS_THDL define where these threshold levels are set.
.setProxCancellation - Sets the proximity sensing cancellation value - helps reduce cross talk with ambient light
.setALSHighThreshold - Value that ALS must go above to trigger an interrupt
.setALSLowThreshold - Value that ALS must go below to trigger an interrupt
.setProxHighThreshold - Value that Proximity Sensing must go above to trigger an interrupt
.setProxLowThreshold - Value that Proximity Sensing must go below to trigger an interrupt
.getProximity - Read the Proximity value
.getAmbient - Read the Ambient light value
.getWhite - Read the White light value
.getID - Read the sensors ID
.setProxInterruptType - Enable four proximity interrupt types
.isClose - Interrupt flag: True if prox value greater than high threshold
.isAway - Interrupt flag: True if prox value lower than low threshold
.isLight - Interrupt flag: True if ALS value higher than high threshold
.isDark - Interrupt flag: True if ALS value lower than low threshold
.readCommand - Reads two consecutive bytes from a given 'command code' location
.writeCommand - Write two bytes to a given command code location (8 bits)
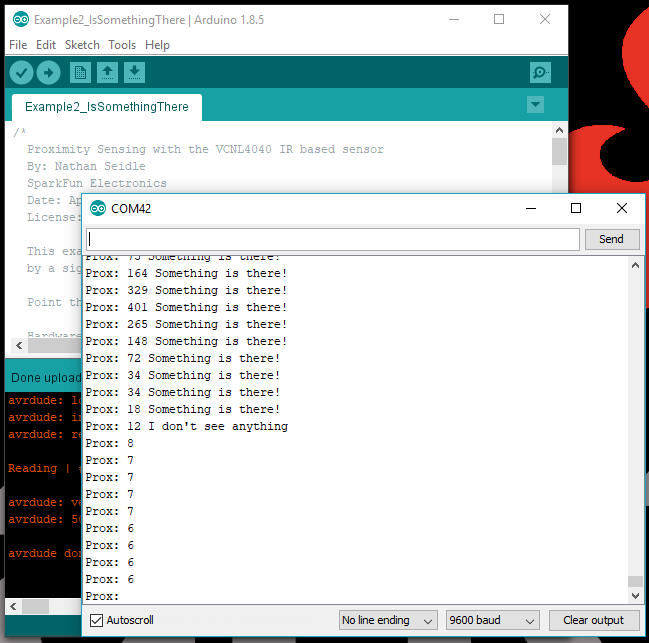
This example outputs the IR Proximity Value from the VCNL4040 sensor in the Serial Monitor.
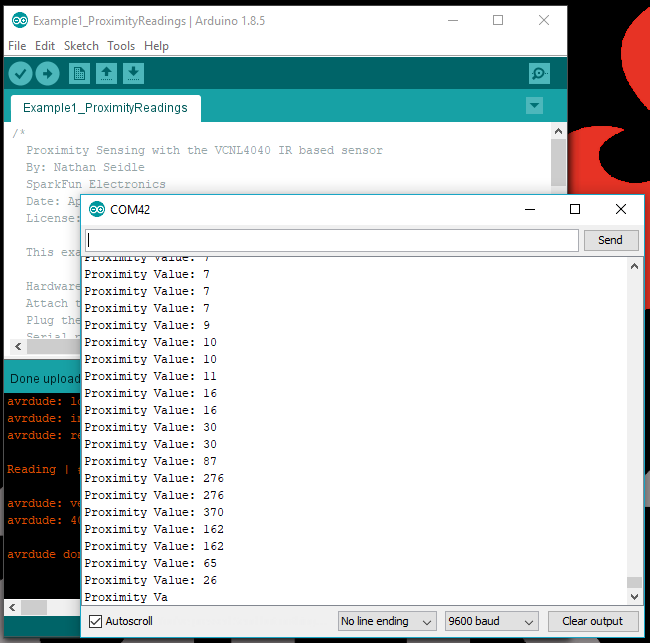
Despite being a qualitative sensor, you will notice that the output does vary with the distance of the object, surface color, and reflectivity. You can also use this setting to estimate the field of view of the sensor. The maximum output value is 65535, closest to the sensor, and the minimum (0-1) being the furthest the sensor can read.
This example takes an initial reading at power on. If the reading changes by a significant amount the sensor prints that something is present in the Serial Monitor.
This example also allows the proximity sensor to work as a dual purpose photogate.
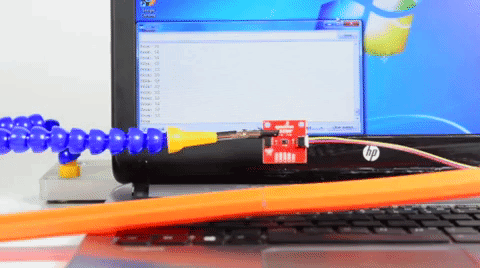
There is a slight delay in the serial output from the microcontroller (few frames); however, this is exaggerated due to how the image is slowed down.
This example outputs ambient light readings to the terminal.
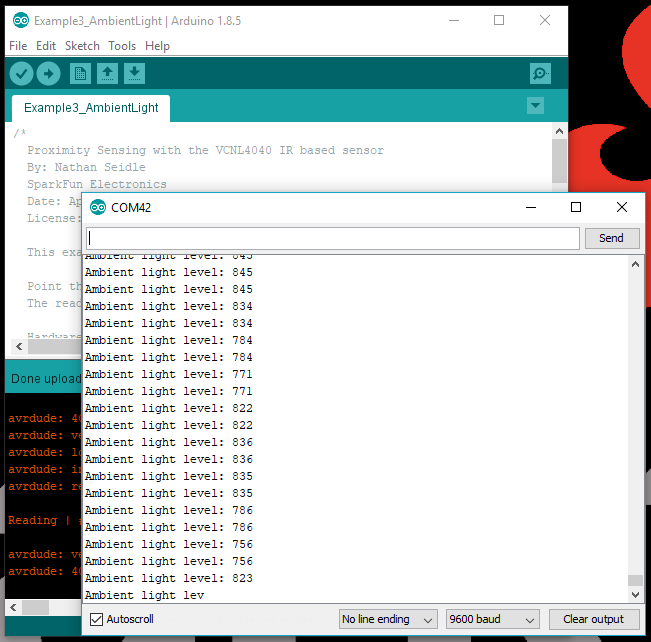
Again the sensor is qualitative, but you can test how the angle of incident from the light source affects the sensor readings.
This example outputs IR, ambient and white light readings to the terminal. Along with proximity and ambient light sensing the VCNL4040 has a 'white light' sensor as well.

This example shows how to use different Wire ports, fast I2C, and various advanced settings that are supported by the library. Please, refer to the datasheet and library functions listed above for more details.
For more information, check out the resources below:
Need help getting started with Arduino and I2C? Check out these resources here:
Need some inspiration for your next project? Check out some of these other Qwiic product tutorials:
learn.sparkfun.com | CC BY-SA 3.0 | SparkFun Electronics | Niwot, Colorado

